Connection algorithm
You can connect the Internet to the TV either wired or via Wi-Fi. Regardless of how modern the technology is, and whether it has a Smart TV, the TV has an Ethernet connector. The question may arise: why connect to the Internet if the device does not support access to it? The fact is that old equipment without smart functions could receive software updates over the network, and with DLNA support it could be used in local networks, so a LAN cable was already used then. Actually, the connection is very simple - just insert the LAN cable into the appropriate connector on the back of the case.
If wired Internet comes to the apartment not via optical fiber, but via telephone cable, you will need an ADSL or with a built-in router. The second option is more convenient, because it’s a rare person today who doesn’t use Wi-Fi. In this case, connecting the TV to the Internet works like this.
- The cable that enters the apartment is inserted into the DSL connector on the modem. If you are using a connection through a router, then you need to insert the cord into the LAN input, colored yellow.
- Depending on the model, it may have one or more LAN outputs. A two-sided RJ-45 cable is inserted with one side into the modem, and the other side into the TV. The situation is similar if the connection is made from a simple router to a TV.
After the devices are connected with a network cable, all that remains is to configure the Internet on the TV. Usually this is not required: just go to the network settings of the TV and make sure that there is a connection.
For network connections, you need to perform connection setup on your TV (may be called manual setup). Its essence comes down to specifying the DNS and IP address. These must be provided by the provider, so you should contact them if this data is missing.
Important! Automatic connection is carried out if the Internet is distributed with a dynamic IP address (almost all home Internet providers do this). If for some reason the user has a static IP, manual entry of parameters may be required.
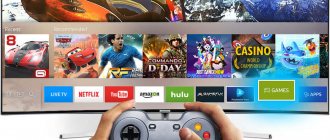
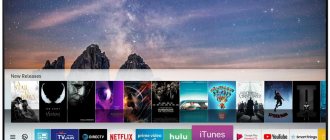
What will connecting your TV to the Internet give you?
Why waste your free time on this? The fact is that having access to the World Wide Web opens up an extensive list of additional opportunities for the user:
- playing media content online;
- Internet surfing;
- video calls via Skype and various instant messengers;
- launching applications and video games;
- watching sports broadcasts, news, TV shows, etc.
As you can see, connecting an LG TV to the Internet or a device from another manufacturer is definitely worth it. Because then you will be able to fully use the functionality of the technology. Naturally, you first need to choose a connection method, which will be discussed further.
If the TV does not connect to the Internet, and you have followed all the suggested instructions exactly, then contact the specialists who are involved in the setup - they will solve the problem.
Possible problems
If you succeed in connecting your TV to the Internet, but the network is not detected, first of all you should check the functionality of the equipment and the correct connection. We look to see if all the cables are inserted into the right connectors, if there are any breaks in the network, if the router or modem is working, if it was decided to distribute the Internet to the TV through them. If everything is in order, then the problem is in the settings, namely, the provider does not distribute the Internet with a dynamic IP address.
- If the address is static, then the solution was indicated in the previous paragraph - just configure everything manually.
- If the connection type is PPPoE, PPTP, L2TP, then connecting directly will not work - you will definitely have to use a router. The network type can be changed in its settings.
- Sometimes providers use MAC address binding. This type of connection is extremely rare, but if all else fails, then you need to call your provider and clarify this point. If your fears are confirmed, then you should find the “TV (product) information” item in the TV settings and find the MAC address there. After this, you need to contact your provider again and ask him to change the MAC address to the one associated with the TV.
It is worth noting that the situations described above are extremely rare, and most often the problem lies in incorrect connection or non-functioning equipment.
Setting up Smart TV
To access the Internet from your TV, it is not enough to connect it to the network. A prerequisite is setting up a Smart TV. All that is required from the user is to create an account on the manufacturer’s services, which is used to access the application store . LG calls it LG Apps, Samsung calls it Smart Hub. TVs from Sony and other manufacturers that use Android TV use a Google account. If the user owns other devices from the TV manufacturer's brand, it is likely that he already has an account.
Registration is standard - you need to come up with a username and password, indicate your email to confirm registration. In some cases, you may be asked for other information. Everything you need will be indicated in the registration window, so there shouldn’t be any difficulties - the main thing is to follow the instructions on TV.
After logging into your personal account, you can download and delete applications, as well as use the Internet on TV.
Settings for Smart TV
How to connect the Internet in different ways on a TV is now clear, but to fully use the capabilities of Smart TV, just one connection to the World Wide Web is not enough.
On LG TVs
It is recommended to register in the LG App Store. Without registration, you will not be able to install the necessary applications and will not be able to use all the functionality of smart TV. The registration procedure is very simple:
- the first thing to do is go to the main menu;
- in the upper right corner of the screen there will be a button to log into your account - click on it;
- in the next window you can enter your authorization data (if you have already registered) or continue creating an account on LG Apps - the “Registration” button;
- Next, you need to come up with a password and enter it along with your email address in the form that opens, then click on “Registration”;
- after that, check your email using your smartphone or computer and confirm the creation of your profile;
- To log into your account, click “Login” in the upper corner;
- enter your registration data, check the box next to “Remain logged in” (next time you will not be prompted to enter data);
- answer “No” in the window that appears, asking you to enter additional information;
After this, your TV receiver can be considered fully configured for watching movies, TV channels, and listening to the radio. Now you can install various widgets and programs, including gaming ones, from the company’s store.
On Samsung Smart TV
To connect the Internet, cable or wireless, to a Samsung TV, you can use the instructions for the same LG device. The connection steps and the diagram are not much different, except perhaps the names of the items in the menu (the meaning of the buttons is easy to guess). But there are some differences in setting up Smart TV on a Samsung TV:
- after connecting to the Internet, try going to the Smart Hub menu by pressing the corresponding button on the remote control;
- To check the functionality of the Internet and Samsung smart TV, you need to launch an application, for example, YouTube.
If you succeeded in connecting your Samsung TV to the Internet and everything worked, then you can relax and start installing various applications from Samsung Apps, and enjoy watching videos and Internet TV.
IN SONY BRAVIA
The entire connection procedure for the SONY BRAVIA TV is similar to that described above for other brands of devices. But connecting a smart TV to the Internet and setting up Smart functions is somewhat different from those discussed.
- To begin, press the key on the remote that says “Home”.
- Click on the button with the image of a suitcase in the corner of the window and go to the “Settings” menu.
- In this window, select “Network”.
- Now click on “Update Internet Content”.
- A connection will begin with the Sony Entertainment Network server to configure the services that are currently available.
- After finishing the setup, Bravia will display a message with a recommendation to return to the main menu by pressing the “Home” button. But you need to ignore this sentence and click on the “SEN” button, after which you will see a list of video channels and a list of applications, both foreign and Russian.
- It may take some time for your Sony device to update. By clicking on the “+” sign or “All applications”, you will see the entire list.
- Having decided on the content selection, click “Open”, after which the broadcast will begin.
- You can add your favorite TV channel to the quick access list by clicking on “Add to my applications”. The list appears initially when you press the “SEN” key.
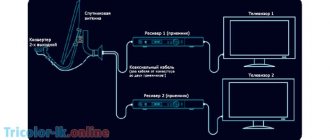
How to create a local network
Not all users know that a TV can be connected to a network not for the purpose of accessing the Internet, but for organizing a local connection with other home appliances.
On a note! This is relevant for a slow connection, when watching TV channels or movies online is not very comfortable, but you can still download them to your PC.
There are two ways to connect your TV to your PC. In the first case, an HDMI or VGA cable is used, and the TV acts as a screen, that is, you cannot manage files on a PC from it. A local network connection gives you access to the hard drive of your computer or laptop: sitting in front of the TV, you can launch a movie from your PC and start watching it. No need to move between technologies to manage content.
Let's look at creating a local network in more detail. The connection can be wired or wireless. In the latter case, the PC and TV must be on the same Wi-Fi network. The TV must have DLNA support; you can find out about this in the specifications.
Sharing folders using Windows
On a PC, you can either immediately share folders so that they are accessible within the local area, or install a media server. To share folders using built-in Windows tools, you need to perform the following steps.
- Open the Internet connection settings on your PC, select “sharing” and oh.
- Select "Turn on file and printer sharing." The computer is now visible to all devices on the network.
- Specify folders that will be available to other users. To do this, select the desired folder, for example, movies, and RMB select “properties” - “access” - “advanced settings” - by clicking o. Here you can configure the number of simultaneous users.
- After confirming the settings with the “apply” button, select “sharing” and specify the users who will be able to view the folder. This could be individual people on the network or everyone. You can also specify the allowed actions - read only or read and delete.
Using media centers
The previous method may seem complicated, so many people prefer to use various utilities, for example, SmartShare in conjunction with an LG TV or AllShare for Samsung TVs. Branded utilities are good for their simplicity.
If there are several TVs in the apartment from different companies, you can use third-party programs - media centers, for example, Kodi , Plex and others . Their advantage is that setup is simpler - the user sees all the folders in the system and can specify which of them will be accessible via the local network. Or you can simply specify the file types available locally, and then all that remains is to launch the media center and open it on TV.
Important! The good thing about such programs is that they often have advanced functionality, for example, they allow you to watch Internet television.
The third way is to launch movies on TV from a PC. In this case, an Internet connection is also used, and both the built-in Windows 10 Cinema and TV media player and third-party programs, for example, KMPlayer, have the necessary functionality. To display a picture in “Cinema and TV” on your TV, just right-click to open the settings menu and select “send to device”. The system will detect the network connection and will only have to specify the TV to start watching on it.
The latter methods imply that the user gets full access from the TV to the laptop’s memory. To manage files, you need to select the broadcast source on the TV - you need to find the one that says DLNA and the name of the PC.
For some devices, access is provided directly from the smart menu, for example, for LG you need to go to smart and find the Smart Share item.
How to set up Internet on Samsung, LG, Kivi TV?
Despite the abundance of types of TVs, the Internet connection in most of them looks similar. The approximate algorithm for TV Sony, LG, Samsung, Kivi, etc. is as follows.
In the settings in the “Network” or “Internet” section there are 2 connection options:
- Wired. After selecting it, you will need to specify the IP address, subnet mask, DNS and other basic parameters. They are often detected automatically, but this depends on the characteristics of the TV and provider.
- Wireless or Wi-Fi. If you select this option, you will need to wait until the search for a Wi-Fi network is completed and enter the password for it.
Connection on an old TV
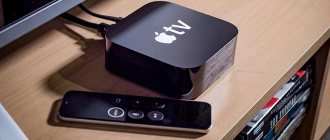
If you need to connect a regular or old TV (not smart) to the network, a smart set-top box will come to the rescue . It can be small, a little larger than a flash drive, and can be immediately inserted into the HDMI output of the TV. Such models are quite weak and have a limited set of connectors. It is better to consider more serious devices made in the form of a separate set-top box that also connects to the TV via HDMI.
Inexpensive set-top boxes, for example, from the company Dexp, have mediocre characteristics; their functionality is limited to turning on the Internet on the TV. More expensive ones, for example, Xiaomi or Apple TV, get powerful filling. With their help, you can watch 4K videos, install games and also use the Internet. Such a device is equipped with Android TV, the interface in this case is largely reminiscent of Android smartphones. Control is carried out by remote control or mouse, if there are the necessary connectors.
To connect your old TV to the Internet, you need to do the following.
- The set-top box is connected to the Internet via Wi-Fi or via a LAN connector, if provided on the case.
- The connection to the TV is made via an HDMI cable.
- On the TV, select the signal source - HDMI output.
- After selecting the source, the interface of the set-top box will appear on the screen; further control is carried out through it.
Connect the TV to the router with a cable
We've sorted out the theory, let's move on to practice.
First of all, you need to connect the router and TV via wire. We need a network cable, also called Ethernet, twisted pair or patch cord. It usually comes with the router, but the standard length may not be enough if the devices are located far from each other. In this case, it is better to buy a long wire and crimp the twisted pair with an RJ-45 connector yourself. This is not difficult to do, again, we have an article on this topic.
Next, connect the cord at one end to the Ethernet port on the TV.
+++
And the other into the “LAN” network connector on the router. The main thing is not to confuse it with “WAN” - a cable from the provider must be inserted into it.