| Canon head restoration | cleaning the HP print head | Epson head cleaning | Brother head cleaning |
Cleaning the print head of an inkjet printer is a complex, painstaking procedure that requires a lot of experience and care.
Moreover, cleaning the head requires special solutions and specialized equipment. Complais professionally performs head cleaning, inexpensively and with a high recovery rate. Cleaning the head on your own most often ends in its death. We regularly receive printers with heads that have been cleaned themselves, but they can no longer be restored.
Why do you need to clean the print head and when?
If you haven't printed on an inkjet printer for a long time, there is a risk of the print head drying out—the head nozzles stop passing ink. Such heads require cleaning - restoring the permeability of dried nozzles, channels and filters.
Black is usually the first color to dry out because users often copy and print in color, and dark gray synthesized from color inks is mistaken for black. Additionally, 4-color inkjet printers use pigment ink as black ink, which dries faster and can cure in tubes without air.
To properly clean the printer's print head, you need to understand how it works and what needs to be cleaned. Heads from different manufacturers differ in their design.
Cleaning HP, Canon print heads
The designs of HP and Canon thermal inkjet heads are similar. But the main difference is in the system of connecting the two parts. The top part delivers ink to the bottom printing part. Canon heads use a soft rubber gasket to connect and isolate different ink channels,
and in HP - a hardened adhesive compound.
Many Canon heads can be partially disassembled, but HP heads are monolithic. The design of the print heads of HP inkjet printers can be viewed here.
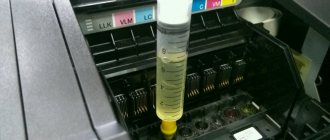
Before cleaning, the head must be soaked in special liquids for several hours.
Only after soaking with a strong jam can you clean the head in an ultrasonic bath.
Cleaning the HP print head in an ultrasonic bath
But ultrasonic head cleaning must be done very carefully. Too much ultrasonic power can kill the head. And prolonged contact of pigment with water leads to obstruction.
How to Clean a 3D Printer Nozzle with Filament
Source: support.ultimaker.com
Clearing a nozzle with filament literally means pushing out stuck material with another material. An equivalent or higher temperature plastic may be suitable for this, but we recommend using a special cleaning filament.
Cleaning filament is a material that is sold in short sticks or spools. At first glance, these fibers resemble nylon. In reality, cleaning filament is a material that is used to clean industrial injection molding equipment. This filament helps to gently push out stuck particles and carbonized plastic without damaging the nozzle. In many cases, cleaning filament is more effective than traditional hot and cold cleaning of a 3D printer nozzle.
Source: support.ultimaker.com
The advantage of the method is its high efficiency with minimal mechanical stress on the printer parts. The disadvantages include additional costs and the ability to use only when the nozzle is partially clogged - the cleaning filament must pass at least partially.
Before using cleaning filament, you must remove the printing plastic and clear the plastic loading channel, and then preheat the extruder to the last temperature at which you printed. Pass the cleaning filament manually, or set the printer to automatically feed (in direct drive systems). After printing starts, cleaning filament with remnants of old filament should appear from the nozzle. Extrusion should be continued until the clear cleaning material comes out free of any old plastic residue.
Cleaning the head in Epson printers
Epson piezoelectric print heads have a completely different structure and operating principle. Main differences:
- firstly, the presence of fittings for supplying ink from cartridges;
- secondly, there is no direct access to fine filters;
- the presence of a membrane separating the electrical part from the ink
- connectors for cables, high voltage in connector contacts
- flooding the contacts with liquid can damage the head and control board;
- insulation of ink channels with a soft sealant (very afraid of pressure), if the sealant is damaged, adjacent colors are mixed, mixed;
- small nozzle size
- the head is afraid of aggressive liquids and high pressure, because this damages the membrane
Cleaning an Epson head is very different from cleaning Canon and HP heads. For example, for Epson even the cleaning agents are different; ultrasound does not help at all.
Epson piezoelectric heads are different from HP and Canon thermoelectric heads. First of all, the presence of a diaphragm that isolates the electrical part from the ink. The diaphragm can be damaged, for example, by aggressive flushing fluid or high pressure. The ink causes a short circuit in the printer control board. In this case, powerful key transistors, a fuse, and, possibly, a head control driver chip burn out. Restoring the head is impossible. In this case, you need to change both the board and the head.
To avoid damaging the Epson head when cleaning, you must follow certain rules. Firstly, when cleaning the channels with flushing liquid, fill part of the syringe with air. At least 3-5 cubic cm. Secondly, do not keep aggressive liquids in the head for more than 30 minutes. And most importantly, make sure that liquid does not get on the connector or board in the head.
It must be said that different types of heads need to be cleaned in different ways. For example, Epson XP-600, XP-700, XP-820 have a head without fittings. Due to their absence, cleaning such heads is difficult, because it is difficult to pump them after soaking.
Read more about cleaning the Epson head.
How to Clean a 3D Printer Nozzle with Solvent
If after following the standard procedures described above the nozzle is still clogged, we suggest a method that is suitable in most cases, in particular if the nozzle is clogged when printing ABS. This method involves cleaning the 3D printer nozzle with acetone or another solvent, such as dichloroethane; the choice of solvent depends on the composition of the filament used.
The nozzle should be disconnected from the hotend, placed in solvent and left for several hours. The liquid will dissolve the plastic, completely or partially, and allow the residue to be removed with a needle.
We recommend keeping spare nozzles that are not currently in use in a glass reagent jar filled with solvent so as not to worry about their readiness for use.
Head restoration in Brother printers
The Brother heads are also piezoelectric, but they are much more difficult to remove and clean than the Epson ones. In addition, these heads are designed differently. The main advantage of Brother heads is that they do not burn in such massive quantities as Epson.
And all because there are no fittings. In addition, the head is mounted on two rails and you need to disassemble half of the printer and remove the rails.
Removing the Brother head is a much more complicated procedure than in Epson, HP and Canon, it’s better not to do it yourself. In addition, there are many nuances when cleaning a Brother head, which you can read about here.
Features of disassembling printers of different models
"HP"
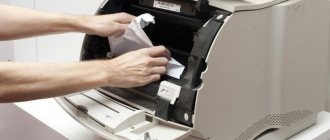
HP printers are quite difficult to disassemble, so it is better to entrust disassembly and cleaning to professionals. To get to the cartridge, you need to remove the top cover and disconnect the toner compartment. In order to remove the remaining parts you will need to unscrew the bottom cover.
"Epson"
Disassembling the printer is quite difficult, since it is quite difficult to get to the internal parts. To remove the cartridge you will need to detach the front panel with buttons. Under the panel there are two mounting screws to which the front cover is attached. Removing the absorber is also difficult; it is attached to the back of the device and secured with three screws.
"Canon"
Most models are very easy to understand. To do this, remove the top cover from the latches and remove the cartridge. To get it out you will need to lift it and pull it slightly towards you.
Head flush steps
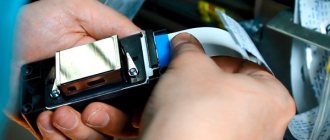
Sometimes the print quality of an inkjet printer head is reduced due to ink adhering to it, which consists of dried ink and debris. In this case, the printer smudges the page while printing. The picture shows the head of an inkjet printer, in which part of the black head is covered with ink mass, to which hairs are stuck, smearing the ink on the page.
After washing, the print head looks like this. The printer stops staining sheets with black ink after external cleaning of the print head. But the printer still does not print in black, and the color nozzles are very clogged. After cleaning in solutions and ultrasound, color printing is restored. And there is no black one yet. And only after a long cleaning with preliminary soaking in a special composition, the black nozzles begin to open and black text begins to be printed. To restore high-quality printing you need to spend another half a day. After the final cleaning of the black head, we get the following picture in which all the nozzles are open. This can be seen from the fact that the printing on the left side of the sheet is perfect. Interruption of printing indicates that the cartridges are bad or the channels are not cleaned sufficiently. It can be seen that the black cartridge cannot provide a free supply of ink to the print head and creates a vacuum. Ink stops flowing into the print head until pressure equalizes. After some time, printing may be restored. But additional cleaning may be required using the printer itself.
Repairing an inkjet printer involving cleaning the print head is painstaking, tedious, and also labor-intensive. The cost of cleaning is 1500-3000 rubles, depending on the degree of drying, the number of colors and complexity.
Preventing blockages
Source: hackaday.com
The quality of the material and the condition of the nozzle directly determine the printing accuracy and smoothness of the surface of the printed part. The user must monitor the condition of the nozzle to avoid blockages. When a 3D printer nozzle gets clogged during the printing process, it creates a lot of problems. Often the extruder must be partially disassembled to clean the tip, and the product will have to be reprinted if a blockage occurs during the printing process.
The main preventative method for preventing blockages can be considered the correct printer settings, that is, matching the temperature and printing speed to the properties of the filament. Particular care should be taken when using materials with high melting points and high viscosity. You should also carefully monitor the extrusion speed during the initial printing phase. If the first layers are laid unevenly, this indicates that the plastic filament is not passing correctly through the extruder.
Another important aspect, especially when using a brass nozzle, is checking the condition of the part. Over time, this material is susceptible to deformation due to its low abrasion resistance. With prolonged use, artifacts appear on the output hole, and when printing with abrasive materials, the brass nozzle can be damaged in a matter of minutes.
Clogging can also occur if the extruder has time to cool down when changing the filament. Before continuing to print, be sure to ensure that the extruder temperature is within the print parameters. Finally, if the extrusion speed has slowed down, you should stop working and check the condition of the printer, but under no circumstances push the filament by hand - applying external force can clog the nozzle even faster, compressing the plastic.
Reasons for the print head drying out
If your inkjet printer prints poorly, or prints blank sheets at all, then the reason for this is probably in the print head. Namely, in the blockage or airiness of its nozzles (nozzles). Less often, the problem lies in the control board. Reasons for obstruction of the print head nozzles:
- long downtime of an inkjet printer without printing;
- mixing pigment ink with water-soluble ink when refilling cartridges;
- bad ink or unsuitable;
- air entering the head;
- bad cartridges or CISS (Continuous Ink Supply System);
- incorrect position of the CISS in height, clogging of the ink supply tubes;
- Dried ink in the pump or output tube
An example of cleaning a clogged pump outlet tube. The photo shows squeezed out solid ink fractions after they have been partially softened with solvents.
Soaking the head and cleaning
Cleaning the print head of an inkjet printer should be done with extreme caution. Gradually, so as not to damage the head. For cleaning, special washing solutions are used. Not aggressive at first. If the head cannot be cleaned, they move on to aggressive solutions with a limited exposure time.
How to properly clean the print head
What rules should be followed when cleaning the print head?
- Clean all colors, even if they print perfectly. It has been repeatedly observed that if one color is cleaned, the other colors often stop working perfectly after cleaning. For example, the printer did not print black and you only cleaned black. After installing the head, you notice that many of the colored nozzles have stopped working. I have to remove the head again and clean the head a second time.
- When flushing the print head, do not apply excessive pressure. This can lead to damage to the head or obstruction of the canals. In Epson printers, excess pressure can cause the diaphragm to rupture and short circuit the head.
- Do not use unsuitable cleaning products. For example, you cannot use water, including distilled water, to clean channels with pigment ink.
- It has been noticed that we are able to restore the operation of 90% of heads that were not subjected to self-cleaning. But if you have already tried to clean the head, then the opposite is true. Recovery is impossible in 90% of cases.
How to clean the head yourself
First, the head is soaked for a period of several hours to several days. Then you can proceed to washing. The purpose of washing is to clean the nozzles, channels, and fine filters from dried ink.
Cleaning the Epson head without removing it can cause liquid to get on the contacts of the cable. If liquid gets into the head connector, the printer fails. In addition, this can flood the optical paper sensor on the carriage and also damage the printer.
You need to clean it carefully, through a syringe with a tube, controlling the liquid pressure. Excessive pressure may damage the printer head. Therefore, along with rinsing, you need to draw air into the syringe, which acts as a pressure damper. Bleeding should be done very slowly to avoid clogging.
After cleaning the print head with special liquids, the head must be dried so that there is no short circuit. Then reinstall and perform several head cleanings using printer tools. To replace flushing fluids with ink and remove air. To do this, you need to have enough ink in the cartridges.
Signs you need cleaning
Any printing equipment requires timely maintenance to avoid malfunctions, operational problems or complete failure. Carrying out preventive measures is a sign of good form in modern realities. If in a large office the services of specialized companies are used for such purposes, then at home everything can be done independently.
The printer itself will “inform” its owner about the need for cleaning due to the poor quality of printed text or photographs. The first signs may be:
- If, when printing a test sheet for checking the nozzles (head nozzles), gaps, white lines, and incorrect color reproduction are visible (for example, the printer prints in a red or pink tint), while one of them may be completely absent, then there is a high probability that a blockage has occurred. This problem occurs from time to time when printing equipment is used intensively.
- The printer head deals with liquid ink, which due to its physical properties can dry out. If you don't use your device for a long time, this is guaranteed to happen. For different models, the drying time is different - from several days to a month.
- Using different types of ink or refilling with ink from another manufacturer may cause the chemical solutions in the printer to mix. Due to internal reactions, the ink may harden and even damage some parts of the print head.
- For preventive purposes, cleaning is recommended after each ink refill.
If you decide to use consumables from another manufacturer, then before refilling it is necessary to completely flush the ink containers, delivery channels inside the device and the head itself.
Head cleaners
Epson head washes
There are several cleaning liquids produced by Epson: 1. Special Repair Liquid 1, as well as A49 (discontinued) for restoring Stylus Color 400/440/600/640 heads, Stylus Photo/Photo EX and only. There are no recommendations for using it with other printers. 2. A29 shipping liquid, Washing Liquid (for canning and washing). It is developed by Epson for Stylus Color 900/980 with water-soluble ink and nothing more. S46 shipping liquid (preservative) – designed for older models, such as:
- Color 300...Color 880, Color 1160, Color 1520, C20...C62, Photo, Photo 700-1290 with water-soluble ink
- C70, C80, Photo 2000/2100 with pigment ink.
CR02 Shipping Cleaning Liquid (for canning and washing). A69 is intended for all more or less new models of printers and MFPs. Suitable for both water-soluble and pigment inks: C58-C87/88, CX2800-CX7800, R200-R2400, RX420-RX700.
Cleaning the Epson R200 head, Epson L800 printer, and Epson RX500.
Not original service fluids
For cleaning heads, the German company OCP produces the following basic liquids.
OCP ECI is a non-aggressive liquid for resuscitation of blue EPSON print heads. It allows filling directly into printer cartridges. But it only helps with small blockages.
OCP RSL is a basic service fluid for all types of printers. But the liquid works best when heated to 35-45 degrees.
OCP LCF III is a service liquid for pigment soaking.
WWM: Washer fluid WWM-CL08 for Epson with water-soluble ink; Washer fluid WWM-CL06 for Epson with pigment ink.
Home-grown cleaning products from forums
For example, Mister Muscle (MM), HELP for glass.
MM with ammonia, green - effective cleaning for inkjet printer heads. Good for washing Epson water-soluble ink (that's what they say).
MM with acetic acid can be blue and orange. It is recommended for Epson pigment inks.
HELP pink.
The main components in the products are isopropyl alcohol, sodium sulfoethoxylate, and ethylene glycol. To make a rinse, you need to add 10 parts of distilled water to the product. Those. dilute 10 to 1.
Our opinion of Mr. Muscle is a completely useless thing. Because it has never helped with severe blockages. All the stories on the forums about the miraculous properties of MM are the tales of Scheherazade. In reality, water-soluble ink can be washed with water.