Printer owners often encounter a problem when the equipment stops printing after refilling. Some users rush to check the cartridge, others contact the service center. In fact, if the printer stops printing after refilling, it is recommended to simply understand the causes of the problem. In most cases, the problem can be fixed on your own and there is no need to carry equipment anywhere.
Checking the settings in the operating system
It happens that the parameters of printing devices in the OS are reset to the basic ones. Most often this happens when installing a new printer or fax machine. In this case, it is worth checking the correctness of the settings through the control panel.
Selecting the desired device:
- Call up the search bar (Win + S) and enter “Control Panel”.
- Go to the “Devices and Printers” section.
- From the presented equipment, select the desired model and right-click on it.
- In the context menu, click on the line “Use as default”.
Another related problem is an overloaded print queue. This point is especially relevant for models connected via a local network.
Clearing the print queue:
- In the “Devices and Printers” section, double-click on the desired model with the left mouse button.
- Next, open the “View Print Queue” item.
- We remove unnecessary tasks from the list or completely clear it (“Document” -> “Cancel all”).
Advice! A more radical way to reset files sent for printing is to restart the computer. But this option will not work if the printer has an independent memory unit.
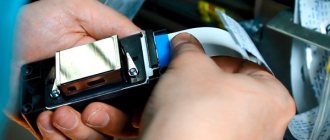
No electrical contact
The design of any cartridge contains electronics responsible for supplying ink, measuring its level and other operations. For normal operation, reliable electrical contact must be established between ink tanks and printers, the absence of which leads to various problems. If it is not there, the Canon printer does not “see” the cartridge.
Loss of electrical contact may occur for the following reasons:
- A small amount of ink has spilled into the printer. This often occurs when cartridges are refilled carelessly. Ink conducts electricity poorly or not at all. If they get on the surface of the contact pad of the cartridge, it will lead to a lack of electrical contact and, as a result, to the inoperability of the printer.
- A foreign object is stuck between the cartridge and the contact pad, which also causes a lack of electrical contact or leads to a short circuit (if the stuck object is made of metal). This usually occurs when cartridges are removed from the printer during refilling.
- Oxidation has formed on the surface of the metal contacts of the cartridges and/or the printer contact pad. This happens when the metal is exposed to moisture for a long time. This phenomenon occurs quite rarely and, as a rule, when the printer has been idle for a long time.
All problems with lack of electrical contact can be resolved by cleaning the metal contacts of the cartridges from any type of contamination and removing foreign objects from the ink tank installation compartment.
The main causes of problems in inkjet devices
Before troubleshooting the cartridge, you need to check the USB cable. Oddly enough, sometimes this cable is the cause of problems. If you don't have a spare cord, try moving all the connectors or connecting the cable to another USB port on your PC. If these actions do not improve the situation, then you need to look for other reasons why the printer does not print.
Ink has dried out in the nozzles
Inkjet printers have one big drawback: after a short period of time, the ink in the print head nozzles dries out. To prevent this from happening, you need to print something all the time, or turn on the printer once every few days (from 3 to 7) so that it “blows out” the nozzles.
Air got in when refueling
Air in a cartridge filled with ink will not cause much harm. Unless the paint begins to leak out of it, since there will be no necessary vacuum inside the container to keep the ink from leaking.
It's another matter when the ink runs out and air gets into the print head nozzles. In this case, the paint in the capillaries of the head may dry out. Air can also get in and dry out the head if it is parked incorrectly after the printer has finished running. It is important to check that the carriage always reaches the parking space. Only in this case will the nozzles be protected from drying out.
Air can damage the print head, especially on Epson printers since it is non-removable. The problem is that when changing ink tanks, if this is done leisurely, or when installing a CISS when the head is outside the parking unit, the nozzles have time to dry out.
Ink is not selected correctly
Some users think that ink is the same for all printer models. But in fact, even for devices of the same brand, ink may differ. The cartridge may not print due to incompatible ink being filled into it, which entails a complete flushing of the print head.
When choosing a paint, it is very important to read the instructions for it, which indicate the devices for which it can be used.
You should also pay attention to the expiration date of the ink.
The cartridge is not installed correctly
Sometimes a situation arises when the printer does not see the cartridge. This is explained by the fact that there are electrical contacts on it, which, when installed, must perfectly coincide with the contacts located inside the carriage. If for some reason there is a contact failure (dust, dried paint), the device will not work normally. It is also necessary to peel off the protective film from the contacts if the ink tank is new.
Some devices, especially MFPs, will not start working while the cover is open. The cause of equipment failure lies in a special lid sensor. Therefore, if you have installed a CISS, and the cable from it prevents the lid from closing tightly, then this sensor must be blocked, for example, with a piece of foam plastic (blocking methods may differ for different printer models).
Excess paint
Many users, when refilling the next time, try to fill the cartridge almost to the brim, which cannot be done. If the box is transparent, then you need to focus on the paint volume being approximately 90%. If the cartridge is darkened, then the operating instructions must clearly indicate the maximum permissible displacement.
It is also worth inspecting the box for microcracks. There should not be any fresh drops on the body after refueling. It doesn’t hurt to wipe it dry with a rag and leave it somewhere dry for a few minutes to make sure there are no leaks.
Solving problems with the printer printing completely black pages
The problem mentioned above almost always occurs due to hardware failures, so not every user will be able to fix it on their own. Next, we will tell you exactly what components or other factors cause this difficulty.
Reason 1: Flash on the drum
The photodrum is an element of the cartridge that receives a signal from the computer with information about further printing. The peculiarity of this element is its sensitivity not only to sunlight, but also to light in general, which is why the removal and repair of the photodrum is carried out in dim light in a special room. Sometimes light hits the drum, which is due to improper operation of the printer or replacement of the cartridge, as a result of which highlights appear on it and the part fails. An obvious symptom of a problem is black sheets printing. It is solved by replacing the element, or sometimes the sensitive coating is restored on its own, but for this a certain amount of time must pass.
Read more: Complete disassembly of the printer
Reason 3: Using the wrong type of paper
Sometimes users unknowingly install fax paper into a regular inkjet or laser printer, which is not suitable for printing on such devices, and it instantly turns black due to the action of ink and temperatures. We advise you to carefully select sheets, avoiding such non-standard formats.
Reason 4: Missing corotron or charge roller
In laser printers, one of the parts of the cartridge is the corotron or charge roller. These elements perform the same function, but have different structures. The corotron is a short, stretched wire, and the charge roller is a relatively thick metal rod that absorbs alternating and direct current when the equipment operates. When repairing a cartridge or replacing ink, the mentioned parts are sometimes removed. If you forget to insert them during reassembly, printing will not work correctly. Therefore, if you have recently replaced the ink or received a printer from repair, we advise you to make sure that the corotron or charge roller is present.
Reason 5: High voltage unit failure
The high-voltage unit is one of the main parts of the printer and MFP, responsible for the correct supply of electricity in the required quantities. If you inserted a cartridge into another printer and printing is normal, this is the element that should be diagnosed. You won’t be able to do this on your own, so it’s better to immediately contact a service center for analysis and further repair of the component.
Reason 6: Poor quality cartridge
Some cartridges are leaky, which causes various problems when using them. Usually the first sheets print fine, but eventually some toner or ink spills, causing spots on the paper or completely black sheets. There is only one way out in this situation - replacing the cartridge with a preliminary complete cleaning of the inside of the printer if paint gets on the components and the pickup roller. Our separate articles, which you will find at the links below, will help you figure this out.
Read more: Troubleshooting problems when removing a cartridge from a Canon printer Proper cleaning of printers Proper cleaning of a printer cartridge Inserting a cartridge into a printer
Above you were introduced to the most common reasons for printing black sheets. If none of them helped you solve the problem, feel free to contact the service center for the help of specialists; perhaps the problem lies in a completely unobvious place.
Describe what didn't work for you. Our specialists will try to answer as quickly as possible.
Laser cartridge
Sometimes after refilling the cartridge refuses to work normally or shows no signs of life at all. The cause of all problems lies, as a rule, in inept user actions, and at the same time deviations from instructions.
Procedure for replacing toner in a laser cartridge:
- Unscrew/remove the cover to access the toner compartment.
- We clean the box from accumulated old powder.
- We fill in a new toner (it is highly desirable to use a branded one, keeping in mind the brand of the printer).
- We remove any remaining powder (especially from the photocell and dosing blade).
- We assemble the cartridge and install it in place.
Advice! To clean the box from powder, it is more convenient to use a vacuum cleaner. If the cartridge is refilled more than a dozen times, then you should pay attention to the condition of the magnetic shafts and the cleaning blade (squeegee). If necessary, the latter are replaced.
Cartridge device
Just as with inkjet printers, laser cartridges are equipped with control chips. In some boxes they are brought out and can be accidentally damaged during the next refueling. The proprietary software of the equipment should notify you of this problem.
No electrical contact
The design of any cartridge contains electronics responsible for supplying ink, measuring its level and other operations. For normal operation, reliable electrical contact must be established between ink tanks and printers, the absence of which leads to various problems. If it is not there, the Canon printer does not “see” the cartridge.
Loss of electrical contact may occur for the following reasons:
- A small amount of ink has spilled into the printer. This often occurs when cartridges are refilled carelessly. Ink conducts electricity poorly or not at all. If they get on the surface of the contact pad of the cartridge, it will lead to a lack of electrical contact and, as a result, to the inoperability of the printer.
- A foreign object is stuck between the cartridge and the contact pad, which also causes a lack of electrical contact or leads to a short circuit (if the stuck object is made of metal). This usually occurs when cartridges are removed from the printer during refilling.
- Oxidation has formed on the surface of the metal contacts of the cartridges and/or the printer contact pad. This happens when the metal is exposed to moisture for a long time. This phenomenon occurs quite rarely and, as a rule, when the printer has been idle for a long time.
All problems with lack of electrical contact can be resolved by cleaning the metal contacts of the cartridges from any type of contamination and removing foreign objects from the ink tank installation compartment.
Problems with the chip or diaper counter
Inkjet printers use two types of cartridges: disposable and refillable. In disposable ones, the manufacturer installs a special chip that blocks the operation of the device after the ink in the container runs out. The printer also refuses to print if the diaper counter indicates that it is full.
Control chip
Each cartridge is equipped with a small chip that contains a variety of service information. The chip is quite fragile, and it is easy to damage it, for example, during the next ink refill. Most proprietary applications that service the printer signal a failure of the chip.
Chip on cartridge
If such a message appears, then the first thing you need to do is inspect the chip for contamination. Dried paint can be removed with a cotton swab dipped in alcohol or a regular rubber band if there is not much dirt. In other cases, you will need to replace the chip or the entire cartridge.
The chips also read the number of pages printed. Some boxes are limited by limits, after which they simply stop working. Reflashing the microcircuit, or again replacing it, helps.
Absorber
Most often, this element is called a “diaper” or absorbent pad. The absorber is necessary to remove excess ink while cleaning the cartridge nozzles. By means of a mini-pump, a zone of low pressure is created in the nozzles, while in the body itself it is close to normal. Due to the difference in pressure, the paint clots are pushed out and fall on the gasket.
Many devices can monitor the level of absorption of the absorber and issue appropriate messages or an error code. If the diaper is completely clogged with ink residue, the printer may refuse to print.
Diaper filled with ink
In a good half of cases, replacing a gasket is a rather labor-intensive procedure, so it is better to leave this matter to specialists. In addition, not every utility allows the user to reset the pollution indicator counter.
There is no universal method for eliminating problems with diapers and chips, since the design of the devices is different. Different printer models have their own troubleshooting methods.
Troubleshooting Brother printers (MFPs)
Brother printers do not have sensors that monitor the overfilling of the diaper with waste ink, and therefore the adsorber is controlled at the software level. The calculation is made based on the number of prints that came out of the machine, as well as on the number of head cleanings (forced and regular). After some time of operation of the unit, the program counter determines that it is time for the diaper to be overfilled and blocks the printer, while the message “Cleaning” or “Error 46” is displayed on the device display. To reset the counter, no additional software is required. The device has a reset function through the service menu. To get into it, do the following.
- Unplug the device's power cable from the outlet.
- While pressing and holding the “MENU” key, connect the power cable to the electrical outlet.
- Wait for the “Maintenance” message to appear on the screen for a couple of seconds. At this moment, you need to have time to remove your finger from the “MENU” key. If that doesn't work, unplug the outlet and do it all over again.
- By clicking on “+”, wait until the number 8 appears, then click “OK”.
- Using the “+” key, select number 2, and then “OK”. After these steps, you should see the message “MACHINE ERROR” or “MACHINE ERROR 00”. If such a message does not appear, but some other message is displayed, then you will not be able to reset the diaper counter.
Brother printer
Next, you need to move on to the soft reset procedure itself:
- follow the steps above up to point 3 (inclusive);
- then use the “+” button to select the number 0 and then press the “OK” button, the image “00:00 XX:XX” will appear, where XX:XX is the time;
- Now you need to press the “BLACK AND WHITE” key (it, as well as the “COLOR” key, can be found near the “START” button) until the inscription “PURGE: xxxxxx” appears (instead of xxxxxxx there can be any numbers).
At the next stage, for the inscription “PURGE” you must enter the special code “2783”:
- Use the “+” key to find the number 2 on the display and press “OK”;
- further, “+” → “7” → “OK”;
- “+” → “8” → “OK”;
- “+” → “3” → “OK”.
- after this you should see the message “PURGE:00000”;
- by pressing the “BLACK AND WHITE” key, select “FLUSH: xxxxxx”;
- repeat all the actions that were done after selecting the “PURGE” inscription;
- after selecting number 3 and clicking “OK”, you will see the message “FLUSH:00000”, then turn off the printer, unplug it and turn it on again.
After the counter is reset, the printer will continue to operate. It is also recommended to remove the diaper itself, rinse it and dry it, but this will require disassembling the device. Understanding how to do this will require a separate article.
Solution for Canon printers
Canon ink tanks have a chip installed that counts the amount of ink remaining in them. When, in the “opinion” of the chip, the ink runs out, an error message appears or about an empty cartridge. Therefore, you need to turn off the counter.
If Canon PG510 / 440 / 426 ink tanks are installed, then press “OK” in all messages that appear on the device’s display. Press “OK” until a message appears asking you to press the button to enable paper feed. Hold it down for a few seconds and the paint counter will be reset. For other cartridges, the reset occurs after pressing the button with the image of a triangle in a circle for 5-10 seconds. or in the printer settings on your PC.
Printing equipment manufacturer Canon uses 2 types of print heads in its devices: non-removable and removable, located directly on the cartridge.
We revive Epson printers
Ink accounting in Epson printers is done by their own software (firmware). Therefore, no matter how much ink you add, the program will consider that the container is empty and block printing.
To return the device to operation, it is customary to use the PrintHelp program, which is freely available on the Internet and is free. In addition, it can be used for most Epson printing equipment.
Using this program, you can not only reset the ink to zero, but also monitor its quantity. The program is also able to detect the overflow of a diaper and, if necessary, reset it.
Restoring HP printers
It's no secret that HP 121, 27, 28, 56, 57, 21 and 22 ink tanks are refillable. In this case, you need to be careful and not allow the ink to be completely depleted by refilling it on time. When the chip detects that the ink is running out (but there is still paint), a message is issued about this: an exclamation mark appears next to the problem ink tank. In this case, you need to click on “Continue”, thereby turning off monitoring of the paint level. The disadvantage of this method is that you will not be able to see the ink levels.
If you do not add ink after this and continue to print, then after it is used up, a sensor that determines the actual amount of ink will work and block the operation of the printer and the chip itself. And a cross will already appear opposite the cartridge. If this happens, you will have to replace the chip or ink tank. Although there are several ways to reset the chip so that the paint level is displayed.
Place the inkwell on the table with the contacts facing up and do the following.
- You will need to seal 1 contact, highlighted in green in the figure, with tape. It is important that only 1 contact is sealed.
- After this, you need to insert the ink tank into the machine, click “OK”, which will appear in the message window, and print the internal test of the unit.
- Remove the ink tank from the printer again.
- Next you need to close another contact. You can choose any one (blue, purple, red) without removing the sticker from the previously closed contact.
- Insert the part back into the printer, click “OK” and print a test page.
- Remove the ink tank from the machine again.
- Remove the sticker from the first contact, then return the part to the machine. You should wait until the unit “sees” the ink tank, and then remove it.
- You will need to remove the sticker from the second contact, wipe all contacts with alcohol, and put the ink tank back into the printer.
The meaning of these manipulations is this: four different cartridges are replaced, after which information about the identifier of the refilled ink tank is erased from the device’s memory, and it, inserted fifth, is considered as new . After this, the printer will assume that there is paint and display its level in the containers.
The second method is suitable if the first one was ineffective:
- seal the first contact, insert the inkwell into the machine, and print the test as in the first method;
- Without removing the sticker from the first contact, you need to glue three contacts with a rhinestone, as shown in the figure;
- insert the part into the machine and print the test;
- remove all stickers and return the ink tank to its place, remembering to clean the contacts with alcohol.
How to reset the error?
Before printing, you may encounter an unpleasant situation when the computer displays an error message indicating that there is insufficient ink. Problems are expressed by codes 1688, 1686, 16.83, E16, E13 . In addition, the indication color will be orange. To get rid of the problem, you need to block the ink level monitoring function in the printing device.
To resume document printing, press and hold the Stop/Reset button for 10 seconds. You can use a special application if you need to get rid of error E07 in MP280 . To do this, you should perform the following steps:
- install the program;
- turn on the printer;
- Press the “Stop” and “Power” buttons simultaneously;
- Press “Stop” 5 times while holding the second key;
- release the buttons;
- insert paper and launch the downloaded application.
The last step is to click on the Set button.
Checking the cartridge with proprietary software
In this case, there is no need for direct user contact with the cartridges: the procedure is controlled through the printer software. You can find it on the official website of the equipment manufacturer in the “Drivers and Utilities” section.
Nozzle cleaning and calibration:
- Open the “Control Panel”.
- Go to "Devices and Printers".
- Click on the desired model.
- Select the line “Setting Printing Options”.
- In the window that appears, find the “Service” section (“Maintenance”, etc.).
- Click on the icon of the required procedure.
Checking the nozzles
Most utilities allow you to check the nozzles, clean the print head and calibrate it. Blowing out the nozzles takes about 1-2 minutes, actively consuming ink. Therefore, the cartridge must be filled at least 50%. If necessary, the procedure can be repeated.
Why does the printer print with stripes?
There are common cases when, when printing files, defects in the form of stripes appear on documents. In this case, the stripes can be both horizontal and vertical, narrow and wide. First of all, the cause of the defect is wear of parts due to long-term use of the printing device. In laser devices, stripes may appear for the following reasons:
- The cartridge is damaged;
- Not enough ink;
- The waste device is overfilled;
- The photo roll is damaged.
The following reasons are typical for inkjet printers:
- Running out of ink;
- The printing mechanism is clogged with dried ink;
- The print head is faulty.
After checking the ink, you should perform head cleaning. It is recommended to perform cleaning using software:
- Launch the utility;
- Go to the "Maintenance"/"Service" section;
- Start cleaning.
If the problem persists, you need to repeat the cleaning 2-3 more times. For printers with CISS, filters should be checked and replaced if necessary. Depending on the model, the print head can be located both in the device (Epson) and in the cartridge (HP, Cannon).
If you rarely use the MFP or printer, it is recommended to run it at least once a week. In this case, you just need to turn it on. If the printer itself breaks down, you should not try to repair it yourself. Take the device to a service center for diagnostics and find out the cause of the breakdown and the cost of repair. In some cases, it makes more sense to purchase a new printer. Carefully select cartridges, as well as spare parts for repairs, from trusted manufacturers.
Cleaning Fixed Printheads
Before you start washing this part, you will need to prepare a small container in which the washing process will take place. This could be a saucer, a plastic box with small sides, a photo bath, etc. You will also need: gauze or bandage, a pair of syringes (10 ml), plastic and rubber tubes, which are found in medical droppers. Rubber bands will be needed if a strong blockage is found that cannot be removed by soaking.
For flushing, it is recommended to use flushing liquid, sold at ink stores. But, since the price of liquids is quite high, you can use household chemicals, namely “Mr. Muscle” (MM) for washing glass, containing ammonia.
Please note that the color of the chemical is either green or blue. Other colors of liquid are not suitable for flushing.
Next, you need to remove the print head itself. Since there are a great variety of devices of this type, each case has its own nuances. A video of the process of removing the head for any printer can be found on the Internet.
Easy way
So, when everything is prepared, do the following.
- Draw MM into the syringe.
- Cut 2 small pieces of gauze. Fold the first one so that it is the size of the lower platform of the PG, then place it in a saucer and soak it in the MM. Crumple the second piece and also soak it a little with glass liquid.
- Turn the PG over with the nozzles up and use a crumpled (moistened) piece of gauze to remove all dirt from it. You may need to change several gauze pads.
- Place the PG on the prepared area of gauze in the saucer. Use a moistened MM gauze swab to remove dirt from the intake grates (be careful not to break them).
- After removing the rubber bands from the inkwells, rinse them under water to remove dried ink, and wipe the areas where they were with gauze.
- Next, you need to drop one drop of MM onto the intake grids using a syringe.
- Once the MM is absorbed, add 1 more drop onto the grates. This needs to be repeated many times, and the piece of gauze under the head should be changed as it gets dirty. When the moment comes that the liquid flowing through the nozzles will not stain the gauze, it means that the washing can be completed.
- To check the quality of washing, fold a small piece of gauze in half, moisten it well with MM, and place the PG on it for about 1 hour. If after time the gauze remains clean or with faint ink stains, but without areas of intense contamination, then the PG can be inserted into the device.
- After installing the head into the printer, it is necessary to run the PG cleaning 2-3 times to remove MM residues.
If a drop of liquid is not absorbed into the grate, leave it to soak for a while. From time to time, remove it with a napkin and reapply.
For severe blockages
When the napkin stops staining, but the liquid still does not pass through, you will have to use the following flushing method, which is used for severe blockages.
- Select tubes of suitable diameter so that they can be placed on the pipes through which the ink enters the head. The tubes should be about 5 cm long and fit tightly.
- After installing the tubes, place the head on the cheesecloth in a saucer and pour MM into them. From time to time, liquid should be added to the tubes, which will gradually flow out through the nozzles. Also, do not forget to change the gauze in the saucer as soon as a puddle appears near it.
- If in one or more tubes the MM descends very slowly or stands still, then it is recommended to leave the head in this position for several hours, or better yet, overnight.
Before installing it in the printer, the head must be “dried” so that it is not dry. To do this, place a few drops of washing liquid into the ink channel grids.
Don't forget to run a hardware print head cleaning to fill it with ink.
Where is the stop/reset button?
The service stop/reset button on the Canon MG2440, MP250 and other MFP printers is located on the front panel next to the device power button. It is indicated by a triangle in a circle and is highlighted in orange. The button provides access to the error reading menu on multifunction devices such as the MG2440 that are not equipped with a display. When you press and hold the key for 5 seconds, the lightning light will begin to flash in a certain mode. This key is often used to disable the print counter program.
- Review of Canon PIXMA MG3640 inkjet MFP: characteristics, cartridge replacement and customer reviews
Stop/reset button on the printer
For “budget” MFPs focused on printing photos (MP280, MP230 and MP250), pressing and holding the “stop/reset” button until a certain number of indicator flashes enables the following operations:
- nozzle test (1 blink);
- quick cleaning of print heads (2 blinks);
- deep cleaning of print heads (3 blinks);
- Printing the printhead auto-calibration page (4 blinks);
- forced scanning of the head auto-calibration page (5 blinks);
- Printing manual head calibration page (6 blinks);
- testing the paper feed mechanism (7 flashes);
- forced cleaning of the feed rollers (8 flashes).