Users of these devices often encounter the problem that the printer does not print in black. Problems of this kind can be caused by various reasons. They are typical for models from HP, Epson, Canon and others. The most serious from a repair point of view are mechanical damage to parts, for example, the print head. In such cases, you will need to seek help from service center specialists. But most of the reasons are quite easy to eliminate on your own, without outside help.
Print head damage
Very often the printer does not print black due to damage to its print head. It is quite difficult to determine this problem. If you have any suspicions of this kind, it is better to take the device you are using to the manufacturer’s service center. If print head damage is confirmed, there are two ways to solve this problem:
- replacing an old part with a new one;
- purchase of new printing equipment.
But before contacting the service, you need to check other possible causes to rule them out. This will avoid unnecessary steps and possible costs if the device is not under warranty. Often the issue is resolved independently in this way.
Printer error
New HP printer models often display various errors when printing documents immediately after refilling cartridges. The device shows a low ink level and therefore does not start working or does not see the installed cartridge at all.
To resolve this issue, you need to do the following:
- Remove the cartridge from the printer.
- Open the “Reset” menu - to do this, press the “Cancel” button on the HP printer and wait 2-3 seconds.
- Press the power button - it is responsible for turning the device on and off.
- Specify the login password by pressing the up and down keys.
- A menu will open where you need to select the “Partial reset” function and press the “OK” button. The printer will then turn off.
- Unplug the device from the outlet and wait a little: 5-10 minutes will be enough.
- Turn the device back on and follow the instructions shown on the display.
- Open the menu and select the “Semi Full Reset” function. Click OK. The printer will turn off again.
- Now turn on the printer again and insert the cartridge back. You can try to print documents.
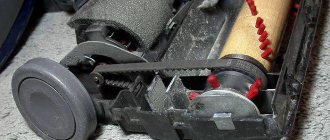
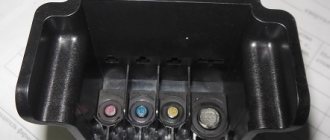
Print head clogged or dry nozzles
The following common reasons for a printer not printing black are:
- clogged print heads;
- drying of paint in the nozzle.
Clogged print head nozzles
The print heads are cleaned in the following way:
- check the black ink level in the printer settings;
- if available, make a test printout;
- when this does not bring results, wash the print head with a special solution;
- give the composition time to act (about 15 minutes);
- go to the settings of the printing device and select the head cleaning option;
- after the process is completed, perform a test printout of any document.
If nothing worked the first time, then all steps must be repeated again. When the second attempt did not bring the required result, then you should work on the nozzles. They often dry out when equipment is rarely used. To remove dried paint from the nozzles, wipe them with cotton wool soaked in alcohol. Only after drying the test document is printed.
Once a satisfactory result is obtained, you can begin working with the equipment. Please note that the nozzles and print heads need to be cleaned periodically to prevent them from clogging or the ink drying out.
The exact timing of regular inspections is given in the operating instructions for each model.
Network printers
When the HP Deskjet 3525 printer does not print (a similar problem occurs with the INK Advantage 6525), the first thing you should check is the wireless network connection status. If you are connecting for the first time, you should not ignore the program’s request to connect via a USB port, and you should also disconnect the connection correctly.
If you use many devices that simultaneously access the router, regular failures in connecting the printing machine are possible. It is recommended to connect the printer to a shared network only after other devices have been identified.
The printer's access to the public network is sometimes blocked by a firewall. It is recommended to add the process to its exclusion list. In particularly stubborn cases, you may need to disable the firewall.
In addition to connection problems, network printing devices have the same “diseases” as other inkjet devices: increased sensitivity to paper quality (especially when printing photos) and the presence of the original cartridge.
For all inkjet printers, there is a general recommendation to prevent possible problems with ink nozzles clogging. It consists of turning off the device after use using a button on the body. This way you can avoid constant heating of the working part of the device, accumulation and drying of ink on the nozzles.
The history of Hewlett-Packard begins back in 1939, when two Stanford University graduates founded a small company in their garage. Initially, it was engaged in the production of measuring instruments.
Today, the modified HP company is one of the most popular and reputable companies producing various types of digital equipment. One of the products of this company - the HP DeskJet 2130 MFP - will be discussed in this article.
No ink or incompatible ink
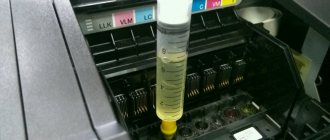
The simplest reason that a device has stopped printing with black ink is a simple lack of ink. Due to various failures, the computer may not notify the user about what happened. The problem is solved by adding ink:
- about 2 cubic centimeters of paint are injected into the cartridge with a syringe;
- carry out testing;
- if the result is positive, then you can add the same amount of ink and print documents.
When refilling yourself, you should remember that in some models it can only be done after installing the cartridge in its place in the printer. To carry out the procedure you will need a special syringe.
Also, the equipment used may not print in black if the inks used and the ones added are not compatible with each other. Therefore, before refilling, you should carefully study the label on the ink bottle. Such information is always indicated there.
It is better to purchase consumables from well-known, trusted manufacturers to be sure of their quality.
Replacing the used cartridge with a new one suitable for the model used is an even easier option for eliminating this type of problem. But doing the refueling yourself will cost several times less.
Computer and printer diagnostics
If the printer stops printing, this is not always due to replacing the ink in the cartridge. If you are sure that the problem is definitely with the cartridge, skip this section and move on to the next one. If there is a possibility that other factors are to blame, do the following procedures first.
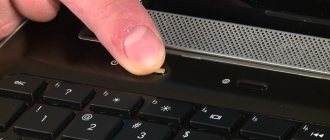
Reboot and reconnect
Restart your computer and printer. Disconnect and reconnect the cable first to the computer and then to the printer. If the USB cable is connected to the front of the system unit, connect it to the rear panel directly to the motherboard. Check to see if there is an indication that the printer is working.
Checking the printer settings
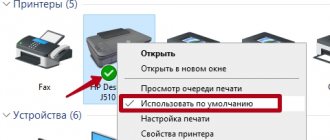
Right-click on the “Start” button and open “Control Panel”. Select the “Hardware and Sound” section and the “View devices and printers” subsection. Find the Epson printer connected to your computer in the list and open its settings by double-clicking. In the “Printer” tab, check if there are checkboxes next to the “Work offline” and “Pause printing” items. If there are any, remove them. Check the box next to “Use as default”.
Print a test page
Depending on the Epson printer model, this function may be on the printer itself. To activate it, you only need to press one button. However, you can also print a test page programmatically. This can be done through the user interface of the Epson printer program.
This can also be done through the “Control Panel”. Select the “Hardware and Sound” section and the “View devices and printers” subsection. Find the Epson printer connected to your computer in the list and right-click on it, select “Printer Properties” and go to the “Basic” tab. Select Print Test Page. If the page passes, then the printer is configured correctly, but if not, read the following tips.
Clearing the print queue
Right-click the Start button again and open Control Panel. Select the “Hardware and Sound” section and the “View devices and printers” subsection. Find the Epson printer connected to your computer in the list and open its settings by double-clicking. In the “Printer” tab, click “Clear print queue”. Check the printer's functionality.
Reinstalling the driver
Update or reinstall the Epson printer driver. To do this, you need to download the latest version of the driver from the manufacturer’s website and install it on your computer. It is best to first disconnect the printer from the computer and remove the old driver. If the installer tells you that the printer needs to be connected, connect it.
If nothing interferes with the printer's software, but it still does not print, this may be due to a malfunction of the printer itself or its cartridges. If the cartridges are refilled, but the printer still does not want to print, there may be several explanations for this. Let's look at some of the possible reasons.
Poor quality filling
It happens that after adding high-quality black ink, the equipment still refuses to print. This may be due to poor quality refilling: the cartridge was inserted incorrectly or sealed. Then the problem can be easily resolved:
- the cartridge is removed and reinserted until it clicks;
- before or after installation, seal the hole from the syringe needle with tape (adhesive tape);
- then check the functionality of the device.
All manipulations should be done carefully so as not to accidentally break anything.
Disabling ink level control and resetting the chip
A number of printing equipment models are equipped with an ink level control function. Therefore, when the latter run out, the printer does not print in black and is blocked. To fix the problem, you need to disable the level control function. They do this in several ways.
- When a message appears that the ink is running low, then press the button responsible for feeding paper and hold it for at least 10 seconds.
- You can go to the printer menu on your computer, select the “properties” tab there, deselect the item that allows two-way data exchange, and confirm the actions.
- For certain models, special programs are installed that reset the ink consumption counter, for example, iptool and mptool.
- Reset the chip on the cartridge.
It is recommended to perform zeroing after refilling yourself. To do this, use a programmer (resetter). You can also purchase disposable or auto-reset compatible chips that work on some models.
Please remember that stopping the ink level control function yourself will void the device warranty.
There is a less expensive way to reset the cartridge counter - to do this, seal the corresponding contacts. The problem of practical implementation lies in finding them. Different cartridge models use different contacts. The algorithm of actions is as follows:
- include equipment;
- take out a black ink cartridge from it;
- place it on the table, pointing the nozzles towards you and the contacts upward;
- seal the upper left contact with tape;
- insert the cartridge, click “Ok”;
- print out the verification document;
- take the cartridge back out;
- seal any contact at the bottom right;
- install the cartridge into the socket;
- check the functionality of the equipment;
- remove the cartridge and peel off the first contact;
- insert it back, wait for recognition;
- then take out the cartridge and remove the second tape;
- wipe all contacts with cotton wool soaked in alcohol;
- returned to its place.
After the manipulations have been completed, the ink identifier should show 100% of its level. If this does not happen, then you can try to glue the 3 upper ones at once instead of one lower right contact for the second time. All further actions are carried out in the same way.
Preparing the printer for first use
After unpacking the MFP, you must remove all packaging tapes and protective films from the case. Then, lower the output tray, open the cover to access the cartridges and remove any stickers inside.
At this point, you can connect the printer to the mains. Pressing the power button will turn it on. Now you need to open the lid again to access the inside. The carriage should move to the center for convenient installation of the cartridge in the HP DeskJet 2130. When installing it, you should remember that you can only touch the black plastic case. Immediately before installation, you need to remove the protective film.
The left slot is for the tri-color cartridge, and the right slot is for the black cartridge. Installation is carried out with a simple movement until a characteristic click is heard. Then you can close the cartridge unit.
Before printing for the first time, you should align the cartridges to ensure the highest print quality. To do this, you will need a special calibration sheet, which will be automatically printed after the first load of paper. This template must be placed in the scanner at an angle to the mark marked on the body. After this, you need to click on the “Start black and white copying” button. The calibration process will begin.
All that remains is to install the included software. It is worth noting that you do not need to connect the USB cable until the program being installed directly asks you to do so.
Driver problems
You should also check the operation of the hardware drivers yourself at home. In this case they do this:
- reinstall the corresponding programs;
- print out a test text.
If the problem persists after all the measures considered, it indicates a more serious breakdown. If the equipment is under warranty, then you must contact the service center or store where the product was purchased.
To ensure that your equipment lasts for a long time, you should regularly clean the print heads and nozzles. You should also use compatible, high-quality ink. If the equipment is idle, then once a month it is necessary to print any document to prevent the ink from drying. It is recommended to use several cartridges of each color, then after refilling they will be perceived as new.
Printer problems
A breakdown of a printing device does not always manifest itself as a complete failure, when the device does not turn on or does not perform its functions at all. In some cases it looks like this:
- The printer does not print in one of the colors, for example, black. The cartridge is in good working order, compatible, and there is paint. Replacing the cartridge and toner does not help.
- Only part of the document is printed.
- The toner does not adhere to the paper.
- Paper does not pick up from the tray.
- The printer does not print or incorrectly transfers the text of any documents onto paper, and does not reproduce standard commonly used fonts.
- The print is not positioned correctly on the sheet.
- Instead of one document, several are printed and vice versa.
The majority of such problems cannot be solved at home without special training. The user can independently see if the device has jammed the paper; if yes, try to extract it; check whether the cartridge is installed correctly; remove foreign objects that have entered the device if they are easily accessible; clean visible dirt. In other cases, all that remains is to contact the service or buy a new device, if it is from a series of disposable ones, which are very cheap.
The history of Hewlett-Packard begins back in 1939, when two Stanford University graduates founded a small company in their garage. Initially, it was engaged in the production of measuring instruments.
Today, the modified HP company is one of the most popular and reputable companies producing various types of digital equipment. One of the products of this company - the HP DeskJet 2130 MFP - will be discussed in this article.