Absolutely every home has a TV. The whole family gathers around it in the evenings to watch the news or an interesting film. But it happens that the TV breaks or certain objects get inside it. Of course, you need to disassemble the TV to remove a foreign object or make repairs. The services of a specialist are often expensive, so it is not advisable to pay money for something that you can do yourself.
Screwdriver set, cotton gloves, soft cloth
Sponsored by P&G Articles on the topic “how to disassemble a TV” How to set up a computer via a local network How to find out the balance of a number How to restore a Beeline card
Decide why you need to disassemble your TV. Disassembling the TV can be complete or incomplete. Complete disassembly implies the complete dismantling of all parts of the TV, and incomplete disassembly means the dismantling of some individual part. If you need to get any object that has fallen through the grille, you only need to remove the back panel of the TV. More global faults will require a detailed analysis of your device. It is worth noting separately that plasma TVs should not be disassembled under any circumstances, since they have a completely different structure and can only be repaired under special conditions using special equipment.
Carefully read the instruction manual for your TV that comes with it. It always contains a diagram of the device. This will help you find all the securing bolts. Place a soft cloth on the surface where you will disassemble the TV to avoid scratching the monitor. It is also recommended to carry out all disassembly work using gloves to avoid leaving greasy fingerprints. It is worth noting that disassembling it yourself will void your warranty, so it is recommended to disassemble the TV yourself only if the warranty period has expired.
Unplug your TV. Carefully remove all screws. Try to remember which socket each screw was in. It is worth noting that the bolts can vary in length and width, so it is best to draw a rough plan for the location of the bolts on paper and arrange them in order to avoid confusion. Now you can carefully remove the back cover of the TV. Usually it is attached to plastic latches. In the instruction manual, find all the places where they are located so as not to inadvertently break some of them. To remove, you need to press each latch while gently pulling the cover in the opposite direction. Do not press with a regular screwdriver, as the iron may damage the plastic. For this, there are special screwdrivers made of thick rubber or flexible plastic.
Partial disassembly of your TV is complete. Next you will see the internal structure of your unit. Most parts are attached using soldering. It is highly not recommended to completely disassemble the TV, as special education and skills in soldering parts are required. Therefore, it is worth disassembling the TV only for minor repairs.
Other news on the topic:
Modern technologies are developing so quickly that we don’t even have time to understand what it was before something new appears. This is exactly what happens with televisions. We haven’t all switched to LCD TVs yet, but plasma ones have already appeared. There are two types of plasma devices - plasma panels and
After a long period of use, unpleasant dark spots may appear on the TV, preventing you from continuing to watch your favorite movie or show. Don't immediately panic and try to apply settings in the main menu to get rid of this problem. Everything is done much easier. Placement Sponsor P&G
Nowadays, new generation plasma TVs are coming into circulation more and more. They differ from their previous counterparts not only in better image quality, but in their compact size, which allows them to be placed almost anywhere. However, modern models can also break. For
Every home has a vacuum cleaner. This unit allows you to keep your home constantly clean. It is also worth noting that a vacuum cleaner is a fairly powerful device that is used regularly. A vacuum cleaner, like any household appliance, has one negative feature - it breaks. What
Almost every person nowadays has a mobile phone. The electronics market is replete with various models. However, very often a mobile phone requires minor repairs. Disassembling a regular monoblock will not be difficult, but how to disassemble a slider? You will need a special kit
If you have a TV, you can easily display images from your computer on its screen. It is convenient to watch movies and photos, play games. In addition, by using the screen extension feature, you can continue working on your computer while your loved ones watch a movie or
While we were looking for a 140x200 mattress, we found interesting news about how to disassemble a modern thin TV.
Today, plasma TVs belonging to the new generation are increasingly found on the shelves of electronics stores. They differ from the previous generation of television receivers not only in that they have better image quality, but also in their compactness
, which makes it possible to place plasma TVs absolutely anywhere.
However, most modern models often fail. To repair a plasma TV yourself, you need to know the sequence of disassembling it well. How can this be done? To disassemble a plasma TV,
you will need instructions for using the plasma TV, various screwdrivers, and a light-colored cloth. First, you need to read the documentation that came with your plasma TV. You need to find a record regarding its warranty period. You must ensure that the warranty period for this equipment has expired. If this does not happen, it is not recommended to attempt to repair your plasma TV yourself, as this may automatically void your warranty. It may be more advisable to entrust warranty repairs to a service center, where they can quickly find and fix problems. If the warranty period has expired, you can try to make repairs yourself.
Operating principle of the LCD matrix
An LCD matrix is a working surface made of glass with several million pixels; they change color, as well as the brightness of their glow, due to the influence of external control signals. Matrix pixels form the image that we see.
In order to control some pixels, microcircuits are used. ICs are drivers that control signals that send a specific signal for each pixel. Typically, control drivers are located on flexible cables soldered into the very base of the matrix glass. This cable cannot be separated from the glass; it is also impossible to replace one cable. In addition, it contains driver power parts, as well as decoder chips.
TV remote control
In order to know how to repair a TV remote control with your own hands, it is necessary, as in the case of a TV, to determine why it does not work.
The most common breakdowns observed are:
- failure of important internal elements due to falls;
- failure of some buttons;
- lack of signal from frequently pressed buttons;
- The remote control only works next to the monitor.
If you drop the remote control often enough, it’s immediately clear what’s wrong with it. The reason here is damage to important parts. Some buttons may not work due to clogged contacts. Frequently pressed buttons become more rigid. And the lack of a signal far from the monitor is a problem with the infrared lamp.
Matrix faults
Matrix failures can be divided into the following groups:
- Mechanical disturbances (matrix bends, water penetration, impact).
- Failure of microcircuits and other parts (resistor, diodes, capacitor, inductors) that ensure the constant operation of these image-forming microcircuits. They are on a flexible, non-removable cable.
- Violation of the permanent cable
- “Burn-out” of pixels that have ceased to be operational without a mechanical justification.
- Backlight doesn't work
The malfunctions of the matrices described above lead to their replacement, since repairs will be too expensive or simply impossible. Replacement in this case is the priority option. For example, the backlight inverter for fluorescent lamps is often located on the power supply board, and the lamps are also easy to replace. It is more difficult to deal with failures in the operation of LED backlights; usually the manufacturer controls it using flexible, permanent cables. However, here you can try to make repairs yourself.
LCD screen repair
Repairing an LCD TV yourself requires extreme caution. It will be a little more complicated than repairing an ordinary CRT TV. But it’s not difficult to learn if you want. The most important thing is to protect the screen.
First, it is important to read the instructions for the TV. The liquid crystal screen can be of two types: LCD and LED. They differ in the nature of the backlight elements; in the first case, fluorescent light bulbs are used, in the second - LED elements.
In order to check the status of the light bulbs, you can connect the device matrix to the network. If in this case one of the lamps does not work, you can simply replace it. The most important thing is to be careful when working, it is important not to damage other parts.
If it is possible to check it without removing the matrix, then it is better to do just that. The burnt out element is removed using a soldering iron. You need to select a lighting element by bringing an old light bulb to the store, where they will select a completely identical option for you.
If the screen is damaged, repair will not help, a new one is needed. You can carry out the replacement yourself, but if you are not sure of the correctness of the actions, it is better to contact a professional. It should also be remembered that each model and different manufacturers have their own characteristics when repairing.
Disassembling a TV with a front housing system
The principle of replacing the matrix depends on the TV model, manufacturer, and the size of the matrix. However, there are general rules. There are two popular types of housing fastening - screw connections and plastic latches.
The front panel of the cladding must be pressed out and the latches removed. Then you will see the matrix screwed to the main body of the TV using metal screws or screws. You need to unscrew each fastener and separate it. Be careful - the screws may be doubled with latches. It will also be necessary to dismantle the bolts on the back wall of the TV; they secure the case with a metal screen that provides protection against malfunctions of the power supply and control board.
When everything is done as needed, the matrix with all the electronics should be separated from the body. To prevent chips and scratches, it is recommended to place the element on a soft fabric; flannel is perfect for this. Next, disconnect the panel from the connecting cable, be extremely careful. In some situations, for additional fastening, as well as protection against movement of the cable, the manufacturer glues strips of adhesive tape to the connection.
Carefully remove it, lift the clamp - pawl located on the connector, you can use small tweezers for this. To avoid damaging narrow paths, you must try to remove the cable without swinging it in different directions. Then you need to remove the stiffening panel from the matrix. For this purpose, we unscrew the screws from the ends; different manufacturers may have 2–12 pieces on one side.
Replacing the matrix at home
Replacing the matrix on a TV is a fairly expensive operation, which should preferably be carried out in a specialized workshop.
On a note! Some workshops offer owners to replace a faulty TV with a new one, purchasing the faulty one for a small fee. At the same time, the price of the new model is reduced by the redemption amount.
If the owner of a television receiver decides to repair it with his own hands, then he must take into account that each TV model uses an original matrix. In each specific case, it must be ordered individually, since there are practically no matrices available for free sale. At the same time, they do not cost much less than a new TV. Replacing the matrix itself is a simple procedure, but it requires:
- skills of careful handling of fragile objects;
- experience in assembly and installation work and setting up household radio-electronic equipment.
Removing the matrix from the rear cover
Dismantling of the faulty matrix is carried out after opening the housing of the television receiver. In this case, access to it can be opened both from the back cover and from the screen (Samsung, Sony Bravia). Before you begin work on replacing the matrix, you must:
- purchase a new matrix;
- prepare the workplace by covering it with soft material (flannel, felt, blanket, etc.);
- collect tools and materials that may be needed during the work (various screwdrivers, tweezers, thin metal plate, alcohol, napkins, etc.).
To access the matrix from the back of the TV, you need to place it with the screen on a soft surface and unscrew all the fastening screws holding the back cover.
Attention! The rear panel can be secured with screws of different lengths. Therefore, you need to remember where exactly this or that screw is located.
After unscrewing all the screws, you need to carefully lift the back cover and carefully disconnect all the components that are located on it. You should be aware that in the design of some TVs (for example, LG), the back panel is equipped with a special hatch that allows access to elements during service, and therefore, when removing the cover, special care must be taken so as not to damage the cables going to it .
By removing the back cover, the owner gains access to the matrix, on the body of which all the electronic components are installed. Having carefully disconnected all the cables going to these modules, you can begin replacing the matrix
Removal from the screen side
To dismantle the matrix from the front side, you need to place the TV with the screen facing up and release all the latches that hold the panel facing in place. This must be done carefully so as not to break the latches. It is best to use a pre-prepared thin metal plate for this purpose. By removing the panel lining, we gain access to the matrix, which is screwed to the back cover of the TV.
On a note! In some cases, the mounting screws are duplicated with latches.
Next, you need to unscrew all the fasteners that are on the back wall of the TV, which blocks access to its electronic components. Then you need to disconnect all the cables that connect the matrix to the printed circuit boards located on its body.
Replacing the matrix
If all the above operations are performed correctly, then you can proceed with the replacement. Having placed a working matrix next to it, carefully transfer to it all the electronic components present on the faulty element. In this case, it is necessary to immediately connect the corresponding cables to them. Then, after wiping the edges of the matrix with a damp cloth soaked in alcohol, install it in place, secure it with standard fasteners, and then carefully connect the signal cable and power supply.
Advice! To make sure that the assembly and installation work was performed correctly, you need to turn on the TV - the screen should light up evenly.
Having made sure that there are no defects, we begin the final assembly of the television receiver housing. It is carried out in the reverse order of disassembly. The process of replacing the matrix ends with checking the functionality of the television receiver. Quite often, when you turn on a television panel with a new matrix, there is no image on the screen, which is due to its inconsistency with the control module. To eliminate this drawback, you need to configure the TV. The procedure for this is described in the service documentation included with the delivery of the television panel.
Removing the matrix with rear disassembly
This repair has a similar procedure, except that there is no front facing television frame, but this is partly the case, since there are quite a few models, so there are certain technological subtleties. In the future, the analysis of the control board, as well as the base of the matrix rigidity, is identical. Installation of the matrix is performed in the reverse order
When performing these operations, you can give a hint. If this is the first time you have decided to replace the matrix with your own hands, then it is recommended to record the actions using a camera. That's basically all. Remember and follow safety precautions, and carefully follow each step when repairing or replacing the matrix of a plasma or LCD TV.
There are a number of malfunctions of LG TVs that the owner can deal with on his own, for example, changing the fuse. Such work does not require special technical knowledge and experience, but there are other difficulties. In most cases, difficulties are associated with disassembling the TV, so we decided to devote this article to this issue and break down this process step by step.
Protection
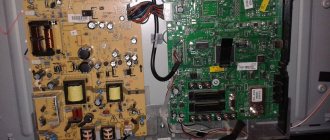
As soon as you put the cover aside, you will only see some parts of the TV, namely the power supply and the microcircuit, everything else is hidden under a metal protection, the removal of which will be the next step in disassembly.
First of all, we repeat the steps with the lid, that is, remove all the screws. Now, everything will depend on the design features, in some cases the speakers will interfere with you, they also need to be removed and put aside. Now the most important thing is that on almost all TVs such protection is additionally fixed in special grooves and recesses, this will be the most difficult part of disassembly.
Using a thin metal object, pry up each lock and release the protection; be as careful as possible so as not to damage the plastic parts and especially the device circuitry.
Matrix
Now you need to remove the protection. Considering that the power supply and circuit are attached to it, they are naturally connected to the TV matrix using a special cable. By slightly lifting the protection from one edge, the cable must be separated; this will require a little force. If all this seemed too complicated to you, contact the LG service center, experts on how to disassemble any LG TV, and will cope with the task in the shortest possible time.
All circuits and other parts are attached to ordinary screws, so removing them will not be difficult; it’s a completely different matter if you need to get to the backlight. In this case, you will have to remove the most fragile part of the equipment, the matrix, experience and skill are important here, the risk of damaging the screen is very high, and this is a very expensive replacement.
This article is also available in the following languages: Thai
Disassembling LG LCD TV: video
There are a number of malfunctions of LG TVs that the owner can deal with on his own, for example, changing the fuse. Such work does not require special technical knowledge and experience, but there are other difficulties. In most cases, difficulties are associated with disassembling the TV, so we decided to devote this article to this issue and break down this process step by step.
Spots appear on the image
Another common breakdown is oval, round or any shaped spots. They can appear due to defects in the glass or due to the destruction of the polarizing layer.
Abrasion of such parts is possible both due to manufacturing defects and due to improper transportation, storage and use of the device. When such spots appear on the LED TV screen, you only need to change the matrix.
In addition, the LED driver may fail or the LEDs in the screen backlight may burn out. To determine such a breakdown, you need to check the LED screen and how it works. How to check this? Turn on the TV using the remote control; if there is sound, but no picture, then the problem lies in the driver or you need to check the LED backlight. In this case, you can repair the LED matrix of the TV yourself, but to do this you should familiarize yourself with the issue and act very carefully.
Please note that to repair equipment you need to properly disassemble and reassemble it.
TV stand
Before proceeding with disassembly, it is necessary to provide a smooth, flat surface under the TV so as not to damage the screen in any way. Place the equipment face down on a table, for example, and unscrew all the bolts holding the stand; depending on the model, their location and number may differ. This process will not cause any difficulties; as soon as the fastening elements are removed, the stand will be free.
Do-it-yourself CRT (picture tube) TV repair
Television receivers confidently occupy one of the leading places in use among other household appliances. They are used by all family members, both for educational purposes and for entertainment. One family may have several televisions. In the living room, kitchen, bedroom and so on.
The popularity of these devices is explained by the presence of a large screen, which, compared to monitors, provides more comfortable viewing of video content.
In addition, not everyone loves and knows how to use a computer, especially older people. Therefore, with the advent of the Internet, televisions still remain popular among different ages and segments of the population.
Like any household appliance, televisions break down sooner or later. Therefore, it would be useful to know the causes of breakdowns of these devices in order to prevent them, and if this does happen, try to repair the device yourself.
I would like to note right away that a TV is a very complex and fragile household appliance. It should be handled very carefully. This is due to the fact that it has a picture tube or liquid crystal panel, which can be damaged if handled carelessly and then replacing them can cost 70% of the cost of the TV itself. Therefore, you need to be extremely careful with them.
As mentioned above, there are two main types of TV screens. This is an electron beam tube (CRT or kinescope) and a liquid crystal panel.
Rice. 1. CRT TV, which I will repair
A ray tube is essentially a large vacuum tube, inside of which there is a vacuum and in which the beam draws an image using deflecting horizontal and vertical coils. Due to the fact that it has an elongated shape, the thickness of the TV is quite significant.
Liquid crystal panels lack all this. The panel itself is a set of LEDs of three primary colors and located next to each other.
The image is obtained by applying voltage to each LED from the video processor and, depending on its value, different colors and shades are formed on the screen. The use of liquid crystal panels has significantly reduced the thickness, weight, and power consumption of such televisions.
We can say that these are completely different devices in design. The only thing they may have in common is the receiving part, the circuit responsible for sound and controls.
In this article we will talk about repairing a TV with a cathode ray tube or picture tube, since they are still actively used, and there is a better chance of repairing such a device than a liquid crystal one.
But when repairing such devices, you need to be very careful, since they contain high voltage up to 25 thousand volts, which are necessary for the operation of the kinescope. This is indicated by the warning signs affixed to the inside of the kinescope. This voltage may remain on the handset even after the TV is unplugged.
Therefore, you should be careful and attentive so as not to receive a life-threatening electric shock. But more on that a little later.
Let's look at the “symptoms” of a breakdown of the Rolsen TV model C29R70T.
It is worth noting that this receiver is assembled from components from Samsung and Philips, which indicates a similar circuit design for other TVs of this type. This means that both the causes and the repair of devices from other companies will be carried out using the same method as here.
And so, let's move on to the breakdown itself, namely, how it manifests itself (see Figure 2). At first the TV worked fine, but periodically the image disappeared, the screen turned black, and there was a white horizontal stripe in the middle. However, sound, remote control and other functions worked fine.
Rice. 2. White horizontal stripe on the CRT TV screen
Also, no extraneous sounds in the form of crackling or burning odors were observed.
Over time, the image disappeared completely, and instead of it, there was always a light stripe in the middle of the screen. It is noteworthy that if you tap on the body of the TV, the band expands abruptly, synchronously with the blows.
Everything indicated that there was no good contact somewhere. Now I had to find where.
It is very important to identify a possible breakdown by “symptoms” in order to limit the search area and not waste time on the working components of the TV. Moreover, unnecessary disassembly, rotation of the board and removal of connectors can lead to even greater problems than before.
For example, some wire may break, and there is also a danger of “destroying” one of the fragile radio components on the board with your hands or a screwdriver.
Therefore, it is very important to carry out a preliminary diagnosis whenever possible.
Whatever it is, the TV will still have to be disassembled. Therefore, we proceed to dismantling the rear protective cover.
To determine where the fastening screws are located, you need to carefully inspect the cover from all sides. The screws may be so hidden that you may not notice them right away. And one unscrewed screw will prevent the lid from coming off, and in doing so, you can break the attachment point.
Rice. 3. Unscrew the fastening screws
When moving or turning the TV, do not shake or hit it too much. This can lead to a break in the filament in the kinescope bulb, which will lead to its failure and there is no point in repairing the device further. Of course, with a cold spiral this happens extremely rarely, but sometimes it happens.
So, the screws have been found, all that remains is to unscrew them. As you can see, the screws may be in hidden places.
Rice. 4. Unscrew the screw in a hidden place
One of the most inconvenient was in the lower part, under the TV. To get to it, you need to lift the back of the case and unscrew the screw. It is better to do this together, so that one person holds the TV, and the other person unscrews the screw.
The fact is that the front part, where the kinescope is, weighs three times more than the back. Therefore, when you try to tilt the TV from behind alone, it may tumble forward so that you do not have time to do anything.
If you still haven’t found a partner, then you can put several heavy books in front. This will give the TV a rest when trying to tilt it.
Rice. 5. Screw at the bottom of the TV
When all the screws around the perimeter of the cover are unscrewed, we try to pull it back. To make it come out of the grooves better, the TV needs to be tilted slightly forward.
Rice. 6. Pull off the TV cover
When removing the cover, make sure that it does not change its direction of movement. If it is sharply pulled to the side, it can break the kinescope bulb on which the board with the elements is installed.
Rice. 7.
Rice. 8. We get access to the kinescope
The flask in this place is very fragile and has a significant narrowing. Also, when the lid is already removed, you need to be careful not to hit or snag this flask.
Rice. 9. CRT TV bulb
There is no need to touch or move the beam deflection adjustment levers, otherwise the image may not be clear later, and it will not be possible to return them to their original position without special devices.
Remove the lid and put it aside. When viewed with the naked eye, you can see how much dust is inside, both on the case and on the boards. If possible, it should be wiped off. Such dust becomes conductive and can cause short circuits and even fire.
Rice.
10. Wipe off the dust Due to the high voltage inside, all the dust from the room is attracted and settles near the elements of the high voltage converter.
Rice. 11. Dust inside the TV
Over time, current may shoot through it into the TV chassis. Therefore, dust must be removed. Even the manufacturers themselves recommend doing this at least once a year.
Take a rag and wipe the body both outside and inside.
You can see how much dust has accumulated on the surface over a couple of years of work.
Rice. 12. Dust on the surface of the board
It is also advisable to clean the board (see Figure 13). But not with a damp cloth, but with cotton wool soaked in alcohol.
When the cotton wool becomes dirty, it needs to be changed. This can also be done with a vacuum cleaner with a special brush attachment. In any case, you need to clean the boards carefully and slowly so as not to break anything.
Without dust, the board will cool better, which will prolong the life of its components.
Rice. 13. Cleaning the board from dust
Let's move on to troubleshooting. It is necessary to inspect the main board for burnt tracks and electronic components. To understand where to look for a fault, you need to know what conventional blocks the “stuffing” of the TV consists of, and which components are responsible for what.
The latest models of CRT televisions are built on a single-chip processor. These are mainly chips from Philips. The signal from the antenna input goes to the channel selector, where it is converted.
Rice. 14. Single-chip processor TDA9351PS/N3/1/1758
Next, the signal, after passing through some filters, arrives at this single-chip processor. Signals from the “tulip” and Scart connectors also come there.
Rice. 15. TV selector KS-H-148
It is processed and divided into audio, video signals and pulses necessary for the operation of the kinescope scan. Each signal comes out from a specific processor pin.
Further, it is either amplified using special microcircuits, or goes directly to the actuator.
The following signals can be amplified: low frequency (sound), video signal, vertical and horizontal scanning pulses. Each signal has its own amplifier, most often built on a microcircuit. Therefore, it’s a good idea to have a schematic diagram of a TV, which can be found on the Internet.
Rice. 16. Electronic filling of the TV board
Using Yandex search, you can determine which microcircuit is responsible for what.
This will make it easier to find the cause of the breakdown, paying special attention to the components of the corresponding unit.
Let's go back to our TV. Let's do a fault analysis. There is sound, the channels are switched, which means: the power supply, tuner, processor and sound amplifier are in order.
Please note that there is a horizontal stripe in the center on the screen. This indicates that the vertical scan is not working properly.
If the strip were vertical, attention would need to be paid to the horizontal scanning elements and the high-voltage transformer.
And so, the problem is the small amplitude of the vertical scanning signal. This signal is too small to sufficiently deflect the electron beam by the frame coils.
This means that the problem is most likely in the amplifier of this signal. Using a circuit found on the Internet for this TV, it was determined that this is a TDA8359J chip. It has nine pins and is located on a common radiator - heat sink.
On the board it is designated as D600.
Rice. 17.
Rice. 18. Fig. 19. TDA8359J chip (D600 on board)
Perhaps it has failed, or its wiring - resistors and capacitors. We carefully inspect the microcircuit itself and nearby elements for discoloration or swelling. Nothing like this is visible.
Next, pull the board closer and turn it over. The traces and soldering points are visible here. For a good result, it is advisable to use a table lamp and a magnifying glass.
Rice. 20. Board on the reverse side
Also, you should be careful not to touch the solder joints of the high-voltage electrolytic capacitor, so as not to get discharged.
You can short-circuit the terminals of the capacitor with a screwdriver to remove the charge and work quietly.
Upon careful examination, through a magnifying glass, of the soldering joints of the legs of the D600 microcircuit, a defect was found in the form of a tin crack around the pin of the microcircuit (see Figure 21). It is very difficult to notice, especially with the naked eye.
Rice. 21. Place for soldering the legs of the D600 microcircuit
This defect is very common in various techniques. The reasons are: low quality tin, thickened legs of the part and significant heating during operation. It’s not for nothing that this chip has a heat sink.
Another reason may be vibrations and the thin fiberglass from which the board is made. The manufacturer saved on the thickness of the material, but in the end we have this problem. The board really bends easily, which leads to solder cracks, peeling of tracks and other defects.
The way out of this situation is to carefully solder all the legs of the microcircuit. Be sure to use flux when soldering. Do not use acid under any circumstances, but only rosin.
You can solder the legs of other power microcircuits and massive components.
Soldering processor pins unnecessarily is not recommended. Since they are too close, they can easily overheat, or the legs can be shorted together. Then it will be very difficult to get everything back.
After soldering, use a knife or something sharp to remove possible microconnections between the board tracks, especially where the work was done.
We install the board back and try to turn on the TV. It is advisable to put on the cover, taking care not to damage the kinescope, while holding the Scart connector from behind so that the board fits into the seats.
Rice. 22. Install the board back
As you can see in the photo, the picture expanded to the full height of the screen and this means that the problem was precisely in the cracks in the solder legs of the vertical scanning chip.
Rice. 23. The picture is displayed well, the TV works!
Now you can screw the cover on and continue using the TV.
Protection
As soon as you put the cover aside, you will only see some parts of the TV, namely the power supply and the microcircuit, everything else is hidden under a metal protection, the removal of which will be the next step in disassembly.
First of all, we repeat the steps with the lid, that is, remove all the screws. Now, everything will depend on the design features, in some cases the speakers will interfere with you, they also need to be removed and put aside. Now the most important thing is that on almost all TVs such protection is additionally fixed in special grooves and recesses, this will be the most difficult part of disassembly.
Using a thin metal object, pry up each lock and release the protection; be as careful as possible so as not to damage the plastic parts and especially the device circuitry.
Matrix
Now you need to remove the protection. Considering that the power supply and circuit are attached to it, they are naturally connected to the TV matrix using a special cable. By slightly lifting the protection from one edge, the cable must be separated; this will require a little force. If all this seems too complicated to you, contact the LG service center, experts on how to disassemble any LG TV, and will cope with the task in the shortest possible time.
All circuits and other parts are attached to ordinary screws, so removing them will not be difficult; it’s a completely different matter if you need to get to the backlight. In this case, you will have to remove the most fragile part of the equipment, the matrix, experience and skill are important here, the risk of damaging the screen is very high, and this is a very expensive replacement.
You can contact the masters from our service center by calling or writing your question on the feedback form.
Your message has been sent.
Thank you for your request.
Author:
You might also be interested in
LG TV repair in 1 day
Order repairs from our service center and receive a working device on the same day, with a warranty of up to 1 year
Find out the exact time and cost of repairs Thank you, no need
Comments (0)
Add a comment
Leave your question using the feedback form and the specialist will call you back and answer without imposing any services.
Our service center is often contacted with the problem of a cracked TV screen. The most common cause is mechanical damage to the TV matrix as a result of an impact or equipment falling to the floor. As a rule, the main culprits of such breakdowns are children or pets (most often cats).
Here is one example of children and pets playing. The child was chasing a cat around the apartment and ended up knocking over the TV. A very decent device, model LG 55LA690V-ZB, was damaged. At one time, the owners of this equipment paid almost 2 thousand US dollars for it. And it took just a few seconds for a runaway child and a cat to turn it into trash...
We cannot convey all the grief and anger that wafted from the parents of a sloppy child and also the owners of a cat. First of all, we asked them not to move the cat to another place of residence, which is intended for the disposal of municipal waste (garbage dump). And also do not apply harsh measures to the child.
Before us, they addressed this problem to one of the official services of the manufacturer of the damaged equipment (LG). It announced the cost of replacing the matrix - 1,400 rubles (about $700). The funny thing is that the real cost of such a panel on online flea markets like “Online” or “Kufar” rarely exceeds 1000 rubles (500 US dollars). Having contacted our suppliers, we found out that no one would ship such a matrix to us at a price below 1,200 rubles (600 US dollars).
You probably have a lot of questions swirling in your head that are related to this kind of screen breakdown. In this article we will try to answer your questions as informatively as possible in the form of a question and answer.
Is it possible to repair a cracked TV screen (matrix) or is only an expensive replacement left?
Unfortunately, screen repair is not possible. The design features of the screen do not allow eliminating mechanical damage. The only option to restore the TV's functionality is to replace the panel.
Conclusions: repairing the matrix is not possible; unfortunately, the only option left is an expensive replacement.
Where does such a cosmic cost of replacing a TV matrix come from?
As a rule, the price of the matrix of the total cost of TV is 80 - 95 percent. This is due to the fact that the production of the matrix itself is a very expensive thing. The cost of a screen manufacturing plant ranges from 2 to 10 billion US dollars depending on the generation of production lines and their technological capabilities. In addition, the panel itself is a large item - therefore, the cost is significantly affected by high logistics costs. Due to its size, large storage facilities are required, which again entails increased costs.
Conclusions: the matrix cannot be cheap and its cost is 80 - 95 percent of the cost of the TV.
From the information presented above, another question arises. If the matrix costs 80-95 percent of the cost of the TV, then in practice its replacement may cost more than the cost of such a working TV at a flea market?
Everything is very simple here. The only supplier where you can order a matrix for a damaged TV without any problems is the manufacturer of the damaged equipment itself. Provided that he has warehouse stocks of the required spare parts. When shipping the matrix, the TV manufacturer relies on its purchase price. In simple terms, it looks at how much it cost the company. Naturally, the production/purchase of the required matrix model occurred at the same time as the production of the TV. But several years have passed since the production of the TV, and the TV that includes a broken matrix has lost in price. And the manufacturer produced (purchased) this matrix at the time of TV production (at the peak of price).
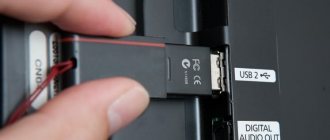
Where to get working parts for replacement
Ready-made LED strips can be ordered for a specific TV model . They take quite a long time to ship. It is possible, after determining the markings of the diodes or their operating voltage, to buy new ones on Aliexpress or in another online store. The delivery time will also not please you with efficiency.
The best option for many is to visit service centers and repair shops. It is almost always possible to find a donor - a TV with the same diodes. By unsoldering them and installing them on your backlight, you can quickly and fairly cheaply return it to functionality.