Remove the washing machine drum if there is a disposable tank
If you need to twist a disposable tank, then after repairing the machine you will need to replace it with another one, it is best if it is no longer disposable. We will look at the method of disassembling the drum in more detail below. The need for this arises when you need to separate the cross from the drum. The crosspiece needs to be replaced if the bronze bushing wears out.
Finally, a few tips on how to properly care for your laundry assistant so that it lasts longer and you no longer need repair recommendations.
- Wipe the exterior and interior of your machine regularly to remove water stains. You can use a solution of dishwashing detergent on the outside; just wipe the inside of the drum with a damp cloth.
- After each wash, leave the hatch door open for a while to allow any remaining water from inside to evaporate.
- Periodically wash the conditioner container without using household chemicals.
- If the quality of the wash has deteriorated, and an unpleasant odor appears in the machine, then deep cleaning is necessary. To do this, you can purchase a special product in the store, or prepare it yourself. Simply mix 1 tablespoon of powder with ¾ cup of bleach. The resulting mixture must be poured into the machine and run a pre-soaking cycle, and then turn it on for rinsing. After completing the process, make sure that all the solution is removed from the drum.
- If you use the top surface of the machine as a shelf, cover it so that it does not get scratched or dirty. Do not place sharp objects on it and avoid contact with corrosive substances.
- It is advisable to change the connecting hoses for draining and collecting water every 5 years and regularly inspect them for wear and cracks.
We invite you to familiarize yourself with the operating features of Kandy washing machines
By following these simple rules, you will be able to keep your machine in working condition for a long time.
Reasons for dismantling the crankshaft
Dismantling the crankshaft on a VAZ-2114 may be required in the following cases:
- The reason that comes first is most often the replacement of the timing belt and other work
that is somehow related to the gas distribution mechanism. Work should be carried out in accordance with the regulations, or if the mechanism fails. - Another reason for dismantling is the crankshaft. They are changed when oil leaks occur in the places where they are installed.
Pulley fastening
On all VAZ-2114 vehicles without exception, the crankshaft pulley is fixed using a massive bolt, which can cause problems when removed.
A curved spanner wrench is good for fixing.
- First of all, this is due to its location, since it is difficult to securely and securely fasten the key or socket head.
- Secondly, even if you managed to position the key correctly, you will have to make every effort to dismantle it
. This is due to the fact that at the factory it is tightened as tightly as possible in order to avoid the facts of self-unwinding. Also, the right-hand thread may not be the best for unscrewing it, which during operation only screws the pulley in tighter and causes the part to stick.
When performing work to remove it, it is best to keep WD-40 on hand.
Tool for getting the job done
To make the work easier, you need to prepare the following tool:
- Jack.
- Wheel chocks.
- Pry bar and flat blade screwdrivers.
- A set of keys.
- Socket heads and extension.
It is best to carry out such work on a lift or inspection pit.
Self-diagnosis
Before removing or checking the condition of the drives, you must:
- Turn off power to the equipment, and then disconnect the water supply and drain lines.
- Remove the side covers and rear wall to gain access to the belt drive. On some machines, the belt drive is covered with an oval-shaped shield, which is attached to the body with Phillips-head screws.
- Place the machine on the side surface of the body.
- Remove the belt from the pulleys, loosen the motor mount to reduce tension, or remove the belt manually (by holding the rubber element with your hand while simultaneously rotating the impeller on the drum).
Self-diagnosis consists of inspecting the impellers and drive belt.
It is recommended to manually rotate the motor and drum shafts, which will allow you to determine the axial runout of the drive elements.
The supports are checked by rocking the shaft by the outer edge of the pulley manually or using a mounting blade. If damage, distortions or rolling bearings with increased play are detected, it is necessary to remove the pulleys to repair the washing machine.
Reasons for pulley failure
The pulley is a ring with a groove corresponding to the profile of the belt used. The outer part is connected to the hub using spokes reinforced with stiffeners. The part is cast from reinforced plastic or aluminum alloy, and then goes through a dynamic balancing stage (to reduce vibration of the equipment during operation). Old-style machines used a belt with a trapezoidal profile; Indesit, LG or Bosch front-loading equipment uses a poly V-belt with increased strength.
Common causes of failure of a part installed on the motor:
What are the options for mounting the unit?
To remove the pulley from the electric motor that drives the tank using a belt, you must first determine the type of its fit.
Mounting methods differ in appearance and are defined as:
- spline connection (has a serrated edge of the shaft end);
- “hot” landing (the end of the engine axis is visually smooth and completely round);
- keyed fit (a groove is visible at the end);
- fit on a cone with a lock nut (the presence of fasteners is visually noticeable).
Automatic washing machine drive pulley
The vast majority of modern front-loading washing machines (Indesit, Bosch, Electrolux, Elgie and others) are equipped with a serpentine belt drive. Their pulley looks like a cylinder with transverse annular grooves. The fit of the part is usually splined or hot. The large wheel that turns the tank is usually secured with a locknut or screw.
Activator-type machines and older frontal models with a bottom-mounted motor are equipped with a conventional V-belt, and the pulley for them has deep flanges that prevent the belt from slipping off. These parts often have a keyway and a threaded connection.
Step-by-step instructions for replacing a washing machine pulley
Are you thinking about how to remove a pulley from a washing machine drum for further replacement? Take your time! Now we will tell you everything in detail and show you!
Disconnect your equipment from the power supply
The pulley, although not directly connected to electricity, is located next to the wires. It’s better to protect yourself from danger in advance, because this way you eliminate the risk of injury!
Remove the top cover
Unscrew all the fasteners that hold it in place.
Also remove the back panel and the belt on the pulley
The photo shows its appearance. In principle, there is nothing similar to it, so you will find it without difficulty.
Lock the wheel in one position
You can do this with a rope or a block inserted into the holes on the pulley.
Heat the mounting bolt with a soldering iron or use WD-40, then remove the mounting bolt
You can’t just pull it out, so these tips will help you with this.
Remove the wheel from the main shaft
Just pull it towards you. It should come off easily. If it’s difficult for you to do this, then you missed something in our instructions.
7. Carefully replace the part with a new one and reassemble the washing machine
To do this, you can read our instructions backwards. The actions will be the opposite.
Congratulations - you have coped with a complex repair, you are a real DIYer!
If you need spare parts for self-repair, purchase them from us: the widest range, fast delivery throughout Russia and a guarantee on everything.
How to remove the drive from the drum
To remove the pulley from the drum of the washing machine, you need to stop it using a wooden block (hammer handle, etc.) inserted between the spokes of the wheel, and at the same time unscrew the locking screw (or nut, depending on the model) located at the end of the drum shaft .
If the nut on the washer drum does not respond to force by hand, it should be treated with WD40 liquid or slightly heated using a hand torch. You can remove a “stuck” fastening from its place by sharply hitting the handle of a wrench placed on the nut or the end of a powerful screwdriver inserted into the groove of the screw.
Removing the Drum
Before you can begin to actually disassemble the drum, it must be removed; the operation algorithm largely depends on the type of machine, the specific model and its manufacturer.
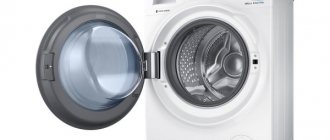
Front loading machine
This type of machine is the most common. The process of removing a drum from such a machine is a rather complicated procedure, but with persistence, attention and accuracy, any job can be completed.
Before starting disassembly, it is important not to forget to disconnect the machine from communications, turn it off and remove the plug from the socket.
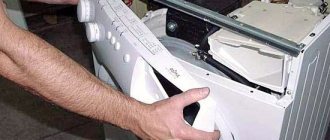
- After unscrewing several bolts holding the top panel, it is moved back and removed. Access to the insides of the device is provided.
- Unscrew the bolts securing the rear wall. They take it off.
- By turning the pulley, remove the drive belt.
- Disconnect all wiring going to the drum.
- Unscrew the bolts securing the electric motor.
- If the model has an upper counterweight, remove it.
- Remove the detergent tray. In most models from LG, Samsung, Indesit and a number of other manufacturers, it is held in place by a plastic latch.
- Disconnect the supply pipe.
- Unscrew the bolts holding the control panel.
- Carefully remove the panel.
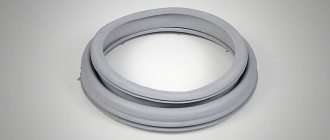
- Loosen the clamp securing the cuff of the loading hatch and tuck it inside the drum. It is important not to forget that the cuff is made of soft material and is very easy to damage.
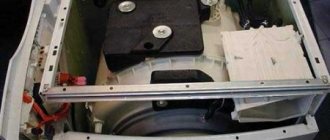
This will open access to the drum, hanging freely on springs and shock absorbers. You can remove it. In some models of washing machines, in particular those manufactured by Samsung, it will be easier to work if you first remove the front panel and unscrew the lower shock absorbers.
Top loading machine
These devices are distinguished by excellent functionality with very modest dimensions. A top-loading washing machine has a hatch at the top. The drum is fixed in it with bolts. Due to significant differences in design, disassembling the device looks slightly different.
- They turn the car around.
- Unscrew the back wall by unscrewing several screws.
- Move the side walls aside and dismantle them.
- Remove all interfering electrical wiring.
- Unscrew the bolts securing the plastic cover.
- Release the shaft and remove the drum.
Regardless of the type of machine, it would be useful to take step-by-step photographs during the work. Having your own instructions with a photo will make subsequent assembly much easier and will protect you from the appearance of “extra” spare parts.
Collapsible drum
Most models of modern washing machines, this is true for models from famous manufacturers: LG, Samsung, Ariston and others, have a collapsible drum, which significantly simplifies any repair work associated with it. Structurally, it consists of two halves, which are bolted together. Along the joint line there is a gasket or a layer of sealant, which ensures ease of disassembly and tightness of the drum.
Most often, disassembly is not particularly difficult, you just need to perform a number of actions in the following sequence:
- place the drum on a flat surface with the hatch down;
- jam the pulley using a small wooden block;
- Use a socket wrench or a socket with a ratchet to unscrew the bolt securing the pulley;
- after the pulley is removed, use a wrench of a suitable size to unscrew the connecting bolts;
- The halves are easy to separate; you may need to apply several light blows to the shaft with a mallet or a regular hammer through a wooden block.
When planning to unscrew a pulley, you must be prepared for the fact that the bolt will resist. If this is the case, you should not try to unscrew it “forcibly”; it is easy to tear off the edges, or even break the rod, as a result of which the repair will take a long time. Before unscrewing any bolts inside the washing machine, you should use WD-40, this will make the work easier and ensure the safety of the original fasteners.
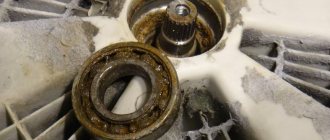
After the drum is disassembled, you can proceed directly to replacing the bearings or removing foreign objects that have jammed the machine. If the task is to remove old bearings, it is better to use a screw-type puller. You can preheat the bearing, but you must use a torch or blowtorch with extreme caution so as not to damage the drum itself.
When changing bearings, it is important to pay attention to the condition of the sealing seals. If they have lost elasticity, there is a lot of wear or mechanical damage, the seals are replaced along with the bearings. Afterwards all that remains is to assemble the car; this is done in the reverse order. Of course, before assembling the drum, a layer of sealant must be applied to the parts being connected.
How to get to the details
The process of disassembling washing machines of all brands must begin by de-energizing the device, draining the water and disconnecting from communications. An important condition is to ensure free access to all parts of the device, so it must be moved to an empty, well-lit place.
On an Indesit washing machine, the unit is dismantled together with the electric motor. To get to it, you must partially disassemble the device.
To work you need to prepare the tools:
- screwdrivers (flat, Phillips or star);
Slotted screwdriver
- pliers;
- a set of keys or heads (mainly two sizes are needed: 10 or 12 and 17 or 19, depending on the model);
- bearing puller (universal with three “claws”);
Bearing puller
- hand-held gas burner or hair dryer (optional);
- rags, liquid for treating soured compounds (in difficult cases).
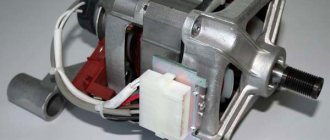
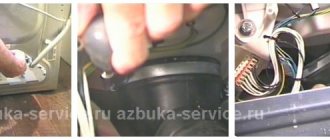
The sequence of actions when extracting an engine from a washing machine using an Indesit brand device as an example:
- Remove the top cover of the device by unscrewing the two screws on the back wall.
- After removing the fasteners along the edges of the back wall, set it aside, at the same time inspecting the surface of the drum for abrasions or tracks from water leaks. Wipe off any graphite dust from the brushes.
- Remove the belt: pry it up with your hand or a screwdriver, slowly turning the larger wheel.
- Unscrew the two bolts securing the electric motor and pull it out.
The removed engine must be cleaned of dirt and fixed on a workbench or table. Next, tighten the puller onto the part and heat it locally using a burner or hair dryer to a temperature of 100-150°C. This will destroy the epoxy compound that coats the splines at the factory. The part of the shaft entering the bearing and the adjacent part of the motor must be insulated from high temperatures. The easiest way to do this is with a wet rag, after making sure that excess moisture does not get inside, onto the windings.
Without a puller (purchased or homemade), it is impossible to pull the part off the shaft without ruining the entire assembly.
The video will help you understand how to remove the pulley from the motor of the Indesit washing machine.
Possible difficulties
If you have no or insufficient experience in repairing washing machines, you may encounter a number of difficulties, including:
- broken wires;
- cuff tear;
- breakage of the pulley when removing it from the axle;
- breakage of the bolts on which the parts are attached;
- breakage of pipes;
- deformation of the bushing during bearing removal.
To avoid such troubles, you need to act carefully, applying a minimum of effort. Otherwise, the damaged part will have to be replaced. If the wires are inexpensive, then if the bushing breaks, you will have to buy a new drum.
Withdrawal procedure
To remove the pulley from the washing machine drum yourself, you will need a screw puller for rolling bearings. The central nut is first unscrewed (not available on all installations), which can be kept from unscrewing spontaneously by a metal washer. Then the legs of the device are inserted between the spokes and rest against the rear part of the hub, the screw is located in the centering hole on the axle. When the handle rotates, the part is smoothly pulled off the shaft without damaging the mating surfaces.
How to unscrew the crankshaft pulley nut?
This procedure is easier to perform using a lever and an extension for it (you can use a relatively long piece of pipe), as well as a socket or socket wrench (38 or 36). A nut, called a “ratchet,” is usually used to secure pulleys on rear-wheel drive vehicles. Such a nut usually has special ledges.
To remove it, you need to get under the car and try to unscrew the element with a wrench and extension. In cases where it absolutely does not lend itself, the gearbox should be put in neutral, the spark plugs should be removed, the key and lever rested on the side member or floor, and an impulse should be given by turning the ignition switch. After this procedure, the nut easily comes off on the first or second try.