Household appliances are a reliable assistant in household chores. All modern families have a washing machine at home. It makes taking care of things easier and faster. With all equipment in use, problems arise. Most often, owners of an automatic washing machine complain about noisy vibration. This is not a harmless sound at all; it can lead to serious damage in the future.
Specialized anti-vibration stands are designed for installation under the legs of a washing machine.
This accessory dampens vibration, prevents damage to the floor covering and prevents unwanted movement of the machine during operation.
Purpose of anti-vibration stands
Installing an anti-vibration stand is the surest way to save yourself from loud noise and damage to the floor covering. This is a small part that can troubleshoot problems with household appliances. A recently purchased washing machine is equipped with new accessories and additional protection.
Anti-vibration stands for washing machines are products that extend the service life.
Bearings, dampers, shock absorbers are parts that prevent strong vibration in modern technology. A machine that has been in active use for a long time begins to lose its original characteristics. Parts wear out, vibration occurs, and you cannot do without a special stand for the washing machine.
These useful devices prevent noise and premature wear of washing machines.
The main functions of the anti-vibration stand.
- Limits noise and vibration levels.
- Provides stability.
- Prevents scratches on the floor.
- Eliminates the problem of uneven floors.
This is an inexpensive, accessible way to reduce vibration and rattling during washing.
Installing the machine into the wall
This option is non-standard, but very effective. This is because in this way, you don’t have to take up space on the floor with the washing machine. Thus, you will make the room more free.
If your house is full of holes in the walls for various wiring, or has a closet, then transform it all into a place where you can put a washing machine. You may need to drill out and widen the hole in the wall a little. But there will be a washing machine installed there, which will not interfere and take up space on the floor.
For reliable operation of the machine, it is important to secure the product well. To do this, you first need to drill holes in the wall for the bolts on which the straps installed at the back of the machine will be attached. It is also important to check the stability of the bottom of the wall closet. If there is a risk that the washing machine will fail, then you should crush and concrete the entire lower opening.
How do they look
Anti-vibration stand for a washing machine, round or square, made of polymer material, with a height of 45 to 50 cm. A set of such stands consists of four pieces, mostly white, gray, black or transparent. Transparent linings are made of silicone. The upper side of the lining resembles a cap; we put the machine leg on it.
The side that stands on the floor has a relief surface.
These devices are made from raw materials with high shock-absorbing properties.
Stand made from an old car mudguard
A mudguard is a plastic or rubber visor over a car wheel that prevents or minimizes the splashing of dirt from under the wheels of the car. If you have an old dismantled rubber mudguard, making a stand will be a piece of cake.
- You need to place the splash guard under the foot of the washing machine and trace it along the contour: you will get a small hexagon.
- Step back just a couple of centimeters from the edges of the resulting figure and draw another hexagon with a larger diameter.
- In place of the small hexagon there should be a niche for the SM leg, but cutting out the hole completely so that the leg stands on the bare floor and is only surrounded by rubber makes no sense. Therefore, we begin to make a niche.
- Take a sharp knife or scissors and cut out the inner hexagon.
- Now you need to cut it lengthwise, in half, as if cutting off its upper part.
- After this, all you have to do is insert the resulting trimmed hexagon into the larger one, and your footrest is ready.
Attention! If the rubber is soft, you can try to pick out the hole right away without cutting out the inner hexagon. But if it doesn’t work out, immediately proceed to the method described above, it is quick and not labor-intensive.
What causes vibration?
If the machine was installed by a master, there should be no complaints or complaints about its work. Errors in installation most often occur if the users themselves did it. There are many reasons for problems, let’s look at the main ones.
These pads are inexpensive and often used.
- Overload. All devices have instructions for use, which indicate the maximum possible filling. If the machine is designed for 5-6 kg, and 8 were loaded into it, then noisy washing is guaranteed.
- Foreign object between the tank and the drum of the machine.
- Uneven loading. Distribute the laundry evenly throughout the drum, otherwise the centrifugal force will swing the device in different directions.
- Level. If the floor in the room is slightly at an angle, and the device is installed incorrectly, without maintaining the level.
- Wooden floor. The problem is that individual elements of this type of coating tend to shift. The surface becomes unstable.
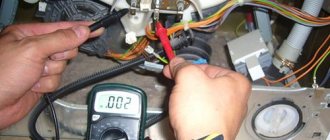
- Breakage of parts or wear of the system. Failure of the bearings will lead to a decrease in the mobility of the drum, and damage to the counterweights will lead to displacement and vibration of the machine.
- Transport bolts. If the unit was purchased recently, make sure that the bolts that secure the parts during transportation have been removed.
Analyzing user reviews, it should be noted that the mats dampen vibration, but do not eliminate noise.
Manufacturers make stands both in the form of regular washers and in fancy ones, for example, in the form of paws.
Note! Before loading the next load of laundry, make sure that the machine does not wobble. Incorrect installation will certainly lead to breakage and the appearance of microcracks on parts.
Types and criteria for choosing anti-vibration stands
You should choose a stand for an automatic washing machine based on its parameters. Key criteria to consider.
Buyers are attracted by the low cost and wide selection.
The devices can be installed separately by lifting each edge. This is available to any buyer.
- Size and shape. The backing should fit snugly against the machine, so it is important to correctly measure the diameter of the legs. Pay attention to the shape: circle or square, choose the appropriate stand. You can find interesting options in the form of animal tracks. It's all a matter of taste.
- Color. Does not affect the quality and characteristics of the product in any way. This parameter directly depends on the color of household appliances and the design of the room.
- Diameter. This parameter affects stability. The larger it is, the better the substrate copes with its task.
- Material. Both silicone and rubber pads do their job well. The only difference is price, appearance and durability. Silicone will cost a little more than rubber. There is a risk that over time the rubber product will come apart; silicone is considered a more wear-resistant material.
You should not choose the cheapest products; they may be made of low quality material and have an unpleasant odor.
You can save money by making your own coasters.
Making a podium with your own hands
Creating a useful thing on your own is a simple process. Construction will require inexpensive building materials and a minimum set of tools. The device must be stable and reliable, able to withstand not only the weight of the machine, which sometimes reaches 80 kg, but also the load due to vibration. To create such an elevation you may need:
- concrete blocks or foam blocks;
- silicate or ceramic brick;
- wooden beam;
- steel channel or metal corner;
- polycarbonate plates;
- dry concrete mixture.
DIY option
Less durable, but much more aesthetic materials are suitable for cladding:
- ceramic or tiles;
- waterproof drywall;
- PVC plates;
- plastic;
- laminated or waterproof chipboard.
In addition, you need to prepare a standard set of tools that can be found in any home craftsman’s pantry, as well as dry cement mixture and tile adhesive. To work you will need:
- construction pencil and square;
- tape measure or measuring tape;
- crosshead screwdriver;
- hacksaw;
- drill;
- level;
- electric screwdriver;
- bucket;
- Master OK.
Do you wash your shoes in the machine?
Oh yes! No
The manufacturing process may vary depending on the degree of complexity, the chosen design and the materials used. When installing the podium, you must ensure that it does not block access to the sewer system and water supply. Otherwise, the inlet hose cannot be installed and the device will not be able to operate.
Expert opinion
I work in the household appliance repair industry. Extensive experience in restoring washing machines and dishwashers.
Ask a Question
It is important that the surface of the pedestal is strictly horizontal. When installing, check the plane with a building level. A prerequisite is ideal smoothness and absence of changes.
To compensate for vibration loads, a damper tape, isolon or polyethylene foam is laid under the machine. The finishing is done with plasterboard and tiles that match the shade and texture of the walls or floor. It is attached to a special moisture-resistant glue, having previously treated the surface with a primer.
Podium for compact SMA in the bathroom
Anti-vibration mat
If the machine is new and the floor in the room is relatively flat, then an anti-vibration mat will be enough to eliminate noise. The materials used to make this product are durable and wear-resistant. It will last more than one year. It is very easy to install: lay it under the unit. This is not a budget option and will cost more than a set of legs.
Ease of installation and durability are its strengths.
How to install?
- Disconnect all hoses from the water supply and place the equipment on its side.
- Clean the legs; they should be free of rust and other irregularities.
- Adjust the feet so that the washing machine stands level and does not wobble. To carry out this operation you will need a level and a wrench. By rotating the leg clockwise, it increases in the upward direction, and if you rotate it in the opposite direction, it decreases downward.
- Place the stands on the legs of the washing machine. Modern rubber products adhere well to the surface of any coating.
- Test the machine.
If the unit continues to rock, repeat the installation from the beginning again.
Causes of vibration and noise
Normally, any household appliance, including a washing machine, should operate without strong vibration and without exceeding the permissible noise level specified in the instructions. And of course, it should not break away even at moments of maximum load and performing certain operations.
If this happens, you need to look for the reasons for the occurrence of such features. They can be hidden either in the device itself or be associated with installation errors, the most common of which is failure to maintain the horizontal level.
It is important to install the machine level, otherwise vibrations may occur.
It is because of the misalignment that vibration most often occurs, since the center of gravity in the unit shifts. But you can easily fix it yourself by simply tightening the legs of the washing machine. They are adjusted by simple rotation around their axis.
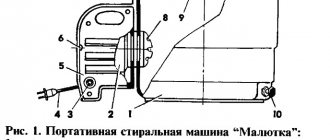
Washing machine legs
Adjusting the support legs
- When rotated clockwise, the support extends from the base and becomes longer.
- When rotating counterclockwise, the reverse process occurs - the leg shortens.
To achieve the ideal position of the device, you need to place a bubble level on its lid and adjust each support in turn until the bubble reaches the central position. Then you need to tighten the fixing nuts, pulling them towards the body.
There is no need to immediately twist the legs as much as possible
Advice. If there is no level, you can use a glass jar or glass of water with a horizontal mark on the wall. Or download a special program to your phone and use it instead of a construction device.
Construction level in a smartphone
Table. Causes of noise and vibration.
| Cause | Description and solution |
The transport bolts were not removed | During installation, the shipping bolts that hold the washing machine drum in a fixed position during transportation were not unscrewed. This is a temporary fastener that must be removed before putting the unit into operation. This can be done without the help of a specialist. |
Unsuitable base | The behavior of the washing machine during operation largely depends on what it stands on. The surface must be smooth and durable. It is better if it is a concrete floor or non-slip tiles. It can move on smooth tiles at the slightest vibration, boards laid on joists will take the load differently, etc. |
Incorrect loading of laundry into the drum | Incorrect loading of laundry into the drum, causing imbalance during operation. This happens when you overload, wash fabrics of different thicknesses or bed linen, small things get into the holes, turning into a lump. Therefore, it is better to wash thin and terry items separately, as well as large and small laundry. |
Bearing failure or seal wear | A bad bearing or worn seal can also cause vibration and loud noise. You should not change them yourself, especially if the machine is still under warranty. This is a job for service technicians. |
Things getting caught in the drum | It could be a sock, a bra wire, a lighter - anything. We must try to get them out. |
Video - Strong vibration during washing or spinning
DIY stand for washing machine
Another option is to make your own anti-vibration stands for the washing machine.
If hand-made products do not reduce shaking, then it is better to purchase ready-made ones without spending additional effort and time.
If the device does not vibrate when you press on the corners, then the vibration during the spin cycle will disappear.
Made of rubber
If you have pieces of rubber on your farm, you can cut out pads from them yourself. To do this, you need to know the exact parameters of the legs and cut out elements of the required shape for them.
The resulting cut out parts are placed under the machine.
From an eraser
Take four erasers and glue them together with superglue. Use a sharp object to make an indentation in the center.
The required diameter and shape can be adjusted by making constant fittings during work.
Frame stand
You can build a stand that will slightly raise the machine above the floor level. The height of such a stand will be 45-50 cm. The front part is retractable, you can store detergents or washcloths in it. The leg mounts are made in such a way that they securely fix the machine to the stand.
Proper installation and a level surface will eliminate additional noise and vibration.
Make sure you have the necessary materials and tools on hand.
- Glue for installation.
- Drill.
- Self-tapping screws.
- Plywood.
- Wooden beams 10 by 10 cm.
- A circular saw.
Before manufacturing, you need to know the size of the bottom of the machine leg.
Self-production of vibration mounts
If you decide to make anti-vibration stands yourself, you cannot do without:
chipboard sheet;- wooden beam;
- self-tapping screws;
- glue;
- facing materials;
- metal corners;
- locksmith tools.
Measure the dimensions of your home helper, cut out the top and bottom of the box. The width of the stand should exceed the width of the machine by 5 cm, the side parts are at your discretion (about 50 cm). Cut the timber to size. Assemble the frame and attach the chipboard walls with self-tapping screws. Iron corners will strengthen the structure . The finished stand is covered with facing material. A rubber mat is placed underneath and the legs are fixed.
The middle niche can be adapted for storing dirty clothes or cleaning supplies, which is good for small spaces. Moreover, the noise of the washing machine during operation will decrease.
Anti-vibration stands for washing machines
Work process
- Measure the length and width of the washing machine and legs, add 5 cm to the resulting numbers - these will be the parameters of the stand.
- Saw the beams and plywood in accordance with the obtained parameters, sand the wooden blanks.
- Assemble the wooden parts using self-tapping screws. Attach all four walls of plywood sheets with glue, additionally securing with self-tapping screws.
You can install it under the supports gradually, lifting each corner and placing the fixtures in stages.
Important! Before installing the machine, place a rubber mat under the frame; it will serve as additional protection against vibrations.
Installing the pads does not take much time.
Eliminating the mobility of equipment will extend its working life, it will not wear out so intensively. After fixing a special stand for the washing machine, the issue of vibration will no longer be a concern.
They will not only relieve you from noise and vibration, but also protect the floor from deformation and scratches.
Features of operating a washing machine on a podium
Many users fear that a washing machine installed on a podium will move during the spin cycle due to strong vibration and may fall. This worry is in vain, because to protect the equipment, protective sides are installed that will stop the device moving towards the edge.
When making a platform, you need to carefully calculate its height. It may happen that it has become more convenient to load and remove laundry from the washing machine, because you don’t have to bend over, but pouring detergent into the ditch is more difficult, because it is at a high altitude. This problem is especially relevant when constructing a high platform behind the toilet. Of course, you can pull out the loading tray, but this method is suitable for dry powder, not liquid laundry detergent. To avoid such a mistake, the height of the stand should be selected so that it is comfortable to load laundry and add washing powder.