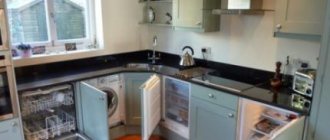
The prices for the services of an air conditioner installation technician are close to the cost of the equipment, so many people prefer to do it on their own. To perform technical work, you need to know how to install an air conditioner yourself in an apartment or office. The procedure is not complicated, but it requires care and attention.
Before installing the split system, check:
- Electrical wiring. If the house has old cables, aluminum wires, or no grounding, you cannot install an air conditioner. The power of electrical plugs is also important. They must withstand the current specified in the equipment passport + a small margin.
- The outer part of the walls. The method of fastening and the depth to which the brackets can be installed depend on the building material.
- Availability of socket. It should be no higher than 50 cm from the level of the floor, radiators, and various pipes.
If non-compliances with standards are identified, they must be eliminated before installing and connecting the equipment. Otherwise, the wiring will burn out or the equipment will not last long.
Standard equipment
After purchasing an air conditioner, the consumer receives:
- 2 blocks – indoor and outdoor;
- Filters;
- Remote control (batteries not included);
- Copper tube (the availability of such a part depends on the manufacturer, since not everyone includes it in the kit);
- Drainage pump (in expensive models);
- Warranty card and registration certificate.
The absence of elements necessary for installation of a split system is explained by the fact that the conditions for installation are different and differ significantly. It is impossible to provide for the length of the cable, drainage pipe, the entire route, as well as the installation location and method of fastening.
Some companies additionally equip systems with devices for operation in winter. This:
- Oil heater. It prevents the liquid from thickening and thereby ensures reliable lubrication of the engine. Otherwise, oil will not flow into the compressor and it will run dry. This situation leads to rapid wear of split systems and a decrease in the efficiency of equipment.
- Heater for drainage tube. It heats up the condensate, preventing it from freezing and blocking the hose.
- Regulating device for controlling condensate pressure. With its help, the operation of the fan is controlled and the outdoor unit is not covered with a crust of ice.
A winter kit is purchased if you plan to use the equipment all year round.
Air conditioner efficiency
How efficiently the equipment will operate and how much electricity will be consumed depends on the specific operating conditions.
Condition one. Let's assume that a heating device is installed next to the air conditioner. Then the compressor:
- will work almost continuously;
- will consume a lot of energy;
- will soon fail.
Condition two. Ordinary dust that has penetrated inside the system can reduce the performance of the air conditioner and even disable it. So you should carry out wet cleaning at regular intervals and quite thoroughly.
Condition three. It is not permissible to place any objects on the surface of the block.
Condition four. The air conditioner should not be covered.
Condition five. Evaporation of the refrigerant can be prevented if, when installing the system, you carefully seal any connections and joints.
Condition six. The outdoor unit should be located lower than the indoor unit. To install it, you need to choose the coolest zone on the outside of the wall. For example, an eternal shadow can be formed by a roof overhang.
If all the above conditions for installing an air conditioner are met, then the system will operate smoothly, creating the desired comfort in the premises.
Installation materials and tools
To install a split system yourself you will need:
- 4-core cable with a diameter of 2 – 2.5 mm² (the exact parameter is indicated in the equipment passport);
- L-shaped brackets for installing the outdoor unit. Their load-bearing capacity should be 4 to 5 times the weight of the outer housing of the air conditioner. Before properly installing an air conditioner in an apartment, calculate the safety margin. This is necessary for reliable fastening in difficult weather conditions - snow, gusts of wind, icing. The dimensions of the brackets must correspond to the dimensions of the outdoor unit.
- Seamless copper tubes with thick walls (if they are not included in the factory configuration). Diameter in 2 options – larger and smaller. To install the air conditioner, choose special soft copper that can be easily flared. This material is used in the refrigeration industry. The length of the pipes corresponds to the length of the route + 30 cm. To prevent dust from getting inside the pipes, they are transported with capped edges.
- Rubber insulation for copper pipes. The length of the segments is equal to the length of the route. For each diameter of copper pipes, select a separate insulation material.
- Corrugated hose with an internal plastic spiral. This consumable is used as a drainage pipe. Sometimes a propylene pipe is installed instead. The length of the drainage tube is 80 cm longer than the length of the route.
- Plastic box for communications.
- Dowels, bolts, anchors. The quantity and dimensions depend on the type of walls and brackets.
In addition, to install the air conditioner yourself, stock up on a hammer drill, pipe cutters, flaring tools, and a drill.
Note! For the outdoor unit of the split system, buy a visor. It will protect the case from snow, rain, dust and other debris. Installing a canopy will extend the life of the air conditioner.
For residents of the first and second floors, it is recommended to install an anti-vandal casing.
If the tank is installed above the drain pipe, a pump will not be required, since the condensate will drain naturally. In another situation, you will have to buy a drainage pump that will pump the resulting liquid.
Features of winter operation
How many degrees can you turn your air conditioning on in winter? As already mentioned, the minimum operating temperature of a split system is indicated in the instructions for specific equipment:
- most non-inverter split systems are designed to operate down to -5 degrees, some models up to +5;
- most inverter units are designed for operation at -10 - -15 degrees;
- Some heat pump models from leading manufacturers are designed for heating at outside temperatures down to -28 and colder.
The efficiency of a split system is highly dependent on the outside temperature. At temperatures around zero, almost any air conditioner can produce several times more heat than the electricity used.
Air conditioner operation for heating
Selecting a mounting location for the indoor unit
Before choosing a location for installing the split system, keep in mind that the electrical cable should only be installed horizontally or vertically. In the first option, keep the distances to the cornice - 5 - 10 cm, to the ceiling 15 cm, to the baseboard - 15 - 20 cm.
When choosing a location for installing a split system, take into account the data specified in the equipment passport and technical requirements.
Installation of the indoor unit is carried out based on the following parameters:
- The distance from the case to the ceiling should not be less than 15 cm; some companies recommend placing the unit 20 - 30 cm below the ceiling;
- There should be no more than 30 cm to the side wall;
- To the nearest obstacle in the path of the air flow – 1.5 m.
The outer housing of the split system is placed on the wall as close as possible to the window, on the balcony frame, if it can support the weight of the housing. In the second option for installing a split system, an additional safety margin is taken into account for snow, gusts of wind, and ice accumulation. If the housing is located on the ground floor, the external building is installed above the reach level.
For apartments located on the second floor and above, this arrangement is not necessary and the outer casing is mounted under the window or on the side. The main criterion in this case is the distance between the two blocks of the split system.
Note! When choosing a location for installing the external housing of the air conditioner, consider the ability of the wall/balcony frame to withstand the load. This point is especially important if the outer wall of the house is finished with tiles or insulation.
Manufacturers indicate the maximum distance between blocks. This is 1.5 - 3 m. If the technical documentation does not specify the distance between the split system housings, they can be installed back to back. This makes installation easier and reduces material costs.
Do I need permission?
People often ask whether permission is needed to install a split system, and is it possible to install it without approval from the authorities? Based on practice, permission to install an air conditioner is not required. An exception may be cases when it is necessary to coordinate the installation of climate control equipment with the authorities in buildings that are architectural monuments or have historical or aesthetic value. In other cases, approval is not required for the installation of climate control equipment.
Requirements for installation of the indoor unit
Before installing the unit indoors, check the location of hidden wiring and pipes. After choosing a safe location, taking into account the parameters specified by the manufacturer, mark the installation of fasteners. Check the location of the load-bearing elements with a level. They must be installed strictly horizontally.
When installing the indoor unit, pay attention to the bottom of the plate, as there are latches on it. They hold the body, so the fastening of this part must be rigid, without play.
Installation procedure
Before installation, carefully read the manufacturer's instructions. Make markings on the walls or balcony frame to install the blocks, taking into account safety standards and technical conditions. First install the inner and then the outer casing of the split system. Think over the route, places for attaching cables. With both cases secured and cables connected, check the system's operation. If there are no leaks, the units are securely fastened, you can use the air conditioner.
Installation of the indoor unit
Installation of the indoor unit is carried out according to the following algorithm:
- Using a drill, make holes for the dowel plugs;
- Insert them into the slots;
- Install the plate that will hold the inner housing of the air conditioner;
- Secure it with dowels;
- Check the correct position using a level;
- Pay attention to the fastening - it should be rigid, without gaps;
- Plan the route based on a slope for communications of 1 cm per meter of length (this installation allows for normal drainage).
Preparation of communication channels
Before installing an air conditioner, study the operating instructions for the equipment yourself. For safe operation of the system, pay attention to the rules for working with electrical cables. Do not twist electrical wires or connect different materials together - copper does not connect to aluminum. With an external connection type, the cable is closed with a box. The wire is fixed with special clamps every 50–60 cm.
For internal wiring, make a small recess of the specified length. The cables are laid in a corrugated pipe secured with plastic clamps.
The interconnect cable is selected 4 - 5 cores, with a cross section of 2.5 mm². When laying pipes outside, fix the cable on the wall every 30–40 cm. After installation, it is covered with a protective box. Secure it to the wall with special glue or screws.
Make a recess for communications according to preliminary markings. Use a corrugated pipe to protect the cable. The depth of the trench is equal to the diameter of the tube + 1 cm. Insert the cable into the corrugated pipe. Install it in the recess, after placing the internal cable, secure the pipe to the wall with clamps. When the wires are firmly fixed and connected, plaster the mini-trench, leaving open the areas of connections with the split system housings.
- Make a hole with a slope for the drainage system on the outer wall (the diameter of the nest should not be less than 5 cm);
- Make a hole for the electrical cable;
- Calculate the length of the cable and pipes for drainage.
When preparing the route for condensate drainage under the system, keep in mind that it should not have corners, bends, or sagging. Otherwise, drops of water will accumulate in it, which will reduce the efficiency of the system.
Outdoor unit installation
Installation of the external air conditioner unit is performed according to the following algorithm:
- Using a level, check the location of the block. It must be strictly horizontal.
- Install anchor bolts and fasteners according to the dimensions of the outer casing.
- Place the housing on the brackets and secure it. Check that the level is installed correctly. If there is a slight slope, it must be eliminated.
After fixing the outer casing, the split system is connected by communications.
Connecting blocks by communications
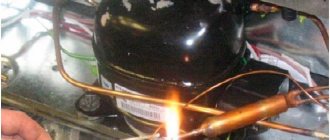
After installing the units outside and inside the premises, prepare communications for connection to the buildings. To do this, cut the copper tubes to the specified length. For work, use only a pipe cutter. If you cut pipes with a file, shavings will form during the work.
It gets into the pipe and leaves burrs on the cut. In the first case, normal circulation in the system is disrupted, which leads to equipment failure. In the second case, the sealing of the joints is broken. This can result in air entering the structure, reducing the efficiency of the engine and drainage system. In such a situation, expensive equipment repairs will be required.
Insulate the pipes. To protect against heat loss, use polyurethane foam hoses. It is not recommended to use foam rubber, as this material has a short service life. After placing the copper tubes in the heat insulator, seal the joints with metallized tape.
Strip the wires of insulation and press with pliers. After that, put a ferrule on each wire. Connect the wires to the housing following the diagram specified by the manufacturer.
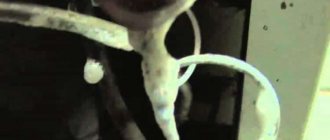
Proceed to connecting the drainage to the equipment. To do this, connect the tube to the plastic tube located at the bottom of the indoor unit. Place a corrugated hose on it and secure the joint with a clamp.
After connecting to the indoor unit of the air conditioner, remove the drainage through the hole made in the wall. In the classic version, external drainage is installed in the same way as for internal drainage. But some consumers do not do this. If there is a polymer tube instead of a hose, you will need an adapter.
Condensate is discharged in 2 ways - to the street or to the sewer. The first method is the cheapest and simplest, so most users simply take the drainage outside and allow it to drain naturally. The second method is more complicated and requires a special diverter device. It is used extremely rarely.
Connecting copper pipes. Loosen the nuts and allow the nitrogen to escape from the system. Manufacturers pump it into the housing to avoid oxidation of parts. Remove the plug and remove the nut completely. Align the edges of the pipes and flare them. This is necessary for the tightness of the system. Place the edge of the pipe to the corresponding terminal of the block and secure the connection with a nut.
Note! When installing household air conditioners, sealants, gaskets and other devices must not be used. If the operations are performed correctly, the copper tubes provide a sealed structure.
Such actions are performed for all ports of the split system. After connecting the communications, remove air, moisture and argon from the system.
Vacuuming
Most craftsmen do not want to vacuum the split system, since it is a long process that requires expensive equipment. The procedure is carried out to remove air and water vapor from the system. If moisture is not removed from the tubes, it will accumulate, resulting in loss of engine power. In winter, the water collected in the drainage system turns into ice. This reduces the diameter of the tubes, in some cases completely blocking them. As a result, the split system may automatically turn off because the protective system is triggered or the engine may burn out.
Evacuation is carried out in the warm season, since the liquid solidifies at low temperatures and it is impossible to remove it from the system.
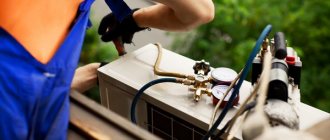
To independently pump out air and moisture from the system and fill it with refrigerant, you will need wrenches, a pressure gauge, and a vacuum pump. There is no point in buying a pressure gauge and a vacuum pump, since this is expensive equipment and will be rarely used. It's better to rent it. When choosing a pressure gauge for freon, indicate the type of refrigerant. Some types of devices work with certain substances.
First, you should pump out the air from the system.
Note! When the arrow drops below zero, turn off the pump and wait 30 minutes until the atmosphere in the line is completely cleared of moisture and air.
- Connect the blue hose of the pressure gauge station to the spool.
- Check that all manifold valves are closed.
- Connect the central (yellow) hose to the vacuum pump.
- Start the equipment.
- After all the air has escaped, monitor the pressure gauge readings. If the needle moves, there is a leak and needs to be fixed.
If it is impossible to use an expensive vacuum pump when installing a split system, perform the procedure manually. For this:
- Unscrew the plugs on the large port of the outer housing (use a hex key);
- Turn the valve 90 degrees for a few seconds and return it to its original position (this creates a lot of pressure and freon enters the system);
- Press the spool for a few seconds and release excess refrigerant;
- Once free of air, install the plugs.
After 30 minutes, start filling the refrigerant.
Freon filling
For long-term operation of the air conditioner, it is necessary to choose the right refrigerant. Manufacturers indicate the type of coolant on the external unit or in the equipment passport. Usually the brand and amount of freon used by a certain type of system is specified. When purchasing a refrigerant, add a reserve to the specified weight to correct leaks. They are inevitable when freon is pumped into the system. To install an air conditioner with your own hands, 1 kg of refrigerant is enough, taking into account losses.
Once air and moisture have been removed from the pipes, turn off the pump but do not disconnect it. Watch the pressure gauge reading. If it is stable, then there are no leaks in the system. After this, pump freon into the outer housing. The process will take 15–20 minutes, depending on the length of the route. For air conditioners, 2 refrigerants are used - freon R22 and freon R410a. The first is in a gaseous state, therefore, when pumped into the outdoor unit of the air conditioner, its position does not change. The second is in liquid form. When filling with freon, turn the bottle over.
To fill the outer casing with refrigerant, follow the algorithm:
- Connect the hose connected to the pump to a cylinder with freon.
- Close the left manifold tap.
- Open the cylinder valve a few turns and let the coolant into the system.
- Monitor the amount of gas supplied using a scale. When the mass of the cylinder decreases by 1 kg, the process is completed.
- Close the freon supply valve.
- Close the valve on the outer casing.
- Disconnect the pipe from the spool.
- Do a test run of the system.
If the equipment is working normally, you can start operating the air conditioner.
Filling with freon and purging the system are different procedures.
To check the tightness of the joints, treat them with soap foam. If it bubbles, there is a leak and needs to be fixed.
After installing the air conditioner yourself and a test run, the system is ready for operation.
Finally - advice for beginners
It is unnecessary to write hackneyed phrases about the difficulty of installing an air conditioner yourself, this is clear from all of the above. For a better understanding, we advise you to carefully watch videos from different masters, and also read the comments left under these videos on YouTube. Smart installers often post there and you can get a lot of useful information from them.
The last point - do not try to save money on the tool. If you can borrow a hammer drill from a neighbor, then you are unlikely to find a vacuum pump for free, and you cannot work without it. Although some unfortunate installers do without vacuuming, squeezing air out of the circuit with freon. But the moisture remains, and it then damages the compressor.
Sources
- https://tehnofaq.ru/ustanovka-split-sistemy-svoimi-rukami/
- https://AeroClima.ru/kondicionirovanie/kak-ustanovit-split-sistemu-samostoyatelno/
- https://ventilaciya.info/konditsionirovanie/ustanovka-konditsionera-svoimi-rukami-sovety-po-montazhu.html
- https://elektroznatok.ru/bytovaya-tehnika/ustanovka-konditsionera
- https://otivent.com/kak-ustanovit-i-podkljuchit-kondicioner
- https://krrot.net/ustanovka-konditsionera-svoimi-rukami/
- https://tehnikoved.ru/klimaticheskaya-tehnika/konditsioner/ustanovka-konditsionera-svoimi-rukami.html