Even if you purchased the most expensive gas stove, the manufacturer makes absolutely no guarantees that it will not break after several years of use. Agree, spending additional money on repairs that you can do yourself will be somewhat inappropriate.
Unlike repairing the same washing machine or refrigerator, you can fix a breakdown of a gas stove yourself, after first understanding the structure of the device. Since working with gas equipment always requires extreme caution, before you start repairing a gas stove with your own hands, you should take all safety measures.
The breakdown of a gas stove can be associated not only with contamination of the nozzles, which means that in some cases it will be necessary to replace faulty parts. During operation, the oven door mount may break or the electric ignition may fail, so later in the article you will be able to familiarize yourself with the most common breakdowns of a gas stove, and consider in more detail the sequence of their elimination.
DIY gas stove repair
Sooner or later, the need to repair a gas stove overtakes almost all owners of these devices.
It is often expensive to contact a professional, and you want to fix problems at home, so as not to waste time on transporting tiles and repairs.
There are a number of problems with gas stoves, for example, adjusting electric ignition, which you can actually handle on your own.
An analysis of the most common breakdowns in slabs and ways to solve them, as well as a video showing all stages of the work, will help you with this.
Hob fault groups
Regardless of the type of heaters, the main failures of the panels are similar. Repair of your hob is necessary when typical faults are detected.
A malfunctioning hob requires immediate repair
Damage to heating elements
Parts damaged mechanically are repairable. For halogen models, the heater needs to be replaced, and the induction winding is almost not subject to failure.
Failure of switching elements or conductors
You can troubleshoot contacts, thyristor switches, relays in 1 day. Repair work will not be difficult for you if you know the design of the slab and have the appropriate skills.
Electronic circuits
If the user does not know how power supplies, controllers, generators and transformers work, it is better to entrust the repair to a specialist. The burnt element must be dismantled and replaced with a new one.
Important! Before starting work, you should check the power from the outlet, the presence of moisture on the panel or dirt on the sensor unit. They may interfere with button sensitivity
Internal structure of the stove
Before doing any repairs, you need to understand what a gas stove is, what parts are present in it, and what kind of DIY gas stove repair may be required in a given case.
There are many companies producing gas stoves: Gorenje, Ardo, Ariston, etc. But all tiles, even if they differ in price, have a similar type of internal structure.
The structure of the burners
The most noticeable part of any stove is the burners. Each burner is attached to the stove table using bolts. The burner also consists of several parts: they have a lid, a divider and an injector.
Each burner is connected to a steel and copper tube with a fastening similar to the American one. Due to this device, the burner receives gas.
Gas burner device
To work with the burners, you don't need any special tools: you will need a wrench, most likely a size 13, to disassemble the burner parts if it needs repairs or cleaning.
After completing the repair and assembly, you need to assemble the structure and check how tight it is to prevent gas leakage.
Each burner has two candles around its perimeter.
One helps create ignition by working with piezoelectric elements or an electronic circuit, and the second serves as a thermocouple connected to a circuit that controls combustion.
Gas burner (grill removed): 1— nozzle, 2— spark plug, 3— flame sensor (thermocouple hot junction)
The candles differ from each other even in appearance, so it will be difficult to confuse them.
A candle for electric ignition has a ceramic caftan; it is needed to prevent the spark from breaking below the required level.
That is why it is important to properly ground the stoves where electric ignition is built-in. Also, electric ignition does not tolerate the use of water pipes and metal threads.
It is important to separate the slab from the riser using special gaskets during installation and repair, otherwise there is a real risk of explosion.
The thermocouple candle has a bronze caftan, which is a powerful heat conductor
The reliability and speed of switching on the protection that shuts off the gas after you have finished using the stove depends on how quickly the semiconductors cool after the flame goes out.
Gas flow control
Under the stove table you can see the collector. It looks like a thick tube from which leads to the burners diverge.
The gas flow is controlled by solenoid valves, the number of which is equal to the number of burners on the stove.
This is necessary so that if the flame of one burner goes out, the others can still function.
Solenoid valves are equipped with an inductor coil. When the thermocouple is heated, an EMF is generated, which fixes the device open.
Solenoid valve with induction coil
How to remove control knobs?
If you need to either adjust the flame in the burners of a Gorenje gas stove, or simply clean the buttons from accumulated grease, you can remove the handles from the control panel yourself, without using additional tools. Depending on the age of the model, the handles may have slight differences in structure.
The first thing you need to do is turn off the gas valve, and then make sure that all regulators are turned off. Next, you can slightly pry the handle with a knife to simplify the process of removing the handles.
So, if you have an inexpensive model, the handles can be removed by pulling, since each of them is based on a spring. To do this, just pull the handle towards you, slowly turning it along the axis.
On expensive models of Gorenje stoves, the handles may be equipped with special fasteners that must be unscrewed before pulling the handle
To prevent the handle from slipping in your hands, you can wrap it with a small piece of fabric, and only then pry it off with a knife.
Heavy contamination of the control panel can slow down the process of removing the handles, so in this case it makes sense to use a special soap solution. Having previously moistened each part with this solution, you can safely begin removing the handles.
If you are not sure that you can fix the breakdown on your own, it is better to contact the company with which you have an agreement for the maintenance of gas equipment.
Do-it-yourself stove repair
Complete repair of gas stoves Hephaestus, Gorenje and other models requires the intervention of specialists, because... Doing it yourself will not only be difficult, but also dangerous.
However, there are a number of works that can be done with your own hands at home and bring the stove into working condition if its damage is not too serious.
What to do if the electric ignition fails?
The most common problem with gas stoves is the failure of the electric ignition. A video will help you fix this problem - watch it before starting the repair to do everything correctly.
Video instructions for repairing electric ignition using the example of a Gorenje stove:
First of all, you need to disconnect the stove from the power supply, remove the partition from it and inspect it for deformations.
If you see that there are chips and cracks on it, this means that this is why the stove is not working, and the partition should be replaced.
It can only be changed when the ignition or auto-ignition is disabled - do not forget about this. After replacing, check how well it works now.
If your Gorenje stove or another model has a built-in piezo ignition, the operating technology will be slightly different.
Replacing the spark plug
First you need to remove the device from the control, then remove the plate partition located below and remove the igniter, which is screwed to the bracket using a fastener.
If it is cracked or otherwise deformed, it should be replaced with a new one. To install a new igniter, you need to disable the module responsible for ignition.
The instructions for the stove will help you find it.
After this, you need to install a new igniter in place of the old part and check how well the gas stove now works.
Oven door repair
Often, after prolonged use, oven doors begin to jam or close poorly.
Oven door fastening
To carry out similar repairs on gas stoves Indesit, Gorenje and others, you need to unscrew the screws that hold the doors and swing them in different directions so that the door is tightly fixed on the hinges from which it may have fallen off.
After this, re-tighten the bolts, if everything is done correctly, the door should snap into place and the oven should close tightly.
Video instructions for repairing the oven door:
If the part still does not work, then you may need to replace the gasket, which is responsible for sealing the oven door to the stove frame.
To do this, you need to unscrew the door hinges, which are located above the handles, and remove the stove cover.
Most likely, you will also need to remove the internal screws and panel edges, or you can simply move them away and thus remove the cover.
The screws that secure the glass to the panel block must be removed, and then the glass itself must be removed by disconnecting the gaskets that hold it in place.
Oven door hinge assemblies
Now you need to disconnect the gaskets themselves, which are located between the door and the glass from the inside.
Now you need to replace the gasket with a new one and return all the parts to their place, proceeding in the reverse order.
Use the manufacturer's instructions, as... The device of different models will be slightly different, and you will have to act differently.
Adjusting the gas supply to the burner
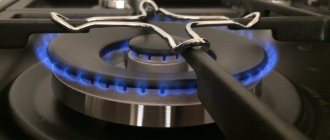
It often happens that the gas supply to the burner is not adjusted correctly. As a result, the flame burns intermittently or disappears altogether. If the device is working correctly, the flame should be smooth and have a bright blue color.
Correctly adjusted minimum flame
If your device works differently, then the ignition or auto-ignition needs to be properly configured and adjusted.
To do this, you must first turn off the gas supply and then remove the partition. Then you need to turn it back on and determine which air damper needs adjustment.
Flame adjustment elements: 1—gas burner, 2—cock rod, 3—minimum flame adjustment screw
To adjust the operation, you need to unscrew the set screw that locks the plate - it is responsible for the proportion in which the gas is mixed with air.
Having installed it in the desired position, turn on the stove and check how it works.
Tips from repair experts
Some expert advice for those who decide to start repairing household appliances.
- If the operation of the gas hob malfunctions, the gas does not light up, or lights up but goes out; in case of other breakdowns, it is advisable to contact a specialist for help.
- If the owner of the equipment is confident in his own abilities and has experience, it is possible to replace a burnt-out heating element, clean injectors, install power regulators, and other elements. Repair of household appliances is carried out when the gas supply valve is closed and fresh air supply is ensured.
- If the ignition system does not work correctly, the electronic unit must be replaced. Before replacing it, it is worth checking the serviceability of the button that turns on the igniter.
- In electric models, the cause of a non-functioning device is often damage or burning of the cable going to the heater. To fix this, just disconnect the non-working wire and clean the charred part of the insulation. But this method is a temporary measure. To carry out better service, you need to completely replace the cable of wires running from the switch or thermostat to the heating element.
- An induction hob requires repair if the high-frequency voltage generator or transistor switch fails. The restoration of the power supply will be carried out by a specialist, as this requires knowledge and experience, and special tools.
- Cracks or chipping of the hob glass are relatively rare. Such a part cannot be restored, and given the complexity of installation and price, you can use a used product. The size and brand of used equipment purchased for spare parts must match the damaged one.
To replace a broken panel, it is enough to disassemble both elements, disconnecting the internal working parts from the decorative surface, and rearrange the working parts instead of the unusable ones.
Hobs equipped with modern components also wear out and components and mechanisms fail. Professionals will perform high-quality diagnostics and repairs. But sometimes you can carry out repairs yourself, taking into account recommendations and observing safety regulations.
DIY gas stove repair
Everyone knows that flammable gas mixed with air is explosive, which is why, for the sake of safety, a special substance with a pungent odor is added in small quantities. In the event of a gas leak, you must call the Gas Control service.
In order to completely protect yourself and your home from a gas explosion during repair work, you must comply with certain requirements, namely:
- Completely de-energize the apartment, turn off the main circuit breaker or unscrew the plugs;
- Remove self-powered mobile devices and turn off the power supply;
- Open doors and windows throughout the entire room;
- Use only special tools and components;
- Close the shut-off valve;
- Eliminate existing faults;
- After completing the work, apply gas by opening the valve.
Before you begin repairing a gas stove, you should completely cut off the power to the room.
If, after carrying out repair work and supplying gas, an incomprehensible hissing or smell of gas appears, you need to turn off the valve again and contact a gas service specialist. You can repair a gas stove yourself and eliminate existing faults quite easily and quickly; the most important thing is to strictly follow the instructions and follow safety rules. If you need to repair a gas stove yourself, then you first need to decide exactly how the device is designed and which components and parts allow it to work properly.
A modern gas stove consists of such systems as:
The basic part consists of burners, burners, shut-off valves and pipelines. The electrical part is responsible for good lighting, electric ignition, and sometimes, in some models, also for the grill system if it is installed in the oven. The supporting structure mainly consists of a body made of stainless steel.
Each gas stove has a standard set of parts. Depending on the model of the device, it may have different configurations and certain nuances, however, their configuration is unchanged.
One of the main parts of a gas stove is the burner, located inside the stove under the hob itself, and on top of the burner there are burners with dividers, which can be removed and washed during wet cleaning, however, the most important thing is that water does not get into the dividers. Each burner is characterized by a specific specific power and is determined by such indicators as: minimum flame when the handle is in the far left position; medium heat – the flame regulator is in the middle; Maximum combustion when the regulator is in the right position. When choosing a product, you need to pay attention to such an indicator as the maximum combustion power. It is determined by the level of gas combustion and is indicated in the technical characteristics of the gas stove itself.
All gas stoves, without exception, use three types of burners, namely:
- Kinetic;
- Diffusion;
- Mixed option.
Diffusion burners are characterized by the fact that a stream of gas enters the burner, where it mixes with air. When the oven burner is lit, air is drawn from the inside of the stove. The principle of operation of a kinetic burner implies that gas is mixed with air during movement and then the combustible mixture is transferred to the burner. Modern models use a mixed version, that is, part of the air is taken from inside the device, and the rest is supplied from outside.
Design and device
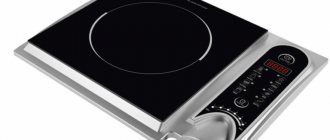
The hob, unlike standard stoves, does not have an oven; it is a flat body 3–6 cm thick and is built into the countertop. This creates the possibility of arranging a hot zone anywhere in the kitchen space, taking into account safety rules. Made in a square or rectangular shape, equipped with several burners located in different parts depending on the shape and size.
It consists of two main components - a control display and burners. Each of them is connected to a thermal relay and equipped with contacts and connected by wires to the control panel. The relay controls the heating temperature, turns off or turns on the device.
There are several types of control panels:
- electronic;
- mechanical;
- with touch buttons.
Equipped with:
- temperature sensors;
- timers that turn off the device;
- sound alarms notifying the end of cooking, etc.
The hob can be coated with:
- cast iron;
- of stainless steel;
- ceramics and glass ceramics;
- enamels.
herehere
Tip The stove is turned on by pressing the buttons located on the surface, then the power relays are activated, transmitting current to the heating elements located under the surface of the stove.
How to disassemble a gas stove
Repairing a gas stove requires certain skills and it is very important to know how to properly disassemble the device in order to carry out the required work. Before disassembling the product, you must turn off the gas valve. If you follow all the steps according to the instructions, you can disassemble the stove and troubleshoot problems yourself. Then you need to disconnect the stove from the gas network and electricity.
The stove should be disassembled in several stages
Disassembling the slab consists of several stages, namely:
- Remove the burners, remove the bolts, lift the top cover;
- To access the oven gate, you need to remove the side wall;
- Remove the burner nozzle.
If there are problems with the operation of the stove and the burners do not light well, then mandatory ignition adjustment is required. If only the burner burns weakly, then the problem may be a blockage. Repair is very simple, since it is enough to clean the nozzle using a thin wire or needle. Getting to the oven nozzle is not always easy; to do this, you need to unscrew the bottom wall of the oven, remove the burner and clean the nozzle.
Important! The structure of almost every gas stove is the same, therefore, it is enough to study the features and technical parameters of one model and it will be possible to carry out repair work without much difficulty.
Gas may periodically disappear if the thermocouple is damaged, therefore, if there are problems with the fuel supply, you need to inspect the integrity of the part. If the flame takes a very long time to ignite, then the solenoid or gas valve for the fuel flow of the burner needs to be replaced or repaired. In addition, you need to adjust the operation of the thermostat. There may be other malfunctions of the stove, so if you do not have experience working with gas equipment, it is best to take it to a professional technician and let him repair the device.
How to repair it yourself?
An electric stove is considered a high-risk household appliance, so you need to do the repairs yourself with the utmost responsibility. If the problem is serious, then it is best to entrust the restoration of functionality to a specialized service employee. Self-repair of an electric stove in most cases involves replacing parts that have failed. For example, a heating element cannot be repaired, regardless of the complexity of its breakdown. If it does not work properly, you will have to replace it with a new one.
The same applies to the temperature regulator: if it cannot be adjusted due to some problems in operation, then it will have to be replaced. You need to be careful when checking the power supply and repairing it. At first, you can try to replace only the cable, however, if there is no positive result, you will have to buy a new module. In most cases, repairing or replacing an electric stove switch is done as follows.
- We turn off the power to ensure the safety of the master. Under no circumstances should repair work be carried out while the power is on.
- The thermostat must be turned to the minimum temperature until you hear a click. If it is not there, then you can be sure that the device has failed. If desired, you can perform another check of the thermostat by simply leaving it in the center position and applying power. In this mode, the thermostat should turn off every 30 seconds.
- Now you can remove the handles. Before doing this, you should definitely read the manufacturer’s instructions, since for some models this part is non-separable.
- First of all, you need to remove the knobs that are responsible for external adjustment, and only then can you move on to the front panel.
- Under the front panel there is a bar that presses the switches.
Another common problem is a cracked spiral, which has to be replaced with a new one. The process looks like this:
- The electric stove is disconnected from the network. There is usually no point in trying to repair the coil, so it is better to immediately buy a new one.
- We remove the correct panel with burners. In most cases, the holes for the heating element are located here.
- The part is pryed off with a small screwdriver and removed. You need to take care in advance of removing wires and contacts so that no current passes.
- The spiral is installed using the same scheme.
Thus, repairing an electric stove with your own hands is a complex process that requires certain skills, knowledge and special tools. During repair work, you need to be extremely careful, since the integrity and performance of the device in the future depends on this. If your device receives an electric shock when turned on, the glass breaks, stops turning off, or does not heat up well, then, first of all, you need to determine the cause of the problem. You can begin repairs only after the possible source of the malfunction has been identified.
To learn how to repair an electric stove with your own hands, see the following video.
Instructions: how to turn off a gas stove during repairs
Very often it is necessary to turn off the stove to replace the flooring or carry out repairs. When you turn off the electric stove, there are absolutely no problems; you just need to unplug the cord from the outlet. When turning off the gas stove, it is important to follow safety precautions and it is advisable to contact a gas service technician.
You can turn off the gas stove during repairs if you cut off the gas supply
Regardless of the gas stove model, turning it off consists of the following steps::
- Blocking gas access;
- Removing the locknut;
- Removing the coupling on the descent to the plate;
- Installation of the plug.
Regardless of how long you need to turn off the gas stove, you must monitor the flow of gas into the burner, since an explosion may occur when fuel is mixed with air. If the stove needs to be turned off for a long time, then a plug must be installed on the pipe leading to the gas main.
Regardless of whether they are old gas stoves, in particular, such as Darina, Wrozamet, Brest 1457, Elekta, or new, modern models, the principle of their design and operation is identical. Models in which the surface of the hob is separate from the oven are considered very convenient and functional. In particular, we can highlight the following: Hephaestus, Ariston, Indesit, Ardo, Kaiser, Hansa. Multifunctional devices that are easy to maintain and repair are considered to be Hansa, Gorenje, Bosch, Zanussi.
The cost of carrying out work by specialists
Malfunctions occur suddenly and require quick fixes, especially when a gas stove breaks down. However, not all home appliance owners have the necessary skills. When it is impossible to carry out repairs yourself, you have to call a specialist to your home. What expenses await the owner:
- replacement or repair of a gas supply valve - from 300 to 1,200 rubles;
- nozzle cleaning - from 400 rubles;
- replacing the oven lamp - from 400 rubles;
- gas adjustment - from 500 to 900 rubles;
- lubrication and cleaning of rods on the feed lever - 900 rubles;
- replacement of rods - 1200 rubles;
- thermocouple replacement - 900 rubles;
- replacement of the ignition unit - 900 rubles;
- cleaning of supply contacts - from 900 to 1,100 rubles;
- change of sealing gum - from 500 rubles;
- replacement or repair of a spark plug - 800 rubles.
Prices depend on the stove model and the region where household appliances are serviced and repaired.
Competent oven repair in a gas stove
Some gas ovens may not close the oven door tightly enough or have other problems. If the electric ignition function does not work well, it means that the device is clogged and requires urgent cleaning.
In order to competently repair the oven in a gas stove, it is better to seek help from a specialist
When repairing ovens, it is imperative:
- Inspect the integrity of all its parts;
- Check the tightness of the connection with the gas hose;
- Inspect the door for damage.
If the door is broken or does not close well, then you need to either carry out repairs and tighten all existing fasteners more firmly. In the event of a serious breakdown, if the oven cannot be repaired, it must be replaced. In addition, when carrying out repair work, you need to inspect the handles of the gas stove, as they can often break and for this reason the device does not turn on well.
Oven door won't close
The most common oven breakdown is poor closing of the oven door. It occurs most often when there is a small child in the house who simply sits on an open door, as a result of which the brackets holding this part bend and do not fulfill their function of pressing the sash.
To repair the oven of a gas stove Indesit, Brest 1457 or Flama stove, you will need to disconnect the door from the unit
. To do this you need:
To summarize, we can say that only the above faults can be eliminated with your own hands. All types of troubleshooting of a gas stove related to the disconnection of gas supply tubes and hoses must be carried out by a gas service employee, after which he draws up a report on the repairs performed.
It's no secret that during operation, gas equipment, like any other device, tends to fail. Therefore, in this article I would like to give some advice to those and for those who would like to save a couple of thousand rubles on repairing a gas stove. After all, the services of a specialist can cost a pretty penny, but you can do the work he does yourself in about ten minutes.
I want to say right away that gas is a source of increased danger, and when mixed with air in certain proportions, it forms an explosive mixture. Therefore, before you begin any manipulations with your beloved appliance, be sure to turn off the lowering tap (the tap that is usually located on the wall, behind someone’s stove, or hidden in the kitchen unit), just in case, open a window or window and disconnect the electric ignition cable, if equipped.
DIY gas stove repair
Repairing a gas stove with your own hands is prohibited by Russian law. True, criminal liability is not yet provided for; if an accident occurs, troubles are expected. In the hero city of Volgograd, one smart guy introduced combustion products from a water heater into the ventilation hole. 4 people died. The authorities classified the case based on the article causing death by negligence. Gas service technicians have the right to replace equipment and perform service work. This is relevant, starting with connections and ending with switching to a different type of fuel. Below are a couple of recommendations, not a user manual, just general techniques.
Finding out the causes of the problem
If a burner on a gas stove does not burn well or does not ignite, you must first disconnect the equipment from gas and electricity. Inspection and repair of the hob may only be carried out after shutting off the gas fuel supply.
Basic security measures cannot be neglected here.
Whether or not the smell of gas is felt in the kitchen after the burner goes out does not matter; any manipulations to maintain gas equipment should be performed only with open windows and good natural ventilation of the room
Many modern gas stoves are equipped with electronics and automatic ignition systems that require electrical power. Often, inexperienced home craftsmen, when working with a gas hob, forget about this feature of this device. As a result, methane vapors ignite from sparks. Therefore, before starting repairs, it is recommended to disconnect not only the stove itself, but also all electrical appliances in the kitchen.
Problems with gas stove burners arise due to:
- incorrect operation of the solenoid valve and/or thermocouple;
- nozzles clogged with grease and soot;
- faulty spark plugs;
- long breaks in servicing gas equipment.
Owners of private houses and apartments where there is a gas stove are required to enter into an agreement for regular inspection of the equipment in question with a specialized organization. Without such an agreement, gas will not be supplied to the consumer.
And gas workers should come at least once a year, checking the functionality of the hob and, if necessary, immediately repairing it. All other calls are paid separately.
If problems with the stove arose during the period between routine checks, you will either have to call a technician again or carry out the repair yourself
Moreover, if during self-repair of burners and other hob devices they are damaged, then it is prohibited to turn on the faulty device without the gas technicians. Even if the stove is more or less operational, then during an annual inspection a gas company specialist will identify a breakdown and immediately shut off the gas until the defects are eliminated. And these are inevitable additional expenses. Plus, they may also impose a fine.
It is recommended to undertake repair of a gas stove with your own hands only if you are absolutely sure that you will do everything correctly
There are no particular difficulties in this work, but you can break something through carelessness or ignorance
The problems are the following:
- The flame is not blue in color - there is not enough oxygen or too much gas is supplied to the injector.
- The burner does not light - the spray holes are clogged with soot or the thermocouple or spark plug is faulty.
- The fire goes out - the gas supply is cut off due to a faulty gas control or problems with the gas pipe.
You can clean or replace the burner on your gas stove yourself. But if the problem area is the meter, the gas pipe itself (cylinder) or an external gas sensor, then it is better to refuse arbitrariness.
In such a situation, you should seek help from the gas workers responsible for the serviceability of the VKGO and VDGO.
Installation of a gas stove with electric ignition
Darina, Hansa, Ardo – so different and at the same time the same. The repair of gas stoves by Hephaestus is exactly like the repair of Ariston; gas stoves are made up of standard units. It is enough to look at a single device to understand the circuit. Have a reference book to help you properly maintain gas pressure. When set correctly, the flame is even and blue. Orange flashes indicate an imbalance in the fuel mixture. If the settings are incorrect, the flame will fail (especially typical for carob ovens).
For those who have read the reviews of the VashTekhnik portal regarding gas instantaneous water heaters, independent repair of gas stoves will seem like child’s play! You cannot do it yourself, but you can clean the device. The technician will have to clean candles, combustion sensors, burners, and sometimes nozzles. There are a lot of interesting things inside the gas stove. Anyone learning how to properly clean equipment should understand what we will see inside. Under the gas stove table:
- Burners. They are often bolted to the gas stove table. Each burner consists of a lid, a divider, and an injector (nozzle). They are not rigidly fastened under the table; each is fitted with a steel or copper tube; the fastening is carried out like an American one. You will need a key of approximately 13 to remove the products. It is more convenient to clean if something is clogged inside. Beware of tearing off the head or thread - you will have to replace it. After assembly, check the tightness by washing. The procedure involves applying foam to the disputed nodes.
- There are two candles around the perimeter of the burner. One serves as ignition (due to a piezoelectric element or an electronic circuit), the second is a thermocouple, included in the combustion control circuit. It's quite easy to distinguish. The high-voltage spark plug is covered with a ceramic caftan so that the spark does not strike below a predetermined level. When the arc flows, you can see: the tongue of the discharge licks the body of the burner. Gas stoves with electric ignition will be properly grounded by a technician. Beware of using plumbing connections or connectors pierced with metal threads. During installation, the hoses are separated from the riser by special gaskets. Failure to follow the rule will easily provoke an explosion in favorable situations. We wrote in more detail, we remind you again. The candle with a thermocouple is covered with a bronze caftan that conducts heat. The faster the semiconductors cool down, the flame goes out, and the protection that cuts off the gas supply will work more reliably.
- Most often there is a collector under the table. A thick tube from which a line goes to any burner. The gas flow is controlled by solenoid valves. The number is usually equal to the number of burners. When the burner flame goes out, the rest will burn. The expediency of the decision can be challenged, but this is how it is done. Each solenoid valve contains an inductor. The thermocouple heats up, an EMF (tens of millivolts) appears, keeping the devices open. Complete activation procedure: turn the gas supply regulator, press down. We press the piezo ignition button, or the electronic circuit performs a set of procedures independently. We hold the handle for a fixed time. The thermocouple warms up, an EMF begins to be generated, the electromagnetic valve is held open due to the phenomenon discovered by Seebeck. As soon as the gas goes out, the sensor plug cools down and the gas supply stops. The process is inertial, we believe that the day is not far off, flame ionization sensors will begin to be used in gas stoves, allowing the protection to operate instantly.
- Similar to the gas manifold, there is a distribution valve panel inside. Single high-voltage wires run to each ignition electrode. Another way to distinguish a thermocouple: two wires with a thinner cross-section stretch to the sensor. The spark breakdown goes to the housing, the second ignition wire is superfluous. If the gas stove is deprived of grounding, we have a chance of getting an electric shock. Fatalities are possible - an additional reason to entrust the installation to a professional. The collector is connected via connectors. There is protection against incorrect orientation of the plug; you can easily mix up some places. When you open the burner, a spark will jump on another divider. It’s not very pleasant, a flash of flame is possible.
- If the charge is generated by an electronic circuit, you will find a simple thyristor, diode, capacitor, and fuses inside. The circuit operates, powered by a capacitor charge with a subsequent burst of energy from the spark gap of the spark plug. Repair of electric ignition of a gas stove concerns the listed elements. The fault is easy to notice. Burnt elements are black or similar in color.
The fire goes out after being ignited
There are times when a properly working gas stove suddenly begins to present surprises. For example, you turn on the gas supply, it lights up, and after releasing the handle, it immediately goes out. Such symptoms indicate a malfunction of the thermocouple - a sensor that turns on the supply of a combustible mixture.
A thermocouple works as follows: when heated, it produces an electric current that magnetizes a solenoid valve. The valve, in turn, opens and gas flows freely into the burner. If the heating of the thermocouple stops, the electrical impulse disappears and the valve shuts off the flow. Thus, if, after opening the tap to turn on the gas and ignite it with an electric candle, the combustion immediately stops, this means that the solenoid valve has tripped and cut off the supply of the combustible mixture.
Repairing a gas stove with such a malfunction is quite simple.
- First, you will need to remove all the handles and the top panel of the stove by unscrewing the bolts located on the sides of the lid and under the burners (stove designs may be different, and accordingly, the locations of the fasteners may differ).
- After unscrewing the fasteners, remove the top cover of the unit.
- After disassembling the unit, you will see two protruding parts near the non-working burner. The white one is the spark plug, and next to it is the thermocouple.
- A wire goes from the thermocouple to a connector from which it should be pulled out. And disconnect the gas control sensor itself from the burner.
- After removing the non-working element, install a new one purchased in advance.
In this way, it is possible to repair the Hephaestus, Ardo, Brest and Hansa gas stoves if the thermocouple fails.
Button malfunction
Sometimes the cause of a spark plug not working may be a faulty button. This malfunction during the repair of Gorenje or other brands of gas stoves can be determined by transferring the wires (after first removing the top panel of the device) to another gas stove button. If the ignition works when the burner tap is opened, then the faulty button must be replaced.
Setting up a gas stove for a different type of gas
Gas is endowed with two significant characteristics:
- The calorific value is determined by the composition. The higher the methane content, the lower the parameter. For natural gas, the calorific value is predetermined by the location where the natural resource is extracted.
- The pressure depends on the type of gas. Liquid requires higher. For the main line, the typical value is 13 mbar. The parameter ensures the correct operation of solenoid valves, injectors, and burners.
If the pressure is too high, the gas does not burn completely, soot and orange flames will appear. The system may not operate correctly. I have come across instructions recommending the use of a reducer to obtain 13 mbar from a balloon. There are probably restrictions. It is not without reason that it is recommended to place two cylinders in parallel. Please note that the main gas is actually liquid, supplied through a reducer. It is pumped from tanks into containers from which houses are supplied. Find out the wiring diagram for the house where you live. There is natural gas distributed centrally, which has lower cost, pressure, and calorific value. The pressure is assumed to be 13 mbar. This aspect must be taken into account when installing and repairing a gas stove.
The reason to call professionals for installation and configuration is that the specialists know the parameters. Of course, a person with a certificate is also aware of local conditions. Now imagine what will happen if you unknowingly connect the equipment incorrectly! It's a gas, stop joking. This is especially true in the outback, where neighboring houses may have different connections. It is recommended to purchase a set of replacement injectors for different gas pressures. They described the process of boring jets with their own hands and mentioned that the law prohibits rework. The work is unsafe. Before purchasing, ask your gas service for the parameters and ask the store if the equipment is suitable. It’s not too late to start making inquiries during the next cleaning. It's not a fact that everything was done correctly.
How to adjust jets. The size of the central hole changes. Less pressure, the hole becomes larger. Verticality and alignment must be maintained, otherwise gas will leak to the side, which will lead to an accident. It is appropriate to recall that in old Soviet gas stoves the jets are hidden deep inside. The design of the burners is unusual. Between the nozzle and the divider there is a tube with a pair of ears attached to the frame. There is one frame for every two burners. In pairs, the pipes are attached with ears inside the housing. A bowl with a nozzle is placed at the lower end, and a divider is inserted into the upper end. The gas stove operates using a jet stream. Propane-butane is heavier than air.
The peculiarity is that opposite the nozzle there is a tube with a radial cutout. Needed to unscrew the hex nozzle without using a long socket wrench. In modern gas stoves, the jet is located under the flame. A different arrangement improves traction and discourages ordinary people from climbing inside the stove. Repairing a gas stove with your own hands is a dangerous business.
Electric stoves today also look like a more appropriate option for summer residents.
Results of the work done
After gas supply and control washing, no gas leaks were detected! The faucet is sealed and works much more pleasantly, without jamming!
Alexander Birzhin, rmtn.ru
Details Published 12/20/2016 16:38
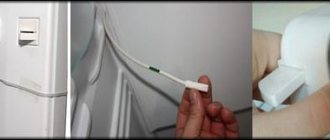
What should we do if we smell an unpleasant gas smell in the kitchen? There is a high probability that this is leaking from the gas valve, which is located directly in front of the device.
As soon as you hear the smell, you should call emergency services, because the gas is highly explosive.
But it’s also worth knowing how to deal with such situations yourself. If the valve is to blame for the leak, then it is better to replace it; for polypropylene pipes, a frialen 63 ball valve is suitable. But simply lubricating the faucet may be enough. To do this, we will study in detail the instructions on how to carefully lubricate the faucet.
Tools and materials that we will need in our work:
Flat blade screwdriver Rag Gag Graphite, grease or technical petroleum jelly Soap We proceed in order: 1
Examine the gas tap, paying attention to how the main part of the tap is made. It can be made in the form of a cone with a hole all the way through, or pressed with a twisting spring using a special plug
2. Shut off the gas supply to the house or apartment as soon as possible, this will minimize the possibility of an accident. If you can’t turn off the gas, you can work like this. You just need to take into account the important rules: Turn off all electrical appliances from the outlet; Ask all uninvolved people to leave the room, if possible, the premises. Make sure there is no open flame in the room and never smoke while working. 3. Next, unscrew and remove the valve from the faucet and gag it to reduce the gas flow. Carefully remove all old grease with a dry cloth and apply new grease without filling the holes. 4. After everything is done, you need to very quickly replace the gag in the gas tap with a bolt. Carefully twist the spring and clamp it with a plug. We resume the gas supply if you shut it off earlier. 5. Ventilate the room well. Then prepare a solution of soap and apply it to the tap. If there are no bubbles, then you have done the job. But still, when there are bubbles, try to assemble the faucet again and check for leaks in the same way. When the problem persists in this case, urgently call the gas service. Since even the smallest leak can lead to a destructive explosion.
Gas is the main assistant to the cook and fireman; with it you will not be cold and hungry. Knowing the safety rules and behavior patterns during emergency situations will protect you from harm and help strengthen your “friendship” with the gift sent to us by Mother Nature. Still don’t know what to do when the gas tap in the kitchen leaks and how to check if there is a leak? Well, let's get down to business then.
You are probably aware that natural gas comes to our kitchens directly from the bowels of the earth, naturally, bypassing kilometers of pipes. The main flammable component of gas is methane. It is this that poses a threat to human life if it comes out of the pipeline. A 5% concentration of this substance in the air is enough, and if you do nothing, fire or explosion is inevitable. “Why does everything have to end in fire?” - you ask. As a rule, due to ignorance of the rules of behavior in such situations, people do not stop using electrical devices (sometimes they even turn on the light to understand what kind of unpleasant smell is coming from the kitchen), and even when the gas tap in the kitchen sometimes goes bad, they bring a lit match to the stove to determine which burner is broken.
According to the rules for handling gas, the population is prohibited from dismantling or repairing pipes on their own. What should you do if the gas tap in the kitchen is leaking? First, open the doors and windows. Secondly, stop using electrical appliances. Third, call the appropriate service.
What to do if you suspect a gas leak, but you’re not sure about it; do you think it’s just your imagination? There is a way to check the correctness of this assumption. Make a soap solution and apply it to the faucet or areas where you think gas may be leaking. If there is indeed a breakdown, then bubbles should appear, and of substantial size. Do you have any doubts? Perform the operation again, because calling emergency services due to unfounded suspicions is also bad, isn’t it?
This is what one of the gas tap models looks like
DIY gas stove repair
The vast majority of owners practice repairing gas stoves on their own. Despite the strict prohibition of inspectors and linemen of local Gorgazov on interfering with the operation of gas appliances, amateur repair of the stove gives a good result and at the same time allows you to save a lot of money. A locksmith, without blinking an eye, will charge 50-100 dollars for repair work.
The burner burns weakly or goes out
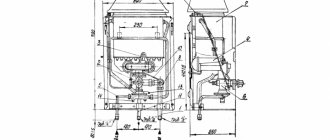
The burner of the table or oven burns weakly when the tap is open fully and the oven is cold. If there are problems with only one burner (the rest are working fine), then the reason is that the nozzle of the corresponding burner is clogged. The repair is simple. It is necessary to clean the nozzle (nozzle, injector). This is done with a thin wire or needle. First, you can try cleaning the nozzle without removing it. The nozzles of the table burners are installed under the burners (Fig. 1. A). The oven burner nozzle is installed on the side of the stove (Fig. 2. A). Getting to the oven nozzle is not always easy. Then you need to remove the bottom wall of the oven, unscrew and remove the burner (it is secured there with one or two screws). The nozzle will be accessible from the oven.
If you cannot clean the nozzle without removing it, you can easily unscrew it with a suitable key.
If all the burners burn weakly, then the reason is low gas pressure. The burner of an oven with a thermostat should be checked when the oven is cold. Otherwise, the thermostat may reduce the gas supply when a certain temperature is reached. This is, in fact, its standard function.
We stock up on tools to carry out repairs
To repair gas stoves at home, you will need a minimum number of tools, first of all:
- A universal screwdriver with interchangeable bits - a cross and a standard straight slot, pliers;
- Small adjustable wrench with side lip extension of 15-20 mm;
- Fum tape for gas appliances;
- Solid gas lubricant;
- Soft brush and highly effective detergent.
You can take “CIF”, “Cleaner” or any other liquid gel used to clean gas stoves with a stainless base from burnt-on fat. Sometimes, in extremely rare cases, you have to use a multimeter to repair a stove.
And, of course, you will need good health, at least there should be no runny nose, otherwise it will be difficult to detect a gas leak, and when working with gas appliances, the main condition for success is work safety. For the most serious work with coupling joints in a gas stove, you will need a watercolor brush and diluted liquid soap.
What might be needed for repairs?
Any home craftsman who decides to repair his electric stove himself must clearly understand electrical equipment, know how it works and the safety rules that must be followed when performing work of this nature. In addition, a person must be sure that he can carry out such complex repairs, independently determine the cause of the breakdown and eliminate it.
You will also need a certain set of special tools:
- To disassemble the plate, you should have slotted or cross-head screwdrivers with different tip thicknesses on hand.
- You will definitely need ring and open-end wrenches, wire cutters, and pliers.
- To perform internal work, you will need a soldering iron, special side cutters, insulating tape, and a device for measuring resistance and voltage.
Gas stove breakdown options
It is known from practice that the better the quality of the gas stove, the fewer reasons there are to disassemble and repair. Appliances manufactured in the CIS begin to break down after 3-4 years from the moment of commissioning, Turkish gas stoves can withstand 5-10 years of operation, German and Italian ones require repair no earlier than 12-15 years of service.
The most common failure cases:
- The electric ignition of the burners does not work, one or all at once;
- The automatic control of the burner flame front does not work;
- The smell of gas appears;
- Malfunction of the flame level regulator.
Of the above set, the most serious problem is considered to be gas leakage. If the smell of gas does not disappear when the gas stove is not working and the central tap is open, you will need to coat all joints and connections, from the supply hose or pipe to the regulator tap and nozzle.
Broken “gas control” of the burner
If after cleaning the burner continues to go out, the fire burns, but does not register, the cause of the malfunction lies in the automation. It is possible to determine the state of the automation using a multimeter. A thermocouple measures the voltage when heated. The solenoid valve checks for winding breakage.
6 reasons why a gas stove burner does not work.
We repair automation. “Gas control” is a set of parts working in pairs (thermocouple and solenoid valve). When heated, the thermocouple produces electricity to magnetize the valve. Loss of contact, as well as mechanical wear, will lead to rupture and gas combustion will stop. The repair is simple: remove the table tray and securely fasten it in a vertical position. A thin copper-colored wire from the burner to the gas stove faucet is called a thermocouple. The connection point between the tap and the thermocouple is a contact. Separate the parts and clean the contacts with sandpaper, connect and tighten securely.
Tip: If the gas control stops working, replace the thermocouple or solenoid valve. Install original spare parts according to the stove model. Universal parts differ in the diameter of the seats. The fit and installation height of the thermocouple plays an important role.
We repair a gas stove with our own hands
In a situation with a gas leak, there is nothing extraordinary; repairs can be done on your own, but you will need to take precautions, remove open sources of fire, organize a small draft in the kitchen, and use a hand-held battery-powered flashlight instead of stationary lamps.
Eliminating the smell of gas
First of all, to repair the gas system, you need to find the location of the leak. Most often, gas escapes through the windings on the couplings or union nuts of the hose with which the stove is connected to the outlet from the main tap. If the stove is made in the CIS countries, then gas can siphon through the nuts on the internal tubes running from the regulator valves to the burners. The third place of possible leakage is the gas supply regulators to the burners themselves.
To determine the location of gas leakage, you will need to apply a water-soap solution with a brush to all threaded pipe connections without exception. A leak can be detected by slowly rising bubbles. There is no other way to determine the location of the repair, except perhaps with the help of a special gas tester.
To repair, you need to turn off the gas valve and repack the joint with fum tape and gas lubricant. Inside the slab, paronite or silicone gaskets are used at all pipeline connection points, providing a very reliable and high-quality seal.
If the smell of gas occurs during operation of the gas stove, then the nozzle system with an air intake and flame divider is subject to repair. During repairs, the injectors must be cleaned with a cut match or a plastic needle. The air intakes are checked for the presence of dust or foreign objects, and the dividers are cleaned of settled gas combustion products with a thin wire.
Repair of faucet regulator
For gas stoves produced in the CIS countries, the most common breakdowns are the regulator taps. Such a valve is made in the form of two parts - a stationary body and a movable cone-shaped liner with holes. The cone is pressed by an insert spring and a drive rod, onto which a plastic burner control handle is placed.
The parts are made of brass; according to the technology, the cone must be ground into the valve body. If the valve parts were operated without lubrication, natural wear or wear on the cone would occur.
For initial repairs, you need to unscrew the two mounting screws and remove the cone, having previously marked its position relative to the body with a marker. Next, you need to remove the dirt, add a small amount of solid gas lubricant and reassemble the assembly in the reverse order. Such simple repairs can extend the life of a gas stove by several years.
Repair of cranes is carried out one at a time so as not to confuse the parts with each other. No other lubricant other than special gas can be used, otherwise the faucet will stick so that it can only be turned with pliers with enormous force.
For Italian or German stoves, faucet repair is generally irrelevant; thanks to the high quality of the metal and lubricant, the device can operate trouble-free for 15-20 years.
Correct repair of the electric ignition system
Most often, modern gas stoves are sent for repair due to a disruption in the stable operation of the built-in electric ignition system. In many cases, a complete failure does not occur; ignition may not work on one burner, or it may periodically appear and disappear alternately on several burners.
The system itself consists of four main elements:
- Contact pair installed on the control handle;
- Power supply systems, which include an ignition unit, a surge protector and a cord for plugging into an outlet;
- Four spark plugs, one for each burner;
- High voltage wires.
The latter are used to connect the spark plugs to a block-generator of high-voltage electrical pulses, one for each spark plug. The body of the gas stove acts as the second conductor of the high-voltage circuit.
Ignition repairs begin with disassembling the gas stove. Initially, remove the burners and remove the front top cover of the gas stove.
Ignition does not work on one burner
In the vast majority of cases, repairing electric ignition comes down to eliminating the short circuit between the high-voltage wire and the housing. The technological cavity located under the front cover is used for laying pipelines and wiring in the slab.
During the cooking process, water and some of the contents of pots and pans get inside the cavity and accumulate for a long time. Liquid substances, which most often have an acidic reaction, conduct current well, so even one drop that gets between the wire and the body can cause the auto-ignition to be repaired.
For high-quality repairs, all high-voltage wires must be cleaned, dried, placed in PVC tubes and fixed on plastic stands, without contact with the metal body of the gas stove.
In addition, heavily soiled spark plugs may be a reason for repair. The deposited grease deposits close the circuit, which leads to blocking the operation of the high-voltage unit of the system.
To perform repairs, you must perform the following manipulations:
- Remove the contact connector from the spark plug;
- Use a screwdriver and pliers to remove the retaining leaf spring and remove the spark plug;
- We wash the part in a strong detergent solution, clean, dry and install it in its original place, put on the connector.
Repairing stuck ignition on a gas stove
A situation occurs when the automatic ignition system begins to operate even when the burner control handle is released or turned off. The cause of the emergency is a short circuit of the control wiring to the body of the gas stove.
To repair, you first need to turn off the power to the gas stove. The next step is to remove the top panel and clean all high-voltage wires from dirt. If the unit is working properly, then the steps performed are sufficient for the initial repair of the device. It is imperative to clean and dry the entire technological niche of the stove.
Sometimes it happens that after releasing the burner handle, the spark plug continues to click for quite a long time. The reason for this situation is that the rotating mechanism of the faucet is heavily contaminated with grease, as a result of which the force of the return spring is not enough to open the contacts.
To repair the burner, it is necessary to remove dirt and lubricate the mechanics with a mixture of VD5.
Electrical surface
First, let's talk about how to repair an electric hob and what problems this version of the stove may have. Most often, owners are faced with a situation where the hob does not work or one of the burners does not heat up when the power is connected.
In this case, the repair comes down to the following steps:
- Check the voltage in the outlet, because Perhaps this particular electrical point has failed, resulting in no power.
- Carefully inspect the cord and plug for mechanical damage. Sometimes the repair ends there - you just need to replace the electrical plug or cord.
- Remove the hob from the countertop by disconnecting all wires and unscrewing the mounting strips.
- Using a multimeter, check the thermal fuse (pictured below) and the transformer. If there is no resistance or differs from the nominal value, you need to replace the circuit elements with new ones.
- Check all wire connections (on the control unit, switches, thermostat, burners) and make sure that there is no simple open circuit. First, try to visually find the fault, and then use a multimeter to test all sections of the circuit according to the diagram.
Often, finding a breakdown of an electric hob with your own hands is not difficult if you know how to use a multimeter. If this device is not available, you can use an indicator screwdriver, which will show the presence of voltage in a certain section of the circuit.
In addition, I would like to tell you why the hob may stop working, so that you know the cause of the malfunction and how to repair each one. So, among the main breakdowns, the most common are the following:
- The fuse blows due to a power surge. Replacement is not difficult, and the cost of the fuse is negligible. To protect equipment from such a malfunction, it is recommended to install a network surge protection device.
- The burner (one or several at once) does not work. Most likely there was a break in the circuit on the heating element. If the wiring is unsoldered, DIY repairs will not be difficult if you have a soldering iron. If the heating element burns out, it must be replaced with a new one. They rang the heating element, but is it intact? Check the control unit; sometimes a contact break occurs on the switch, which needs to be either repaired or replaced.
- The sensor does not work. Here things are more serious, because... A touch-sensitive hob will be difficult to repair for a novice electrician. First, as in previous cases, ring the sensor. If you cannot find the banal cause of the malfunction, you will have to either replace the touch panel or send it in for repair. Typically, failure of this circuit element is extremely rare and is caused by improper operation of the equipment. If you find that the sensor does not turn on after washing, it means that the control unit has simply burned out from the saline solution that some would-be advisers on the forums recommend washing the surface with.
- Does not heat up or heats up weakly. Again, check the heating element, thermostat, temperature controller. The opposite situation may occur when the electric hob gets very hot and does not turn off. In this case, with a 95% probability we can say that the cause of overheating is a failure of the thermostat, which does not turn off the power when the burners are sufficiently heated. The thermostat cannot be repaired, so it must be replaced.
- The surface is cracked. The rarest of cases that can happen with a glass ceramic hob. If you see that a web of cracks has formed on the surface, and at the same time you are 100% sure that no one in the family dropped heavy dishes on it, there may be two reasons.
Malfunctions in the burner operation control system
Modern gas stoves are necessarily equipped with flame front control systems. A thermocouple tongue is installed on the burner, which receives heat from the flame. A heated thermocouple produces a small voltage at the contacts.
When the burner is turned on, the handle is recessed by 3-5 mm, which leads to the fixation of the opening tap on the electromagnet built into the housing. While the magnet receives voltage from the thermocouple, the gas valve remains open.
Repairing the control system is completely similar to the procedure for restoring the ignition system. Most often, the thermocouple is covered with a thick layer of deposits that interfere with the heating of the sensor. All repairs boil down to thoroughly cleaning the thermocouple and installing it in the socket.
Experts also recommend cleaning the contacts on the connecting wiring; the voltage is low, so even a thin layer of fatty deposits on the connectors can damage the system.
Frequent problems and methods for eliminating them
Before starting to repair equipment, you should study its design in detail, as well as diagnose the device in order to identify the cause of the malfunction.
Frequent malfunctions and ways to eliminate them.
Poor oven heating. This problem often occurs due to a broken switch. To fix the problem, it is enough to install a working element.
Remember, if replacing the switch does not bring the desired effect, you need to check the heating coil.
To do this, you should first dismantle the rear panel of the stove body, loosening the clamping brackets of the device
If damage to the spiral is detected, it is important to replace it. In this case, the new mechanism should be installed exclusively in prepared grooves. Uneven flame length in the burner or lack of fire in the burner
As a rule, this problem occurs due to clogging of the gas channels of the stove. To restore the functional properties of the unit, you should clean the nozzle passage holes using a thin needle.
Uneven flame length in the burner or lack of fire in the burner. As a rule, this problem occurs due to clogging of the gas channels of the stove. To restore the functional properties of the unit, you should clean the nozzle passage holes using a thin needle.
However, if this procedure does not resolve the problem, you will need to check the spark plug insulation for leaks and the solenoid valve's structural integrity. If any malfunctions are detected, the worn element should be replaced.
- The appearance of extraneous sounds during gas combustion. This problem often occurs when the balance of the air-gas mixture is disturbed. When using old kitchen stoves, adjusting the air damper of the device will help eliminate the problem. To eliminate noise, when operating devices of a new type, all flame dividers are replaced.
- Spontaneous extinguishing of the gas burner. When the stove is operating properly, the flame from the burner “washes” the thermocouple. However, if the fire does not reach the element, the burner may spontaneously go out. To eliminate the malfunction, you should clean the stove nozzle from dirt or adjust the gas supply.
- The flame goes out in the oven. Modern gas stoves are often equipped with a gas control system. Thanks to the presence of this function, when the flame in the oven goes out, the fuel supply is automatically blocked. In this case, the sensor, when cooled, transmits a signal to the valve of the device, which shuts off the passage channels of the furnace. However, if there is a malfunction in the gas control design, the flame in the oven burns only when the ignition button is pressed. As a rule, after stopping the impact on the key, the burner spontaneously extinguishes.
This problem often occurs when the thermocouple is not cooled quickly enough. As a rule, in the process of heating this element, an electric current is generated. In this case, the flow, holding the magnetic valve in the pressed position, does not allow the resource to close the passage hole of the nozzle.
To restore full operation of the unit, the thermocouple should be cleaned of dirt. This procedure is performed using sandpaper.
If cleaning the thermocouple from dirt does not bring the desired result, it is necessary to replace the faulty mechanism.
Poor supply of gas burner flame. This problem often occurs when the holes in the jets that spray fuel become clogged.
Regular cleaning of the injector clearances will help prevent excessive dirt accumulation.
The second reason for poor flame pressure is the incorrect ratio of the air-gas mixture that flows to the burner. If it is necessary to increase the burning intensity of the fire, the air damper of the stove should be adjusted.
Remember, improperly repaired kitchen appliances can lead to gas leaks and explosions.
Prevention
In order for a kitchen unit to work for many years without serious breakdowns, regular preventive maintenance is required. After each cooking, wait until the stove has cooled down, you must thoroughly wash and remove food debris from the surface. This will protect the equipment from various blockages.
It is not recommended to leave operating equipment unattended. The boiling liquid can flood the flame on the burner, thereby shortening the service life of the gas control mechanism and auto-ignition elements.
Advice! When cleaning surfaces from burnt food, you can use baking soda. This will speed up the cleaning process and add disinfection. Burners and grates made of cast iron are cleaned with a wire brush.
It is necessary to regularly lubricate the rubbing surfaces of the control valves. How to do this was described above.
Repairing a gas stove is not difficult. But it’s even easier to keep it clean and tidy. And then the irreplaceable kitchen appliance will serve for many years, delighting you with impeccable performance.
Problems with candles
When the spark plugs sparkle yellow or orange, this is a sure sign that the power supply is broken. If you notice sparking of the spark plugs, then in this case you should disassemble the panel to get to the electronic filling of the device. You must proceed as follows:
- Unplug the hob.
- Using a screwdriver and other available tools, remove the top cover.
- Now disconnect the contacts from the power supply.
Thus, you can replace the unit: just take the broken one and show it to the sales consultants in the store, who will offer a working part.
You can make sure that the problem is with the unit by turning on the hob in the dark. If the spark is blue, it means the unit is working; if it is yellow or orange, it needs to be replaced.
Sparking yellow or orange light can also be due to oxidation of the spark plug rod. The problem is solved by replacing the faulty part. It is worth noting that such problems are extremely rare and occur only where for a long time the concentration of moisture in the air exceeds all necessary standards.
This can also happen if you give transfusions too often. Water particles can penetrate inside the panel, causing droplets to fall on wires or microcircuits. In this case, quick and high-quality drying will help, otherwise the candle rod may oxidize. Otherwise, the wires will become rough and can easily break, as a result of which you will have to completely replace the electronic filling of the hob.