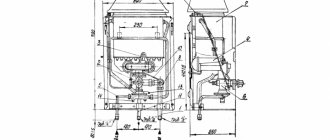
A gas water heater or gas heater is a metal body with two pipes attached to it, supplying cold water for heating and gas.
A gas water heater has several components:
- Radiator;
- Gas supply pipe;
- Burner;
- Igniter.
Cold water supplied through the pipe puts pressure on the membrane that releases the gas. When it begins to flow into the burner, it is ignited by the igniter, which heats the heat exchanger, through which warm water flows to the tap.
The igniter can be with piezoelectric, manual or electronic ignition. The gas is automatically ignited when the water tap is opened.
Why does the geyser leak and water drips from it?
The column or flow heater is becoming an increasingly popular product. A small device can fit compactly in the kitchen and provide hot water to several points of intake. In addition, heating with gas is cheaper than heating with electricity. But what to do if the gas water heater is leaking? Should I call a professional or figure out the problem myself? Possible options are indicated in the article.
Pipeline leak
In some cases, the geyser leaks as a result of the formation of holes in the copper pipes. A thorough inspection of the heat exchanger when the water is turned off will allow you to find the location of the leak. Liquid leaks from large holes, minor damage is detected by rust around it and green spots.
What to do to fix the leak:
- Cold welding. It is important that the welding compound used can withstand high temperatures. Similar information can be found on the packaging of the product. You will need to remove a piece of cold welding from the packaging, knead it with your hands (wearing gloves) until it begins to harden. Then apply the composition to the pipe and smooth it until it hardens completely.
- Soldering holes. You can eliminate the reason why the gas water heater is leaking by soldering the damaged area. It will first need to be cleaned, degreased and coated with flux. Using a powerful soldering iron or torch, it is necessary to cover the damage on the pipe with solder (the solder layer should be approximately 1-2 millimeters thick). It is recommended to solder several holes located close to each other with a piece of copper plate. It is not advisable to solder Chinese inexpensive heat exchangers, since very often they are painted on top. In this case, paint is used by manufacturers to hide the uneven color of low-quality copper (it contains impurities). In this case, the tubes burn out during the soldering process because they are too thin.
- Installing a clamp with a rubber gasket. The simplest way to eliminate a leak without damaging the structure. This measure is especially effective if the tube does not fit tightly to the casing and if there is enough space.
In some cases, it is possible to discover the reason why the column is leaking too late and the pipe manages to rot to such an extent that only its replacement can save the situation. Finding the right part is not easy even in specialized stores. Using a flexible water line or a corrugated stainless steel hose instead of a rotten tube will help solve the problem.
It is easy to replace a worn rod o-ring yourself, as well as rubber gaskets. It is quite possible to fix a leak in a gas water heater yourself; no special skills or knowledge are required. But still, when repairing such equipment, you should not forget about safety. If you do not have confidence in your own abilities, then it is advisable to seek help from specialists.
The column or flow heater is becoming an increasingly popular product. A small device can fit compactly in the kitchen and provide hot water to several points of intake. In addition, heating with gas is cheaper than heating with electricity. But what to do if the gas water heater is leaking? Should I call a professional or figure out the problem myself? Possible options are indicated in the article.
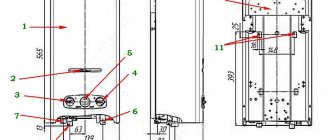
Where does the water in the column come from?
To understand the causes of the problem, you need to understand the device. The basis of the design is a metal body, to which two pipes are connected. A flow of water passes through one for heating, and gas is supplied through the other.
Water pressure acts on the membrane, the igniter and burner are activated. It heats the heat exchanger through which cold water moves. You open the faucet and get a hot stream.
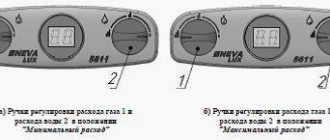
Most dispensers operate automatically as soon as the tap opens. Manual and piezoelectric ignition is also found.
Why did the column leak?
There can be several reasons for a leak.
- Gaskets between connections are worn out. Rubber gaskets are installed between the pipes and pipes for tightness. Over time, they tear, become deformed, become damaged and require replacement. If a leak is noticed in the area of the connecting elements, you need to remove the old ones and install new gaskets.
- The heat exchanger (radiator) is leaking. Most often, water drips from the connections between the pipes and the radiator. Due to temperature and moisture changes, supply pipes wear out and corrode, so water flows from below. It is necessary to seal or replace faulty parts.
- Prevention has not been carried out for a long time. Gas equipment requires periodic inspection and maintenance to prevent breakdowns.
Leakage of threaded connections
Sometimes water drips from the gas water heater due to leaking threaded connections. In the places where they are located, manufacturers use American nuts (flare nuts).
To seal them, rubber gaskets are used, which, when exposed to high temperatures, lose their elasticity, become hard and allow water to pass through.
To troubleshoot you will need:
- Turn off the water (there is a special tap on the tube through which cold water is supplied to the column);
- Unscrew the threaded connection with an adjustable wrench (it will be easier to unscrew if the connection is slightly heated);
- Take out the old rubber gasket and carefully inspect the threads.
If the thread is not damaged, then you just need to replace the gasket with a new one and tighten the connection with a wrench. If there are defects on the American thread, the union nut will need to be replaced.
The best option would be modern silicone gaskets. They are more durable than rubber seals and provide better sealing. Instead of one gasket, you can use two in one place of the threaded connection.
Methods for eliminating leaks
First of all, inspect the equipment to find the location of the leak. Then proceed with the repair.
Heat exchanger problem
Before starting any work, turn off the water supply and turn off the gas. Inspect the speaker radiator: if the case is damaged or cracked, green spots may form on the surface. This is because the moisture does not have time to dry out. Most often, fistulas form from the outside, so you do not have to dismantle the part.
If no damage is found on the outside, then you will have to remove the radiator. This is a labor-intensive process, since you will have to disassemble the entire column. In such cases, it is better to call a specialist.
- soldering iron;
- solder;
- fine sandpaper;
- degreasing agent.
- Drain the radiator. To do this, open the hot water valve, unscrew the cold water nuts. To completely remove moisture from the coil, you can use a vacuum cleaner. Otherwise you will not be able to reach the temperature required for soldering.
- Remove the casing and inspect the products. All detected damage and cracks must be cleaned with sandpaper. After complete removal of plaque, wipe the cleaned areas with a degreasing solution, then wipe dry.
- Heat the damaged area with a soldering iron. Sprinkle rosin or an aspirin tablet on top. After heating the area to 160 degrees, solder the tin. If it beads up, it means you haven't heated the surface properly. For successful further operation, the surf must be at least 2 mm.
- Treat all areas with a green coating in this way.
Keep in mind that such repairs are temporary. The welded areas are vulnerable and may soon begin to leak. Therefore, it is recommended to completely replace the element.
Malfunction of the water unit (gearbox)
If a leak is detected in the Electrolux, Oasis, Orion, Neva gas water column in the area of the water unit, it means that the rod seal is faulty. The entire element will have to be replaced. Do this:
- Close the gas and water valves.
- Remove the top casing; you may have to unscrew the screws.
- Disconnect the water unit from the radiator. Unscrew the fasteners that secure it to the back wall.
- Unscrew the knot and remove the membrane.
- Use a wrench to unscrew the rod and install the working part.
Wear of threads and connections
Damage and deformation of connecting nodes is not uncommon. To determine the specific cause, you need to inspect all connections. The left pipe leading to the body supplies hot water, the right one transports fuel. Most often, droplets of moisture form on the water pipe - condensation.
This is normal, repairs are not needed in this case. But if you notice a heavy leak, then:
- Block the incoming flow from the water supply.
- Disassemble suspicious connections and inspect.
Most often, rubber gaskets leak. Therefore, prepare spare parts in advance.
- Remove the deformed gasket, clean the threads from scale and dirt, and wipe dry.
- Install a new element (preferably made of silicone, they are more durable).
- Reassemble the parts in reverse order.
- If the nut rotates during installation, install a new part of the same size.
Pipeline damage
In water heaters from Vector, Ariston and other brands, not only connections and gaskets can wear out. The leak may be in the pipeline itself. For immediate repairs, you can use the heat exchanger method - solder.
You will need the same tools: soldering iron with solder, fine-grained sandpaper, degreaser. Now you need to drain all the liquid from the pipe and dry it. Clean the broken area with sandpaper and degrease. Solder the damage with a soldering iron.
We remind you that such repairs will not last long. It is used as a temporary measure. After which it is better to replace the faulty parts.
Users noted that finding replacement piping parts is not easy. Manufacturers do not produce spare parts, so some use standard corrugated hoses.
Do not forget: a geyser is a high-risk device. Amateurs are better off not taking risks and contacting a service center. In other cases, adhere to safety precautions.
Radiator leak
Hot water appears thanks to the existing heat exchanger. The heat exchanger radiator consists of metal pipes and plates located close to each other. The plates come into direct contact with the fire, due to which soot appears on them during operation.
Signs of soot accumulation include:
- The flame is yellow;
- When burning, the fire deviates to the side and heats the body (the flame should tend upward);
- Soot falls off the gas water heater;
- Even when operating at full power, the water heats up weakly.
To remove soot, you will need to remove the casing by unscrewing the bolts (latches) that secure it.
Important! To prevent soot from entering during disassembly of the column, it is necessary to cover the burner with a rag.
After the assembly is removed, it must be washed by placing it in a container with water for several hours to loosen the soot. This will make it easier to clean the space between the heat exchanger plates. For quality cleaning, it is recommended to use running water, a long-bristled brush and detergents. After drying, the radiator is put in place.
Green spots on the heat exchanger indicate existing cracks and holes.
If the geyser is leaking due to a failure of the heat exchanger radiator, then the actions should be as follows:
- The water supply pipes must be shut off to prevent water from entering the gas water heater. After which the hoses are disconnected and the remaining water is drained. The remaining liquid in the coil is removed with a pump or vacuum cleaner; you can try blowing the water out with your mouth using a hose. This must be done, since the remaining moisture absorbs heat during the soldering process, and it will not be possible to heat the metal to the desired temperature.
- Damaged areas (they are green) will need to be cleaned with sandpaper and degreased with a solvent, and then wiped dry.
- Crushed rosin or an aspirin tablet should be sprinkled on the work surface. Rosin and aspirin will serve as solder here.
- Using a soldering iron with a power of at least 100 W (since they will have to work at temperatures above 180 degrees), it is necessary to increase the solder to a height of approximately two millimeters. If the soldering is loose, this means that the working surface is not heated enough. You can additionally heat the soldering area with an iron or another soldering iron.
- Each through-hole fault will need to be soldered in a similar manner.
- After the soldering work is completed, you need to wait until the working surface has completely cooled and assemble the gas water heater.
- Before full operation, the equipment is started in test mode.
Why is the geyser leaking - what to do
If there is no maintenance, after 4-5 years of operation, you may suddenly encounter water starting to drip from your instantaneous gas water heater. Leaks occur for several reasons.
Some problems are easy to fix yourself. Others require skilled maintenance. If the owner is faced with the fact that his gas water heater is leaking, there are several important points to consider:
- Is it possible to use a faulty water heater?
what causes the leak;
- methods for eliminating leaks and increased condensation formation.
Regardless of how intensely water drips from the boiler, it is necessary to determine the cause of the leak and eliminate it immediately.
Technical reasons for column leakage
There are two main failures that lead to leaks. The malfunction is determined by the method of exclusion. The breakdown is indicated by the localization of the appearance of liquid. So, if water flows from below, most likely the malfunction is associated with a failure of the gearbox. When condensation appears, the breakdown is associated with the heat exchanger.
Below is a description of common problems:
- The malfunction of the water unit is a gearbox, a simple control device that sends a signal to open the gas valve and to the ignition unit. Inside, the “frog” is a hollow structure divided in half by a membrane. When water is supplied to the reducer, pressure is applied to the diaphragm, which in turn leads to the movement of the rod connected to the gas valve. The membrane fails due to prolonged pressure and mechanical stress. Signs of a breakthrough:
- water drips from the safety valve of the gas water heater - the membrane blocks the access of liquid, but the barrier disappears after damage or wear of the gasket;
- the water unit is leaking - another clear sign of failure of the membrane or rod seal. Initially, only a few drops of water are released during operation. Over time, the flow in the frog becomes more intense.
Corrosion or hole in the heat exchanger (radiator) - the steel or copper tubes of the coil are subject to constant thermal stress. As a result of direct exposure to fire, microcracks form on the metal surface. Burnout of the tubes occurs. The first sign of failure is the accumulation of condensation on the body and internal components of the water heater. In places of leakage, copper changes color to poisonous green.
To eliminate a leak, you must determine its root cause. For this purpose, remove the boiler casing and carry out a visual inspection. Work begins after determining the location and intensity of the leak. Before servicing, turn off the gas and water supplies.
The main causes of geyser leakage
A geyser is a complex piece of equipment that, with proper care, will provide long-term, uninterrupted operation. But, like all such devices, it has its own service life. Thus, if you do not pay attention to the first malfunctions and problems in operation, you can reduce the service life of the equipment.
Leaking and dripping from the column is nothing new. Many consumers face this problem. But only timely elimination helps to keep the device in good condition. Guided by our article, you will be able to eliminate dripping or leaking from the gas water heater, if this is not related to the need to completely replace the equipment.
If the leak continues for a long time, and all possible methods to eliminate it do not help, then, most likely, this will be evidence of a burnt-out heat exchanger. Then you will have to change parts or buy a new column
To know which method to solve the problem to use (and there will be several of them), you need to determine the cause of the malfunction.
Similar problems are possible in devices of any brand. Some models have a very vulnerable radiator, others have contact areas, others have a membrane, etc.
And, if you find a leak in your gas water heater, then perhaps the cause is one of the following:
- Wear of water flow connecting elements . Most likely, it is necessary to change the rubber seals and gaskets that are located between the hose and the pipe.
- The heat exchanger has leaked and is now leaking water . Constant exposure to fire on the metal surface of the coil causes microcracks. The result is pipe burning. And then the first sign of a radiator failure is the accumulation of condensation. Water appears on the body and on the column components located inside the device.
- Worn rod or diaphragm sealing ring . Often it is from the gas-water unit that water begins to ooze. The cause is often damage to the o-ring or membrane. The part (both) can be easily replaced with a new one.
- Long-term lack of preventive checks . Typically, unexpected leaks are the result of a lack of preventive maintenance.
When the water heater starts to leak, the first thing you need to do is check the pipe connections. To determine the root cause, you need to remove the casing from the column and inspect it visually - the location of the leak indicates the location of the breakdown. Only after determining the specific location and intensity of the leak can you begin to attempt to eliminate the defect.
The casing is easily dismantled, since it is attached only with bolts, and sometimes with latches. If you notice that water flows only when the boiler is on, you will need to start the heater at the time of checking, then turn it off again. Before carrying out repair work, it is imperative to turn off not only the water supply, but also the gas supply.
The pipes that are connected to the heat exchanger are always affected by temperature changes. This often causes corrosion and deformation.
If liquid appears at the bottom of the boiler, it may be due to the gearbox. The presence of condensation or dripping detected in the upper parts of the column indicates a breakdown of the heat exchanger
How to fix a leak in a column
First, identify the source of the leak. This can be done quite simply by visual inspection. The casing is attached with latches or fixed with bolts. If water drips from the geyser only when you turn it on, you will need to start heating the water for a few seconds. After identifying the location of the breakdown, they begin to eliminate the leak:
- Threaded and other connections - leaks are eliminated by changing all the gaskets and re-packing the connection. To improve sealing, special silicone compounds (sealants) are used. If a hose leaks, it must be replaced; it cannot be repaired. The average service life of gaskets is 2-4 years. You can prevent leakage by carrying out regular maintenance of the water heater, with the replacement of all sealing rubber bands.
You can eliminate leaks at threaded connections yourself. Repairing a “frog” requires certain technical skills and a clear understanding of how the water unit works.
Conclusions and useful video on the topic
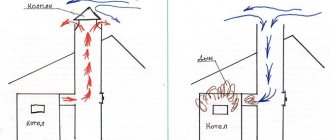
The following video will introduce you to the consequences of unsuccessful unauthorized reinstallation of a water heater with water entering the gas pipeline:
Sometimes identifying the source of a leak is not so easy. And the consequences of water getting into a gas pipe can be fatal, since in the absence of gas, household appliances do not always automatically turn off. The characters in the following video talk about this:
Obviously, if water accidentally gets into the gas system, the person responsible for the accident faces serious trouble. Even if it is possible to avoid or reduce administrative liability, the moral and material costs will be significant.
It turns out that it is cheaper not to break the Rules and seek help from a specialized organization than to cause trouble for yourself and your neighbors.
Would you like to share your own experience in eliminating problems when water gets into the gas supply system? Do you have useful information on the topic of the article? Please write comments in the block form below, ask questions and post photographs.
Condensate in a gas water heater - what to do
In this case, the problem is more serious. Most likely there is a leak in the heater. Occurs under the influence of small microcracks. Initially, perspiration appears on the body and internal parts of the speaker. Subsequently, condensation begins to drip from the gas water heater.
A heater (radiator, coil or heat exchanger) consists of pipes with fins. When exposed to direct fire, the metal will burn out over time. Thinning pipe walls lead to leaks and condensation. The malfunction must be corrected immediately. Replacing the radiator or soldering the damaged area will help get rid of condensation.
Soldering is performed in the following way:
- the liquid from the heat exchanger is drained;
remove all dirt and scale from the surface;
soldering is performed with a soldering iron heated to 180°C and a power of at least 100 W;
Condensation in a gas column can form due to every microcrack and deformation. Soldering is used to treat each damaged area.
It happens that condensation forms only on the cold water pipe, and the problem usually arises in new turbocharged boilers. While the water heater is under warranty, it should be replaced immediately. There should be no condensation in a working column.
The gas water heater is leaking - causes and ways to eliminate them
One of the most common problems faced by owners of instantaneous water heaters is leakage. What to do if the gas water heater is leaking? You can call a specialist who will quickly correct the situation; another option is to try to figure out the cause yourself.
- 1 Causes of leaks
- 2 Options for eliminating leaks 2.1 Heat exchanger
- 2.2 Water unit
- 2.3 Worn threads or connections
- 2.4 Pipeline damage
Causes of leaks
The main reasons why a geyser leaks are usually the following:
- Wear of gaskets in connections. The fact is that rubber gaskets are installed between the pipes and pipes. During use, they wear out and begin to tear or deform. If the leak is in the area of the connecting parts, they need to be replaced with new ones.
- A hole has appeared in the heat exchanger. Over time, the circuit is corroded by rust and becomes overgrown with scale, which negatively affects the integrity of the metal. Therefore, after 6-10 years of service, the radiator may leak.
Main types of faults
You can fix a malfunction in a gas water heater by turning to specialists for help or doing it yourself. But still, when working with such equipment, it is necessary to know the safety measures, as well as their strict adherence.
IMPORTANT! Otherwise, independent repair of a gas water heater is fraught with HUMAN SACRIFICES.
List of breakdowns found in geysers:
- The igniter does not light;
- The pilot light goes out;
- There is a pipe leaking in the radiator;
- Water is leaking at the connections.
There are two main reasons why a gas water heater leaks. Failure is determined by elimination. Where exactly the fault is located is indicated by the localization of the liquid. The fact that the gearbox has failed will be indicated by water flowing from below. If condensation appears in the column, the heat exchanger (gas column radiator) is faulty.
The most common breakdowns:
- A reducer or water block is a device that sends a signal to open the gas valve and then to ignite. From the inside, the gearbox looks like a hollow structure, divided in two by a membrane. When water is supplied to the reducer, pressure arises, from which the membrane wears out over time, leading to malfunctions. When liquid drips from the column's safety valve, this means that the membrane is blocking water access, but due to wear, the barrier disappears.
- Another sign of a problem with the membrane is a leaking water unit. Such a breakdown can also be caused by failure of the rod sealing gasket.
At first, during operation, only a few drops of water are released; over time, the flow in the gas water heater becomes more and more intense. Microcracks or corrosion in the radiator appear due to constant exposure to fire. As a result, the copper or steel pipes of the coil burn out. In this case, condensation first accumulates on the internal components and the housing. Leak points are indicated by a change in the color of the copper - it turns green.
Options for eliminating leaks
Heat exchanger
What to do if the radiator in the gas water heater leaks? First you need to disconnect the device from the power supply, turn off the gas and water. Then carefully inspect the heat exchanger. Leaks often appear as rusty or greenish spots. This happens because the moisture in these places does not have time to dry out. Basically, holes are formed on external elements, which facilitates the repair process. If the leak points are in a hard-to-reach area, you will have to remove the radiator. Then it is better to call a specialist.
If there are leaks in the heat exchanger, it is recommended to replace this element with a new one. But some decide to repair the part in the following way:
- drain the radiator - open the hot water valve and unscrew the cold water nuts, and suck out the remaining moisture with a vacuum cleaner;
- found holes and cracks are rubbed with sandpaper so that no rust remains;
- the cleaned areas are treated with a degreaser and wiped dry;
- take a soldering iron and use it to heat the damaged area, sprinkle rosin or an aspirin tablet on top;
- heating the metal to 160°C, solder the tin; if it forms droplets, then the surface is not heated enough.
The thickness of the tin layer should not be less than 2 mm. Please note that soldering the holes will only give temporary results. After a few months, the leak will make itself known again. Therefore, it is necessary to purchase a new heat exchanger as soon as possible.
Water node
It happens that a leak occurs in the water unit. This usually indicates that the stem seal is faulty. To replace a damaged element, you will have to remove and disassemble the water unit (“frog”). This is done as follows:
- disconnect the water unit from the wall of the gas column;
- unscrew the part and remove the membrane;
- Use a wrench to remove the rod and replace it with a serviceable part.
You should also pay attention to the condition of the membrane. If it has lost elasticity or become deformed, it must be replaced.
Worn threads or connections
In most cases, leaks occur precisely at the junctions of water pipes and gas water heater pipes. A leak should not be confused with condensation, which often forms on the pipe supplying heated water. This is a normal process and there is no need to try to fix anything. If this is indeed a leak, then perform the following actions:
- block water supply;
- disassemble the leak site;
- in most cases, leakage occurs due to loss of elasticity of the gaskets - then it is necessary to prepare spare elements;
- the old gasket is removed, the threads are thoroughly wiped from scale and dirt, then dried;
- install a new gasket (it is advisable to give preference to a silicone element);
- the parts are assembled in reverse order.
Pipeline damage
In rare cases, leaks occur in water pipes. As a temporary measure, you can solder the damaged area in the same way as repairing a heat exchanger. To do this, you should prepare: sandpaper, a soldering iron and a degreaser. The sequence of actions is as follows:
- All liquid is drained from the pipe and dried.
- The leak site is cleaned with sandpaper and degreased.
- Damage is sealed with a soldering iron using tin.
It should be remembered that such a pipe will not last long, so it is necessary to quickly replace it with a new one.
Leak prevention
To prevent a leak from catching you by surprise, it is necessary to carry out preventive maintenance of the device at least once a year, inspect it for rust, sediment accumulation, etc. It is advisable to change all rubber seals every two years.
For better insulation, it is recommended to use special sealants and sealing elements.
Most of the reasons that cause a gas water heater to leak can be eliminated yourself. To extend the service life of the water heater, do not neglect the manufacturer’s recommendations; you should periodically inspect the device and replace worn parts.
What to do if the gas water heater is leaking?
- Why is it leaking?
- How to fix a leak?
- Radiator leak
- Leaking pipes
- Replacing the water assembly rod seal
Leakage in threaded connections
The phrase “gas water heater” usually refers to a flow-through gas water heater, which is installed to heat water in houses not connected to centralized heating. This heating method has many advantages, the most important of which is independence from utilities and maintenance work, which allows you to always have heat and hot water in the house.
However, residents of houses connected to the gas pipeline also have many problems. One of the most common troubles is the breakdown of gas equipment, which can lead to very serious and even life-threatening consequences. Read about what to do if you find a leak in a gas water heater in our article today.
Administrative responsibility and its size
Of course, the direct damage resulting from the accident will have to be paid by the identified culprit. But will he be fined for water found in a gas pipe?
And if so, to what extent and on what basis? In answering this question, we will proceed from the assumption that the result of an error when connecting the column was only the entry of water into the gas pipeline.
In this case, most often we are talking about the sanctions provided for in Article 7.19 of the Code of Administrative Offenses of the Russian Federation “Unauthorized connection and use of electrical, thermal energy, oil or gas.”
This article provides for the following fines:
- 10,000 – 15,000 rubles for citizens;
- 30,000 – 80,000 rubles for officials;
- 100,000 – 200,000 rubles for legal entities.
For officials, the fine may be replaced by disqualification for a period of 1-2 years. Repeated violation aggravates guilt and increases financial liability.
This could be the end of the discussion of the topic of fines, if not for one nuance: lawyers disagree on whether Article 7.19 of the Code of Administrative Offenses of the Russian Federation can be applied in the situation we are considering. Since such a discrepancy exists, let us consider the arguments of both sides.
Unauthorized connection is a tie-in
There is an opinion, which is usually expressed by defenders of those responsible for the accident, that an unauthorized connection is made for selfish reasons, the purpose of which is to steal gas. It is carried out in addition to metering devices for the unaccounted consumption of this resource.
This connection can be made using one of two possible methods:
- insertion into a main line located underground or on the street;
- connection to a household line that was previously functioning, but was disconnected by the resource supplying organization for non-payment or upon termination of the contract for other reasons.
Obviously, both of these connection methods require insertion, that is, connection in a place where there is no corresponding technical branch to which, for example, a flexible rod could be screwed.
The connection of the gas water heater was carried out in a place that was technically provided for in the household scheme of the current contract with the gas supplier. That is, such a connection cannot be considered an insert; such a connection is not unauthorized, and Article 7.19 of the Code of Administrative Offenses of the Russian Federation, in this case, cannot be applied.
There was a violation of the Rules for the Use of Fuel, the punishment for which is provided for in Article 9.11 of the Code of Administrative Offenses of the Russian Federation. Penalties in this case (in rubles):
- 1000-2000 for citizens;
- 2000-4000 for individual entrepreneurs or officials;
- 20,000 – 40,000 for legal entities.
For entrepreneurs and legal entities, administrative suspension of activities is possible.
Any arbitrariness is unauthorized
There is also an opposite opinion, based on different interpretations of the concept of “unauthorized connection”. Supporters of this decision believe that not only the insertion, but also the replacement of one household appliance with another in violation of the existing Rules for the use of gas is unauthorized.
Clause 10 of these Rules (approved by Resolution No. 410 of May 14, 2013) provides grounds for replacing gas equipment and the fact that only a specialized organization can carry out this type of work. Consequently, work carried out independently is considered unauthorized.
It should be noted once again that civil liability in accordance with Art. 1064 of the Civil Code of the Russian Federation, as well as compensation for costs associated with calling emergency services, the violator faces regardless of administrative punishment.
Why is it leaking?
We have compiled a list of the most common reasons why a gas water heater begins to leak. So, if you suspect a leak, then perhaps the reason will be one of the following:
- The connecting elements of the water flow are worn out. That is, in other words, the rubber sealing gaskets located between the hose and the pipe need to be replaced.
- The heat exchanger, that is, a kind of “tank” in which the water is heated, burst. The pipes connected to it are constantly subject to temperature changes, as a result of which they can become deformed and corrode.
- Regular preventative maintenance was not carried out. A geyser is equipment that requires periodic inspection and maintenance to prevent breakdowns. If you neglect these duties, a leak may appear unexpectedly.
How to fix a leak?
Having discovered the cause of the leak, you can begin to eliminate it. Our further actions will depend on which part of the gas water column is the source of the leak.
Radiator leak
The fact that there is a crack or hole in the radiator is indicated by the presence of green spots on this part. The procedure for eliminating a leak in the radiator will be as follows:
- We shut off the water pipes to prevent water from entering the column. Disconnect the water supply hoses from the column. Drain the remaining water from the radiator. To remove liquid from the coil, use a vacuum cleaner or pump.
- Armed with sandpaper, we clean the damaged areas. Then we treat these areas with a degreasing solution and wipe them dry.
- We take a soldering iron with solder, which can be used at temperatures above 180 degrees (the power of the soldering iron must be at least 100 W). Grind a piece of rosin or grind an aspirin pill into powder. Sprinkle this mixture onto your work surface.
- Having heated the soldering iron to the desired temperature, we increase the solder to a height of approximately 0.2 cm.
- We repeat this procedure for each through damage.
Alexander Gerasimov in his video will show and tell you how to properly solder a geyser radiator yourself.
Leakage in threaded connections
Quite often you can detect leaks in the threaded connections between parts of the gas water heater. Pay attention to which pipe has a leak: the left pipe usually supplies water for heating, and the right pipe usually supplies gas. As a rule, water begins to leak from the pipe if the sealing gasket is worn out. Changing this part is very easy.
- The first thing to do is block the water supply.
- Then we disassemble the connection in which the problem is detected (we use a regular wrench for this purpose). We remove the worn gasket.
- We clean the connecting elements from dirt and degrease them.
- If the thread on the American nut is damaged, it should be replaced.
- Then we install a new rubber gasket and assemble the connection.
Leaking pipes
Sometimes a leak is found not in the connection of the tubes, but directly in them themselves. Experts advise that if cracks and small holes are detected in the tubes, use the same method as for eliminating a leak in the radiator, that is, soldering. However, in the absence of proper care, it is not always possible to detect damage in time. If you realize it too late, and the tube has already become rotten beyond repair, you will have to replace it.
Those who have encountered a similar problem say that it is very difficult to find a suitable tube, even in stores specializing in the sale of gas equipment. As a replacement for the tube, you can use a corrugated stainless steel hose or flexible water line.
How to properly solder a tube without spoiling it and extending the life of the gas water heater can be seen in the video by Vladimir Pekar, which is presented below.
Replacing the water assembly rod seal
Another possible place for leaks to occur is the gas-water unit. If water begins to ooze from it, most likely the rod o-ring has worn out. This part will be fairly easy to replace.
The parts of the water assembly are held together by six screws - we unscrew these fasteners first. Then we separate the two parts of the assembly housing. From the inside we remove the membrane, the spring and the plate with the rod, which is a round disk with a metal pin. If you unscrew this pin, you can find a rubber ring underneath it - this is the seal. We remove the worn ring, put a new one in its place and assemble the assembly in the reverse order.
Repair of a replaced geyser heat exchanger
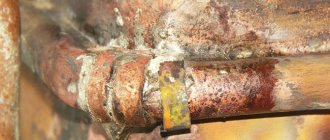
For almost three years, the NEVA LUX-5013 geyser worked properly after replacing the heat exchanger, but the happiness did not last forever, and suddenly water began to drip from it. I had to do the repairs again.
Removing the casing confirmed my fears: a green spot appeared on the outside of the heat exchanger tube, but it was dry, and the fistula, from which water was oozing, was on the side inaccessible for inspection and soldering. I had to remove the heat exchanger for repairs.
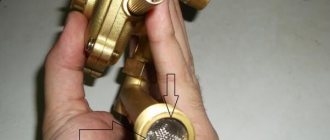
A problem arose while searching for the location of the fistula on the back of the removed heat exchanger. The fistula was located at the top of the heat exchanger tube and water oozed from it and flowed along all the tubes below. As a result, all the turns of the tube below the fistula on top turned green and were wet. It was impossible to determine whether this was a single fistula or whether there were several.
After the green deposit had dried, it was removed from the surface of the heat exchanger using fine sandpaper. An external inspection of the heat exchanger tube did not reveal any blackened spots. To find leaks, we had to pressure test the heat exchanger under water pressure.
To supply water to the heat exchanger, the above-mentioned flexible hose from the shower head was used. One end of it was connected through a gasket to the water supply pipe for supplying water to the gas water heater (in the photo on the left), the second was screwed to one end of the heat exchanger tube (in the photo in the center). The second end of the heat exchanger tube was plugged using a water tap.
As soon as the water supply tap to the gas water heater was opened, drops of water immediately appeared in the suspected locations of fistulas. The rest of the tube surface remained dry.
Before soldering the fistulas, it is necessary to disconnect the flexible hose from the water supply network, open the plug valve and drain all the water from the heat exchanger, blowing it out. If this is not done, then the water will not allow the soldering area to be heated to the required temperature, and the fistula will not be able to be soldered.
To solder the fistula, which was located on the bend of the heat exchanger tube, I used two soldering irons. One, with a power of 40 W, was placed under the bend of the tube for additional heating, and the second, one hundred watt, performed soldering.
I recently purchased a hair dryer for my household and soldered the fistula in a straight section, additionally heating the soldering area with it. It turned out that soldering with a hairdryer was much more convenient, since the copper heated up faster and better. The soldering turned out to be more accurate. It’s a pity I didn’t try to solder the fistula without a soldering iron, using only a hair dryer. The air temperature from the hair dryer is about 600˚C, which should be enough to heat the heat exchanger tube to the melting temperature of the solder. I'll definitely check it during the next repair.
After repair, the place of the heat exchanger tube where the fistula is located is covered with a millimeter layer of solder, and the path to water is reliably blocked. Repeated pressure testing of the heat exchanger showed that the tube was leak-tight. Now you can assemble the gas water heater. Water will no longer drip.
I bring to your attention a short video on how to solder a gas water heater radiator.
Total views: 29323
It is worth noting that with the help of the presented technology it is possible to successfully repair not only the heat exchangers of geysers, but also copper heat exchangers and radiators of any other types of water heating and cooling devices, including copper radiators installed in cars.
The gas water heater is leaking, why, how to fix it
The geyser leaks when the seal in the water supply and hot water outlet is broken. When using a gas water heater, unfortunately, such situations often arise.
Such problems can occur in geysers of any brand. For some models, the most vulnerable is the heat exchanger, for others - the contact areas, for others - the membranes, etc. Some leaks can be fixed on your own, others only with the help of a specialist.
Next, we will look at possible situations related to column leakage and ways to eliminate them yourself or with the help of professionals.
- AT HOME ON THE DAY OF APPLICATION FREE CONSULTATION BY PHONE UP TO 2 YEARS WARRANTY
Why is the geyser leaking?
The gas column leaks if the components of the gas column are damaged or if a leak has formed at the junction of pipes or elements in the column. And their types are:
The insulation of the connecting elements is broken
Solution: dismantling and replacing all components (connections) that affect the tightness during water movement. They are located between the main pipes and pipes. They must be treated with special compounds and sealants.
Wear of rubber gaskets
The solution is to replace them 2-4 times a year.
Violation of the integrity of the heat exchanger
Wear of connecting pipes through which water flows from the water supply system.
This causes corrosion, small cracks and deformations. Water flows through them from the gas water heater.
As a rule, it is necessary to replace the gaskets.
Lack of regular preventative measures
Eliminating gas heater leaks
If you observe the following symptoms:
- Microcracks or deformations on the body.
- Green spots on the surface of the protective layer. The reason for their appearance: high humidity, then we can assume that the radiator is leaking.
In this case, the action plan will be as follows:
- Blocking the water supply.
- Disconnecting hoses and pipes from the gas apparatus for receiving and transferring liquid.
- Drying the radiator. Cold water is completely eliminated, even from the smallest channels. To remove water from the coil, a special pump or vacuum cleaner with reverse draft is used.
- Cleansing problem areas. Fine sandpaper is used. After cleaning with it, these areas are degreased with a solvent and wiped with a dry cloth.
- Soldering. A soldering iron is used that can operate at 180 degrees. Its minimum power is 100 W. A little rosin crumbles. The solder layer is raised 2 mm from the surface. A heated soldering iron is brought to it. Every microscopic crack and through zone is sealed.
In practice, soldering gives only a temporary effect. Pipes become very vulnerable. It is logical to replace pipes and other necessary elements.
The solder cools completely. The column is assembled using the reverse algorithm. Being tested.