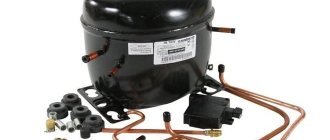
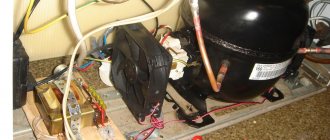
From a technological point of view, the design of a refrigerator is a combination of such components as a thermoregulation system, a start relay and a forcing compressor.
All nodes may be faulty, and different causes may have the same symptoms. Very often, when the starting relay is suspected during repairs, the cause turns out to be a breakdown of the thermostat. To understand how to check the standard thermostat of a regular refrigerator.
Thermostat with spiral sensor
Safety rules to follow when checking
A refrigerator is a large household appliance that requires high voltage to operate. There are three main threats that potentially exist if you decide to repair your refrigerator:
- electric shock (high voltage appears on the contacts of the relay, thermostat, on the compressor windings);
- electric shock (short circuit inside the electrical wiring of the refrigeration device, due to exposed parts of the wiring getting into contact with the metal body);
- frostbite due to refrigerant contact with the skin.
Anyone who decides to repair the thermostat (or any other refrigerator component) must take serious precautions. Do not carry out work while the refrigerator is plugged in: be sure to turn off the power to the device
As a result (or in the process) of repair work, wiring contacts are formed that should be connected to each other. All connections must be properly insulated. It is necessary to continuously check the presence of voltage on all surfaces capable of conducting current - the body, internal elements of the refrigerator compartment, etc.).
All tools (screwdrivers, pliers, multimeter terminals) must have insulated handles.
Types of thermostats for refrigerators
There are two types of thermostats:
- mechanical;
- electronic.
The electronic thermostat is an electronic plate on the display of which all data is displayed. This is the most advanced device; it records temperature changes with greater accuracy. But equipment with an electronic control module is expensive, so mechanical thermostats are more often used.
Reference. The mechanical thermostat can be replaced with an electronic one.
There are three main types of mechanical regulators on the market:
- Russian (Oryol plant) - TAM series;
- made in Denmark - Danfoss;
- Italian (Ranco company) - K-50, K-52, K-55, K-56, K-57, K-58, K-59.
They are used in refrigeration equipment "Minsk", "Orsk", Beko, Candy, Indesit, Bosch, Ardo, Samsung, etc.
The most common thermostats include:
- TAM-112, TAM-113 - used in single-chamber units, analogous to K-50;
- TAM-125 - installed in freezers of 2-chamber 2-compressor equipment, analogous to K-57;
- TAM-133 - used in refrigeration chambers of 2-chamber units, analogue of K-59, Danfoss 077B6;
- TAM-145 is a 3-pin freezer temperature controller with a defrost alarm (red light on the control panel).
The procedure for replacing the thermostat
- Disassembling the refrigerator. In electromechanical models, the technician disassembles the refrigerator body to get to the thermostat (which, as a rule, is located under the top cover of the unit). In electronic models, disassembly is carried out both outside (to get to the control module, which is also located under the top cover of the unit) and inside the refrigerator chamber, where the temperature sensor is hidden.
- Removing a faulty thermostat. To do this, in electromechanical models, the contact connectors are first disconnected from the thermostat. Next, the technician removes the lighting unit and pulls out the thermocouple of the thermostat. In electronic models, the temperature sensor is first cut off from the control unit, and then a wire with a temperature sensor is pulled from inside the refrigerator through the back wall.
- Installing a new temperature sensor. In electromechanical models of units, the master connects the contact connectors to the new thermostat. Then a thermocouple is lowered into the evaporator channel through a special hole, and the hole itself is sealed with sealant. In electronic ones: first, the wire, at the end of which there is a temperature sensor, is threaded through the back wall of the refrigerator. After this, the wire is connected to the control module by soldering or twisting the wire. Places of soldering or twisting are covered with heat shrink to prevent moisture from entering.
- Refrigerator body assembly. This is done in the reverse order of disassembly. Before assembly, the technician checks the resistance of the temperature sensor to ensure compliance with factory values. If, when replacing the thermostat in electromechanical models, the thermocouple is too long, the technician places it in the cavities under the top cover of the refrigerator.
- Functionality check. At the final stage, the technician turns on the refrigerator and observes for a while whether it is working correctly.
Where is the thermostat located in the refrigerator, how to remove it for replacement or repair
The thermostat is installed outside or inside the device, where it is enclosed in a protective housing. In old refrigerators, the relay is located on the right, under the light bulb in the refrigerator compartment; in modern refrigerators, it is usually located outside . Before checking the refrigerator thermostat at home, you need to carefully read the available instructions.
Location in Indesit
You can find out where the thermostat is located in the Indesit refrigerator from the documentation from the manufacturer. In appliances produced in recent years, it is mainly installed above the door. In order to get it out, you will need a Phillips screwdriver . First, remove the handles, remove the casing from the latches, unscrew the screws that secure the strip with the signal light - there you can see the relay.
Location in Atlanta
In earlier models of Atlant refrigerators, the thermostat is placed in a small plastic box with snap-on latches, which is located on the panel. To get to it, simply remove the handle for switching the temperature and unscrew the housing protecting the thermostat.
Location at other manufacturers
In modern models, the placement of the thermostat may be different. When searching, you need to rely on the location of the relay handle. It is attached to a streamlined box or panel. If you remove them, you can find the part.
Temperature sensor device
The detector must be considered together with the thermostat (temperature regulator) - these two units function together, they are the ones who adjust the operation of the cooling system. In fact, this is the core of the control part, to which a selector is connected, a touch panel for setting the desired mode.
A thermostat with a relay is a box with a selector on the wall of the refrigerator, inside its compartment. In modern models, the assembly is often built into the body, usually in the upper part. The outer segment consists only of an adjustment knob (selector), a control panel with buttons, a touch or conventional display, and an indication.
Using a graduated selector or on a touch screen, depending on the advancedness of the product and the type of control - mechanical, electronic - the user sets the cooling and freezing modes (normal, super freezing, etc.).
There are 2 types of thermal sensor designs.
Electronic (connected to a microcontroller, to a microcircuit) is a small piece of sensitive material in a plastic case, a thermistor, thermocouple, and a small board with it. The element's terminals are connected to the thermostat or control unit microcircuit. When the temperature changes, the resistance of the thermocouple changes, which is recorded by the microcontroller (MC) and compared with the values set by the user. Next, the command from the MK is sent to the relay, which closes/opens the contacts. In this case, there are 2 wires that supply a small voltage to the sensor. The thermostat, or rather the control unit with such a device, is also electronic.
A more common version of a thermal detector is mechanical. It should especially be considered together with a thermostat of the same type - it is, rather, a part of it, more inseparable than that of electronic varieties; it is usually irreplaceable, although this is theoretically possible. A more suitable name for the entire assembly is a thermal relay. This version of the sensor is a sealed metal capillary tube filled with refrigerant inside. Some models have a copper bulb at the end. One end of such an element is placed in the location where measurements are required, the second with a bellows goes into the thermostat, connecting there with mechanical parts that affect the circuit contacts.
There is a certain pressure inside the bellows tube that varies depending on the temperature. At the other end, attached to the thermostat, there is a bellows (corrugated elastic shell), the tension of which changes when the user adjusts the frames for closing/opening contacts (motor on/off) using a selector with a spring. At a certain temperature, the refrigerant changes its state (expands/contracts), the pressure in the tube changes, the part entering the thermostat moves and presses or stops acting through the bellows on the rod that closes or releases the electrical circuit.
When the cooling level reaches the one set on the selector, the sensor signals this (electronic version) or stops putting pressure on the thermostat spring - the relay releases the contacts or they themselves separate depending on the pressure. The motor stops working. Thus, freezing and hypothermia are excluded. Over time, the temperature begins to rise for natural reasons and due to the “rest” of the compressor. The described process occurs in reverse.
Possible causes of failure
There are several obvious signs that indicate a broken thermostat:
- the compressor works without stopping, or with short-term stops (this can be understood by the constant noise of the refrigerator);
- the inside walls are covered with ice, and snow freezes in the freezer;
- the refrigerator compartment is set to low or high (relatively) temperature;
- Water is spreading under the refrigerator;
- The refrigerator switches itself off and stops working.
The main reason for thermostat failure is mechanical wear of the elements. The most likely damage is:
- bellows body. The tightness will be broken, part of the refrigerant will escape, and ensuring the required pressure to turn on the compressor will become impossible;
- contacts due to burnout;
- connections between the tube and the evaporator. The tightness provided by the adhesive joint will be broken.
How to check functionality yourself
There are many ways to check the functionality of the device at home. Particularly indicative are those that are related to a specific problem. For example, if the refrigerator is running without stopping, you should turn it off, defrost it, unscrew the temperature control knob to the minimum value and turn it on again, after placing a thermometer inside the refrigerator compartment. If after a couple of hours the thermometer measurement value is more or less than +6°C, then the thermostat needs to be replaced.
Checking for ice formation inside the refrigerator is carried out in a different way. With the compressor running, turn the regulator knob and increase the temperature. If the thermostat is working properly, the compressor will stop working.
If the problem is that the equipment does not turn on, the thermostat is checked by directly shorting the two wires included in the thermostat. If, when disconnecting the device from the electrical circuit, the refrigerator turns on, then the thermostat is faulty.
There are testing methods that require dismantling the device. Basically, they are used by specialists, but the average person can also use them. One such way: using a multimeter. Having dismantled the thermostat, place its tube in cold water for several minutes, and then connect it to a multimeter, previously set to “resistance” mode. The device is recognized as working if “0” is displayed on the tester when “ringing the circuit”
What is a thermostat and why is it needed?
When a device stops functioning adequately, signs may include the following:
- the motor runs continuously, the refrigeration unit does not turn off;
- a “snow coat” (deposits of ice and frost) is detected on the walls of the chamber, the injection is too active, the freon circulation is increased and the refrigerator freezes too much;
Snow coat: a sure sign of trouble
- It’s warm in the refrigerator compartment; the more items you load inside, the worse the space cools.
- after switching off, the motor does not start immediately (it holds the temperature for a long time and does not restart).
To correct the situation, you should turn off the device from the network and completely defrost it. The contents of the chambers should be removed, then turn on the refrigerator and switch the temperature regulator to full maximum (minimum temperature). You should place a thermometer inside the refrigerator (do not use liquid ones; electronic ones are best). If the thermostat is functioning, then as soon as the thermometer shows the readings you set, the refrigerator will turn off. If, after reaching the temperature, the motor continues to operate and cool the chambers, then the thermostat is faulty.
Under conditions of constant adjustments, the temperature inside the chamber is constantly changing, the rate of these changes depends on the level of sensitivity of the thermostat.
Thermostat device
Temperature regulators for all refrigeration systems (including household appliances) are pressure gauge devices. They function due to changes in fill pressure. Pressure changes due to temperature differences. Some modern refrigerators contain an electronic thermostat - a much more advanced device that allows you to more accurately record temperature changes and turn the compressor relay off/on.
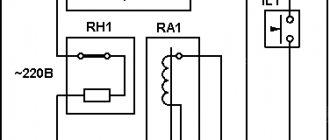
Thermostats are mechanisms containing a lever system and a set of contacts through which they are connected to the general electrical wiring of the device.
The temperature regulator is based on a so-called bellows - an element sensitive to temperature changes, which, with the help of a spring, acts on the general electrical circuit. Thus, when the temperature changes, the bellows transmits a signal to the spring, the spring to the lever, the lever to the main mechanism, and the mechanism to influence the overall electronic system. Of course, the regulator also contains a special gasket that acts as an insulator of the internal components of the thermostat from the external environment (primarily from humidity). Also, the regulator inside is filled with a special liquid (chloromethyl).
The most basic thing, and where you should start, is checking the thermostat. A sign of a malfunction or impending breakdown is excessive freezing of the refrigerator or, conversely, the device has stopped heating altogether. This means that the regulator “poorly understands” the temperature, i.e. it may work, but the range in which it detects temperature has changed. You set the refrigerator to 4 degrees, but it turns off at + 15? This means that the thermostat “thinks” that +15 is 4 degrees and therefore a false signal appears on the refrigerator. There are two ways to check:
Method number 1 - directly
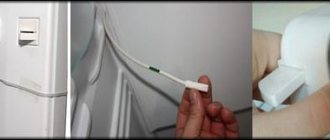
Leave the thermostat inside the refrigerator. Finding the two wires that go into it, disconnect them carefully (so that later you can easily return them to their place) and connect them together. Be careful! The wires carry high voltage. All operations with wires should be done only with the engine turned off.
Two wires coming from the regulator
This method is good if the refrigerator does not turn on. It completely tests the thermostat, since all temperature restrictions are no longer relevant.
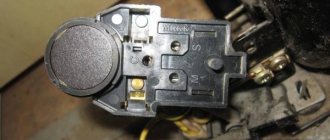
Method number 2: checking the bellows
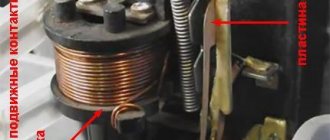
This method allows you to check the regulator without removing and disassembling it. However, some basic knowledge of component design is required. Near the small axis on which the adjustment knob itself is attached, you should find a plate; you need to move it and click it.
Dismantled thermostat
If the plate is fixed “tightly” and cannot be moved (there are no clicks), then the regulator is out of order.
Method No. 3 - checking with a tester
The main method that most craftsmen use is checking with a tester (multimeter). To do this, the thermostat should be removed (before replacing, it will need to be dismantled in any case). The multimeter should be set to “resistance” mode; the setting should be minimal (set to minimum).
Checking with a multimeter (tester)
There are cases (however, extremely rarely) that the thermostat functions properly when dismantled, but refuses to function inside. This is due to a rare malfunction that may be related to temperature conditions - in the cold it stops working, and at room temperature it does not open the circuit. To test it, place the part in a glass of very cold water. A few minutes in the water and it is ready for diagnosis. If the number “1” (breakdown) appears on the tester screen (in circuit ringing mode), then the regulator is faulty, if “0”, then the part is working.
Design features and operating principle
The thermostat or thermostat is one of the main elements without which normal operation of the refrigerator is impossible. It records the readings of temperature sensors in the refrigerator and freezer compartments and sends a signal to the compressor start relay.
In accordance with these signals, the compressor turns on if the chamber is not cold enough and turns off when the temperature reaches a set level. Technically, the thermostat is a relay, at one end of which there is a sealed tube filled with freon.
On the other side there are contacts, the opening and connection of which sends a signal to the compressor. The end of the tube with freon, also called a capillary tube, is fixed to the evaporator.
The refrigerant placed inside reacts sensitively to heating and cooling. When the temperature decreases or increases, the pressure level inside the tube changes, causing the relay contacts to connect or open.
The movement of the contacts is controlled by a small spring. It is used to set the temperature level that should be inside the refrigerator compartment. A temperature adjustment knob is attached to the spring. Turning this knob changes the tension of the spring.
As a result, more or less force must be applied to close and open the contacts. This affects the level of pressure in the capillary tube at which the contacts are triggered.
A thermostat is a small device that is equipped with a sealed tube with a sensor filled with refrigerant. Based on changes in evaporator temperature, the relay turns the compressor on or off
This regulates the degree of cooling of the air in the refrigerator. When using an electronic regulator, this process is carried out slightly differently, but the principle remains approximately the same: the desired temperature level is set based on the actual indicators recorded by the capillary tube.
But such models use an electronic control module that can simultaneously manage data from several sensors. It is not always possible to repair or replace such a thermostat at home. Handling complex electronics requires knowledge and special equipment.
Typically, the thermostat is installed inside or outside the refrigerator compartment. Before starting repairs, it will not hurt to study the structure of the refrigerator and the technical data sheet of the device. There may be a lot of useful information on the design of a specific thermostat model, as well as its location.
Usually the thermostat is located next to the handle for setting the temperature. The internal arrangement is typical for relatively old models. Inside the camera, the element is usually enclosed in a plastic protective housing.
The adjustment knob is located directly on it. To remove the thermal relay, you need to remove this handle and unscrew the mounting screws to remove the housing.
In more modern models, the thermal relay is placed outside the chamber in order to save precious cubic centimeters of internal space and not spoil the design with additional elements
But you also need to look for the thermostat near the control knob, usually under the refrigerator body somewhere at the top. The handle is removed in the same way, the fasteners are unscrewed and what you are looking for is found behind the protective panel.
Refrigerator temperature sensor location
The location of the regulator depends on the refrigerator model. Information about its structure and location is contained in the operating instructions for the household appliance. It is usually located next to the temperature control knob. In old household appliances, the thermostat is installed inside the chamber, under the light bulb, and covered with a protective housing. To remove the part, remove the handle by pulling it towards you. Then unscrew the screws and dismantle the housing.
In modern models, the thermostat is located outside, usually above the door. If it needs to be removed, first also remove the adjustment knob. Then unscrew the bolts and remove the panel with the light bulb, after which the regulator is removed.
Repair
The thermocouple (thermistor) cannot be repaired - it is too miniature and has no replaceable parts. The wiring can be repaired (soldered, twisted, replaced), but not the specified elements. The sensor tube for mechanical thermostats is especially not repairable: no matter how well the hole in it is insulated during repair, including solder, sooner or later it will depressurize, and a bellows with flaws is extremely difficult to bring into proper condition - there will always be miscalibration.
The exceptions are the following cases:
- when the contacts come off, there is a break, a short circuit, an incorrect fit - then the connections are resoldered, the parts are positioned properly;
- installing a new thermocouple on an already installed cable (simply cut and solder in place of the old thermistor, without snapping off the wiring chip from the control unit).
A case of repair from user experience
Let's give an example of how the location of a thermistor affects its performance. The case of the Liebherr CP4003 refrigerator is described. In this model, if the temperature sensor malfunctions, an alarm sound is generated, which was observed by the user. The owner ordered a new sensor, but also decided to simultaneously check the old product and try to revive it.
The refrigerator was turned off, defrosted, and the chambers were dried. Then the protective panel (cover) was removed from the detector. In this case, the device type is no frost, and the part in question is placed on a “crying wall”. The detector was dried with a regular hairdryer without removing it from its seat. In this case, it is necessary to ensure that the directed heat is moderate; high temperatures can damage and melt plastic parts. After these procedures, we launched it and everything worked properly.
Obviously, the cause of the problem is an unsuccessful location for installing the temperature sensor. Over time, due to aggressive conditions, the sensor depressurizes, condensation gets inside, which distorts the readings. Accordingly, the system issues an alarm about a breakdown; incorrect messages are sent to the compressor, forcing it to work constantly.
The further solution was that the protective panel was not mounted, the element was left open, without a cover, and condensation was removed from the walls near the device once a week with an ordinary rag or napkin. The new sensor was not needed and was left as a spare.
How to replace a temperature sensor yourself?
To accurately determine whether a thermostat malfunction is the cause of the problems, you need to conduct a small diagnostic and only after that proceed to replacing the unit; the process of identifying the breakdown and repairing the refrigerator can be done with your own hands.
Diagnostics and adjustment
If the walls of the freezer are significantly frozen, use this method to check the functionality of the functional unit:
- While the motor is running, slowly turn the control knob, increasing the temperature inside the compartment.
- After some time, when the level of the set value coincides with the temperature level in the compartment, the sensors will record the set parameter, and the compressor will receive a shutdown signal. Stopping the motor will mean that the relay is working properly.
- Remove all food items from the compartment and leave the refrigerator on for 5–6 hours. During this time, carefully monitor the duration of breaks in the operation of the motor: if it is at least 30–40 minutes, the household appliance can be operated as usual. Otherwise, adjust the cyclicity of the compressor by changing the thermostat settings.
You can determine that the “culprit” for not turning off the refrigerator is the thermostat in this way:
- disconnect the refrigerator from the power supply;
- remove all products and place them in a cool place while checking the functional unit;
- set the regulator knob to the lowest possible temperature or turn on the freezing mode;
- place a thermometer on the middle shelf of the refrigerator compartment that can measure air temperatures below 0 ⁰C;
- connect the refrigerator to the power supply;
- after 2 hours, evaluate the thermometer readings: if the air in the refrigerator compartment has heated up to more than 6 ⁰C above zero, the relay is faulty.
If the household unit does not start working for a long time after being turned off, follow these steps:
- Turn off the power supply to the refrigerator, remove the thermostat casing. In older refrigerator models, two wires connect to the terminals of the functional unit. Disconnect them and connect them directly to each other (with a small piece of wire or a straightened paper clip).
If at the moment of closing the contacts the compressor begins to work, the relay is unsuitable for use. If the motor does not start, the cause of the problem may be a breakdown of the start-protection relay or the motor.
In more modern models of household refrigerators, 4 wires are connected to the thermostat:
yellow with green stripe – grounding; orange (or red, black) connects the unit to the compressor; brown – “zero”, leads to the fork; white (or yellow, green) is connected to a light bulb in the refrigerator compartment.
To identify a thermostat malfunction, short-circuit all wires except ground. If the motor turns on, the regulator is faulty.
Tools
To repair the refrigerator yourself (replace the regulator), you will need:
- flat and Phillips screwdrivers;
- knife;
- round nose pliers;
- spare element of suitable modification.
Rules for dismantling the thermal relay
In older refrigerator models, the thermostat is located inside the appliance. To remove the element, it is necessary to remove the temperature control knob and the protective plastic casing. In more modern refrigerators, the thermostat is usually located outside the chamber and can be located in the upper part, directly above the door.
Removing the faulty part:
- Remove the element protective cover.
- Disconnect the capillary tube from the evaporator and carefully remove it from the housing.
- Unscrew the fixing bolts and remove the relay. The block with contacts and regulator can be mounted either with screws or with latches.
- Disconnect all wire terminals that are connected to the thermostat. To avoid confusion with the connection when installing a new part, write down the color coding of all wires.
- Remove the faulty element from the refrigerator.
Before replacing a functional unit, disconnect the power from the household appliance.
Replacement
- Carefully, so as not to damage the part, insert the new bellows tube into the body and attach it to the evaporator. The part must be pressed against the wall of the element.
- Connect the relay wires.
- Reinstall the working thermostat.
- Secure the protective cover and all panels and components that were removed when dismantling the assembly.
- Connect the refrigerator to power.
Replacing the refrigerator temperature sensor
A faulty thermostat requires replacement. Replacing a broken thermostat yourself is quite simple if you get to the place where it is installed. This is where difficulties arise.
In modern refrigerators, the thermostat adjustment is usually located on the front panel and is located at the top of the refrigerator, but it can also be located inside. The refrigerator cooling module (evaporator) is hidden under the plastic casing and is located in the rear.
To install a new thermostat yourself, you need to remove the broken thermostat.
To do this, you need to turn off the power to the refrigerator by unplugging the power cord. Depending on the refrigerator model, remove the plastic casing cover that contains the broken thermostat.
Mark the wiring diagram with a marker. Remove the capillary tube of the broken thermostat from the place of attachment (placement).
Install the new thermostat in reverse order. Do not confuse different thermostats that look similar to each other. Some can only work at positive temperatures, others are intended only for freezers. Using a thermostat that is not designed to operate a refrigerator (freezer) can lead to incorrect operation of the equipment and failure of expensive components (compressor).
Therefore, be sure to check the wires connected to the thermostat. It’s one thing if you found your own replacement thermostat, from the same manufacturer or brand, but another thing if you use an analogue.
By the way, the wires suitable for the thermostat have the following purpose:
- orange, red or black - connects the thermostat to the compressor;
- brown - phase wire leading to the socket;
- white, yellow or green - leads to a light indicating that the refrigerator is on;
- striped yellow-green - grounding.
Starting from the size of the contacts (the width of flat conductive contacts has 2 standards - 4.8 and 6.3 mm), location, thermostats can differ in the settings of the contact groups (power or low-current) and purpose (medium-temperature or freezing). For example, using an externally similar temperature sensor K57-2.5 instead of K59-2.5 will lead to freezing in the rear wall of the refrigerator and a change in the temperature regime of the refrigerator.
All thermostats have a so-called operating temperature range (for example, for the RANCO K-59 thermostat it is -32/+6), which the thermostat is actually designed to maintain.
Thermostats on the outside of the housing or inside have 2 adjusting screws that are responsible for the adjustable temperature range within the operating range (this is approximately 4-18 degrees) and for the response differential (usually 2-8 degrees). Be careful - simply adjusting one screw shifts the operating on/off temperature range. For example, the normal factory thermostat adjustment in the extreme minimum position (in the extreme position when rotating counterclockwise) is set to response thresholds of minus 10 / plus 3.5 degrees Celsius.
Rotating the adjusting screw responsible for the temperature range shifts these settings -> for example, to the position minus 5 / plus 8.5 degrees or minus 15 / minus 1.5. As a result, increased or decreased temperature in the refrigerator and spoiled food, etc. And if the second screw is additionally adjusted, then it is very difficult to restore the factory settings after the intervention - often, it is necessary to replace the thermostat with a new one.
Carefully. Twisting is not recommended. The thread stroke of the adjusting screw in the thermostat may not be structurally limited (especially with Chinese analogues); as a result, the screw may fall out of the thread during adjustment - it will not be possible to reinsert the screw without disassembling the entire thermostat.
How to replace correctly
When performing work to replace a faulty thermostat, you need to follow the instructions to avoid common mistakes. Violation of the rules for installing a new component can cause incorrect operation of the equipment and cause breakdowns of other parts.
Dismantling
When starting to dismantle the thermostat, be sure to unplug the refrigerator from the outlet. Then you should find the location of the component depending on the type of equipment. Usually, for dismantling it is enough to unscrew the adjusting knob, remove the fasteners and the protective cover of the housing.
How to determine that the temperature sensor is broken
We will describe how to check the temperature sensor in the refrigerator. Do not confuse the diagnostic methods of the thermostat and the sensor: the first device may be broken, but the second may be working, and vice versa.
Tips to help determine that the temperature sensor is broken:
- for options with microcontrollers: measure the resistance of the electronic sensor (thermistor) with a multimeter. The value must coincide with the data in the table showing the dependence of the nominal value on t°. The method does not always involve removing the sensor;
- Often the electrical module itself signals the failure of the sensor by producing sound signals, and if there is a display, error codes;
- inspecting the bellows tube for holes or depressurization;
If the refrigerator does not turn on, then find the thermostat wiring and close them directly - the unit does not need to be dismantled. If the device works, then the problem is in this device. But this method does not provide 100% diagnostics - it may be the thermal relay that is broken, and not the sensor.
Most often, the thermistors of the evaporator break down - there the environment and loads are more aggressive (high humidity, constant significant temperature changes).
Diagnostics of electronic temperature sensor (thermistor)
We will separately describe how to check the temperature sensor on a microcontroller for a refrigerator. For example, let's take a Samsung Rb30j3200ef refrigerator with a DA32-10105q sensor equipped with a 502AT-2 thermocouple (thermistor).
We find the thermocouple model in the refrigerator instructions, and the technical description for it on the Internet:
The search for a specification (specification, datasheet) is usually carried out using foreign sources; the PDF file of the technical documentation contains all the characteristics of the thermistor. From the table we see that the resistance is 5 kOhm at +25° C, the operating range is from −50 to +110° C.
We find 502AT-2 and look at the rest of the data, comparing it with temperature:
Next, look at the graph to see how the resistance changes as the temperature rises/falls. The higher it is, the lower the Ohm number and vice versa.
We remove and diagnose the electronic sensor
Removing the compartment cover:
Under the cover:
Disconnect the thermocouple connector. We measure its resistance at room temperature: at +25° C it should be 25 kOhm. If the indicator is different, then there is a breakdown:
If a breakdown is detected, the thermocouple must be removed and replaced. Unscrew 3 screws and remove the entire large rear panel:
This hole is an air duct through which the cold goes into the freezer; there is a damper here, it is visible if you turn over the removed lid:
If we disassemble the cover, we will find a thermocouple:
The thermocouple is removed, immersed in water at room temperature (this will make the environment more stable), and the multimeter is switched to measuring resistance. We compare the values with the factory ones (available in the specification tables).
Add heated liquid and boiling water - the resistance decreases.
The thermistor is working properly - the readings correspond to the graph and tables in the datasheet. In practice, there is no point in immersing the thermocouple in water; it is enough to measure the resistance at the current temperature without removing it from its seat (for clarity, we repeat the photo):
Device and principle of operation
On one side of the device there is a tube attached to the evaporator, on the other there are terminals intended for connecting wires.
If the temperature in the refrigerator increases, the pressure in the tube increases as the refrigerant begins to expand. As a result, the contacts are closed, turning on the compressor.
As the temperature decreases, the pressure decreases (the spring tension varies) and the contacts open.
Modern refrigerators Atlant, Indesit, Samsung, Bosch, Beko, Stinol, Whirlpool are equipped with electronic thermostats. They consist of sensors and a control unit with a timer.
The table shows the most popular temperature controllers, technical characteristics and approximate prices.
| Name | Characteristic | price, rub. |
| TAM-112 and TAM-113 | Installed in single-chamber refrigerators. | 400 |
| TAM-125 | Designed for two-chamber, two-compressor refrigerators. | 400 |
| TAM-133 | It is analogous to Ranco K59 or Danfoss 077B6 and is installed in models with two chambers. | 370 |
| TAM-145 | Analogous to K56-L1916, K56-P1431, K56-L1954, used for freezers. | 350 |
| K-59 | Manufactured by the Italian company Ranco and installed in two-chamber refrigerators. | 400 |
| F2000 | It is a capillary thermostat designed for single-chamber units. | 550 |
| K-50 | Can be installed instead of the domestic model TAM-112. | 450 |
How to check the thermostat yourself at home?
Once you understand what a thermostat is in a refrigerator, it will be much easier to detect a breakdown and fix it. There are several ways to check the functionality of the thermostat yourself.
The optimal temperature of a refrigerator turned on at full capacity is 6-7 C.
The refrigerator works without shutting down
In this case, there is no need to remove the thermostat for diagnostics. Enough:
- de-energize the unit;
- release all cameras;
- set the maximum temperature or start the fast freezing mode;
- place a thermometer in the center of the refrigerator compartment, preferably one that measures negative temperature;
- turn on an empty refrigerator;
- After a few hours, get a thermometer, which should show 6-7 Co.
You can check whether the thermostat is working if you remove the snout completely and connect the wires directly.
If the readings differ from 6-7 Co, it is worth removing the broken thermostat and replacing it with a new one.
If the thermostat is faulty, the refrigerator may not turn on.
The unit does not turn on
The consequence of a malfunction of the refrigeration unit can be not only a breakdown of the relay. Before calling a specialist, you need to figure out: what exactly is the breakdown and is it possible to fix it without contacting a specialist?
A new thermostat can be purchased at a specialty store.
In this case, the check is simple: you need to turn off the power to the refrigerator by unplugging the device from the socket. Then remove the protective cover and sort out the wires.
Before you begin repairing your refrigerator, you need to disconnect it from the power supply.
If the model of the unit is old enough, then only two wires are suitable for the relay terminals, which need to be connected to each other using a piece of wire, or by fixing the wires at the ends of a paper clip.
If checking the thermostat does not reveal any problems, then the failure lies elsewhere.
Plug in the refrigerator, if the compressor starts working, then the cause of the breakdown is the thermostat. If the compressor does not start, then the cause of the breakdown is the relay or the motor. In the latter case, you cannot do without the help of a specialist.
Only a master can carry out high-quality repairs with a subsequent guarantee.
Modern models are a little more difficult to understand, since there are already four wires going to the thermostat.
- The wire coming from the engine is orange, black or red.
- From nutrition - brown.
- From the signal light - yellow, white or green.
- Grounding – yellow with a green stripe.
Before replacing the thermostat, be sure to remember the location of the wires.
The first 3 wires from the list are subject to short circuiting. Next, the device is connected to power and the operation of the compressor is checked. If it starts, then the fault is in the thermostat; if not, the fault is in the relay or motor.
A faulty thermostat must be replaced.
Ice buildup on the walls and shelves of the refrigerator/freezer compartment
To check the serviceability of the thermostat in this case, you must do the following.
- Release the cameras.
- Leave the unit running for 5 hours.
- During the “empty” operation of the refrigerator, measure the time between startup and shutdown of the device. If the interval is 40 minutes, then the unit is operating normally. At the lowest values, the thermostat is considered faulty and must be replaced.
Once a problem is identified with a non-working refrigerator, the problem is fixed.
How to adjust the refrigerator relay?
If the malfunction is minor, the thermostat does not have to be completely replaced, you can just adjust it. This method will suit you if the walls of the freezer are evenly covered with frost (in the case of a single-chamber refrigerator), or in the case of a two-chamber refrigerator, the temperature in it is below normal, and the back wall is completely covered with frost.
Attention! When adjusting the relay, use only well-insulated screwdrivers. If your device is a two-chamber one, adjusting the thermostat is very difficult; most likely, you will have to call a specialist, and even in this case, the repair may take more than a day.
There are cases when regulation will not help at all - the ice is uneven. In this case, most likely the reason lies in the obstruction of the filter, a refrigerant leak, or a change in the shape of the seal.
To adjust the relay, you need to place the control knob in the central position and tighten the adjusting bolt. When it is fully tightened, the device turns off; when unscrewed a little, the duration of its operation increases. The second bolt is located on the outside of the refrigerator.
Using it you can set the parking time. If the bolt is tightened, the duration of operation of the compressor will be maximum, and if it is slowly unscrewed, the pause between operating cycles will increase.
If you are unable to configure the relay yourself, you will have to call a technician or completely replace the thermostat with another one.