The first feature that distinguishes equipment of imaginary foreign manufacture, interpreted by forum users as demonstrating the affinity of the CIS, is non-repairability. When you take it apart, you break a decorative piece, you have to buy a special tool, there are endless tricks. Western personal computers were not blessed with such a sophisticated (bad) protection system. It seemed that static voltage could burn out the lion's share of the motherboard's peripherals. Both screws of the Redmond home multicooker, covered with a colorful warranty sticker (easy to soak), are extravagant. Covered with film, you will have to place the home multicooker in a double boiler (just kidding). The delights are designed to deceive the cunning, handy Russian man, who can easily bypass three degrees of protection. The impression formed by the product is spoiled. Today we are discussing repairing a Redmond multicooker with our own hands.
What's inside the miracle - the pot?
The picture shows which wires are on the bottom of the multicooker.
Power is supplied through red wires. The switch (which puts the device into operation) and the thermal fuse (protects against overheating) are installed in series. The voltage from the thermal fuse is supplied to one terminal of the heating element, to the power supply board. The white wire is connected to the power directly. Through it, voltage is supplied to the second terminal of the heating element and closes the relay contacts. Wires that supply voltage and ensure operation
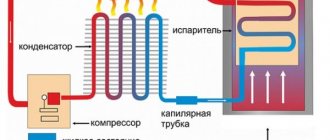
Under the heating element there is a power supply with standard wiring. It is the most loaded part of the multicooker. Its task is to convert the current of 220V to direct current 5V and 12V (the first supplies power to the control unit, and the second – the switching circuit, activates the relay). The home network supplies power to the three-pin connector, which is located at the bottom. A yellow-green wire stands out: this is grounding.
Schematic representation of the internal structure of the Redmond RMC-M23 multicooker
Often, manufacturers install a universal board for the entire model line into the device. Naturally, technological nuances are kept secret, because companies do not count on the introduction of self-taught craftsmen into household appliances. When looking at the photo, an insulated metal round disk catches the eye. This is a battery that, when disconnected from the network, stores preset cooking programs in memory.
In the picture the battery is shown at the bottom (yellow)
What is the button at the bottom? CONTENTS
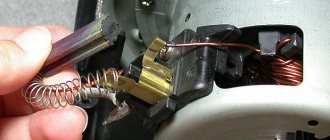
1. The “button” at the bottom of the tank turned out to be not a switch button at all, as it seems (so that the multicooker would turn on only when a pan was installed inside the tank), but simply a block pressed tightly to the pan with a temperature sensor and a thermal fuse inside.
Photo 5. “Button” - a block with a temperature sensor and a thermal fuse
The red wire here is the network wire, from 220 volts, first it passes from the socket through the thermal fuse in this button (the official name is “thermal fuse 165°C 10A”; when burned, it cuts off the power from the network), then it is connected to one of the terminals of the disk heating element and only then goes into the power supply board. Yellow thin wires go to the temperature sensor (it is an NTC thermistor with a resistance of 50 KOhm at 25°C).
Typical errors and their characteristics
Each multicooker model has a user manual, which shows possible causes of errors and the inability to continue operation.
In some cases, the same code may indicate several malfunctions at once, so this factor must be taken into account.
Before you take your multicooker in for repair, you can try to find out what exactly is the reason. The following tip will help with this.
| Error code | Possible reasons |
| E1 | Moisture gets on the heating element or it burns out |
| E2 | Broken power cable or faulty top heat sensor |
| E3 | Possible moisture on the heating shade or the lid is not tightly closed |
| E4 | Board fault or clogged pressure sensor |
| E5 | Automatic shutdown of the multicooker due to overheating. Prevents premature wear of the ten. |
Expert opinion Pavel Maksimovich Torsunov
In some cases, errors cannot be resolved on your own or their code is displayed incorrectly. Then you cannot do without qualified repair specialists. Initially, you need to understand what could trigger the appearance of a particular code on the display and try to eliminate this reason as far as possible.
E1
This error occurs in three cases:
- There is a hole in the bowl through which the liquid enters the heating element.
- Foreign objects and food residues get on the heating element, which causes combustion processes.
- Malfunction of the ten itself and its burnout.
To make sure the heater is working properly, it is recommended to unplug the multicooker, carefully open the lid and remove the bowl. Next, plug the plug into the outlet and control the heating process. Its absence provides the answer to why the E1 code appeared.
E2
This problem most often occurs due to a break in certain parts of the cable, the connection of which to the multicooker does not cause it to turn on. You can check this reason by connecting an alternative cable (you can ask your friends or neighbors). If the device works when it is connected, then the reason has been found.
Sometimes E2 appears when the thermal sensor located at the top is shorted. It is recommended to open the lid, carefully remove the bowl and observe the operation of the heating element when the plug is plugged in. If the error appears again when closing the lid, then the malfunction has been found.
E3
The most common mistake that occurs is when the lid is not tightly closed. In some models it is accompanied by a characteristic sound signal.
It also appears when liquid gets on the heating element. It is necessary to carefully remove the bowl and look at its condition from below. Perhaps crumbs, small particles of vegetables, cereals have stuck to it.
E4
The most difficult error, as it indicates a malfunction in the central board, which regulates all processes of the multicooker. The second reason is a malfunction of the pressure sensor. Only a specialist can find the problem and fix it.
E5
If the machine is used throughout the day and the heating element experiences increased loads, the automation is triggered, which provokes a forced shutdown. This is necessary to prevent the heating element from burning out prematurely.
Operating rules
The main cause of malfunctions is failure to comply with basic rules for using the device. As a rule, this is due to liquid and food particles getting inside the device.
When preparing food, anyone can be inattentive, rush too much, while forgetting about the safety of using the multicooker. Experts say that following two simple rules can reduce the risk of device failure:
- Milk, water and any other liquid must be poured into a heated bowl, provided that it is inside the device. Inattention in this case leads to liquid getting on the circuits and other important parts of the multicooker.
- You should also put food inside if there is a bowl in the appliance. Otherwise, breakdown cannot be avoided.
Subscribe to our Social networks
Design and principle of operation
All blenders are divided into several categories, which differ from each other in design and method of use, as well as different attachments and functionality. To effectively and correctly carry out repairs, you should understand the design features.
Stationary
Stationary varieties look like small food processors and are bowls with knives rotating inside. As a rule, the knives are installed at the bottom of the bowl. The device is desktop and does not need to be held during operation. This blender model is capable of grinding a large portion of food at a time.
The main disadvantage of stationary devices is the need to allocate a lot of storage space. In addition, some models do not chop vegetables well and grind them into crumbs or leave too large pieces. In terms of repairs, stationary equipment is much easier to disassemble and repair compared to submersible equipment.
Manual (submersible)
Hand blenders are shaped like a long handle with a cutting end. The nozzle is lowered into the container with the products, the device is turned on and held until the grinding process is completed. Due to their compact size, submersible devices do not require much storage space in the kitchen. The ability to change attachments significantly expands the list of food preparations.
This creates discomfort during long-term cooking. Also, the device is not suitable for stirring large portions of food.
Cleaning the multicooker
To clean the inside of the product yourself, you must first study and strictly follow the algorithm of actions.
- We remove the lid of the multicooker - it is made of metal or plastic (depending on the cost of the product), then unscrew all visible elements that are secured with screws.
- We clean the internal elements from loose substances by turning the multicooker over and shaking it gently but vigorously.
- If no liquid is found inside, then collect everything in reverse order.
When a blockage occurs at the bottom of the device, where the contacts are located, the action algorithm will be as follows:
- disassembly is carried out from below - unscrew the screws securing the bottom cover;
- disconnect the wires going to the software and heating board;
- unscrew the screws securing the heating elements - after this they should be easily removed;
- carefully, so as not to damage, dismantle the internal thermocouple;
- We clean all microcircuits, temperature sensors and boards from bulk products.
How to completely disassemble a multicooker? Full scheme of actions
There are temperature sensors in the lid and bottom of the product - therefore, you need to disassemble the multicooker with extreme caution so as not to disturb these delicate wiring. One wire is connected to the touch screen
A lot depends on these parts - they are the “brain” of the device. Due to damage to the temperature sensors, programs and cooking modes may fail. Moreover, the kitchen assistant may not turn on because the required set of heat indicators does not occur.
Preparation
- The device is disconnected from the network, wait until it cools down completely.
- Wipe the lid from grease with a soft cloth.
- If the grease cannot be scrubbed off, use mild dishwashing detergents without abrasives.
- Wipe the lid dry.
Removable element on a screw
Operating procedure
- The cover of the electrical appliance is opened.
- In the area of the lid there are two plastic latches. You need to press on them and push towards the center.
- The upper sector is pulled towards itself, and then sharply down.
- All internal parts are thoroughly washed to remove food debris.
- To put the part in place, perform the reverse steps. If everything is installed correctly, the clips will click when seated correctly.
If the product is broken and you need to see the internal parts, but the master does not know how to carefully disassemble the multicooker, then:
- First of all, wipe all contaminated areas of the product with a rag.
- The electrical appliance is turned upside down.
- The bottom cover is held in place by a screw, unscrew it. Dismantle the bottom.
Removing the lower part
- All removable wires going to the board are disconnected.
- Unscrew the screws holding the heating element.
- Remove the thermocouple and all microcircuits.
- Unscrew the screw holding the top cover (when the model does not provide for removal). Then, press the cover with a screwdriver and remove the temperature sensors.
- Remove the plastic rings on the latches (if there are any at the edges of the metal case).
- The inner walls are taken out from the outer ones.
Cleaning the multicooker valves
Problems with pressure in a multicooker can occur due to clogged valves. The operating instructions recommend cleaning the inside of the multicooker lid. We remove it by first unscrewing the central nut and wash the valve rubber, which was mentioned above.
Let's move on to cleaning the second valve. Using pliers or wrenches, unscrew the valve nut, remove the bushing and washer. Turn the lid over and remove the valve. Wash with cleaning agent and wipe the valve elements. We collect it in random order. Just pay attention: it is very important to place the valve rubber correctly, on the right side. We assemble the second valve, not forgetting that its rubber band should be on the outside of the lid. We return the lid to the multicooker, screwing it with a nut.
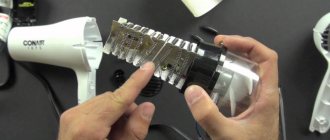
Where to find and how to replace the thermal fuse
Several thermal fuses are always located in the middle of the multicooker, no matter what brand it is. They are located behind the cambrics that cover the plume. In every multicooker, the cambrics are located in plain sight. In some models they can be assembled into a clamp, but more often they are not fixed in any way.
If you are repairing a Philips multicooker, you can unscrew the bottom of the device with your own hands and find the fuses.
Under the saucepan there is a knot that looks like a massive metal mushroom, supported from below by a spring. If you disassemble the multicooker, you will find fuses around this mushroom.
Thermal fuses should only be attached using clamps. For obvious reasons, you cannot solder them.
What you can fix yourself
If the device malfunctions, you can take some actions yourself:
- Cleaning the device . It is carried out in accordance with the above algorithm of actions (disassembling the device and cleaning its parts).
- Replacing thermal fuses. There are two of them, the fuses are covered with cambrics. The first one is located in the middle of the multicooker, in the middle clamp, or is fixed separately. You cannot solder the thermal fuse, because the part is very sensitive to high temperatures. It can only be replaced with a new one. To do this, you need to disconnect the part from the clamp and carefully replace it. The same actions are performed with the fuse located on the lid of the multicooker.
- Control board. It is located at the bottom of the device. To carry out repair work, you need to disconnect the bottom of the multicooker, power wires, and heating elements. Next, you should carefully inspect the board, identify dirt and remove it from the surface. If the board burns out, it is replaced with a new one, provided that the markings match.
- Multicooker lid latch. One of the most common problems. You can eliminate this problem yourself by showing intelligence and patience. Many people have solved the latch issue by installing magnets on the rim of the lid and the main part of the multicooker. This unique solution will allow you to operate the device for a long time, because service centers do not undertake repairs of this kind.
Repair cost
Redmond multicookers are among the most popular in their class in Russia.
Many service centers offer repair of these devices as a separate service. How much does it cost to repair a Redmond multicooker? In most Russian services, the repair price varies from 650 to 1,500 rubles, depending on the complexity of the breakdown. The cost of repairs usually does not include the price of parts. The cost of diagnostics is usually not included in the cost of repairs indicated in the price lists of services.
In most cases, only after diagnostics are carried out, the exact cost of repairs is determined by the service center technician.
What to do if the multicooker breaks down - try to fix it yourself or use the services of a service center, of course, is up to you to decide. We hope this article will help you make the right decision.
Appliance cover
Today we will tell you how to repair the Redmond multicooker. We will try to fix the lid with our own hands.
This is a standard breakdown for most types of multicookers. Damage to this cover is due to planned aging, that is, the manufacturer deliberately makes it unreliable. The finger on the button broke... The lid moved as a result of the temperature... The rods reach special grooves and the lid is inserted, but a few millimeters are missing...
We will need small magnets and will make a magnetic lid that closes, is held on by magnets and is opened under force. You need to glue 4 magnets - two on the lid and on the body of the multicooker itself. The multicooker bowl is pre-removable.
We select the points where we will glue the magnets. Degrease the surface with alcohol. First, apply high-quality glue to selected points on the body and press the magnets. Let's wait until the glue dries. Now, not forgetting to respect the poles of the magnets, glue them to the lid. In this case, it is more convenient to apply glue directly to the magnet. If there is a need and the height of the magnets is insufficient, you need to glue two magnets on top of each other. Here we are already acting empirically.
This, of course, is not the most common way to solve the problem of a broken multicooker lid latch. Basically, experts solve it by replacing the handle, if the mounting points are not damaged, but the handle itself is broken. Or, as an alternative, drill holes in the handle and fix it with screws. The choice is yours.
This is interesting: Why the vacuum cleaner began to work loudly: causes of malfunction, how to repair
How to disassemble and remove the cover
Models with a removable handle (using the example of SkyCooker M40S):
- Turn and remove the steam valve.
- Insert a plastic card by widening the gap between the top and aluminum covers.
- Slide the card into the slot until you hear a click. The sound means the card has pushed out the latch.
- Insert the second card and remove the second stop.
- Remove the first card and press out the remaining two latches.
- Remove the plastic cover.
- Place the appliance with its back facing up and remove the condensate container. It comes out easily, without clicks or screws. Underneath there is a plug that hides the loop and wires.
- Loosen the screws in the plug and remove it.
- Lift the lid and pull the metal bar out of the holders.
In such models, a thermistor is located under the aluminum panel of the inner cover. It is attached with double-sided tape or glue and covered with foil. The wires from it (blue in a white additional braid and yellow - ground) pass under the plug, go down into the case and stretch to the board located at the bottom of the structure.
The wires are constantly bent and often break, which leads to error “E2”. The multicooker turns on, understands commands, but stops heating, displaying a failure message immediately after pressing the “Start” key.
Models with a key using the Redmond RMC-M4500 as an example:
- To clean the steam valve, you need to remove the plastic box on top of the lid.
- Then remove the valve from it and wash both components.
- The aluminum cover of models in this series is secured with screws - they need to be unscrewed to remove the part.
The lid snaps into place thanks to a key-valve, which is secured in a recess on the body with two spikes. The latter quite often break or wear out. As experts on the forums note, this is “planned wear”, forcing buyers to change the device to a more modern one.
Redmond RMC-M70:
- The valve is dismantled in the same way as the previous model.
- The aluminum liner is attached to two clamp clamps. They need to be squeezed simultaneously or one by one, and the lid can be easily removed.
Model Redmond RMC-250:
- Remove the aluminum cover by pressing the three clips around the circumference.
- Remove the steam valve. The difference between the model is that this part is located inside and not outside. When sliding into place, the valve should snap into place on the stopper.
How to fix a key lock
Since the key is mounted on two pins, the most logical thing to do if they malfunction is to increase the protrusions. To do this, wire is fused into the key or nails/screws of suitable length and diameter are driven.
An easier way is to put screws on the lid or glue metal plates, and small flat magnets with sufficient adhesive force to the body.
Modern models of Redmond multicookers can be disassembled as simply as possible. The manufacturer recommends regularly removing and cleaning the steam valve and the aluminum inner lid. Older models are more difficult to disassemble, but in quite accessible ways. Take proper care of your multicooker so that it does not spoil the aroma of your dishes and lasts longer.
Problematic latches
Quite often, multicookers and steamers from the Redmond company have top lid latches that break. According to experts, this is one of the most common breakdowns. Some craftsmen claim that this is a defect introduced by the manufacturer, so that users buy new top covers after a certain period of use of the product.
Advice! Close the top lid of the Redmond multicooker with the latch already pressed and release it only after the lid fits tightly. Thus, the load will be much less.
If a breakdown does occur, then you shouldn’t immediately go to the store and spend money on buying a new lid, especially since with such a minor breakdown it’s pointless to go to the service center: they simply won’t undertake to repair the multicooker, advising you to install a new lid. There is an original method of repair at home that does not take much time and effort; you just need concentration, patience and the ability to work with superglue. In order to properly troubleshoot the problem, carefully watch this video:
Multicooker "Redmond RMC-M22"
Malfunction: there is no indication, the multicooker does not respond to control buttons. Let's start disassembling and try to repair multicookers with our own hands. After unscrewing the screws on the bottom, disconnect the lower part of the stand from the base. We get access to the power supply, switching circuit and several functional elements. Unscrew the 4 screws of the power board.
We inspect the transformer for the presence of solder joints and tracks. We test the transformer windings with a multimeter. If the transformer is broken, replace the thermal fuse after unsoldering it. We call diode bridges, transistor. We replace elements and parts when breaks are detected.
Another option for repairing multicookers with your own hands with a “won’t turn on” fault, which generates an alphanumeric error code. Deciphering the codes allows a technician who knows them to understand the cause of the malfunction and begin to eliminate it.
For example, the code “e0-e4” displayed on the screen indicates malfunctions associated with short circuits and breaks in temperature sensors. They are located on the top or bottom of the multicooker. There may be a problem with thermal fuses, we have already discussed them above. Different manufacturers have their own codes. It is necessary to remove the multicooker body and use a multimeter to look for an open circuit, measuring the level of resistance. Then eliminate the detected breaks by replacing or repairing the necessary elements.
Is it worth repairing it yourself?
You can repair the Redmond multicooker yourself only when the warranty has already expired, and before that it is better to take it to specialists, but check visually what repairs were made so as not to pay extra money.
When repairing multicookers of different models with your own hands, the main thing is to correctly diagnose why the multicooker does not start working. The reasons are quite different:
- an error message “E1”, “E2” or “E5” appears on the display (read more about Redmond multicooker errors here);
- failure of a microcircuit, resistor or capacitor;
- the thermistor has burned out;
- extreme case - the power supply burned out;
- heating element failure;
- The latch on the top cover is broken.
In addition, you need to know how to disassemble the multicooker. Only after a visual inspection and then a thorough diagnosis can you understand what happened to the product and how to repair the multicooker. It will be useful for the home master to watch this video:
How to repair a latch
Maxwell multicookers are often brought to service centers with the same problem for repair. Few people dare to repair household appliances with their own hands, but there is nothing wrong with that.
To repair the latch, you need to prepare epoxy resin, a needle and a screw, the length of which is from 10 to 15 mm.
This part is initially held in the device body using two small plastic axes. These axles cannot withstand the pressure exerted on them forever; sooner or later they break. The debris remains inside the holes in which the axles rotated. The first thing to do is take them out of there.
On the burner of a gas stove, heat the needle red-hot, holding it with tongs or pliers.
You need to drill a hole in the latch with a thin drill. It is necessary to drill where the axles previously “grew” from. The diameter of the drill should be smaller than that of the prepared screw.
When drilling, try not to disturb the stiffening rib, which is located inside the latch. Drill only into the outer wall.
Screw the screw into the resulting hole, trying to make sure that it is oriented with respect to the latch at an angle of 90 degrees, otherwise you will get a broken axis.
Remove the screw, dip it in epoxy, and screw it back in. Allow the resin to cure and install the latch in its proper place. The screw will take on the role of the broken axis, and the multicooker will last for a long time.
The multicooker does not work
In this section we will talk about possible breakdowns when the multicooker does not turn on at all. Option one is the Redmond RMC-PM380 multicooker. When the power is turned on, there is no indication, the buttons do not work.
Let's start repairing the Redmond multicooker with our own hands. Turn the device over and turn off the power. Unscrew the bottom. We begin the inspection with the thermal fuses, which are located inside, in the very heart of the multicooker. Usually they are covered with cambrics and dressed in wires of different colors. We test the fuse contacts with a multimeter. If they do not ring through, they need to be replaced. After replacement, we test the device. The indicator lights up, the multicooker is working. We remind you once again: the thermal fuse needs to be looked at first.
Why is a thermal fuse installed for a multicooker?
The thermal fuse is a kind of wire element that resembles a resistor in appearance. Its main function is to protect the multicooker from overheating.
Thanks to the thermal fuse, you can significantly extend the life of the multicooker.
Not a single multicooker electrical circuit is complete without thermal fuses. They are usually located inside the device. Usually there are several of them, and you have to figure out which one burned out. To do this, you need to check the elements using a multimeter, which should measure the resistance. And if it is not there, the part needs to be replaced.
Reasons for the thermal fuse to burn out:
- Malfunctions of the power supply and switching;
- Sudden voltage changes;
- Malfunction of the control unit.
Thermal fuses can be of several types. Popular types are cpgxld or ldcpg. The operating voltage of such elements is usually designed for 250V, the operating current capacity is 10A or 15A. A number with a degree sign usually indicates at what temperature this element will operate. For example, at 167 °C.
As a rule, these parts are not restored, that is, they operate once, after which a new part must be installed.
Control board repair
We have already explained how to remove the back cover earlier - you need to unscrew the fastening screws, then disconnect the thin wires that connect the control board to the power supply. Next, we disconnect the heating elements and, with special care, the thermocouple located in the center - this part is very fragile and is afraid of any mechanical impact.
To clean the board from carbon deposits, it must be disconnected, providing access from both sides. We carefully inspect it for the presence of grease stains; if there are any, wipe it with a cotton swab dipped in alcohol. For multicookers of different models, the arrangement of the boards may be different.
Microcircuits must be examined very carefully, using a magnifying glass, to identify areas of carbon deposits, violations of tracks and solder seams. If you don’t understand anything about this, then you shouldn’t contribute to causing defects on such a fragile and important part. Damaged parts are carefully desoldered and replaced with new ones, taking into account the matching markings. After repairing the boards of the Redmond multicooker, if you did it yourself, you need to varnish all the tracks to protect them from moisture penetration.
Features of disassembly from different manufacturers
When disassembling the device, you need to take into account the design features. Equipment from different manufacturers has distinctive features.
"Brown"
The main feature of Braun blenders is that during disassembly the engine is removed along with the control system. If this does not happen, you need to pull the edge of the board with pliers.
"Philips"
In Philips devices, there is a cover on the back end, under which there are 2 screws for the power cord. They hold the engine and do not allow it to be removed from the other side.
"Bosch"
To disassemble Bosch devices, just use a screwdriver. Having lifted the case and removed the latches, all that remains is to unscrew the screws to gain access to the mechanisms.
"Kenwood"
The process of disassembling Kenwood blenders is similar to unwinding Bosch appliances. Using a screwdriver, you need to break through the gluing area and walk along the entire casing. Then disassembly is continued from the reverse side, prying the regulator handle in several places.
Polaris
When disassembling devices from, you need to unscrew all visible screws. After removing the fastening, it is possible to separate the parts of the housing and gain access to the internal structure.
Vitek
The halves of the Vitek blender body are secured with latches. The main retaining screw is located under the switch, which can be removed by prying with a screwdriver.
How to turn on a multicooker after purchase, what to do if it doesn’t turn on.
How to turn on a multicooker after purchase, what to do if it doesn’t turn on.
Other useful information about home multicookers:
Have you purchased a miracle of modern technology - a multicooker and don’t know where to start cooking, how to turn it on, what skills and knowledge are needed for this? Don’t worry, you made a justifiable purchase; the device has several advantages.
The main thing is that with its help you will prepare only healthy food. Ease of use is not unimportant.
Purchasing and preparing a multicooker for first use
Everything in the multicooker device is accessible and understandable, but be sure to read the simple recommendations given below before starting work.
How to turn on the multicooker for the first time?
Before you turn on the multicooker for the first time, you need to do the following:
• carefully remove it from the box, remove all advertising stickers and materials used for packaging. The only exception is the sticker with the serial number, the absence of which will deprive you of the right to warranty service;
• wipe the device body with a damp cloth.
• wash the bowl in warm soapy water and dry well.
• if during first use there is a foreign smell (which is acceptable and not a malfunction), you need to “wet clean” the entire device - wipe the inner lid and multicooker bowl with a 9% vinegar solution, then boil it with half a lemon for about ten minutes in any mode intended for cooking.
Disassembling the Redmond home multicooker
Below we will look at the features of Redmond multicookers. Let's bypass the expensive models - we believe, not everyone has them - let's go with the standard one, sold at a reasonable price. Typical set of programs, average cost, uncomplicated appearance.
The Redmond home multicooker is distinguished by the complete absence of external screws. Improves appearance. The body consists of a plastic bottom, surrounded by a rim with a metal wall. It's not the screws that attach it to the base (hidden by an intricate label explaining the warranty period, forget it - the decor), it's the plastic teeth. To prevent the paper from being soaked by cooking fumes, it is carefully covered with a transparent piece of plastic. Good - food won't stain the paper. Therefore, the Redmond home multicooker will look great. It is easier to wash the case; liquid products are allowed without fear of losing the warranty.
One screw is cross-shaped, the second is equipped with a triangular hole. Reminiscent of an Egyptian pyramid only with fewer faces. Moreover, the standard nozzle has three slots and a spacing angle of 120 degrees. You will definitely rip off the head. Avoid pressing, otherwise the wall of the Redmond home multicooker will bend inward and the presentation will be lost. The foresight is admirable, causing slight contempt for the ingenuity of the designers. Insert both screws triangular, making access difficult. A non-standard head is more expensive; a single screw is not enough to hold the walls in place. Delightful, thought out to the smallest detail, the repairmen cannot be stopped! A triangular bolt is secured from the inside with a nut to the wall. The bottom is simply glued, sits on plastic teeth (when you first get acquainted with the equipment, without knowing the features, you will rip off the head and lose your warranty).
From the bottom, the cover is attached with one screw to the inner shell of the case using a bracket, you get a sandwich:
- Bottom.
- External walls.
- Internal walls of the working compartment.
The bottom is made of plastic, glued to the outer walls of a thin sheet of steel. Rolled onto itself to form a cylinder. Easily bends and breaks. The inner walls of the body are formed of high-quality steel, durable, and shaped like a bowl larger than the one in which you cook. There is a hole in the middle of the bottom where the main button wire goes. The heating element is a washer (a figuratively cut disk) that is attached to the compartment with three screws equipped with locking washers. One contact goes to the plug connector, the second comes from the switching power supply board, which houses the relay controlled by the central circuit.
To attach the main button to the heating element disk, there is a steel cylinder to which the die is attached. There is a spring between it and the main button. The Redmond multicooker has two sensors. The first one chose the lid (top), the second one from the bottom. The first one is hidden between the walls. There are three conductors under the plastic loop:
The latter is necessary in case steam gets inside. For lovers of experiments, we inform you: if the main button is covered with cereal, damage will take time to appear. The heating element's disk hangs over the void. To the side, at the edge of the bottom, there is a power board on four stands. Located at a certain height from the surface with the electronic filling down. In addition, the top is protected by a flat lid. There are holes in the bottom of the Redmond home multicooker, so if you spill liquid, there is a high probability that the table will get wet. Closes the plug, socket. The current will immediately go to ground if the device is connected correctly. Otherwise, as long as the fuses burn out, households will suffer. Please note: liquid has spilled inside, avoid handling with your hands at the same time:
- Wet table, battery.
- Home multicooker housing, kitchen faucet.
- Bowl, gas pipe.
It is dangerous to approach a home multicooker while power is available. It’s safer to turn off the switch on the access panel, the automatic distribution box, than to risk your life. Stop trying to pull out the plug, it may become dangerous.
There is also step voltage. The cook should avoid potential touching. They move away from the place of breakdown of a cable laid underground in a goose step. The heel of the forward leg is placed against the toe of the standing leg. Security is ensured. Along the path, the current forms a potential difference on the surface. The voltage drops uniformly along the length. The longer the step, the higher the potential difference between the legs. The probability of breakdown of the insulation represented by the soles of shoes increases, and a person will receive an electric shock. The principle works in the kitchen until the fuses burn out or the dangerous appliance is not turned off automatically.
Why the multicooker does not turn on and how the device works
To repair a multicooker, you need to understand what it is.
Judging by its appearance, the Redmond multicooker looks like a small container with a display and buttons for selecting cooking programs. Its lower part contains a connector for connecting to the network and a switch. There is a lid on top, opening which you can see the food bowl. This is where the entire cooking process takes place. Such dishes can be easily removed, which is very convenient for washing.
If the multicooker does not turn on, then the first step is to check the presence of current in the outlet
The operating principle of all multicookers is almost the same, and if you understand the brand of one device, you can easily repair other models of devices, such as Philips, Panasonic, Polaris, Scarlet, Mulinex, Vitek, Maxwell and others.
To protect the pressure cooker from damage, you must carefully read the instructions and adhere to the rules for operating the device written there.
Do not forget that before placing food, the food bowl must be pulled out so that accidentally spilled liquid or scattered small crumbs do not get inside the mechanism.
Possible reasons why the multicooker does not turn on:
- Incorrect placement of the food bowl - in this case, the device does not respond to actions and does not turn on. To solve the problem, you need to unplug the device from the outlet and rearrange the bowl correctly. The truth is that the design of the bowl itself is incorrect, that is, a manufacturing defect.
- Some foreign objects or crumbs of food have gotten into the multicooker mechanism - to fix this, you will have to disassemble the unit. Disassembly occurs by unscrewing the screws on the top and bottom covers, after which you can very carefully clean the mechanism.
- A plug has fallen out of the socket or there has been a short circuit in the socket itself - in this case, you just need to connect the device or check its operation in another place.
- The valve is clogged or the wrong cooking program is selected - in this case the device will also not turn on.
- Low voltage in the network, insufficient for operation of the device or its absence.
- Malfunctions in microcircuits - you can get to them by unscrewing the bottom cover and removing the thermometer that regulates the temperature in the device. There you can see a failed capacitor or thermistor, scale on the elements. In this case, the damaged part can be replaced.
- The thermal fuse has burned out - such a breakdown occurs especially often in Redmond multicookers. This can happen due to power surges or the cooking process taking too long. In this case, you will also have to replace the element.
These are the most common reasons why the multicooker may not turn on.
Replacement or contact a specialist
It is possible to replace the component yourself if you follow the instructions. If you are unsure of the correct replacement, it is better to contact a specialized center. Professional help will cost more, but will help quickly resolve the problem.
If the device stops
When the blender stops working, you need to carry out diagnostics to understand the reasons for the incorrect operation. In most situations, the problem can be eliminated without repair or replacement of components.
If there is a buzzing
A quiet humming sound after the blender starts means that the motor is working properly, but the unit cannot start spinning the blade. In this situation, you need to remove the bowl and use your fingers or a small screwdriver to press the button that blocks the mechanism from starting.
If it doesn’t work even with the lock released
Problems with starting even when the lock is disabled indicate a malfunction in the motor winding. With this problem, there is a high probability that one or more windings have burned out, resulting in the motor breaking down and requiring replacement. Often the cost of a new motor is comparable to purchasing a new blender, so in many situations it is not cost-effective to replace.
If there are no signs of life
Situations when the blender does not respond when turned on may indicate various malfunctions. To determine the specific cause of the problem, you will need to perform diagnostics.
Checking the outlet voltage
First of all, you need to make sure that the electrical outlet is in good condition. To do this, just connect any other device. If it works normally, then the reason is not a defective socket, and you need to continue diagnostics.
Checking the cord
The next stage of inspection is to inspect the electrical cord. In practice, it is often chafed or damaged from the inside. To diagnose, you need to disassemble the blender body and remove the cord, which is fixed inside to a special block using screws or soldering. You can check the integrity of the cord with a voltmeter. The resistance level should be close to zero. If you do not have a voltmeter, you can take a new cord, connect it in place of the old one and connect it to the network. If the problem persists, the problem is not related to the cord.
Checking the fuse
If there is a fuse in the blender, you also need to check it. The fuse is removed from the socket, and if it fails, the thread inside the housing will be broken. Repairing a component is quite difficult, so it is best to replace it if it breaks. All technical characteristics are indicated on the fuse body, according to which you can easily select a similar part.
If the new fuse fails instantly
If the working fuse blows immediately after connecting the blender to the mains, it indicates a short circuit. The problem is a malfunction of the control unit or engine. In this situation, you need to connect individual units to the network and monitor the result. To check the voltage level you will need an ammeter. If the voltage value is significantly higher than the nominal value, then the source of the problem has been identified.
Visual inspection of the printed circuit board
Comprehensive diagnostics also involve inspecting the printed circuit board. Most often, capacitors fail, and this can be visually seen by their swelling. When a resistor burns out, its surface becomes dark. During inspection, you need to make sure that the connecting tracks on the board do not have breaks or peeling that occur during a short circuit. If such defects are discovered, the electronic unit will need to be replaced.
Finding and replacing the thermal fuse
Most multicookers have several thermal fuses, which are covered with plastic to protect them from moisture. All of them are located inside the case, so to find the burnt element you will need to disassemble the device. To do this, you need to turn the multicooker over, find the fastener from below that holds the bottom cover, and unscrew it.
After the device is disassembled, you can see several wires inside; you need to find the one that goes from the electrical connector to the terminal of the heating element. The wire will go through a thermal fuse, which is located in a plastic thermal insulation tube.
In most cases, unsecured thermal fuses simply hang down, but sometimes they are fixed with clamps that are attached to a screw. Please note that fuses are very sensitive to heating, so soldering is prohibited.
In addition, manufacturers fix them using a crimping method, so the thermal fuses cannot be removed. Therefore, to determine the condition of each element, it is necessary, without removing them, to use a multimeter to determine the resistance level. Once the condition of each fuse is determined, the faulty parts must be replaced.
Replacing a thermal fuse using an example
Let's look at replacing one thermal fuse using a live example. There is a multicooker whose display does not turn on, initially we do not know what the problem is.
Let's disassemble the device. To do this, you need to unscrew one screw from the bottom and open the bottom cover. You can see that the design of the multicooker is extremely simple. Its insides can be divided into 3 parts:
- The power unit is a power supply and a relay switching heating element.
- Control board with display (which does not work).
- A heating element.
Let's look at the power part of the multicooker and its wires:
- The white wire from the network connector goes to the power supply.
- The red wire goes from the power connector through the thermal fuse to the heating element terminal.
- The black wire goes from the heating element terminal to the power supply.
- The red wire goes from the second terminal of the heating element to the power supply to the switching relay.
- Yellow is the common ground wire that connects the metal structures of the multicooker (external and internal casing).
- The white wire goes to the control board from the switching relay.
The figure shows wires by numbers
First you need to find out if the electricity is reaching the power supply. To do this, you need to connect the multicooker to the network and first measure the voltage at the terminals of the network connector itself.
Next, check the voltage between the connector terminal and the heating element terminal. We see that electricity does not reach the heating element through the red wire.
The red wire goes through the thermal fuse, most likely that is the problem. Let's take it off. To do this, you need to unscrew the screw from the metal plate with which the thermal fuse is attached to the multicooker body.
Unscrew the screw.
Let's look at the model:
- model – RY184;
- temperature – 184
OWITH;
- current – 10 A;
- voltage – 250 Volts.
Thermal fuse close-up
Disconnect the thermal fuse using wire cutters. We order a new element with similar characteristics.
The thermal fuse cannot be connected to the wires by soldering, so you need to make sleeves for crimping. They can be made from a radiator for a transistor. The resulting two plates need to be cleaned with sandpaper. And then bend them into open tubes.
Sleeves that came from the radiator
Using sleeves, we attach the thermal fuse to the wire by pressing it with pliers.
The fuse is fixed to the inner housing using a metal plate in which it is wrapped. It needs to be screwed back to its original place. After this, you can check the voltage at the terminals.
When we are convinced that everything worked out, turn on the multicooker and see the result.
How to determine which element is faulty
It's time to test the thermal fuses to see if any need to be replaced. It also happens that all these elements need to be changed. You can check the condition of the part with a tester.
Do-it-yourself repair of the Polaris multicooker is quite simple in this regard. After all, you don’t even have to remove the thermal fuses to check them.
The next sensor is located in the lid, but it is undesirable to open it without being sure that the reason for the breakdown of the multicooker lies there. You can check the sensor by measuring the resistance in its wiring and at the same time increasing the temperature of the cover.
If no change occurs, then the sensor has indeed failed and should be replaced
Then it’s time to unscrew the lid, but you need to do this very carefully so as not to damage anything inside.
Common breakdowns
Most multicooker failures occur due to contamination of various contacts - liquid or bulk products have gotten inside the product:
- various cereals: millet, buckwheat, rice;
- sugar;
- pepper, salt.
Such breakdowns are not difficult, and they can be eliminated by doing the repairs yourself, but the user must remember that the device should not be plugged in until it is completely cleaned - the consequences can be very disastrous and cause serious damage to the family budget.
Solution
The instruction manual advises the user to follow recommendations regarding troubleshooting. If the situation has not changed, then there is only one way out - a service center.
| Error code | What to do? |
| E1 | Check the bowl for holes and perforations Clean the multicooker from dirt by carefully turning it upside down after turning it off. Check if the heater works when the plug is plugged into the network without a bowl |
| E2 | Check whether there is a network in the appliance and whether the food selection functions work. Check operation with the lid open and closed. |
| E3 | Open and close the top cover tightly again Check the operation of the heating element |
| E4 | Contact a service center, as this error may appear if the central board is faulty |
| E5 | Turn off the multicooker for 3-4 hours, let it cool completely and turn it on again |
In some cases, the problem detection sensor shows an incorrect error code, which complicates the process of finding and solving it. If all of the above actions are not successful and do not restore the multicooker’s functionality, you cannot do without a service center.
It is not recommended to open the multicooker yourself, disconnect the boards and check them for malfunctions. If this fact is discovered at the service center, the customer will be denied warranty service. Lack of experience can only aggravate the problem and make further repairs impossible.
Turning on the multicooker for the first time
Before you make a purchase of any multicooker model, you must first become familiar with its features. This will help you determine the functions you need, as well as understand which ones you will need to use most often. Having chosen the appropriate option, before you start using the product, you must first study the instruction manual, as well as the manufacturer’s recommendations regarding the preparation of various delicious dishes.
Each multicooker kit necessarily includes several parts:
- inner bowl;
- electromechanism;
- special spoon;
- container for steaming;
- various additional accessories.
The equipment depends on the type of device model and its brand.
Important! If you brought the purchased device into a room from the street where the temperature is below zero, it is strictly forbidden to turn it on until it becomes warm.
Each model comes with an instruction manual, which describes in detail all the nuances of working with the product. Expensive devices differ from cheaper ones by a larger set of additional functions. In addition, this product comes with a special book describing many different recipes for preparing delicious dishes. It is written in accessible language. Anyone, even those without cooking experience, can understand how to prepare any dish.
Step-by-step instructions for a beginner
Before you start using a new device, you must first check its serviceability, then prepare the device for further use. To turn on the multicooker for the first time, you need to complete several successive steps:
- The packaging is removed.
- Remove the protective paper separating the multicooker bowl from the heating element.
- The parts are freed from plastic film.
- The internal container intended for storing products is thoroughly washed. After washing, factory smells will disappear.
- The device is thoroughly wiped.
- The voltage is 220 volts.
- Water is poured into the tank, maintaining the minimum level.
- Cover the container with a lid and set the heating mode.
The completion of the operation will be indicated by a loud sound signal similar to a siren. In some models, after the end of the process, a transition to an automatic temperature holding mode is provided. It must be stopped by pressing the shutdown button.
Good to know! There are devices that do not have shutdown buttons. To stop the operation of such a multicooker, you will have to constantly unplug the cord from the outlet. When purchasing a device, do not forget to pay attention to this.
For ease of operation, each device is equipped with a timer. The installation button is always located in the main menu of the device.
How the Redmond multicooker works
To repair a multicooker yourself, you should familiarize yourself with its design features and analyze the principle of operation of the device. It resembles an ordinary pan on which a monitor and a power button are located.
The container is closed with a special lid with a latch. The device contains a bowl in which food is prepared. Under this part of the device there are power and control units. There are also diagrams there. A multicooker is considered a multifunctional device. Its operation is ensured by a microprocessor. It consists of several elements.
Electrical diagram
The voltage goes to the connector, which has several contacts. One grounds the unit, the second connects to the housing, the third connects to the cover.
Wiring diagram
Power gets to the wires. They carry the current to the switch and fuse, which are fixed in series. A switch is used to start or stop a job. The fuse protects the unit from overheating.
Power supply and switching
This element solves 2 problems at once. It supplies alternating voltage of 220 Volts and converts it to direct voltage. 5 Volts are required for the control unit. The switching circuit requires 12 volts. The circuit includes a battery. It is required to record the actions of the hostess, who launches the device’s operating programs.
Thermal resistances
The device contains 2 thermistors. One of them is attached to the lid, the second - to the bottom of the device. The key task of the elements is considered to be thermoregulation in the use of the device. Thanks to this, it is possible to maintain the temperature set by the owner.
Thermal fuse
This element protects the kitchen appliance from overheating. It helps prevent damage to the control system.
Turning on the multicooker for the first time
Before you make a purchase of any multicooker model, you must first become familiar with its features. This will help you determine the functions you need, as well as understand which ones you will need to use most often. Having chosen the appropriate option, before you start using the product, you must first study the instruction manual, as well as the manufacturer’s recommendations regarding the preparation of various delicious dishes.
Each multicooker kit necessarily includes several parts:
- inner bowl;
- electromechanism;
- special spoon;
- container for steaming;
- various additional accessories.
The equipment depends on the type of device model and its brand.
Important! If you brought the purchased device into a room from the street where the temperature is below zero, it is strictly forbidden to turn it on until it becomes warm.
Each model comes with an instruction manual, which describes in detail all the nuances of working with the product. Expensive devices differ from cheaper ones by a larger set of additional functions. In addition, this product comes with a special book describing many different recipes for preparing delicious dishes. It is written in accessible language. Anyone, even those without cooking experience, can understand how to prepare any dish.
Step-by-step instructions for a beginner
Before you start using a new device, you must first check its serviceability, then prepare the device for further use. To turn on the multicooker for the first time, you need to complete several successive steps:
- The packaging is removed.
- Remove the protective paper separating the multicooker bowl from the heating element.
- The parts are freed from plastic film.
- The internal container intended for storing products is thoroughly washed. After washing, factory smells will disappear.
- The device is thoroughly wiped.
- The voltage is 220 volts.
- Water is poured into the tank, maintaining the minimum level.
- Cover the container with a lid and set the heating mode.
The completion of the operation will be indicated by a loud sound signal similar to a siren. In some models, after the end of the process, a transition to an automatic temperature holding mode is provided. It must be stopped by pressing the shutdown button.
Good to know! There are devices that do not have shutdown buttons. To stop the operation of such a multicooker, you will have to constantly unplug the cord from the outlet. When purchasing a device, do not forget to pay attention to this.
For ease of operation, each device is equipped with a timer. The installation button is always located in the main menu of the device.
The multicooker has stopped working and won’t turn on anymore - reasons and DIY repairs
Before blaming the manufacturer for a breakdown, it is worth analyzing the situation. Perhaps you simply do not know all the intricacies of the device. It is also necessary to remember what happened the last time it was turned on.
Possible reasons
So, you've taken your new slow cooker out of the box, loaded it with groceries, and are trying to start it up. But for some reason she doesn’t want to turn on. Fixing the problem in this case is not difficult: most likely, you just installed the bowl incorrectly or overloaded it with products above the division (see photo). The container must be removed and reinstalled. It is also necessary to check the degree of loading of the device.
A similar problem can also occur when:
incorrectly set cooking mode: each type of dish requires a certain temperature; if it is violated, overheating protection is triggered;
excessive loading of products above the level of divisions located in the upper part of the bowl and, as a result, excess boiling liquid entering the heating element;
Loading the multicooker above the level of the last mark is unacceptable
lack of liquid: in this case the bowl overheats, the sensor immediately triggers and turns off the device;
- low voltage or lack of electricity;
- Contacts become dirty when pieces of food get in: they need to be cleaned;
- the pressure valve built into the multicooker lid is clogged: in this case, it is enough to simply rinse it;
- deformation of the bowl: this defect is clearly visible even externally;
- factory defective temperature sensor: the last two problems are rare, but they can still happen.
Defects such as a burnt microcircuit or failure of a temperature sensor are less common. In this case, you will not be able to figure it out yourself without special knowledge - you will need to contact a service center.
After selecting the cooking mode, do not forget to press the “Start” button
Correct operation
Often users feel that the multicooker turns off prematurely. The reason for this very often lies only in violation of operating rules. Thus, interruption of heating before the set time can occur when:
contact with the heating element of bulk products or moisture;
The heating element must not be exposed to moisture or food particles.
- incorrectly set cooking temperature for this product; in this case, the built-in overheating protection may also trigger;
- burning of the bottom of the bowl;
- exceeding the set temperature due to a clogged pressure valve located in the multicooker lid (it must be removed and cleaned);
- factory defect of the temperature sensor: such a problem occurs infrequently, but it is quite possible;
- a defect in the bowl, due to which food gets onto the heating element.
In order for the multicooker to serve for a long time, it is worth remembering the basic rules of its operation:
- place it on a flat, hard surface;
- connect the device to a working outlet with grounding;
- Before turning on, make sure that the lid is closed tightly;
- after washing the bowl, it must be dried or wiped dry; It is prohibited to place wet dishes on the multicooker stove;
The pressure valve located in the lid of the device is also not simply wiped with a dry cloth, but washed thoroughly.
The steam valve built into the lid requires mandatory cleaning
Rules for using a multicooker
To avoid unexpected malfunctions of the device, you must always strictly follow certain rules and requirements. The sequence of actions when operating the device is also very important:
- choose the required recipe, prepare the necessary products;
- remove the bowl from the appliance, load it with food;
- lower the bowl into the multicooker;
- check that it is connected correctly to the electrical network;
- set the required program;
- turn on the appliance for cooking.
Operating rules
Each instruction manual for the device contains certain rules, such as, for example:
- The device should only be installed on a solid, level surface;
- connect the device only to a grounded outlet;
- before turning it on, be sure to check the tightness of the closed lid;
- after each cooking, the bowl must be thoroughly washed, dried or wiped dry with a towel;
- The lid and the pressure valve located in it also need to be washed well and wiped dry.
When should I contact the service center?
If any cases of the device turning off or its incorrect operation occur, you must first check everything step by step, from correct inclusion to detection of burnt food or dirty contacts.
When using a multicooker, you need to check all your actions with the operating instructions. Many faults, such as dirty or oxidized contacts, can be eliminated independently.
Attention. If the multicooker does not work, the desired cooking mode is not set, or it turns off on its own, before deciding what to do, you must immediately disconnect the device from the network.
Before contacting the service center, it is advisable to perform a number of manipulations:
- turn off the device and try to plug it into another outlet (if the problem is a faulty outlet, the device will work);
- check all wires for damage or maybe a wire has come loose somewhere;
- check the instructions to see if you are doing everything correctly;
- try emptying the multicooker, washing it, drying it thoroughly or wiping it dry with a towel.
If all these manipulations do not help the operation of the device, then you need to contact a service center. But remember that if the device is under warranty, the workshop may refuse free service and repair if the device was opened at home yourself.
Source: tehnikoved.ru
- 16.02.2013
- Uncategorized
The convenience of the multicooker was appreciated by many women. If you have not yet become the happy owner of this “helper,” then you should know what you need to consider when choosing it for the store.
When a woman first hears the word “multi-cooker,” she can imagine a saucepan equipped with a number of functions. A multicooker is a real “miracle pan” that is capable of controlling food preparation without human intervention. It contains about a dozen functions: stewing and baking, boiling and frying, etc. You don't need to spend time standing at the stove to cook a delicious meal. It is enough to select the operating mode that is necessary for this. Modes are selected on a special control panel. With just three or four buttons, you can control the entire process, from turning it on to finishing the cooking of the dish.
This question probably worries those people who are just thinking about purchasing a multicooker. In fact, this device is capable of preparing everything: soups, side dishes, cereals, pies, omelettes, casseroles, pilaf, desserts, yogurts and much more. With the advent of a multicooker in your home, you can use not only familiar recipes, but also experiment, coming up with new dishes. Now your menu will become more varied and useful. If you adhere to a dietary or balanced diet, then the multicooker will be a real godsend.
The first thing you should definitely pay attention to when choosing a particular multicooker model is its design. The control system for the “miracle pan” is located on the outside. The kit should include a bowl for preparing dishes (food should be placed in it). Please note that the volume can vary from 3 to 6 liters. If you have a large family, then it is better for you to choose a bowl with a maximum volume. The surface inside has a non-stick coating. The top of the multicooker is closed with a lid. Pay attention to whether it fits tightly. When choosing a multicooker among a dozen models, pay attention to its operating mode. Some models are equipped with traditional modes. We are talking about baking, stewing and steaming. Other models have additional features that allow you to diversify the menu. It is advisable that the multicooker have a built-in timer. In fact, this function is currently available in almost all models of this device. Thanks to it, you will have the opportunity to delay cooking. By setting it for a certain number of hours, for example before leaving for work, when you return you can dine on a freshly prepared hot dish. If your multicooker has a function called “Keep Warm,” then you can safely choose it. When choosing an “electronic pan” you need to look at its power. The fact is that the speed of cooking depends entirely on this indicator. The higher the power, the faster the cooking process will be carried out. The ideal figure is 600-800 W. Those who care about their health are advised to look at the coating of the pan. It is desirable that it be ceramic and not Teflon. It is also worth knowing that the multicooker cord can be detached, or it can be permanently attached. The first option is the most convenient, because it will be convenient to store. But the second option is safer to use. Choosing a multicooker is actually not as difficult as it seems. Purchasing this device will save housewives time, but at the same time there will always be healthy food on your table!
Source: multiwarka.ru
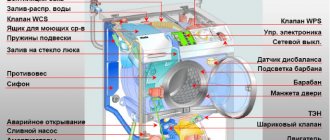
The most common malfunctions of multicookers and system errors
If the multicooker breaks down and does not work, then in some cases the corresponding error codes are displayed on its display, by which you can understand what exactly happened.
If you do not understand the design of a multicooker, then in the event of a breakdown it is better to turn to professionals
The Redmond multicooker is characterized by the following designations:
- E1 or E2 – system error, possible breakdown of the power supply, heating element, or the lid is not tightly closed;
- E3, E4 or E5 - the temperature sensor or fuse has failed, the system may have turned on to prevent overheating.
Also, codes E1, E2, E3 may indicate that moisture has entered the mechanism. In this case, you need to unplug the device and give it time to dry.
Also, one of the most common breakdowns of multicookers is contamination of the device. This happens when liquid or any bulk substances, such as rice or sugar, get inside the mechanism.
To solve the problem, the device needs to be cleaned by performing the following steps:
- Remove the top cover of the device by unscrewing the bolts;
- Clean the circuits by turning the device over and shaking it gently;
- If the blockage is at the bottom, then you need to remove the bottom cover;
- Disconnect the contacts of the software and heating boards;
- Remove heating elements, temperature sensor and other elements;
- Clean all parts from crumbs or other contaminants.
If the thermal relay becomes clogged, the contacts should be slightly unclenched and then wiped with thick paper. This can happen if water gets into the device or condensation forms.
Do-it-yourself multicooker repair
If the multicooker stops responding to any actions, does not heat, beeps, does not heat up well, does not turn off, blinks or displays errors on the display, it must be inspected and, if necessary, repaired. This can happen with any brand of equipment, and it doesn’t matter whether it’s Samsung, Redmond or Vitek.
The main thing is to remember that you need to work with electrical appliances very carefully, observing all safety measures and be sure to remove the plug from the socket! Just turning off the multicooker is not enough!
Before you start repairing a multicooker, you should study the recommendations of specialists and watch a training video
What to do if the multicooker:
- It turns off before the appointed time - the cooking mode may have been selected incorrectly or there has been too much food. To do this, you need to turn off the device, check the recipe and restart it again. The thermal protection may also trip, the valve may become clogged, the food in the bowl will burn, or there may not be enough liquid to continue the cooking process. Sometimes the problem may be a violation of the integrity of the bowl or a sensor failure.
- It takes too long to cook food - most likely, the temperature is set incorrectly, there is too much food, or the bowl is not positioned as it should be. It is worth restarting the device, letting it stand for a while and checking the installation of the bowl.
- It switches to heating on its own - you can fix the problem by holding the “O” button and in a few seconds everything will return to normal.
- Doesn’t count down time - probably a software error has crept into the device’s operation or the timer is not configured. You need to carefully read the instructions and, if necessary, manually set the timer.
- It beeps - in this case, the contacts of the device may short-circuit. Sometimes it is enough to remove the battery for the squeak to stop.