How to unlock the Combustion stove
Locking the hob is possible for induction EIT6351XPD, EIT6341WD, EIT5351WD; to remove the block, you need to press the “key” symbol.
Models with IconLED are equipped with a safety lock function to prevent settings from being changed accidentally, for example by children. To turn it on, you need to press and hold the watch sensor for 5 seconds. “Loc” will appear on the display for 5 seconds.
There are two options:
- If the safety lock is activated and no function other than the current time is set, the oven will not operate.
- If you turn on the lock after setting one of the programmer functions, the oven will work, but it will be impossible to change its operating parameters.
once it cools down...
Page 7
- Image
- Text
6
as soon as it cools down.
• When cleaning, do not use abrasive cleaners that could
scratch the glass surface and paint.
DESCRIPTION OF FUNCTIONS
OVEN FUNCTIONS AND APPLICATIONS
Oven light, on in each of the following switch positions
Oven illumination on.
Static heating of the oven with upper and lower heating elements. The thermostat can be set to a temperature between 50 – 250°C.
Heating by means of top and bottom heaters. The temperature selector can be set anywhere between 50°C – 250°C.
Grilling food using infrared radiation. The thermostat is set to maximum temperature.
Grilling by infrared radiation. The temperature selector is set to the maximum position.
Grill using a fan. The warm air flow will create a higher temperature in the upper part of the oven (above the rack or baking sheet). The thermostat can be set to a temperature between 50 – 250°C. Recommendation. This function is useful when grilling food or frying large pieces of meat at a higher temperature. The oven door must be closed.
Grilling assisted with oven fan. Temperature inside the oven is higher towards the top. The temperature selector is set between the 150-250 °C range. Tip: This function is also used for grilling or baking bulky meat chunks at high temperature. Oven door is closed.
For long-term food storage, use appropriate...
Page 5
- Image
- Text
4
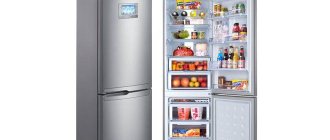
food storage (no longer than 48 hours). For long-term food storage, use containers suitable for this purpose.
COOKING STOVE - BURNER IGNITION
Turn the button to the left to the “MAXIMUM POWER” position and light the gas with a match or lighter.
COOKING HOB – LIGHTING THE HOB BURNERS
Press the appropriate burner control knob slightly towards the appliance and turn it anti-clockwise to the “MAXIMUM POWER” position. Light the gas using a match or any gas ignition device.
IGNITION OF GAS BURNERS USING ELECTRIC IGNITION
It is easy to press the button and turn it to the left to the “MAX POWER” position. With your other hand, press the high-voltage ignition switch or press the button all the way onto the control panel and hold until a spark ignites the burner on stoves equipped with a high-voltage ignition switch directly on the control lever.
LIGHTING THE BURNERS WITH HIGH VOLTAGE GAS IGNITION KNOB
Press the appropriate burner control knob slightly towards the appliance and turn it anti-clockwise to the “MAXIMUM POWER” position. Now use another hand and press the gas ignition knob on the control panel and keep it pressed until it ignites the flame.
IGNITION OF GAS BURNERS USING ELECTRIC IGNITION
Turn the burner tap handle to the left and set it to the “MAXIMUM POWER” position. Keep the handle pressed against the panel for approximately 5 more seconds to allow the flame fuse sensor to heat up. When the sensor heats up, a thermoelectric voltage is generated, which will hold the fuse magnet, and the gas will burn. If the flame goes out, the gas supply to the burner will automatically close, regardless of the position of the tap handle - “MAXIMUM POWER” or “LOW FLAME”.
LIGHTING THE BURNERS WITH FFD HIGH VOLTAGE IGNITION KNOB
Press the appropriate burner control knob slightly towards the appliance and turn it anti-clockwise to the “MAXIMUM POWER” position. Then push the knob towards the panel to a limit position. High voltage ignition device starts firing the burner. Hold the knob pressed to the limit position for about 5 seconds after the flame appears to allow the flame sensor scanner to heat up. Release the knob and check whether the burner is on. If the flame dies after releasing the knob, repeat the ignition procedure. After that set the knob to the desired position.
EXTINGUISHING COOKING BURNERS
When extinguishing the flame of the burners, you need to turn the corresponding tap handle to the “OFF” position. Check to see if the burner flame has gone out.
SHUTTING THE HOB BURNERS OFF
Turn the selected knob to the “OFF” position and check whether the flame is extinct
COOKING
• When cooking, use lower and wider pans. Please contact
Make sure that the burner flame heats the bottom of the vessel and does not go beyond its edges.
• Gas stove burners come in different sizes. For complete (economical)
when using burner power, use cookware with recommended
COOKING
• Use low and wide cookware for preparing food on gas burners. Make sure
burner flames heat the dish bottom and do not go beyond its rim.
• The appliance is fitted with different size burners. For optimum (economical)
consumption of gas use the recommended cookware bottom diameters:
— small burner from Ø 120 to Ø 160 mm,
How to clean the Gorenje stove
To wash the front panel, liquid non-abrasive cleaning agents and a soft cloth are used; there are special kits for each type of surface - enamel, glass ceramics, stainless steel. If you purchased a model from the design collection, then find out which product is best to clean the fittings (copper, platinum coating or aluminum) so that it does not lose its original appearance.
When washing the lid, do not use acidic liquids to prevent the metal edging from becoming dull. The glass lid can be washed with your usual cleaning product.
It is recommended to clean the glass ceramic hob only when it has cooled down. Do not use abrasives, sponges that you used to wash dishes, or steel wool. If you want to preserve the appearance of the surface for a long time, use special products that create a dirt-proof film and clean the glass ceramics every time after use. Except for those cases when you need to quickly remove dirt so that it doesn't burn.
This is especially important if you spilled sugar or spilled sweet compote, jelly or jam. First use a soft damp cloth, and if that doesn't work, use a special scraper, holding it at an angle of 45° to 60° and pressing lightly. Make sure that the plastic handle does not touch the hot glass.
Water stains can be removed with a weak vinegar solution, but do not wipe metal frames with it.
Using aluminum or copper cookware may leave stains that are difficult to remove. This does not affect the operation of the device and damage of this type is not covered by the warranty.
You can clean the oven simply with water and soapy water or a special spray for stubborn stains. Electric models in most cases are equipped with the AquaClean function. You need to pour half a liter of water into a deep baking tray and place it on the lower level. Turn on the steam cleaning mode, then after half an hour wipe all softened dirt with a damp cloth.
The inner surface of the ovens in the Combustion stoves is covered with very resistant non-porous pyrolytic enamel SilverMatte, which is easily cleaned and is not subject to scratches and chips, but still do not rub it with hard, especially metal, sponges; use special detergents.
Do not clean the thermostat and upper heating elements with chemicals, only with a damp cloth. To clean the upper heaters, you must first unplug the appliance from the power supply, then remove the baking trays and wire rack. Pull the heaters towards you, then the cross clamp will pop out of the slots on the left and right. Then push the entire structure back until the holder is secured in the recesses.
Many people are interested in how to clean the thermocouple in a gas stove. Sometimes the electric ignition stops working if the burner is flooded or a greasy coating has formed on the electric ignition plug. The burner can be removed and wiped with a damp and then dry cloth. Clean the thermocouple and spark plug with a soft toothbrush. Before assembling, you need to dry the burner thoroughly, and then try to light the gas for the first time with a match. When the thermocouple warms up, the electric ignition will start working again.
Important! If cleaning does not help, do not try to fix the problem yourself. Contact the service center.
Clean the rubber oven seal after each use using hand washing liquid and a soft cloth, and wipe it dry. Removable guides can be removed for hand washing or dishwasher cleaning. You need to lift them from below to remove them from their nests.
Using an electronic programmer you can program...
Page 10
- Image
- Text
9
Using an electronic programmer, you can program the oven in two ways: SEMI-AUTOMATICALLY: - the oven immediately starts and after a set time it will automatically turn off AUTOMATICALLY - setting the oven to automatically turn on and off
The oven operation can be programmed with help of digital programmer with two methods: SEMIAUTOMATIC REGIME
—
the oven is in operation immediately and it is switched off automatically after
elapsing of set up time
AUTOMATIC REGIME
—
automatic switching on and off of the oven.
SEMI-AUTOMATIC OPERATION
For this programming method, determine the operating time of the oven
(duration). The maximum possible tuning period is 23 hours and 59 minutes!
semiautomatic regime You determine the duration of oven operation in this programming method (duration of operation). The maximum duration is 23 hours and 59 minutes!
SEMI-AUTOMATIC OPERATION PROCEDURE
Examples for clarity: Duration of work - 1 hour 20 minutes (1.20). Setting the operating time: • Press button 2 (0.00 symbol appears and press button 5 until
will appear 1.20. During setting, symbol 6 will also be displayed. After 5 seconds, the exact time will appear on the electronic display and symbol 6 will be lit.
• Turn on the oven: Set the heating system using the appropriate button
and oven temperature.
• The oven works immediately after switching on (starts baking); during
baking symbols 6 and 8 are lit.
• After a specified period of time – in this case, after 1 hour and 20
minutes - the oven will automatically turn off (baking is finished) - an intermittent acoustic signal will sound, which can be turned off by pressing button 1, 2 or 3. After 2 minutes, the signal will automatically turn off. - symbol 8 disappears - symbol 6 flashes.
• Turn off the oven and press buttons 2 and 3 simultaneously to turn off
symbol 6! As soon as symbol 6 disappears, the oven is ready for manual control of the functions.
USE OF SEMIAUTOMATIC REGIME
Example for easier understanding: The requested duration of operation is 1 hour and 20 minutes (1.20). The duration setting up: • Press the button 2 (the display shows 0.00 and the symbol and then press the
button 5 so long, as the value 1.20 is achieved. The symbol 6 is glowing in addition during the setting up. 5 seconds after setting up the normal day time and the symbol 6 will glow.
• Switch on the oven: With the corresponding button set up the chosen heating
method and the temperature of baking.
• The oven starts to operate immediately after switching on (the baking starts); the
symbols 6 and 8 are glowing during the baking.
• After elapsing of set up time – 1 hour and 20 minutes in our example
— the oven will switch off automatically (the baking is finished), — a discontinuous sound signal will sound, this can be switched off with pressing one of buttons 1, 2 or 3. Otherwise the sound signal switches off automatically after 2 minutes. — the symbol 8 vanishes — the symbol 6 will blink.
• Switch off the oven and for to vanish the symbol 6 press simultaneously the
buttons 2 and 3! The oven is ready for manual control of operation after vanishing of symbol 6.
AUTOMATIC OPERATION
With this programming method, you determine the operating time of the oven (duration) and the end of operation (end of operation). The maximum possible setting and end of work is 23 hours and 59 minutes (end of work setting = time of day + 23 hours 59 minutes).
AUTOMATIC REGIME
At this programming method you determine the duration of oven operation (duration of operation) und the finishing time of operation (end of operation). The maximum duration of operation is 23 hours and 59 minutes (the set up time for finishing = actual day time + 23 hours and 59 minutes).
ATTENTION!
If the oven is not turned on with the appropriate buttons, it will not work in automatic mode!
REMARK!
The oven would not work automatically when you would not switch it on with the corresponding buttons!
Comments
Highlight → I found the instructions for my stove here! #manualza
- Click →
I'm not stupid, I strictly follow the instructions.
Manualza!manualza.ru
Still not with us?
the main thermal radiation can be...
Page 3
- Image
- Text
2
the main thermal radiation can be 750 mm, in other directions - 100 mm.
• Do not close the stove lid while the burners are hot.
• If the stove is not working, make sure that all switches are turned off,
and the gas valves are closed.
• During any manipulation with the stove (when cleaning the stove and during repairs), in addition to
everyday use, close the gas supply valve located on the gas pipeline and disconnect the stove from the power supply by unplugging the supply cord from the outlet).
• If the stove will not be used for more than 3 days, close the tap
gas supply located on the gas pipeline. If the stove has not been used for more than 3 months, we recommend testing all its functions before putting it into operation.
• If you smell gas, immediately close the gas supply valve,
located on the gas pipeline. The stove can be used again only after the cause of the gas leak has been determined, it has been eliminated (by a specialist from an authorized service organization) and the room has been ventilated.
• If a malfunction is detected in the gas or electric part of the stove, do not
We recommend carrying out repairs yourself. Turn off the stove and use the services of an authorized service organization.
• Do not perform a leak test or look for gas leaks.
with the help of fire.
• The stove must be turned off if there is any activity in the room where it is installed.
work that can change the environment of the room, i.e., work in which a fire or explosion may occur (for example, when gluing linoleum, working with paints, adhesives, etc.). You can turn on the stove and use it again only after finishing the work and thoroughly ventilating the room.
• When operating a household appliance that runs on gas fuel,
the heat and humidity of the air in the room where it is installed increases. Therefore, it is necessary to ensure sufficient ventilation in this room. A window or window must be open, or an air purifier must be installed to remove combustion products and fumes from the room. When using the stove for a long time and intensively, it is necessary to provide additional ventilation, for example, by opening the windows, ventilating the room well, or increasing the power of the air purifier fan.
• The required minimum air supply must be 2 m
3
/hour per
every kW of power.
• The manufacturer does not recommend the use of any additional
devices to prevent the flames of cooking burners from going out or to increase their efficiency.
• The manufacturer is not responsible for malfunctions, and the warranty does not
applies to defects resulting from non-compliance with the rules and operating requirements specified in this “Manual...” and improper handling of the device.
• For safe and long-term operation of the stove, we recommend once every 2 years.
contact an authorized service organization with a request for periodic monitoring of the functions of the stove and its maintenance.
it by yourself. Switch the appliance off, cut the gas supply and call authorized personnel to make the repair.
• If you plan an absence exceeding 3 days, turn off the gas pipe cock and shut the
gas supply. If the appliance is out of service for more than 3 months, it is advised to retest and reset all functions of the appliance.
• Before moving the appliance from its designed position, resulting in temporary
danger of fire or explosion (eg linoleum or PVC adhesive, working with coatings etc.), the appliance must be put out of service.
• In change of the environment for which the appliance is designed, with a transient
risk of fire or blast (eg at linoleum or PVC gluing
• Do not place any combustible objects on the appliance or at a shorter distance
than its safety distance (the shortest distance of an appliance from combustible items is 750 mm in the direction of main radiation and 100 mm in other directions).
• Do not put any flammable objects close to hob burners, oven heating elements, or
in accessory space.
• Do not use cookware with damaged surface coating or otherwise defective due to
wear or handling.
• Do not place the appliance on a pedestal.
• Manufacturer does not recommend using any additional accessories, for instance
flame extinguishing protectors, or efficiency increase gadgets.
• Do not move the cooker by holding the hob.
• Do not close the hob cover while gas burners are still hot.
• The manufacturer declines responsibility for any damage caused by violating the
instructions and recommendations set herewith.
• Do not use pressure vapor cleaner for cleaning the appliance.
• Cooker may only be installed against non inflammable back wall.
How to connect a Gorenje electric stove
The manufacturer recommends installation with the help of service center employees, only in this case the device will have a 1-year warranty plus a year of service. Make sure that there is a mark on the warranty card.
A three-phase connection is recommended using a 5x1.5 mm connection cable 2 type H05VV-F5G-1.5 (formerly CGLG 5Cx1.5), (fuse 3x16 A).
For single-phase connection, use cable H05VV-F3G-4 (formerly GGLG 3Cx4), (fuse 32 - 40 A depending on type). The ends of the wires are crimped into terminals, secured with screws, and the lid is closed.