The refrigerator temperature sensor is extremely important, as it affects the operation of the entire system, the basic principle of operation - turning the compressor on and off with the correct time intervals. If the temperature sensor breaks, the motor will work intensively continuously and, since it is not designed for such a pace, will soon fail. There are a number of other equally critical consequences of a sensor malfunction: violation of the camera mode, too much or too little cooling. Let's look at how to diagnose a broken temperature sensor, how to determine that it is the one that is broken, and also describe how to repair it, if possible, and the replacement process.
Operation of the temperature sensor in the refrigerator system
It is advisable to consider the principle of operation of the thermosensor of refrigeration units (domestic, industrial) together with a description of the operation of the entire system, since the element affects all its main aspects. The temperature detector is the main sensitive control unit; further commands from the electronics and thermostat depend on its indicators.
A household refrigerator, strictly speaking, does not produce cold itself in some complex ways, by mixing special reagents, etc. The principle is extremely simple: it uses an environment that already exists, the system only removes heat from inside the cabinet through the circulation of the coolant. The air is cooled using an evaporator (defrost) inside the device in the process of freon (refrigerant, refrigerant, cooler) taking heat from the chambers and releasing it to the surrounding space through an external condenser (radiator).
The algorithm is like this:
- The piston of the compressor (motor) with a container of freon compresses this substance, it boils and transforms into gas. Due to the specified and created pressure, it is distilled.
- The refrigerant flows inside the cabinet through a system of tubes and an evaporator (also known as a defrost, a small coil inside the cabinet) - as it moves, it takes heat from the internal space, thus lowering the temperature.
- Next, the freon enters the main line and the coil on the external elements (the condenser, the familiar radiator at the back), where its temperature now decreases, and the captured heat is absorbed by the environment. The substance turns into a liquid state, enters the filter-drier, where the moisture evaporates, passes through a capillary tube, and returns to the motor capacity. From there again - the evaporator. The cycle repeats.
Place and function of the temperature sensor in the system:
- t° readings are sent to the thermostat;
- The thermostat compares the received information with the mode limits set on it and sends a command to the motor, which ensures the implementation of the set values, that is, achieving the desired temperature inside the cabinet. This creates cooling cycles inside the chambers. The longer the compressor operates, the faster and more frequently the freon moves through the tubes and the more intense the cooling and freezing occurs, and, conversely, the less frequent and shorter the start, the weaker these processes are.
The principle of operation of the refrigerator
Without delving into technical terms and complex diagrams, the operation of a refrigerator can be described something like this:
- the compressor removes freon vapor from the evaporator and transfers it by injection into the condenser;
- where these vapors cool and condense back into liquid;
- after which it again enters the evaporator, where it acquires a gaseous state.
Consider each of the elements of this chain in a little more detail.
The compressor - also known as the motor - is the main working center of any refrigerator, which drives freon through the system, providing cooling. There are refrigerators with one and two compressors. The second type includes models such as LG LSR 100 RU, Atlant XM 6321-101, Liebherr SBSes 7353-25 001 and many others.
Condenser - Distills coolant vapor into a liquid state under pressure by removing heat. In small coolers, the condensers are usually in the form of a coil, which is located on the back wall of the device. For larger models, this device is a radiator located at the bottom of the refrigerator in close proximity to the compressor.
The evaporator is the place where the freon boils and then evaporates.
In addition to these components, the system also includes a capillary tube (reduces pressure along the path from condensation to evaporation), a dryer (a filter that is located at the inlet of the capillary tube and protects the system from clogging) and a reboiler (as the name implies - the main purpose is boiling of freon, which prevents it from entering the engine)
The operation of the cooling system in the refrigerator is regulated by a tandem sensor and relay.
In older models of refrigerators, the relay is a plastic box located on the wall of the refrigerator, inside the chamber, equipped with a regulator handle.
In modern devices, the relay is built into the body, often in the upper part, and a control panel equipped with buttons, a screen and LEDs is displayed for everyone to see.
How it works? The relay (regardless of its type) sets the desired level of cooling of the refrigerator chambers, after which the refrigerator temperature sensor comes into operation, which continuously measures temperature readings and transmits them to the relay.
As soon as the cooling level of the chamber drops below the set level, the temperature sensor sends a signal and the compressor stops working for a while in order to avoid hypothermia and freezing of food. Some time later, when the temperature begins to rise due to the motor resting, the temperature sensor sends a signal again, the system is activated and cooling starts.
Turning off the freezer motor is achieved by interrupting the electrical circuit with the thermostat. When the heating level increases, the circuit closes again and cooling resumes.
Modern models are equipped with several temperature meters that regulate the microclimate in each compartment individually. This is especially true in multi-chamber devices equipped with freshness zones and other bells and whistles. In this case, the operation of one sensor will not be enough, because maintaining the microclimate in the above zone is fundamentally different from the norms for a simple refrigeration chamber, which means that one analyzer in this case will not be enough.
Examples include the Samsung RF 50 K 5920 S8/WT refrigerator model, the Bosh KMF 40 SA 20 R refrigerator, and the LG GC-B 40 BSGMD refrigerator.
Importance of Thermal Sensor
The refrigerator motor is designed only for periodic on/off. The switching period is long only at the first start (can reach several hours), when the set temperature is dialed and set. Then the refrigerator works like a thermos: the cabinet is sealed and insulated. Over the course of a day, with standard periods of the door being open, the temperature rises by only a few degrees. Turning on the compressor itself (not fans, injection units, etc.) is required only to maintain the mode and they are short-term - in total, under average conditions they amount to 2–4 minutes. in 60 min.
The system operates automatically - the sensor detects insufficient temperature, so there is no command to stop working. The motor drives the refrigerant, the cycles are repeated until the sensor reports that the value set on the thermostat has been reached. After this, the compressor is turned off by a relay (in electronic control, a microcontroller is involved in this), which received data from the detector.
If the thermal detector is broken and does not give an impulse, the control units regard this as the presence of insufficient temperature inside the cabinet and force the motor to work constantly, for wear and tear, until it burns out, and there will be freezing inside the cabinet. There are also types of situations when the sensor provides incorrect readings. For example, if he constantly sends reports that the temperature is sufficient, although in reality the opposite is true, then the engine will not turn on, the refrigerator will not cool or freeze. But it is the first situation described that is more dangerous, since such a breakdown results in engine failure.
If the device’s motor (except for the first start) operates constantly, this indicates a breakdown of the t° sensor, but this is also typical for depressurization, freon leakage, or problems with the thermostat in general, so diagnostics are somewhat more complicated. The compressor in this mode will fail in just a few days. The power unit definitely needs periodic “rest”, then it will work for years.
Recommendations for pauses in the refrigerator compressor from one of the special sites:
The importance of the temperature sensor is that the switching periods directly depend on it, since it is the one that notifies the system about the temperature in the chambers. For example, the thermostat receives a message from the sensor that t° corresponds to the set value, which means that a command to start the motor is not required. When the sensor detects an exceedance of the set value, a command is issued to turn it on/off. That is, the detector is the first link of the described part of the control system; if it is broken, the entire circuit functions incorrectly.
Temperature sensor device
The detector must be considered together with the thermostat (temperature regulator) - these two units function together, they are the ones who adjust the operation of the cooling system. In fact, this is the core of the control part, to which a selector is connected, a touch panel for setting the desired mode.
A thermostat with a relay is a box with a selector on the wall of the refrigerator, inside its compartment. In modern models, the assembly is often built into the body, usually in the upper part. The outer segment consists only of an adjustment knob (selector), a control panel with buttons, a touch or conventional display, and an indication.
Using a graduated selector or on a touch screen, depending on the advancedness of the product and the type of control - mechanical, electronic - the user sets the cooling and freezing modes (normal, super freezing, etc.).
There are 2 types of thermal sensor designs.
Electronic (connected to a microcontroller, to a microcircuit) is a small piece of sensitive material in a plastic case, a thermistor, thermocouple, and a small board with it. The element's terminals are connected to the thermostat or control unit microcircuit. When the temperature changes, the resistance of the thermocouple changes, which is recorded by the microcontroller (MC) and compared with the values set by the user. Next, the command from the MK is sent to the relay, which closes/opens the contacts. In this case, there are 2 wires that supply a small voltage to the sensor. The thermostat, or rather the control unit with such a device, is also electronic.
A more common version of a thermal detector is mechanical. It should especially be considered together with a thermostat of the same type - it is, rather, a part of it, more inseparable than that of electronic varieties; it is usually irreplaceable, although this is theoretically possible. A more suitable name for the entire assembly is a thermal relay. This version of the sensor is a sealed metal capillary tube filled with refrigerant inside. Some models have a copper bulb at the end. One end of such an element is placed in the location where measurements are required, the second with a bellows goes into the thermostat, connecting there with mechanical parts that affect the circuit contacts.
There is a certain pressure inside the bellows tube that varies depending on the temperature. At the other end, attached to the thermostat, there is a bellows (corrugated elastic shell), the tension of which changes when the user adjusts the frames for closing/opening contacts (motor on/off) using a selector with a spring. At a certain temperature, the refrigerant changes its state (expands/contracts), the pressure in the tube changes, the part entering the thermostat moves and presses or stops acting through the bellows on the rod that closes or releases the electrical circuit.
When the cooling level reaches the one set on the selector, the sensor signals this (electronic version) or stops putting pressure on the thermostat spring - the relay releases the contacts or they themselves separate depending on the pressure. The motor stops working. Thus, freezing and hypothermia are excluded. Over time, the temperature begins to rise for natural reasons and due to the “rest” of the compressor. The described process occurs in reverse.
What is a thermostat and why is it needed?
First, let's figure out what it actually is.
A thermostat is a device that controls the temperature in your refrigerator and sends signals to the compressor, causing it to turn on and off depending on the degree of cooling in the chamber. It works very simply. The thermostat is a relay. On one side there is a special hermetically sealed tube filled with freon. On the other hand, there are electrical circuit contacts, with their help the compressor is controlled. See also -
How to adjust the thermostat in the refrigerator
Principle of operation
It all works very simply. The end of the capillary tube is attached to the evaporator. Since it is filled with a refrigerant, for example, freon, when the t˚C rises inside the refrigeration chamber, the pressure in it increases. This closes the corresponding relay contacts and turns on the compressor. After some time, the t˚C in the refrigeration compartment decreases, the pressure in the bellows tube drops and the contacts open. The compressor turns off.
Another important component of the thermostat is a spring that compresses and releases its contacts. It depends on her how and when they will work. For example, in order to open contacts at low pressure in the system (low t˚C) less effort is needed, for high pressure - more. The spring tension is adjusted using the thermostat switch knob. This is how the temperature regime changes in the Atlant refrigerator and other models with mechanical control.
Some refrigerator models have an electronic thermostat.
It consists of a temperature sensor and a control module. In modern models, several sensors can be installed for each cooling zone. If your refrigerator has electronic temperature control, repairing it may require specialized knowledge. See also -
5 refrigerator models that we do not advise you to buy
Peculiarities
Modern refrigerator models may have several temperature sensors, which complicates fault diagnosis, repair and replacement. But at the same time, the quality of operation of such devices is much better. Using several meters, the microclimate in each compartment is regulated separately, which is especially important for multi-chamber, two-door devices. This is how advanced capabilities are provided, for example, “freshness zones” are created, for which only two sensors (only in the refrigerator and freezer compartments) are not enough, since maintaining a special microclimate has its own specifics.
If the electronic detector breaks down, you can replace only its part with the wiring, or even just the tip itself with the thermocouple, if the wires are intact, but with the mechanical version, you need to change the entire tube, which means that you will always need to pull out the entire thermostat. But the problem is not even this, but the fact that tubes with a bellows (in this case, strictly speaking, this is the sensor) are not sold, so they almost always replace all the thermal relays.
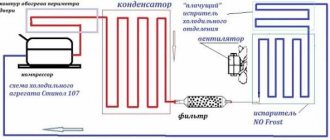
Do-it-yourself Samsung No Frost refrigerator repair
The Samsung No Frost refrigerator is no longer cold
Before you start repairing this refrigerator, you need to understand what the No Frost system is, here it should be noted that almost all units with this type of defrosting are repaired in the same way. Translated from English, No Frost means “Without Frost,” that is, as many put it, dry freezing. The principle of operation is that the fan, blowing on the freezing evaporator, makes forced air circulation in the refrigerator and freezer compartments, to put it simply, the same principle as in an air conditioner. Owners of air conditioners know that water is constantly dripping from these household appliances, that is, condensation drains from the freezing radiator, and this is where the differences begin. Over a certain period of time, frost accumulates on the freezer, if the air conditioner has an open system and when it stops working, this frost melts due to the external temperature, then in the Know Frost refrigerator, the role of a heater is played by a defrost heating element, which turns on after a certain specified time of operation. engine. In the photo on the right, you can see icing on the freezer evaporator, this is the result of improper operation of the defrosting system, as a result, due to such ice on the freezer, the refrigerator compartment does not cool, and if there is a lot of ice, then frost will disappear in the freezer compartment. So, little by little, we approached the topic of repairing Samsung No Frost refrigerators. Next we will consider breakdowns and ways to eliminate them in refrigeration units with electronic and mechanical defrosting systems. The only thing I want to add to all of the above is the following. In refrigerators with a know frost system, regardless of whether it is Samsung or another brand, freon leakage is extremely rare and without a technician, this problem cannot be dealt with, so further we will consider breakdowns associated with electronics and mechanics
Repair of Samsung No Frost with mechanical control
First of all, I want to talk about icing on freezer evaporators. It often happens that the refrigerator compartment becomes warm, but in the freezer compartment, the food is frozen as if nothing had happened to the refrigerator. Unlike the crying system, in No Frost refrigerators there is only 1 evaporator, and thanks to the fan, cold air is forced into the refrigeration compartment, that is, in these refrigeration units, all the nuances of repair are related only to the freezer, the temperature in the refrigerator compartment depends on it . I will now answer frequently asked questions from my clients, I think this will greatly clarify many points related to malfunctions and breakdowns
I have a two-chamber Samsung refrigerator, it worked for more than 5 years without a single breakdown. Last defrosted 2 or 3 years ago. Just recently, the upper chamber, where the main products are located, stopped cooling, everything is fine in the freezer, all the products are frozen, as before. There are no normal craftsmen in the area, since we live on the outskirts, 80 km from the regional center. The foreman who services our village said that there was a freon leak and we need to take the refrigerator to the regional center. We tried to defrost the refrigerator, left it with the doors open for a day, but when we turned it on, the situation repeated itself - there was no cold in the refrigerator compartment, but everything was fine in the freezer. After surfing the Internet, I found out that freon leaks on No Frost happen very rarely and no smell is heard. Tell me, can we just change the thermostat or some other part?
To determine whether there is a freon leak or not in the Samsung No Frost refrigerator, you need to do 2 simple things. First, try the sides of the refrigerator, if they are hot, then there is probably no leak. Secondly, defrost the refrigerator, and this is where many people make a big mistake, and now I’ll tell you what it is. It is necessary to defrost such units not for 12 hours or 24 hours, but for at least three days, and only then turn on and watch how the refrigeration unit will work. If after two or three hours the refrigerator does not reach the required temperature, then we can talk about a leak or a clogged capillary. By the way, a refrigerant leak in such refrigeration units is extremely rare; in the vast majority of cases, the problem is a faulty defrost sensor or clock mechanism - see photos 2 and 3. These are the details we will deal with
How to check the timer and defrost sensor of a mechanically controlled Samsung refrigerator
You can check the timer directly on the refrigerator. To do this you need to do the following steps. This clock mechanism has a spinner (selector), it can only be turned clockwise. First of all, disconnect the refrigerator from the power supply by turning the selector clockwise, you will hear a click, this click means that the timer has turned on the defrost mode. Turn this selector clockwise again until it just clicks. Turn on the refrigerator, after 20-30 minutes it should turn off, and you should hear a click, which will mean that the refrigerator is in defrost mode. The defrost mode lasts approximately 30-40 minutes, that is, after 30-40 minutes the refrigerator should turn on, if this does not happen within an hour or 2, then the timer is unusable. Here it is necessary to note one thing that in 90% of cases, such a check does not mean that the clock mechanism is working properly. The fact is that during testing it can show absolute performance, but in operation it will be glitchy
Photo 2. Timer for Samsung refrigerator
How to check the defrost sensor of a Samsung refrigerator
The defrost sensor in the Know Frost refrigerator is located on the freezer evaporator; in order to get to it, you need to remove the front panel. Below I made a video that talks in detail about repairing a Samsung No Frost refrigerator with a mechanical defrosting system, but first, let's see how the defrost sensor works. When the temperature in the freezer drops, the sensor contacts close; after the timer enters the defrost mode, voltage is supplied to the heating element, that is, the heating element, through the sensor. After the heating element has heated the evaporator, the defrost sensor opens its contacts and the heating element stops working, but the clock mechanism begins to work. That is, the defrost sensor is a kind of current switch, from the heating element to the timer. This is where we need to figure it out, I’ll now list what will happen if the defrost sensor does not work correctly
- The defrost heating element will not turn on , as a result, ice will remain on the freezer evaporator, which will subsequently accumulate to such an extent that the refrigerator will simply stop turning off and freezing normally
- The refrigerator does not turn on , this will happen if when the temperature rises, that is, when defrosting is running, the sensor does not switch to another mode
It is almost impossible to check the defrost sensor 100%, just like the timer, that is, checking it can show that it is absolutely working, but this does not guarantee its functionality while the refrigerator is operating. From practice I can say that I always change everything together, that is, I take the sensor, take the timer, the overheating fuse and just throw it away, and replace all these parts with everything new. Believe me, after 5-6 years, the entire mechanical part in such units simply crumbles, so there is no need to chemically or greedily
Photo 3. Defrost sensor for Samsung No Frost refrigerator
Photo 4. Defrost heating element for Samsung know frost refrigerator
Watch a video about repairing a Samsung No Frost refrigerator with a mechanical defrosting system
After we got acquainted with some of the details of this refrigerator, we can summarize. In 90% of cases, cold and frost disappear as a result of improper operation of the defrost heating element, which leads to icing of the freezer evaporator. In general, if the refrigeration compartment in your refrigerator has stopped cooling, turn off the aggregator for three days, do not forget to open the doors to both compartments. Then you start it, if it gets cold as expected, then first of all, check the defrost heating element, if it is ok, change the defrost sensor and timer. I didn’t say a word about such details as the fan and thermostat. These spare parts fail very rarely, the video above has information on this, I recommend watching it. The article just turns out to be so big, but it takes a long time to talk about these details, I think I’ll write another article about this
Repair of Samsung No Frost with electronic control
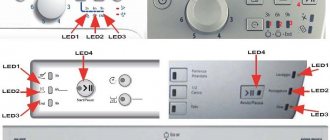
People are afraid of what they don’t know, and in this case almost the same thing happens, but in fact it turns out that repairing such refrigerators with your own hands is much easier than with a mechanical control. Usually the whole point of the repair comes down to recognizing the error, or rather the error code. The fact is that modern Samsung refrigerators have a self-diagnosis function that displays an error code on the display, that is, it shows which part is broken. I think this is where we should start. In the photo below you will see one of the types of displays, in short, I’ll start with it
Test mode in a Samsung refrigerator
And so, in order to put the Samsung refrigerator into test mode, you need to simultaneously press two buttons, as shown in the figure above, it is very important not to release them for 5-10 seconds, you must wait until all the indicators light up. After completing the procedure, press the “a” button - look at the photo above, after pressing this button, a sound signal should sound, this will indicate that the refrigerator has entered diagnostic mode. In refrigeration units with such a display, the test mode lasts about 30 seconds and occurs automatically, after this time an error will be displayed on the display, of course this will only happen if the control module detects it. You can see the error codes below, where I did it and explanations for them
Now I bring to your attention another video where I introduce a refrigerator with a different control unit into the test mode
Samsung Samsung refrigerator error codes
Due to the fact that different Samsung devices use different displays, I posted all the codes.
- 01 – the ice maker sensor is not working correctly, it is quite possible that it is connected incorrectly;
- 02 – the refrigeration chamber sensor is lying. Measure its resistance at room temperature, it should be about 6 kOhm
- 03 – It is necessary to measure the resistance of the defrost sensor of the refrigerating chamber, it should be about 6 kOhm
- 04 – check the refrigerator compartment fan, either the fan is covered or the wires are broken
- 05 – ice maker, leveler or ice ejector not working
- 06 – check the serviceability and correct connection of the CoolSelectZone device. No idea what the hell this is
- 07 – the external temperature sensor is covered, or you simply forgot to connect it
- 08 – malfunction of the freezer temperature sensor;
- 09 – check the defrost sensor of the freezer evaporator and the defrost heating element itself too
- 10 – you need to look at everything related to the fan
- 11 – look at the contacts of the capacitor and the capacitor itself
There are also Samsung models on which the error code is indicated differently
- R5 or “02” – the sensor in the refrigerator compartment has screwed up
- D5 or “09” is the most common error. Associated with the defrost sensor or the defrost itself, you need to check both
- F5 or “08” – the control module does not see the freezer sensor
- E5 or “07” – the external temperature sensor has screwed up
- RD - the air damper began to work incorrectly
And so, in the event of a failure of any part, you will be able to calculate the breakdown, and if you are smart enough, then fix the fault. It should be noted here that the No Frost system itself, both mechanically and electronically controlled, is practically no different, that is, there is a defrost heating element, there is a damper and sensors. In this article, I could not describe all the breakdowns in the No Frost system, but with the development of the site, I think that there will be a lot of material about the repair of these refrigerators, so keep an eye out, there will probably be an article that will be useful to you
On my YouTube channel there is a lot of information on repairing refrigerators with the No Frost system, and you can also find out how to repair a washing machine or vacuum cleaner. Come in - watch, subscribe, like - the channel needs your activity
@zaguma, apparently not understanding the subject, gives absolutely useless advice on “defrosting a refrigerator with a no frost system.” I’ll try to explain with my fingers why this advice is useless.
I would like to immediately dot all the Ts - I am not a refrigerator repairman, I just encountered the same problem myself, which is why I had to dig through quite a large number of service manuals and instructions to repair my old Indesit.
I think everyone present here is familiar with Soviet refrigerators such as “ZIL”, “Sviyaga”, etc., in which, when opening the freezer, we found ourselves in a small arctic with an ice coat on the walls.
Due to this, this “coat” was formed - the moisture contained in the food and air entering the freezer when it was opened and closed condensed on the walls of the freezer, after which, due to the low temperature, it changed its state of aggregation and turned into ice. Taking into account the fact that we use the freezer constantly, removing food from it and adding it back - the ice coat grew in size over time and in order to get rid of it, we defrosted the refrigerators. This defrosting method is also called drip defrosting.
Let us recall the operating principle of any refrigerator:
I took the picture from here and will add a little copy-patsy from the same resource:
The refrigeration unit works as follows. The motor-compressor pumps out freon vapor from the evaporator and pumps it into the condenser. In the condenser, freon vapors are cooled and condensed. Next, liquid freon enters the evaporator through a filter drier and a capillary pipeline. The hydraulic resistance of the capillary pipeline is selected in such a way as to create a certain difference in suction and condensation pressure, which is created by the compressor, at which a certain amount of liquid passes through the pipeline. Each capillary corresponds to a specific motor-compressor. At the freon inlet to the evaporator, the pressure drops from condensation pressure to boiling pressure. This process is called throttling. In this case, the freon boils, entering the evaporator channels, the freon boils, the energy required for boiling in the form of heat is taken from the surface of the evaporator, cooling the air in the refrigerator. After passing through the evaporator, liquid freon turns into vapor, which is pumped out by a compressor. The amount of heat removed by a refrigeration machine per unit of electrical energy expended is called the refrigeration coefficient of the refrigerator.
So, with the help of a compressor, you and I drive the refrigerant through a closed circuit and cool the contents of the calorie storage. The cooling process itself takes place on the same evaporator, which is located in the refrigerator chamber, where, according to the laws of physics, condensation should collect and freezing should occur.
No Frost System
It was precisely designed to prevent ice from freezing on the evaporator, as a result of which we do not lose the efficiency of heat transfer in the freezer. The best way to get rid of ice painlessly is to melt it. To achieve this, a heating element was added to the evaporator, which melted the freezing ice.
If you have read this far, then a reasonable question may well arise: “Why heat the cooling element? Author, what were you smoking?
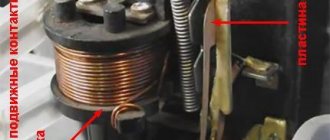
The principle of operation of the system is as follows: along with the heating element, the manufacturers installed a special sensor on the evaporator, which is responsible for monitoring freezing and the so-called “defrost timer”, hooking up the compressor control electrics to it.
This is the same frost sensor that monitors the appearance of frost on the evaporator. It is very easy to check whether it works or not by testing it. If called correctly, then this is the so-called “thermal relay”. Stinols and indesites use the same thing, the average price is 500 rubles.
There are our production, there are bourgeois ones.
This is the so-called defrost timer. They differ slightly in design, but the principle of operation is absolutely the same. When the thermostat detects freezing, it commands the defrost timer to turn off the compressor and turn on the heating element. The heater turns on for a certain time, melts excess water or ice if it has formed, after which it turns off the heater and turns the compressor back on. Its operation is very easy to diagnose - all defrost timers have a button, when your compressor is running - just press it, the compressor should turn off. If it turns off, the problem is either in the shade or in the sensor. If it does not turn off, there is most likely a problem with the timer. As a rule, it just changes to a new one. Average price – 500 rubles,
may be more expensive. Again, it all depends on the design and manufacturer.
And this is the defrost heater itself, which is laid along the evaporator. If the relay works and rings, and the defrost timer turns off the compressor during testing, but you still have ice freezing on the evaporator, the problem may be in the shade. Diagnosed by the same dialing. This happens extremely rarely and it simply needs to be replaced.
The average price is 1,000 rubles.
So, let's draw conclusions
: in working refrigerators of the
no frost
, ice should not freeze in the freezer. If this happens, you must first look for the specific cause of freezing. In fact, the system is ultra-primitive and for repairs you will need a tester and a Phillips screwdriver. In extremely rare cases, wire cutters, a soldering iron, some tin and electrical tape, and definitely blue heat shrink if the thermostat you bought does not fit the connector to your refrigerator.
1. Find the defrost timer and hear that the compressor is running. Press the timer button - if the compressor turns off, the timer is ok. If not, it must be replaced.
2. Find the thermal relay and call it with a tester. If it rings, the relay is alive and does not require replacement. If not, we change it.
3. In an extremely rare case - the thermostat is working and the defrost timer is working - we call the heater. If there is a break in the shade, we change it.
If you have tried all 3 options, but the situation still does not improve, you should check the wiring from all of the above modules to the compressor. It is likely that there is a break or poor contact somewhere, but this is extremely rare.
If I’m wrong about something, I’m happy to accept objective criticism.