The computer has become so integrated into our daily lives that it has replaced many other technologies. However, highly specialized devices have great advantages and remain in demand. For example, a home theater is ideal for watching movies. At the same time, the capabilities of both types of technology can be expanded through switching. To do this, you just need to know how to connect a home theater to a computer, and do it correctly.
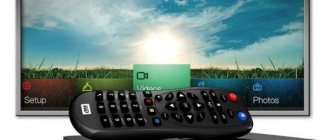
Connecting a home theater to a computer or TV
Connecting a home theater to a computer, to a TV + photo connection diagram.
Connecting a home cinema to a computer
Nowadays, home cinemas produce sound that is even better than the best models of expensive specialized computer speakers. If you haven’t purchased it yet, then take a look at how to choose the right home cinema.
To connect a home cinema to your computer, you need to have two main things: acoustics and a DVD player. The player is needed as an amplifier that will provide good sound quality.
The computer must have a modern sound card or motherboard with an integrated component of this type.
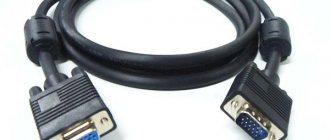
The connection of the home cinema to the computer is made with such a wire; it is connected to the computer into the greenish port.
The easiest way to connect a home cinema to a computer is to use a cable that has tulip and mini-jack plugs at both ends. The cable is connected to the DVD player using a “tulip” connector, and to the system unit using a mini-jack plug. With this configuration, the DVD player plays the role of an amplifier, reproducing sound in 5.1 format.
Now you need to connect the speakers to the amplifier. Typically, a home theater has a passive subwoofer, which is designed to reproduce low sound frequencies, and 5 audio speakers.
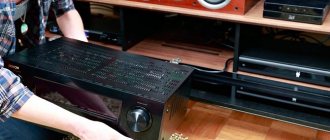
Having finished connecting the computer sound card with a DVD player, subwoofer and speakers, you need to connect the entire device to the electronic network. The player can be placed on the system unit or (depending on the length of the wire) at any distance from it.
Hardware and software for such connection have been available for many years. Modern video cards make it possible to connect not one, but several monitors to a computer. It is often possible to create a system with two or three screens working at once.
Connecting a home cinema to a TV
A home cinema system consists of an audio-video receiver connected to speakers and a TV set. A DVD player and Blu-Ray player, as well as VCRs, are included in the home cinema system as an additional feature.
All components are connected to a receiver, which provides power to the speakers and control of the equipment. When connecting a TV, you need a special cable. Its choice depends on the connections between the TV and the home theater receiver.
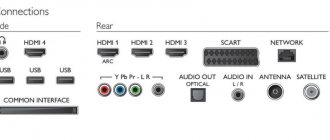
This can be a standard composite connector, HDMI (High Definition Media Interface), S-Video input or RGB connector.
Connecting a home cinema to a TV and AV receiver - connection diagram.
We connect the S-Video cable to the IN connector of the TV and the reverse end to the OUT connector of the receiver.
Then we connect the RGB cable with plugs of greenish, blue and reddish colors to the appropriate OUT connectors of the receiver and IN of the TV set.
Next, connect the HDMI cable to the OUT connector of the receiver and the IN connector of the TV. When using a high-definition TV, an HDMI cable provides the best connection for digital video signals.
The next step is the installation of speakers, with the help of which the greatest stereo sound and great effect are achieved.
No matter what incorrectness in the placement of acoustics leads to a deterioration in the great sound or to its absence
The central speaker is located above or below the TV.
We open the holes for connecting the wires to the speakers by pulling out the reddish and black covers of the rear panel of the receiver and sound speakers. We respectively connect the reddish wire to the reddish cover and the dark wire to the dark cover.
The subwoofer is connected using a special cable to the OUT connector of the home cinema receiver.
Using color audio-video cables, we connect a Blu-Ray or DVD player to the system. The proper connectors are located on the back of the player and on the panel of the home theater receiver.
Finally, we connect the CD player using a stereo cable. We connect inserts of snow-white and reddish colors to the left and right outputs of the player, and the other end of the cable with plugs to the special connectors of the home cinema receiver.
All that remains is to connect all the electronic cords from the system components to the surge protector and connect it to the power source. We hope our useful tips, photo summary and connection diagram will help you.
Sound decoding methods
Digital optical input is best suited for transmitting multi-channel audio from a TV to cinema speakers because it produces better audio quality. It is available on all latest TV models. To connect the equipment you will need a fiber optic cable. You just need to connect the adapter to the “optical out” socket on the TV with the “optical in” input on the cinema receiver. If the direction of transmission is mixed up, the signal will not be transmitted.
If an optical output is not provided on the equipment, audio is output via coaxial - it also transmits six-channel sound. You will need the appropriate cable and connectors on the equipment. You need to connect the “coaxial out” (S/PDIF) jack on the TV and the “coaxial in” jack on the speaker system receiver. Don't forget about the direction of transmission.
Table: Comparison of cables for multichannel audio transmission
| Options | Optic | Coaxial |
| Bandwidth | Up to 20 Tbit/s | 1 Gbit/s |
| Interference | Not subject to electromagnetic and radio frequency interference Does not create interference - obtaining “pure” sound | Any interference affects the source of electromagnetic waves itself |
| Electrical insulation | Insensitive to voltage surges | Subject to external influences |
| Weight | 240 kg/km | From 800 kg/km |
| Price | Requires special knowledge and tools, expensive cable | Cable splicing is simple and cheap |
Today, optical fiber provides the best connection because it allows you to transmit signals quickly and securely. But coaxial cable when used on a network has significant disadvantages:
- easily damaged;
- expensive and difficult to install connectors;
- limited bandwidth compared to fiber optics.
An optical input is the most effective solution for connecting an old movie theater to a modern TV. If the equipment allows it, it is better to choose fiber optics, especially since there are special adapters and converters. Old technology will give the new a special sound.
Connection options
The option for connecting a computer to a home theater depends on the model of acoustics and the capabilities of the computing unit itself.
Via local network
If you communicate with the computer privately, then connecting via a local network will not be difficult
Including a 5.1 speaker system in the local home network allows you to use the computer for its intended purpose (for example, for work), and the media center to watch movies collected in a shared folder on the PC. In this case, you can watch movies and listen to music from any other device: laptop, smartphone, etc.
The sequence of actions is simple:
- Configure the cinema adapter to receive Wi-Fi signals from your home router.
- Enter your password (if you have one).
- Conduct a test run of any video.
The advantages of this connection method are as follows:
- use of equipment for its intended purpose;
- watching movies downloaded from the Internet to your home film library on your computer;
- use of unique cinema functions such as karaoke.
Connecting a monitor to a home theater
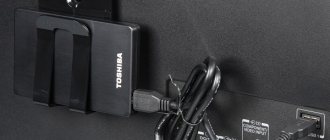
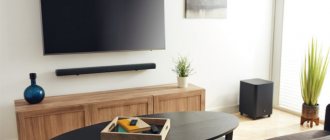
The back panel of a home theater looks like this
For connection to a 5.1 speaker system. For a computer monitor, you will need to purchase, depending on the monitor model, either a cable with “tulip” connectors on one end and VGA on the other, or an HDMI cable.
You can use a TV as a monitor to display video and audio files:
- The cinema speaker system is connected to the TV in the traditional way.
- Connect the TV to the computer using an HDMI cable, available at any digital equipment store. Moreover, it is possible to purchase a cable of a given length.
- Testing the sound.
This connection option is justified only if the theater owner is a passionate fan of films with a lot of dynamic scenes. Modern monitor and TV displays are characterized by a short response time - this is the period of time during which the image on the screen changes.
Home theater as a sound amplifier
Home theater speaker connectors differ from the standard connectors provided by the design of computer sound cards. Therefore, to amplify the sound, you will need an intermediary - a regular DVD player and a cable, at one end of which there are tulip-type connectors, and at the other - a minijack. The sequence of actions for this connection option is as follows:
- The minijack is connected to the standard input of a computer audio card for speakers - it is usually marked with a green tint or marked out.
- “Tulips” in red and white are connected to the DVD player to the inputs marked in - their colors correspond to the colors of the connectors.
- The speaker system is connected to the DVD player with a set of analog cables that come with the home theater - each input and connector is equipped with identical color codes.
- In the “Sound inputs/outputs” tab of the computer sound card settings, select the option with six speakers.
- On the DVD player, select the desired audio input channel and perform a sound check.
The advantages of this switching option are as follows:
- ease of connection;
- no additional costs for purchasing components.
Other options
By purchasing a special adapter from electronics stores, equipped with a minijack on one side and sockets for home theater speakers on the other, you can connect a 5.1 speaker system directly to your home computer. This option is only possible if the PC has a more advanced sound card capable of such a load.
Home LAN
The advantages of this solution allow:
- provide not only a wired connection, but also what is carried out via Wi-Fi;
- the ability to use a home theater both for its intended purpose and as karaoke;
- the ability to create your own film library, viewed from any home gadget.
A wired connection implies the presence of all devices connected into a single unit, in the same room, in close proximity to each other.
User Misconceptions:
Misconception #1. When you are finished playing you should switch everything back for correct operation. If you keep one of the on-the-fly encoding technologies always on, you will not be able to view and listen to files with multi-channel audio, since they are already encoded and require output directly to S/PDIF.
Solution: you don’t need to switch anything, watch a movie in stereo - it’s laid out at 5.1, watch a video with a DTS or Dolby track - the sound is perfectly laid out across channels. This can be seen even on a player that can switch audio tracks, for example, The KMPlayer.
Misconception No. 2. On-the-fly encoding of stereo sound from an mp3 file using Dolby Digital Live or DTS Connect will be several times inferior to hardware decomposition of such sound on speakers or a receiver.
Solution: If acoustics of similar quality are connected to the receiver, the difference will not be so significant. The main thing in the settings of THX Studio Pro (or a similar “improver” of the sound card) is not to forget to disable the options that create various effects: for example, it makes the voice stand out from the general sound background. Much depends on the sound card; Creative Titanium HD copes with this with a bang.
Sound settings
After connecting the speaker system to the computer, you will need to perform simple setup. It is necessary to indicate in the PC settings that for sound reproduction it is not a stereo system that is used, but 5.1 acoustics.
To do this, you can use standard Windows tools or programs installed when installing drivers on the sound card. In most cases, this is the Realtek manager, but there are other applications. You can find the icon in the tray at the bottom right of the screen or in the Control Panel.
You need to open the section in which you manage audio inputs and outputs and indicate that the audio signal is now broadcast not to two, but to 6 speakers. Next, if the connection was made through the receiver, you need to open its settings and indicate through which audio input the sound signal is received. To check how the connection works, you need to start a movie or music on your computer. If everything is done correctly, sound will be heard from the home theater speakers. Next, all that remains is to adjust its quality using the equalizer. You can also adjust the location of the acoustics, try moving them around the room, raising or lowering them to achieve the perfect sound.
Conclusion To hear the best quality sound while watching a movie or playing music, you need to know how to connect your home theater speakers to your computer. This can be done in several ways: through a DVD or Blu-Ray player, or directly to the sound card.
Sometimes this requires purchasing one or more additional cables. After the equipment is connected by cable, you need to perform a simple setup. Now high-quality surround sound will be played through the speaker system.
What to do if there is no sound?
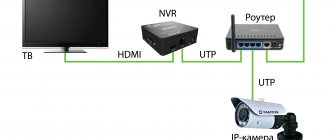
Many people are concerned about the problem of sound output when connecting a home theater to a TV. It's all about the complexity of the connection: the cinema is connected to a PC, but the TV is used as the image output, not a computer monitor. That is, 3 devices are involved in the process at the same time, which can cause various conflicts.
One of these is the situation when the sound is played from the speakers built into the TV, and the 5.1 speaker system is completely ignored by the player (changing the audio settings also has no effect). The matter may be hidden in the discrepancy between device models from different manufacturers.
However, this problem can also be fixed, although you will have to buy something extra:
- the TV and home theater are connected by an optical cable (the problem with sound is solved);
- The TV and computer are connected with an HDMI cable (the sound is still ok, but the image quality has become better).
Thanks to this scheme, audio and video signals are separated, after which they no longer conflict with each other. As a result, the sound comes from 5.1 acoustics, and the image is supplied to the TV from the computer.
There are still a considerable number of different difficulties that may arise, but these are individual situations. In general, if you properly configure and connect your home theater to your computer, major problems can be avoided. In all other situations, there will most likely be a serious technical malfunction.
Home theater via PC monitor
This method is suitable if your TV or projector breaks down, since watching movies on a small computer monitor is not very comfortable. The connection can be made in two ways:
- HDMI cable;
- VGA cable with tulips at the end.
In the first case, you can easily switch from a PC monitor to a TV and watch the image where it is convenient. The second option is suitable for older devices that do not support HDMI. Both connection options are ideal for online computer games, since the dynamics of the picture are constantly changing, and not all TVs are able to quickly respond to changing images.
Why is this even needed?
Home theaters allow you to feel the effect of presence.
The main functions of such a technical system from a computer and a home theater are as follows:
- the ability to watch films and programs directly online;
- enhancing the immersion effect in virtual reality during games;
- karaoke connection.
Connection options
There are several options for connecting a home theater to a PC, depending on the configuration and how the user plans to use the equipment.
In the first case, a laptop or desktop computer is used as a source of sound and image. Speakers and TV are connected to it.
The second option is to synchronize the PC with the acoustics.
Let's look at each method in more detail.
To turn on sound through cinema acoustics, you need an amplifier. In most cases, it is used as a DVD player, which comes with the kit. This element can also be mounted into a column (special module or subwoofer). The connection process will be like this.
When using a DVD player equipped with RCA connectors, synchronization occurs through “tulips”. Since the computer has 3.5 mm connectors, you cannot do without an adapter.
The miniJack plug (3.5 millimeters) must be placed in the output located on the sound card or PC motherboard.
The RCA cable (tulips) is connected to the audio jacks on the DVD player or other amplifier. In most cases they are designated as AUDIO IN or AUX IN, depending on the model. The acoustics are connected to the player through the appropriate sockets.
Now you need to configure the transmission of video signals from your computer to the TV screen. Experts recommend connecting via HDMI. Using this type of cable, the picture quality can be preserved as much as possible. If you don't have an HDMI port on one or both of your paired devices, you have other options: VGA, DVI, or DisplayPort.
If the ports on your PC and TV screen do not match, you must use adapters. Finding a suitable device will not be difficult. They are sold in electronics stores in a wide variety. Before purchasing, you need to decide exactly which adapters are needed and in what quantity.
Synchronization is simple. On the one hand, the cable is connected to the TV, and on the other, to the connector on the video card or motherboard of the computer (laptop). If the equipment is turned off, turn it on and check the signal.
Computer monitor instead of TV
This type of connection most often helps in case of a TV breakdown or general malfunction. In general, this can help in other circumstances, but it is not possible to list all of them.
The bottom line is that the PC monitor will be used to play the image, while everything else works from the home theater.
This method is also used by video game fans, only in the opposite direction: they transfer the image from a computer monitor to a large screen. In both cases the connection will be identical.
To connect devices together you can use:
- HDMI cable;
- VGA cable, with or without a tulip.
If the owner has a modern computer and the same home theater, then most likely there are HDMI connectors. You should connect through it, since this data transfer format is the best of its kind (for both video and audio).
For older computers and/or theater media centers, use a VGA cable. It was through it that devices were connected before the advent of HDMI. But this cable must have a “tulip” at the opposite end if the media center does not have a VGA connector.
A “tulip” is a cable branching into three plugs with different colors. Most often these are red, white and yellow, but there may be others (for example, COMPONENTVIDEO with red, blue and green colors).
This connection method has no particular advantages or disadvantages. Often, this is a last resort in controversial situations (the same TV breakdown, etc.). On the other hand, a computer monitor has a much lower response, and new frames will appear earlier than on a TV screen. That is, the scenes will become more dynamic, although modern television models have long been not inferior in functionality to computer monitors.
Automation is good, but hearing is better
Then you should play some well-known music or watch a movie clip. If the system sounds hollow or lacks something else, it is likely that the automated installation has suppressed some frequencies. To fix this, you need to find an equalizer or dynamic control setting. Sometimes it has its own name, such as Audessey or Dolby, but regardless of the name, you just need to turn it off and the sound should improve.
Subwoofers may have their own volume and frequency controls, called crossovers. If they were purchased with the system, then all this should be controlled by the on-screen menu. Otherwise, the subwoofer will have to be configured separately.
When connecting home theaters, you should always start with the suggested settings and change them only when you are confident that the problem can be solved by simply moving the speakers. Sometimes even a few centimeters make a difference.
Connecting using an HDMI connection
After selecting the desired wire, to connect the devices, connect them with a cable, making simple settings.
Connection procedure:
- Turn off your devices.
- Connect one end of the wire to the HDMI input port on your personal theater receiver, and the other end to the HDMI output port on your laptop.
- Turn on the equipment.
- In the speaker system settings, select the desired jack and set it as the signal source.
- To configure your PC, right-click on the screen and select the “Screen Resolution” option from the drop-down list. Set one of the commands: expand the image to both displays, turn on one of the screens, duplicate the video image.
If the monitor is on a high-definition home theater (HDTV), then the video can only be seen on the TV screen, and not on the laptop display. To see elements on your laptop monitor, turn off your personal cinema.
If this jack is not available, use an adapter that can be used to connect the HDMI connector of the speaker system to the USB port of your laptop. However, this will result in loss of image quality.
Connecting devices via HDMI is the most preferable option, as it provides the most optimal quality of audio and image transmission.
Via local network
The home theater can be connected via a local network. This way, the computer will play and send signals to the speaker system, but you can use it as you wish.
The media center will play the movie from the computer (the video files must be located in a separate shared folder), the home theater will also receive audio signals from the PC, but the computer can be used as desired at this point.
The sequence of actions for a local connection is quite simple:
- the home theater adapter is configured to receive a signal from a Wi-Fi router; if it is not available, this can be done via a LAN/network cable;
- enter the password for the Wi-Fi network (not required for a wired connection);
- run any video as a test.
Thanks to this connection, it becomes possible to watch movies located on the computer’s hard drive, for example, downloaded from the Internet. But even this is not necessary, because by slightly customizing the functions of the media center, you can receive the signal online (broadcast a movie directly from the Internet, while the computer will act as a connecting link).
The main disadvantage of this type of connection is the need to have a TV or monitor specially connected to the cinema’s media center.
Options for connecting a home theater to a computer
Connecting a home theater to a computer can be done in two ways. In the first case, the PC is connected to a DVD player with connected speakers to output the audio track, and to the TV via HDMI to transmit the image. In the second case, the acoustics are connected directly to the computer.
Computer, TV and speakers
To connect a home theater to a computer for audio output, you will need a receiver, which is usually a DVD or Blu-Ray player. This device receives the entire sound range, and then divides it into components and sends a fragment corresponding to its intended purpose to each connected speaker.
As a result, if the sound according to the events of the film is heard from behind, then the viewer will hear it from the rear speakers. Different speakers are designed to deliver different audio tracks, so, for example, the voice will be heard from the center speaker above the TV, rather than from behind or to the side. This creates the feeling that people are talking on the screen. First you need to connect the speakers to the receiver. For this purpose, the cable that comes with the speakers is most often used.
The output marked Front R and L is used to connect front speakers, Center - central, Rear or Surround - rear, Subwoofer - subwoofer.
The next step is to connect the player to the computer. You will need to purchase, if not included, a 2RCA cable (tulip-type plugs in red and white) - mini Jack 3.5 mm (headphone jack).
This wire is connected with a 3.5 mm plug to the green output marked OUT on the computer audio card, used to output sound to headphones or stereo speakers. “Tulips” are connected to the receiver into the red and white inputs marked IN. Now you need to connect your TV or monitor to your home theater. For this, types of cables such as VGA, HDMI, DVI are used. The second and third types of wire are more preferable, because transmit images in the highest possible quality.
In addition, DVI and HDMI also broadcast an audio signal, so the sound when watching a movie can simply be transmitted to the TV speakers, without using a home theater. If your computer and TV set do not have the same connectors, you can use adapters, for example, DVI-HDMI.
To establish a connection between the equipment, you need to connect both switched off devices with a cable, then start them and on the TV, in the list of signal sources, select the input to which the computer is connected. If there are several of them, the markings that are usually present near the connectors on the back or side panels of the television receiver will help you avoid mistakes. When connected with HDMI and DVI cables, the audio signal is output directly to the TV.
To transfer it to a home theater, you can connect an optical cable or HDMI input on the receiver and output on the TV set. Another option is to connect the TV and speakers connected to the player with a 2RCA-2RCA or 2RCA-mini Jack 3.5 mm cable. If there is no sound when connecting via HDMI, you should make sure that both devices support the ARC standard, which allows you to transfer the audio track from your TV to your home theater. Thus, when connected through the player on the computer, the movie starts. The image is displayed on the TV, and the sound is output through the receiver to the home theater speakers.
Direct speaker connection
If the user purchased an advanced 5.1 sound card for the computer with a number of additional channels, it is not necessary to use an AV receiver for connection. All you need is to purchase several 2RCA-mini Jack 3.5 mm adapters.
Next, the front speakers are connected to the green connector on the audio card via an adapter, the rear speakers to the black connector, and the center and subwoofer to the orange connector. To connect side speakers for 7.1 systems, the gray output is used.
How to connect
The easiest way to connect a laptop and a home theater system is via an HDMI cable. This interface is available on the player and laptop computer. An HDMI cable, as a rule, is not included in the cinema set. It needs to be purchased separately.
An HDMI cable is the best option that can be used when connecting your home theater system to various equipment. This is a multimedia interface that allows you to broadcast video and audio signals of the highest quality. HDMI is a universal connection cable that can be used to output both audio and video to a TV.
In this case, you need to connect the laptop and DVD player via HDMI. This is easy to do; you need to find a port with the appropriate designation on both devices. Next, you need to connect the acoustics to the player.
For this purpose, cords are used that are supplied with each cinema of this type. Communication occurs the same for all models. The instruction manual will tell you which wire and connector need to be connected in series.
The center speaker connects to the port labeled Center. The front ones must be connected to the connectors marked Front. Rear sound emitters are connected to sockets labeled Surround. The subwoofer connection port is labeled Subwoofer.
Before connecting the equipment, think about how best to place it in your room. The central and front speakers should be located near the sound source, the rear speakers should be in the corners of the room, preferably behind the user. The subwoofer can be placed in any convenient place.
A computer can replace many devices, be it a stereo system or a TV. But despite its ability to reproduce all known formats in a clear image, the machine cannot provide surround sound, helping to immerse the viewer in an exciting story. This problem can be easily solved if you know how to connect your home theater to your computer.
Home theater connection
By home theater, users mean different sets of devices. This is either multi-channel acoustics or a set of TV, player and speakers. Next we will look at two options:
- How to use a PC as a source of sound and image by connecting a TV and speakers to it.
- How to directly connect existing cinema acoustics to a computer.
Option 1: PC, TV and speakers
In order to reproduce sound on speakers from a home theater, you will need an amplifier, which is usually a supplied DVD player. In some cases, this may be a module built into one of the speakers, for example, a subwoofer. The connection principle in both situations is identical.
Option 2: Direct speaker connection
This connection is possible if the amplifier and computer have the necessary connectors. Let's look at the principle of operation using the example of acoustics with 5.1 channels.
- First we need four adapters from 3.5 mm miniJack to RCA (see above).
- Next, we use these cables to connect the corresponding outputs on the PC and the inputs on the amplifier. To do this correctly, you need to determine the purpose of the connectors. In fact, everything is quite simple: the necessary information is written next to each slot.
- R and L (Right and Left) correspond to the stereo output on the PC, usually green.
- FR and FL (Front Right and Front Left) are connected to the black “Rear” jack.
- SR and SL (Side Right and Side Left) – to gray with the name “Side”.
- The center speakers and subwoofer (CEN and SUB or SW and CE) are connected to the orange connector.
If some sockets on your motherboard or sound card are missing, then some speakers will simply be unused. Most often, only a stereo output is available. In this case, the AUX inputs (R and L) are used.
It is worth keeping in mind that sometimes, when connecting all 5.1 speakers, the stereo input on the amplifier may not be used. It depends on the principle of its operation. Connector colors may differ from those shown above. Detailed information can be found in the instructions for the device or on the manufacturer’s official website.
Sound settings
After connecting the speaker system to your computer, you may need to configure it. This is done using the software included with the audio driver, or using standard operating system tools.
Read more: How to set up sound on your computer
Conclusion
The information provided in this article will allow you to use the equipment at hand for its intended purpose. The process of creating a symbiosis of a home theater with a computer is quite simple, you just need to have the necessary adapters available
Pay attention to the types of connectors on devices and adapters, and if you have difficulties determining their purpose, read the manuals. We are glad that we were able to help you solve the problem. Describe what did not work for you
Our specialists will try to answer as quickly as possible.
Did this article help you?
Knowing how to connect a home theater to a computer is necessary for the user if he wants to get clear surround sound when watching a movie. This can be done in two ways - by connecting the speakers through the player or directly to the computer. The process in each case is very simple; all that is required is to purchase an additional cable if the required one is not included in the kit.
Tags: machine, beat, sconce, view, choice, house, , sign, insulation, cable, like, computer, , magnet, marking, monitor, setting, connection, principle, wire, project, start, , work, regulator, row, network, system, connection, means, scheme, ten, type, current, installation, filter, photo, effect
Via mini-jack adapter
In addition to the above 3 connection options, you can purchase special adapters. One of them is a Mini-jack adapter with sockets for acoustics. Thus, you can not use a DVD player, but connect the speaker system directly to the computer.
However, the built-in sound card will not be enough. It is necessary to purchase a more advanced model that will be able to work with 5.1 type acoustics.