To watch a movie with sound or listen to your favorite music on your computer, you need to connect speakers or headphones to it. Let's figure out how to connect speakers to your computer. The connection method depends on the type of sound-producing devices - wired or wireless.
With wire
Wired speakers can be either very inexpensive or advanced music centers. Wires may get in the way on the desk, but such devices reproduce sound without any problems even on old PCs.
How to connect speakers to a home computer or laptop:
- Place the speakers on the table. For harmonious sound reproduction, place the right and left parts correctly - they are usually marked by the manufacturer with the letters R and L, respectively. If there are no markings on the right hand, place the speaker from which the power cable comes.
- Plug the power cable into a power outlet; if you have miniature USB speakers, connect them via a USB cable.
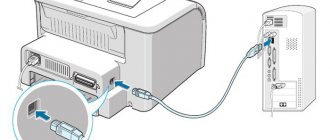
- To directly connect the speakers to your computer, start on the right side. Insert the cable tulips into the speaker connectors, matching the colors of the sockets - place white in the port with a white outline, red - with a red outline.
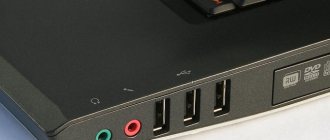
- Insert the third end of the wire into the computer audio jack located on the back or front panel. The corresponding slot is highlighted in green.
- Connect the right speaker to the left using a wire in two tulips.
- All that remains is to turn on the music to check the functionality of the devices.
Along with the speakers, you can also use a microphone, transmitting an audio signal from it. How to connect a microphone to a computer and at the same time output sound to speakers - insert the cord from the microphone into the correct jack on the computer. It is highlighted in pink and marked with an image of a microphone or the signature mic.
Problem solving
If there is no sound on the PC after connecting, this means one of the following problems:
- The sound is turned off in the settings - click on the speaker icon in the tray and look at the volume level. If set to 0 or muted, simply increase the volume.
- If the speakers themselves have a physical mute button, press it to activate the device.
- Check that the wires are connected correctly by checking the colors on the sockets and plugs.
- In Device Manager, check the drivers for your sound card, and if there are problems, reinstall them.
Music Center
If you have a music center at home, you can easily output sound from your computer to it without spending money on buying additional speakers. How to connect the music center to your computer:
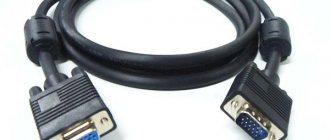
- you will need a special wire, at one end of which there is a 3.5 minijack connector, at the other - a white and red tulip;
- insert tulips into the sockets of the music center of the corresponding color;
- place the other end into the PC audio output, marked in green;
- turn on the center, select AUX mode - playback from an external source.
You can output sound to a 5.1 speaker system in the same way, observing the colors of the plugs. But the computer must have a discrete sound card installed, with an increased number of connectors. In addition to the usual outputs for a microphone and front speakers, it has inputs for additional speakers and a subwoofer, and digital S/PDIF.
Step-by-step instruction
Let's look at how to properly connect speaker systems:
1. Location of devices.
Analog type 2.0 and 2.1 speakers must be positioned correctly: it is best to install the speakers on the sides of the monitor, and the subwoofer - arbitrarily, but to achieve maximum effect.
Each column is marked on the back: L (left, left) and R (right, right). There has been persistent debate over the location of the subwoofer for a long time, so it should be installed where the low-frequency sound will be most optimal for the user.
The first thing you need to do is turn off your computer. Many users neglect this recommendation, but this is a safety precaution and it is better to follow it once again to avoid electric shock or voltage surges. Since the power constantly “walks” around the motherboard, supplying electricity to different devices, a sharp increase in power will lead to breakdown (especially if the speaker system is digital and resource-demanding).
Wireless
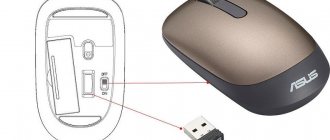
Wireless speakers are connected via Bluetooth. On laptops, the Bluetooth interface is usually built in by the manufacturer, but for a computer you will most likely need an adapter - a small device in the form of a flash drive that is inserted into a USB port. Here's how to connect Bluetooth speakers to your computer:
- activate the speakers;
- Press and hold the network connection button on the speaker;
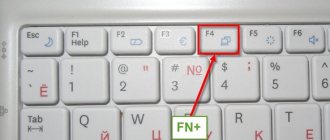
- on a laptop, to turn on bluetooth, press the key combination Fn+F4 or Fn with another function button marked with a wireless connection icon;
- in Windows 10, click on the networks icon in the tray and turn on Bluetooth in the menu;
- In Windows 7, find and activate the connected speaker in the Devices and Printers section of the Start menu.
Also, in any version of Windows, you can launch “Device Manager” and click on the Bluetooth section. In the module properties, select "Enable". A wireless connection icon will appear in the tray, click on it and go to the “Add device” mode. The computer will find the audio source and offer to connect to the equipment.
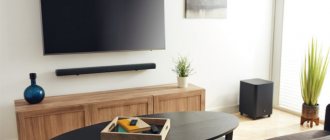
How to connect a JBL speaker to a TV?
2 ways to connect a JBL speaker to your TV
- activate Bluetooth on the speaker by pressing the button with its icon (the indicator should blink);
- turn on the TV and go to settings;
- find the item to turn on Bluetooth;
- activate it and start searching for devices;
- select the column name in the list that appears, click and wait for pairing to complete.
THIS IS INTERESTING: Your question: How to withdraw from permanent registration?
29.01.2021
Sound settings
After successfully connecting the acoustics, all you have to do is configure the sound parameters. How to set up speakers on a computer in Windows OS: right-click on the volume icon in the tray and go to “Sounds”. On the “Playback” tab, check that the correct device for transmitting audio is selected - your speakers. To ensure that music is always sent to the speakers, click on “Default” at the bottom.
In the same window, additional tools are available that will help in case of problems. Right-click on your speakers, select "Test" from the submenu to test the devices. You can also turn off the equipment from here.
Connecting and setting up speakers on your computer
There are many speaker models on the market from different manufacturers with different numbers of elements and additional functions. The process of connecting and configuring all the necessary components depends on the complexity of the device.
Step 1: Connection
First of all, you need to connect the speakers to your computer. The side panel of the motherboard contains all the connectors necessary for connection. Note that it will be colored green. Sometimes "Line OUT" is also indicated. Take the speaker cable and plug it into this socket.
Additionally, it should be noted that most computer cases also have a similar audio output on the front panel. You can make a connection through it, but sometimes it reduces the sound quality.
If the speakers are portable and powered by a USB cable, you should also connect them to an open port and turn on the device. Large speakers also need to be plugged into an outlet.
Step 2: Installing Drivers and Codecs
Before setting up a new connected device, make sure you have all the codecs and drivers for the system to function properly and play music and movies. First of all, we recommend that you check your installed drivers and the process is as follows:
- Open Start and go to Control Panel.
- Here, select Device Manager.
- Scroll down to Sound, video and game devices and expand it.
Here you should find a line with the audio driver. If it is not there, install it in any convenient way. You can find detailed instructions in our articles linked below.
Sometimes music doesn't play on your computer. This is mainly due to the lack of codecs, but the reasons for this problem can be very different. To learn how to solve the problem with playing music on your computer, read our article at the link below.
Step 3: System Settings
Now that the connection is complete and all drivers are installed, you can begin setting up the system for the newly connected speakers. This process is quite simple, you only need to complete a few steps:
- Open Start and go to Control Panel.
- Select the "Sound" option.
- In the Playback tab, right-click the speaker you're using and select Configure Speakers.
- In the window that opens, you will need to configure audio channels. You can change the settings and check immediately. Select the location that best suits your needs and click Next."
- Users who have installed speakers with full-range speakers or surround speakers will need to activate them by checking the corresponding icons in the configuration window.
This setup wizard only takes a few steps to improve your sound, but you can get better results by manually adjusting the settings. This can be done according to these instructions:
- On the same “Playback” tab, select the columns with the right mouse button and go to “Properties”.
- In the “Level” tab, only volume, left and right balance are adjusted. If you feel like one of the speakers is louder, adjust the balance in this window and move to the next tab.
- On the Enhancements tab, select sound effects for the current configuration. There is an ambience effect, voice suppression, pitch shifting and an equalizer. Make the necessary settings and go to the next tab.
- All that remains is to study “Advanced”. Here the exclusive mode is configured, the bit depth and sample rate are set for use in the general mode.
After changing the settings, be sure to click “Apply” before exiting for all settings to take effect.
Step 4: Realtek HD Setup
Most built-in sound cards use the HD Audio standard. The most common software package at the moment is Realtek HD Audio. With this software you can set up playback and recording. You can do it manually like this:
- First download the program from the official website and install it on your computer.
- Open Start and go to Control Panel.
- Find "Realtek HD Manager" here.
- A new window will open and you will be taken directly to the Speaker Configuration tab. Here the appropriate speaker settings are made and the full-range speakers can be activated.
- In the “Sound Effect” tab, each user configures the parameters for himself personally. There is a ten-band equalizer, many different patterns and presets.
- The Standard Format tab makes the same change as the System Playback Settings window, only Realtek HD still allows you to select DVD and CD format.
System Settings
After connecting external speakers and installing the appropriate software, you can analyze and adjust the system configuration. The entire algorithm in this case is quite simple and includes the following manipulations:
- go to the “Control Panel” tab in the “Start” menu;
- open the “Sound” section;
- in the Playback menu, right-click the connected speaker system and select settings;
- in the tab that opens, configure audio channels and click “Next”;
- When installing broadband audio devices, they must be activated by checking the corresponding lines.
Correct use of the installation wizard will maximize the quality of the reproduced sound. In this case, you can get the best results by adjusting the settings manually. To do this you need to follow the instructions.
- In the Playback section, select the installed speakers and right-click on them and go to the Properties tab.
- In the "Level" section, adjust the volume settings and balance of the left and right speakers.
- If desired, select sound effects based on the current configuration in the “Improvements” tab. This menu item provides options such as EQ, Pitch Bend, Voice Suppression and Ambient Effect.
- In the last step, you need to go to the Advanced option to configure the exclusive mode and also configure the sample rate and bit depth for the general mode.
After making all of the above changes, you must click “Apply”. Otherwise, you may find yourself in a situation where all the steps have been followed correctly, but the connected speakers are not working.
Realtek HD setup
In the vast majority of cases, built-in sound cards operate in HD Audio format. In this case, the most common software package is Realtek HD. This program allows you to configure all sound playback parameters, as well as record the corresponding files. To make the necessary changes, you will need to follow a number of steps.
- Download the latest version of the program from the developer's official website and install it.
- From the Start menu, go to the Control Panel tab.
- Open Realtek HD Manager."
- In the window that opens, the “Speaker Configuration” item will appear, in which you need to configure previously connected speakers. In the same section you can activate broadband audio devices.
- Adjust the settings in the Sound Effects menu to suit your personal preferences. To do this, the user is provided with a 10-band equalizer and a whole arsenal of models.
- By clicking on the “Standard Format” tab, the user has the opportunity to make certain changes to the parameters and formats: CD or DVD.