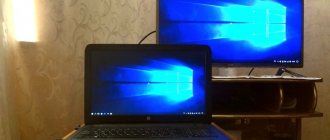
Soundbars are an excellent alternative to massive speaker systems used for TVs to create a full-fledged home theater. They are also actively used in combination with computers.
The soundbar can rightly be called a new and innovative product in the audio equipment segment. These are special sound panels that are distinguished by their compact size, wide functionality and ease of use.
Despite the modest size of the device, the sound created is practically in no way inferior to the speakers and subwoofer that form the speaker system.
To get the full potential of your soundbar, it needs to be connected to your TV correctly.
1) Buy a universal bracket to connect the soundbar to your TV.
You can find universal brackets for attaching your soundbar to your TV on Amazon, electronics stores, and major retailers like Walmart. There are also brackets for connecting your soundbar to your TV that are made specifically for certain products, but they are usually unnecessary and overpriced.
We recommend the Mounting Dream Soundbar Mount (on Amazon), which will work with most soundbars as well as most TV wall mount systems. This is important if your TV will be wall mounted and you will also have a soundbar installed.
2) If installed, remove the TV from the wall
Your TV may already be installed when you decide to add a soundbar, in which case don't worry. It can be a bit of a hassle to remove it and disassemble the soundbar, but if you do it right, you'll only need to do it once.
If your TV is not installed, you can skip this step. If you have a new TV that hasn't been installed yet and you need to mount it to the wall during this installation, go ahead and install a wall bracket because the location of the soundbar mounting bracket depends on where the wall mount placement will be.
3) Remove the TV bracket and install the bracket by eye.
As mentioned earlier, you may already have a wall mount on your TV. Everything is fine. In fact, this is very important because the soundbar mounting bracket needs to use the same holes as the wall mounting bracket, so you need to figure out how these brackets will fit together.
This should be easy to do: With the TV laying flat, place the TV wall mount on top of the TV in the location where it needs to be to properly mount the TV on the wall. If you haven't tested the wall mount yet - you'll need to do that first so you know which holes to use on your TV mount.
Next, lay the soundbar bracket on top of the wall mount bracket to visually determine which holes on the soundbar bracket you will use based on where you want the soundbar to hang. You'll likely need a soundbar nearby to confirm. If you have some painter or something you can use to mark the holes, make a mark on them.
Be sure to leave enough space between the bottom of the TV and the top of the soundbar to operate any buttons on the top of the unit.
4) Attach the wall mount and soundbar bracket to the TV.
At this point, installing the soundbar mount and bracket should be an easy task. Just use the holes you marked to make sure everything is in the right place and use the hardware that came with your mount and bracket to secure it.
One note: you may need to buy new screws from a hardware store if the originals are no longer long enough. If you use one fat screw through the soundbar bracket and wall mount and then into the back of the TV, you may not have enough screw depth to play with.
And this is not the time when you want to skimp on something like this. These screws secure the TV to the wall.
Activation
To activate the ARC function, you need to make sure that all connected devices support it and connect them with an HDMI cable (2009+ model year). On devices such as Sony (excluding set-top boxes), you need to enable the BRAVIA Sync function. On most devices, the Control for HDMI option, which allows you to use ARC, is enabled by default.
If the ARC function does not work, make sure that:
- the Control for HDMI parameter is enabled (value “On”);
- the Input Mode parameter is set to “Auto”;
- TV supports Auto Return Channel;
- the receiver is connected to the HDMI port on a TV that supports ARC;
- The TV is connected to the HDMI OUT A output of the receiver (for STR-DN1050);
- HDMI OUTPUT is set to A or A+B (for STR-DN1050).
6) Attach the soundbar and check
Now you're finally ready to attach the soundbar to the bracket, so go ahead and use the hardware that came with the bracket to secure the soundbar in place. You are now ready to connect to your TV or media device via HDMI/HCMI Arc, Optical, RCA or Bluetooth to test the device.
One thing to watch out for here is to make sure there is enough space to control the soundbar if it has buttons on the top. If there is not enough space, you may have to remove the TV from the wall and change the mounting bracket.
Features of HDMI cable
The modern interface is used in digital television, computers, LCD, plasma, LED screens, game consoles and receivers. It supports all the necessary resolutions for watching movies and video files: HDTV1080p, 1440p, FullHD, 3D, 4K, 8K. The latest quality is broadcast only through version 2.1.
The standard HDMI cable length is considered to be from 3 to 5 meters. Allowed up to 10m. Longer wires will require a signal amplifier.
HDMI Ethernet versions additionally carry Internet traffic at different speeds. Thanks to the high cable bandwidth, digital television maintains high clarity and contrast.
A variety of connectors allows you to connect via HDMI not only a TV and PC monitor, but also smartphones, tablets, automotive equipment, and digital set-top boxes.
Should I install a soundbar on my TV?
Installing a soundbar on your TV is different in many ways from installing a soundbar under or above your TV separately. Each configuration has its pros and cons, and we have a more in-depth discussion of top-mount versus bottom-mount and whether surround sound might be the best option depending on your situation.
But for now, let's look at some details about how adding a soundbar to your TV can change your experience.
Self-installation of the soundbar
If your TV and soundbar are mounted separately, the sound from your front speakers, which is almost always provided by the soundbar, will remain in the same place even when you move the TV.
If your TV is mounted on a fixed mount this probably isn't a big deal, if you have a large room you may want to mount your TV on an articulating mount so you can swivel it in different directions. In this case, the soundbar installed on the TV is crucial.
Installing a soundbar on your TV
There are many benefits when you mount your TV on a soundbar. First, the sound moves with the TV. Whether you tilt your TV or move it the other way, you can be sure that the sound will be directed at the person or people watching the TV.
A mounted soundbar, even if it's mounted vertically, by the way we have a guide, will also improve the sound quality because it's not sitting somewhere or screwed to the wall where sound vibration can be absorbed by the surface. This gives your home theater a new level of sound you'll love and allows the sound to travel further from the front of the room.
Soundbar won't mount
When your soundbar sits on top of your entertainment center, it collects dust, gets dirty faster, and is more likely to get damaged, especially if you have children or pets. It can also increase the feeling of clutter. Installing a soundbar is a great way to avoid damage from accidents and keep your home theater room tidy.
However, there is something to be said for whether you should mount a TV at all. In some cases, you don't have a choice because the design of your room only allows the TV to be mounted high, but if you have a choice, you really want the TV to be at eye level.
How to choose?
Soundbars are in great demand among lovers of high-quality sound, so their range is quite wide. When choosing a model, there are several key points to consider.
- Type of audio system and its internal configuration. The quality and strength of sound reproduction depends on these factors. Much depends on the model. The volume of sound and its strength depend on the clear and calculated location of a certain number of speakers. The sound quality largely depends on the level of the audio track.
- Speaker power. It is determined by the volume range indicator. The higher the power, the better and louder the sound will be. The most suitable range for a soundbar will be from 100 to 300 W.
- Frequency. It depends on the purity of sounds. If this indicator is high, then the sound will be much cleaner. For humans, the best frequency perception range is from 20 to 20,000 Hz.
- Sometimes subwoofers are included in the package. They are designed to reproduce low frequency sound. For example, explosion sounds, knocking and other low-frequency noises. Such options are more needed by fans of games and action films.
- Connection type. Can be wireless or using optical cable and HDM interfaces. They support more audio formats, so the sound will be better.
- Dimensions. It all depends on the wishes and capabilities of the user. The larger the size of the structure, the higher its cost and functionality.
You can choose a small system, but it will not give the same playback as a large one.
Recommended Mount for Soundbar to TV
Mounts for connecting your soundbar to your TV have become popular, so there are plenty of options to choose from. As with any product you buy, you want to know it's quality, won't be stolen, and will last for years to come.
While there are TV soundbar mounts that are made for specific brands, some really great options we've found are the Dream Soundbar Mount (on Amazon), which was discussed in "Step 1" in this article, or the Mount -It! Universal soundbar mount (also on Amazon) pictured above.
Mount-It! The Universal Soundbar Mount is a great price for the quality and performance you'll get from it, and based on the reviews, it's a product you can trust.
It fits TVs from 32 to 70 inches, which is great for large home theaters, and fits big brands like Sonos, Samsung, Sony, and Vizio. The design is designed to be flexible to fit any make and model of TV and soundbar. It is compatible with all types of TV wall mounts, including fixed, tilt, swivel, articulated and interactive.
So even if you decide to purchase a different TV mount in the future, you can be sure that it will attach to it too. Mount-It! The universal soundbar mount isn't flimsy or cheap. It's made from high-strength 2.5mm steel that can support up to 33 pounds—a lot more than you'll ever need, but it's good to know it's built with durability in mind.
Moreover, it is easy to install. All you have to do is screw in the four bolts and watch the installation video to make sure you do it right. Equipment included.
Brand-specific options
If you like the peace of mind that comes with a TV soundbar mount that's made specifically for your soundbar, there are options for you. For example, the Sanus Soundbar Mount (on Amazon) is designed to be compatible with SONOS Beam and work with any TV mount.
If you decide that mounting a soundbar and TV together is not necessary, there are many wall mount options made for specific soundbars or rows of soundbars, such as the Bose Soundbar Wall Mount from Dinghosenn (also on Amazon.
What problems may arise when connecting?
Whichever of the proposed methods is used to pair the soundbar with a computer or laptop, in some cases some problems may arise during the connection process. The most common of them are the following malfunctions.
- While connected via Bluetooth, the soundbar cannot connect to the adapter on the computer. The main reason why this happens may be that the PC is already connected to some other device - a phone, headphones or tablet. It is very easy to fix this problem. You need to disable the old connection in your computer's Bluetooth settings.
- If devices are connected using an HDMI cable, then the problem may be both the cable itself and the device. Often this may be due to the lack of drivers required for the video card. Therefore, you need to make sure they are available. If the required software is not found, it can be installed from the disk, or if it is missing, downloaded via the Internet. When all drivers are installed, you need to try connecting the device again. If a problem arises again, then you need to make sure that the cable itself and its connectors are in good condition. If necessary, you need to replace it with a working one.
Visibility for other devices must be enabled in the PC settings
The soundbar is currently an excellent alternative to conventional speakers. It boasts excellent sound quality and volume. In this it is not inferior to speakers, and most often even surpasses them. The main thing to do when purchasing is to choose a model that is suitable for the characteristics of the computer and the size of the room in which it will be used. As for the connection procedure, it takes little time and will not cause difficulties even for inexperienced users.
Tips for optimal TV mounting
As mentioned earlier, it's important to remember that the eye level is optimal for your TV or home theater screen. So, when you install your TV, here are some tips to help you install your TV to avoid eye and neck strain and optimize your viewing and listening experience.
- If you decide to mount your TV well above eye level, choose a mount that can tilt downwards.
- Make sure your seats are far enough away from your mounted TV to avoid neck strain.
- Choose a location, starting with the lowest possible height, and if you decide to install it higher, test it gradually.
- The more flexible the mount, the better. There are now several high quality mounts available at very good prices that can accommodate a wide range of viewer height preferences and move freely. Check out full-swivel mounts like the ECHOGEAR Articulating Articulating TV Wall Mount (on Amazon).
Happy installation!
Recording source: https://thehometheaterdiy.com