4.8 / 5 ( 44 voices)
If you have problems or doubts about the correct operation of the microphone on your headphones, then this article is especially for you. In this material we will look in detail at how to check your headphone microphone:
- on PC with Windows 7, 8 and 10;
- on phones with Android and iOS;
- through special applications;
- using online services.
Let's also consider why the sound is not recorded and what to do about it?
Checking on computers, laptops with Windows 7, 8, 10
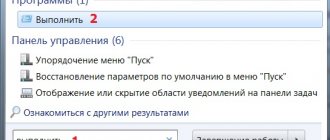
There are several ways to test a headset on Windows. The simplest life hack on how to check the microphone on headphones:
- Connect your device to your computer.
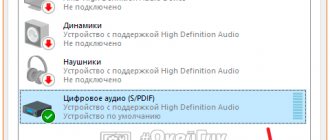
- Take a look at the system tray - at the bottom right of the display you will notice a speaker icon.
- Right-click on the icon and select the connected headset from the drop-down list.
- The working microphone from the headphones is marked as the default device, as indicated by a daw in a light green circle.
- On the right side of the name you will see a sensitivity scale.
- How to check the microphone on Windows headphones? Put on your headphones and say a couple of phrases into the microphone.
- If the scale bars begin to vibrate and fill with green, it means the microphone is working.
- You can further adjust the quality and volume of the recorded audio by going to the Properties submenu, going down to Levels, and adjusting the sliders.
Is the microphone working?
A universal device for testing the device in question is a multimeter. Quite often, many devices are equipped with batteries. And insufficient voltage on the contacts of which can become one of the reasons for inoperability. Checking the performance of a battery is very simple - just measure the voltage between its positive pole and negative pole. It must be nominal.
Photo: microphone with battery
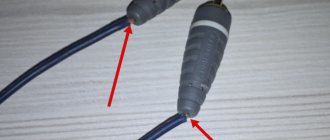
You can also use a multimeter to simply check for voltage at the plug contacts. To do this you will need to disassemble it. Voltage measurements should be performed between two contacts: common and some channel. Most often, only one channel is used - the left one. Therefore, the black probe should be installed on the central contact, and the red one on the side.
If there is a nominal voltage between these two contacts, which is usually about 1-3 (V) depending on the modification, we can conclude that the device is working. It is also possible to check the amount of current passing through the contacts - it should be approximately 1-3 mA.
Photo: measuring batteries with a multimeter
Even though the current and voltage flowing through the plug contacts is small, you should be extremely careful when taking measurements. Since there is always a chance of damaging electronic components.
The system writes that installing Windows on this disk is impossible gpt - disk. What to do, the answer is below.
How to disable the touchpad on a laptop? Recommendations at the link.
There are many reasons why a sound recording device may not work. But most often problems with functioning arise from the software. This kind of trouble can be resolved quite simply - by reinstalling codecs, drivers or other components. It is much more difficult to repair or test the hardware. This requires some skills.
microphone connection diagram
But, nevertheless, most of the actions are not complicated. Most confident computer users who have been working with this technology for several years can implement them. Thus, eliminating microphone malfunction is relatively simple; you just need to devote enough time to this process and be careful.
Checking the headphone microphone on smartphones
If you don’t have a computer or beech computer at hand, you can check the headphone microphone using a tablet or phone. The main thing is that the audio ports and audio plugs are compatible.
Let's now consider how to check the headphone microphone on your phone. The procedure here is the simplest, the same for iPhones and Android devices:
- Through the built-in voice recorder . Plug in your headset, go to the app, start recording and speak a few phrases. Save the file, listen, evaluate the quality.
- Via online service . Many people are interested in how to test a headphone microphone online. Refer to the built-in or installed browser (the application must be granted access to the headset used), find the webcammictest service. Click on "Test Microphone".
- Through special programs . If your phone doesn't have a built-in voice recorder or you can't find one, look for audio recording apps in the App Store or Google Play. Microphone speaker is suitable for iPhones, and Mic Test is suitable for Androids. By the way, “Mic Test” is a very advanced software that will allow you to test both built-in and plug-in microphones on both wired and wireless headsets.
Test using the Sound Recorder app
Click the “Start” button, go to the “Programs” section and in the “Standard” directory, find “Sound Recorder” (in “Seven”) or Voice Recorder (in “Ten”). Record a few phrases and save the audio file. When listening, in addition to the functionality of the microphone on the headset, you can check whether it is noisy or emitting extraneous sounds.
I don’t recommend using online services to test hardware - nowadays it’s a big imprudence to trust too much to sites found through a search engine, and then give them access to the computer’s hardware. However, the standard Windows tools described above are quite sufficient for the test.
Subscribe to me on social networks to receive timely notifications of new publications. See you soon!
Sincerely, blog author Andrey Andreev.
Checking the headphone microphone using special programs
The easiest way to test the functionality of your headset is to use the free Audacity program, a powerful audio editor that will be useful for other purposes. This application is similar to the built-in voice recorder, but in a more advanced version. How to check if the microphone on headphones works using it? Record a short audio file by speaking a few phrases into the headset, and then listen to it to check the sound recording.
The second free and useful program that can also be used for testing is the Skype IP telephony application. You can check the microphone in your headphones online using the following instructions:
- Install Skype on your computer or laptop.
- Refer to "Sound Settings".
- In the Microphone section, select the required device.
- Decide on a comfortable volume.
- ABOUT
- Make a follow-up call to a friend or acquaintance.
- If this is not possible, you can test using the Echo/Sound Test Service, which you will find in the main menu. The service will allow you to make a test call - follow the operator’s commands, and then listen to the recorded file to evaluate the sound.
Diagnostic options
As already mentioned, there are several diagnostic options that you can do yourself. For this we don’t need any supernatural knowledge or skills, everything is extremely simple. All users, even beginners, need to learn basic sound testing skills. Still, in the modern world we often have to communicate with people through a computer, but I want people to hear their voice clearly and understandably - this will greatly help in communication.
Using Windows OS
To check the sound directly through the operating system, we will need to go to the computer control panel. In it you need to go to the section called “equipment and sound”. Here you will need to select the “sound” tab, which contains the sound check tab. When you change the volume of sounds here, the number and color of squares on the strip will change, with which you can check your microphone.
If something doesn’t suit you, you can immediately go to settings, change sensitivity, sound processing parameters and much more that the user needs. All this allows you to adjust the equipment to suit you, position the microphone correctly for more comfortable use when communicating. Everything is intuitive and signed; no problems should arise in this section.
By the way, in this operating system you can configure a very convenient function that will come in handy more than once. If you go to the “communication” tab in the settings, you will see an interesting function that you can connect. Its essence is that when you receive a call while listening to music, the computer will automatically reduce the volume of all sounds to a minimum, again, everything is subject to adjustment and configuration. This was done for convenience, as many users complained about excessively loud and unexpected ringing while listening to music. Now this function is quite useful and relevant, however, for some reason many people do not know about it.
Recording sound
For the convenience of users, many services have also been created on the Internet, with the help of which you can record sound. By going to one of these sites, you can record your speech and even a song, and then listen to it. While listening, you can draw conclusions about the quality of the device; it is recommended to open the settings so that they are at hand. Through trial and error, you can achieve the ideal combination of volume and quality of your voice, so such services are very useful for ordinary users.
With the help of such sites, you can even find the cause of your device's malfunction. Of course, the reason will not be determined 100%, however, the service tests your computer and audio recording device according to basic parameters, identifying the most common faults. If the sound still does not start to be recorded, then this is a reason to contact the service for help from a specialist or buy new headphones or a separate microphone.
Via Skype
Skype is a popular service for communication through audio and video calls. You can check the sound quality right inside this service; this is part of the Skype functionality. For these purposes, you need to go to the program settings, to the “sound” subsection. Again, everything is extremely simple and clear. This tab will provide several diagrams that display the presence of a sound signal, its strength, etc. If some settings do not suit you, you can uncheck the automatic setting, which transfers the user to manual mode. Here you can configure it with the help of your friends, who will provide feedback directly during the call. You need to move the sliders in the volume settings, while simultaneously communicating with your interlocutor, and he will guide you at what levels you can hear better.
We hope that the above tips will help you understand, get comfortable with checking and setting up audio recording on the microphone in your headphones. Even a child can master these skills - they are so easy to master. I would like to wish that communication on the Internet brings you only positive emotions!
Subscribe to our Social networks
Checking the microphone on headphones using online services
How can I check headphones with a microphone on a computer differently? Another high-quality and free testing is done through numerous online services:
- mictest.ru;
- itguides.ru;
- it-doc.info;
- mictests.com and others.
Right in the browser you can record a file and listen to it. Some services allow you to analyze the sound and display its brief characteristics, monitor the recording volume level and the sensitivity of the headset. But for this to be possible, do not forget to give the browser you are using access to use the microphone.
PC connection
To connect the equipment in question to a computer, you must have a specially designed interface for it.
Today, connections are made in two ways:
- via a 3.5 mm jack located on the dedicated board;
Photo: 3.5 mm jack
A connector with a diameter of 3.5 mm is the most common. Today it is present on almost all equipment equipped with the ability to play and record. To make the connection, simply insert the plug into the connector. It is marked in pink or red.
Most modern models do not require the installation of any additional drivers or codecs. Most often, the standard ones that come with the operating system (Windows XP or Windows 7) are quite sufficient.
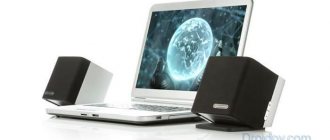
Photo: USB microphone
Some difficulties sometimes arise when connecting via a USB interface. Since these devices are usually professional equipment intended for studio recording. And accordingly, they require specialized software. It comes included on digital media, and can also be downloaded from the Internet.
If necessary, you can use a special USB-3.5 mm adapter.
PC connection
To connect the equipment in question to a computer, you must have a specially designed interface for it.
Today, connections are made in two ways:
- via a 3.5 mm jack located on the dedicated board;
- via USB interface.
A connector with a diameter of 3.5 mm is the most common. Today it is present on almost all equipment equipped with the ability to play and record. To make the connection, simply insert the plug into the connector. It is marked in pink or red.
Most modern models do not require the installation of any additional drivers or codecs. Most often, the standard ones that come with the operating system (Windows XP or Windows 7) are quite sufficient.
Some difficulties sometimes arise when connecting via a USB interface. Since these devices are usually professional equipment intended for studio recording. And accordingly, they require specialized software. It comes included on digital media, and can also be downloaded from the Internet.
If necessary, you can use a special USB-3.5 mm adapter.
Is the microphone working?
A universal device for testing the device in question is a multimeter. Quite often, many devices are equipped with batteries. And insufficient voltage on the contacts of which can become one of the reasons for inoperability. Checking the performance of a battery is very simple - just measure the voltage between its positive pole and negative pole. It must be nominal.
You can also use a multimeter to simply check for voltage at the plug contacts. To do this you will need to disassemble it. Voltage measurements should be performed between two contacts: common and some channel. Most often, only one channel is used - the left one. Therefore, the black probe should be installed on the central contact, and the red one on the side.
If there is a nominal voltage between these two contacts, which is usually about 1-3 (V) depending on the modification, we can conclude that the device is working. It is also possible to check the amount of current passing through the contacts - it should be approximately 1-3 mA.
Even though the current and voltage flowing through the plug contacts is small, you should be extremely careful when taking measurements. Since there is always a chance of damaging electronic components.
There are many reasons why a sound recording device may not work. But most often problems with functioning arise from the software. This kind of trouble can be resolved quite simply - by reinstalling codecs, drivers or other components. It is much more difficult to repair or test the hardware. This requires some skills.
But, nevertheless, most of the actions are not complicated. Most confident computer users who have been working with this technology for several years can implement them. Thus, eliminating microphone malfunction is relatively simple; you just need to devote enough time to this process and be careful.
Reasons why the device may not work
There are several main reasons why the device in question may not work. They can be divided into hardware and software.
Hardware includes:
- connecting cord faulty;
- socket for connection not working;
- electronic components are damaged or not working properly.
Software errors that interfere with conversations on Skype or other applications are much easier to eliminate.
The presence of this type of problem is due to:
- incorrectly installed codecs or drivers;
- the presence of all kinds of conflicts between already installed programs.
To correct software errors, you just need to reinstall it.
Testing audio devices in Windows
- Connect the devices to the appropriate sockets on your computer. They are usually indicated by corresponding icons. On your laptop or speaker set, the headphone jack will be marked with an icon. Some jacks are color coded: green is usually for the headphone and line-out jacks, and pink is for the microphone.
- Launch your media player. You can select it from the list of programs in the Start menu. Select the audio file you want to play from the media player library. You can also double-click the audio file in Windows Explorer to launch the default media player and automatically play the track. You should hear a sound.
- If the microphone has a power button, turn it on. Open the Start menu and then go to Control Panel | Hardware and Sound | Sound". Select the Recording tab, select your microphone from the list of devices, and click Properties.
- Go to the “Listen” tab and check the “Listen from this device” checkbox. Click "OK" and then position your microphone so that you can speak comfortably. Try talking. You should hear your own voice coming through the headphones. Open the Listen menu again, uncheck Listen to this device, and click OK.