Work and entertainment on a computer cannot be considered complete if there is no sound on it. It is necessary to watch movies, listen to music, receive notifications of new messages, and so on. You can name hundreds of programs, sites, games and applications that lose their relevance without sound.
The sound should be clear and loud, and its distortion is a big problem that every Windows 10 user may encounter. If the sound on your computer begins to crackle, wheeze, sound muffled, hiss, or has other problems with it, you need to fix the problem as soon as possible malfunction. In this article, we will look at the main reasons why similar sound problems can occur in Windows 10, as well as ways to fix them.
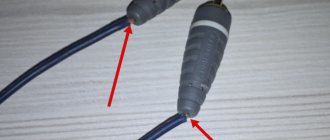
Important: Before you try to fix a software problem, make sure that the problem is not hardware. If the sound hisses from speakers connected to a computer or laptop, try checking them by connecting the speaker system to a player or phone. In a situation where the laptop's built-in speakers wheeze, on the contrary, connect an external speaker system to the laptop and see how it sounds. You can also try disconnecting the laptop or computer connector from the sound card and connecting it again.
The sound on the computer wheezes due to effects
The most common problem that most often results in sound distortion is the effects being turned on. In the Windows operating system, you can apply various effects to the output sound, which many users forget about, and they think that there are problems with the audio.
Sound effects on your computer may turn on due to changes in system settings by various applications that have administrator rights. You can check whether wheezing, hissing, or muffled sound is due to Windows effects in the audio settings. This is done as follows:
- In the lower right corner of the screen (where the notification area is located), find the speaker icon and right-click on it. In the drop-down menu, select “Playback devices”;
- A window with sound settings settings will open. Among the available playback devices, determine which one is responsible for audio output and select it. After that, click on “Properties”.
Important: Please note that the configured device is used by the system by default; - In the audio device properties window that opens, go to the “Advanced” tab and make sure that the “Enable additional audio tools” checkbox is unchecked;
- If your version of audio drivers has an “Advanced Features” tab, select it and check the “Disable all effects” checkbox.
After saving your changes, make sure that the sound on your computer has returned to normal and is “clean.” If it continues to crack, wheeze, hiss, or have other defects, proceed to the next step in the instructions.
Disabling audio effects and additional audio features
The first thing you should try to do when the described problems with sound appear in Windows 10 is to try disabling all “improvements” and effects for the played audio, they are the ones that can lead to distortion.
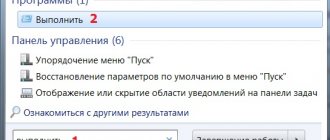
- Open the list of Windows 10 audio recording and playback devices. Different versions of Windows 10 do this slightly differently. All relevant methods are in the material: How to open recording and playback devices in Windows 10.
- Select your default playback device. And at the same time, make sure that the desired device is selected as it (for example, speakers or headphones), and not some other (for example, a software-created virtual audio device, which in itself can lead to distortion. In this case, just click right-click on the desired device and select the “Set as default” menu item - perhaps this will already solve the problem).
- Click the Properties button.
- On the “Advanced” tab, disable the “Enable additional audio tools” option (if there is such an option). Also, if you have (may not have) an “Advanced Features” tab, go there and apply the settings.
After this, you can check whether audio playback on your laptop or computer has returned to normal, or whether the sound still hisses and wheezes.
Sound hisses and crackles in exclusive mode
Some versions of Windows 10 may conflict with sound card drivers, causing the user to experience defects when listening to audio in exclusive mode. Also, problems with exclusive sound mode may occur on a weak computer. To exclude the possibility of crackling, hissing and wheezing when playing sound due to the exclusive mode, we recommend trying to disable it.
To prevent applications from using exclusive sound mode, right-click the speaker icon again in the notification area and select Playback Devices. Go to the properties of the device you are using and on the “Advanced” tab, uncheck both items located in the “Exclusive Mode” section.
Check if the sound improves after turning off exclusive mode.
Reason 4: The sound manager is not configured
In addition to the sound settings in Windows itself, the laptop has a sound manager, which is installed along with the drivers. You can find it by going to Start - Control Panel - Hardware and Sound .
Here look for an application with the word Audio. For example, Toshiba laptops have the Smart Audio , and Dell laptops have Dell Audio .
Hardware and Sound - Smart Audio Manager on Toshiba Laptop
Go to the sound manager and check if the sound is turned on.
Smart Audio - sound manager on a Toshiba laptop
Sound problems due to incorrect drivers
The Windows 10 operating system automatically installs the optimal (according to its version) drivers when the system first starts. However, in some cases, problems may arise with such drivers. To exclude this, it is recommended to download and install the latest version of drivers for the sound card on your computer from the official website of its developers.
Please note: If the problem with hissing, wheezing and other sound defects occurs on your laptop, you can also try reinstalling the audio drivers from the official website of the laptop manufacturer.
Important: If Device Manager does not indicate that there are problems with the sound card drivers, this does not mean anything at all. Even in this case, it is recommended to try updating the drivers, since the system may not see the presence of defects in the sound, assuming that if the sound is output, then there are no problems with it, but in reality this may be different.
Codec update
Have you done all the work outlined above, but the sound on your laptop is still wheezing? Then there is one more chance - you need to update the codecs. You can download and update codecs on the Internet. Another option is to buy discs in specialized stores. If this does not help, then perhaps your laptop is overheating, which is why sound problems begin. Very rarely, sound problems can be due to a flaw in the BIOS; try updating it. If all these methods did not help eliminate your error, then it is better to take the laptop in for repair, perhaps the technicians will be able to fix it. Tell them that there is no sound on the laptop. They probably know what to do. They will tell you everything in detail and show you, and will definitely fix all the problems.
Quiet sound in Windows 10 due to communication settings
Another innovation in modern versions of Windows is the automatic muting of the sound output by various programs when making a call, for example, in Skype. There may be situations when this option does not work correctly and, due to some errors, constantly keeps the sound muted, considering that the computer is in call mode.
To rule out the possibility of low sound problems due to this Windows feature, you can try disabling it and see if the problem persists. Disable the option in the sound settings:
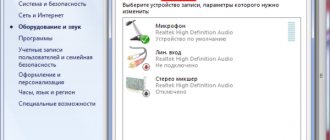
- Right-click on “Start” and select “Control Panel”;
- Next, set the “Large icons” viewing mode in the “Control Panel” and select “Sound” in the list of computer settings;
- In the window that opens, go to the “Communication” tab and check the “No action required” checkbox, then click “OK” to save the settings.
Note that this method helps solve the problem only if the sound is quiet, but in a situation where it wheezes or crackles, the problem cannot be eliminated.
Incorrect audio output device selection
Sometimes the lack of sound is not due to technical problems, but to simple user inattention. For example, if headphones were previously connected to the laptop, and the next time the sound is turned on, the user expects to hear it through the built-in speaker of the laptop. Therefore, if you have any problems with playback, check to see if there are any third-party devices connected through which sound may be transmitted.
You should also pay attention to the volume level set in Windows. When using speakers, make sure they are connected to an electrical outlet. Check the current position of the power switch, and if it is off, turn it on. Set the volume to a sufficient level using the buttons on the remote control or the rotary knob on the back of the main speaker.
Important! In addition to adjusting the volume level, the speakers may also have other controls, such as changing the bass level and the balance between the speakers. Change the position of only the control that controls the volume.
Sound problems in Windows 10 due to incorrect playback format
Modern sound card models support almost any audio playback format that can be offered by the Windows operating system. However, if you have an old card installed in your computer, this may cause problems.
To go to the playback format settings, you need to go to the “Control Panel” and select “Sound” from the available options. Next, click on playback device properties. A window will open where you need to go to the “Advanced” tab. Set the “Default Format” option to “16 bit, 44100 Hz (CD)” and save your changes.
It is worth noting that the 16-bit format at 44100 Hz is supported by almost all sound cards, and it has been used since early versions of Windows.
If none of the above tips helped fix the situation with wheezing, crackling and hissing sound, we recommend that you try checking your computer for viruses. It often turns out that the computer is infected with a Trojan or Malware virus, due to which the operating system freezes, which is accompanied by a temporary loss, wheezing or crackling sound.
( 424 votes, average: 4.55 out of 5)
How to delete a folder that won't delete
Why doesn't the mouse work on a laptop?
Related Posts
Sound enhancement programs
If the user is not satisfied with the sound quality on the laptop, you can try special programs that provide the ability to configure the optimal audio mode.
Sound Booster
Sound Booster software
It is considered a fairly simple and convenient utility that allows you to enhance the sound in the shortest possible time. Moreover, you don’t need to spend a lot of time setting up and searching for the necessary checkboxes - just click on “autostart” (the program will load immediately from the OS) and move the volume slider to the required position.
SRS Audio SandBox
It has established itself as a simple and interesting program for sound processing. The utility includes modules such as 3D balance, 3D space, volume, optimization, speaker frequency.
SRS Audio SandBox is a simple and interesting program for audio processing
Audio Amplifier
Another popular program that allows you to quickly improve your sound. To change the audio level, you will need to click on “Load file” and move the slider to where you need it. You will need to save your changes at the end.
Audio Amplifier utility for improving sound quality
Razer Surround
The Razer Surround developers managed to create unique sound processing algorithms, with the help of which the user can count on creating a surround sound effect. You can decrease and increase the bass, reduce the volume spread, adjust the sound and volume of the interlocutor.
Installing the Razer Surround Utility
Step 1. In the request field of any browser, enter “Razer Surround download”, press “Enter”.
In the request field of any browser, enter “Razer Surround” and press “Enter”
Step 2. Go to the official website of the developer of the Razer Surround utility.
Go to the official website of the developer of the Razer Surround utility
Step 3. Click on the "Download for Windows" button.
Click on the “Download for Windows” button
On a note! The inscription will differ depending on what system is on your device.
Step 4. Select a folder to save the installation file, for example “Desktop” or “Downloads” folder, click “Save”.
Select a folder to save the installation file and click “Save”
Step 5. Left-click the downloaded file either from the bottom download bar of the browser or from the “Downloads” folder.
Left-click on the downloaded file
In the “Downloads” folder, double-left click on the installation file
Step 6. Check the box to read the terms and conditions, click “Next”.
Check the box to read the terms and conditions and click “Next”
Step 7: The installation process will begin, please wait for it to complete.
Installation process, waiting for completion
Step 8. To use the program, you need to create an account on the official website. After installation, a window will open where you need to click “Create an account.”
Click “Create an account”
Step 9. The utility will offer to go to the official website, click on the link “Go to the site...”.
Click on the link “Go to website...”
Step 10. For convenience, change the site interface to a language convenient for you by selecting from the list in the appropriate menu.
In the top menu, change the language to Russian
Step 11. Fill out the registration window with your details by entering your email. email, login and password.
Enter your data
Step 12: Click “Start.”
Click “Start”
Step 13. Select the appropriate item, click “Next”.
Mark the appropriate item and click “Next”
Step 14. Accept the terms by clicking “I accept”.
Click “I accept”
Step 15. Open your email. email and confirm registration by following the link in the email. letter.
We confirm registration by email. email, click “Login”
Step 16: Log in to your created account.
Enter the data you entered during registration and click “Login”
Conclusion
We looked at what to do if the speakers in your laptop wheeze. Use the recommendations described above and problems with sound distortion should be resolved.
Almost any modern laptop is equipped by default with speakers that can, if necessary, replace headphones or external speakers. And although they have very high reliability indicators, interference may appear during prolonged use. In this article, we will talk about some of the reasons for this problem and methods for eliminating it.
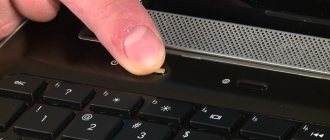
Problems with the audio jack
If the malfunctions persist when connecting other external devices, the cause of the breakdown may be the connector through which they are connected. Try changing the position of the plug in the socket. If the sound appears temporarily and then disappears again, the difficulties are caused by poor contact at the connection point.
If you have experience in disassembling laptops and the ability to use a soldering iron, you can fix the breakdown yourself. If the laptop warranty has not yet expired, or you are not sure that you can repair the audio jack, contact a service center. Do not forget that traces of self-repair or broken seals on the case will lead to loss of the store’s warranty. In this case, the following repairs will have to be carried out at your own expense.
Note! The reason for the lack of audio may be connecting speakers or headphones to the microphone jack. To restore normal operation, simply switch the mini-jack to an adjacent slot.