A laser printer is a model of office equipment designed for printing texts or graphic images on plain paper. The resulting print is not prone to fading, is wear-resistant and does not react to moisture.
Printers have different performance levels; a large enterprise, office, student or schoolchild can choose the appropriate model. Offices and enterprises opt for monochrome printers, and at home they print not only texts, but also color photographs or documents. The print quality of color products is much lower than that of slim models. The price of a laser printer depends on technical characteristics - performance, format, memory capacity, resolution.
Advantages of a laser printer:
- high printing speed;
- excellent quality, image clarity;
- economical toner consumption;
- resistance of received documents to ultraviolet radiation and humidity.
One cannot help but note the high cost of consumables, especially when it comes to color printing. All models of printing equipment use the xerography method. Despite the differences in appearance and characteristics, the internal structure is almost the same.
History of creation
The method of transferring dry dye to paper was patented in 1938 by US inventor and physicist Chester Carlson. The method was based on the use of static electrical energy. The technology was adopted by Xerox 10 years later. It took another 10 years to refine the electrographic transfer method and to invent a device that could automatically display information on paper. At first the machine was cumbersome and some operations had to be done manually. Only in the 50s. A fully automated mechanism was created, which is the prototype of modern laser printing technology.
The laser beam was added to the printer design by Xerox in 1969, and the first printer went on sale in 1977. It was the Xerox 9700 model. Only large companies and offices could buy the innovative device, since the price exceeded 300 thousand. The speed of the first printing technology was 120 pages per minute, it could do double-sided printing. Printers became available to ordinary private users after 5 years. They were started to be produced by Canon. Then the number of manufacturers and new models of printing equipment increased rapidly every year.
Laser printer device
A laser printer is a printing device that applies toner to media using photoelectric xerography.
Different models may have minor differences, but the basic operating elements will be the same.
- Scanning mechanism. It consists of rotating lenses and mirrors. By correctly arranging them, the required image is formed on the surface of the photodrum, which is applied with a laser. Since the picture is not applied with dye, but simply changes the charge of particles on the surface of the shaft, it cannot be seen. A controller with a raster processor is responsible for the operation of the scanner.
- Block for transferring an image to a medium. It includes a cartridge and a charge transfer roller. The cartridge consists of a photo shaft, a charging and a magnetic shaft. It is on the surface of the photo roller of the cartridge that the charge changes under the influence of the laser. The transfer roller, using a neutralizer, removes static charge from paper entering the printer. This is to prevent the sheet from sticking to the drum.
- Unit for final fixation of the image on the media. After the toner is transferred to the sheet, it passes through an oven, where it is “baked” under high temperature. The particles contained in the toner easily melt and reliably fix the print on the paper, so the applied pattern is not erased and is well preserved for a long time.
- Interface block. Responsible for the exchange of information and interaction between different nodes in the printer.
- Printers from Xerox, Canon, and HP brands use positively charged toner. Therefore, the laser draws an image with a negative charge, which attracts the powder to the surface of the drum. This technology allows you to draw the image on the media as much as possible.
- The operating principle of laser printers from Brother, Kyocera, Epson is different, since their toner has a negative charge. The laser changes the charge not of those areas on which the image should be applied, but, on the contrary, of the spaces between the drawn elements. This method distributes the toner evenly over the surface of the sheet.
Transfer
The page fed into the printer passes under the image drum. To ensure that the toner on the OPC surface gets onto the sheet, a Transfer Roller is located under the paper. The metal core of the roller is charged with a positive charge, which is transferred to the page through the soft rubber coating.
HP Transfer Roller LJ 4050
Toner particles come off the drum and move onto the sheet, but are held there only by static attraction. We can say that the toner is simply poured in the right places.
Dust, paper fluff, and powder particles are removed from the photodrum and sent to the waste hopper (Wiper Blade, Cleaning Blade), which is a flexible polyurethane plate mounted on a metal frame. Now that the drum has already made a full circle, the corotron (or roller) again restores the charge to the OPC surface and the cycle repeats.
Cartridge device
A simple cartridge consists of a dye compartment, a waste compartment and a photo roller. The drum cartridge contains a photocell and toner.
Toner is a fine black powder. The color machine uses violet, yellow and blue dye. The powder consists of polymer particles coated with a dye containing magnetite and a charge regulator. From different manufacturers, the powder differs in grain size, magnetization and dispersion, so you need to refill the cartridge only with the toner that is intended for a specific model.
The appearance of the cartridge in different models may be different, but they all consist of the following elements:
- The toner compartment where it is stored.
- Magnetic shaft. Through it, the powder is fed from the hopper to the photocell.
- Dosing blade. Responsible for the thickness of the toner layer that falls on the surface of the photo roll.
- Raquel. After transferring the paint from the photo roll to the paper, the squeegee cleans the surface of the roll from powder residues.
- Charge roller. Charges the drum surface.
- Compartment for working out. Waste toner gets into it.
Some cartridges have a built-in microchip that collects information about the number of pages printed. If necessary, it can be replaced.
Also, during operation, other parts of the cartridge, which are considered consumables, may wear out. The cartridges themselves can be refilled many times and used until the gears or body parts are completely worn out.
Installing drivers
Next, proceed to installing the drivers if the operating system did not automatically download them during connection. It’s easier and more reliable to get software (you can also find a proprietary application there, if the developer provides one for a specific model) from the company’s official website, but there are alternative options. You can’t skip this step, because without drivers you simply won’t be able to start using the printer.
Read more: Installing printer drivers
How a laser printer works: printing principle
Drum charge
A sensitive green or blue layer is applied to the surface of the photo roll. In some models, the charge transferred to the photodrum will be positive, while in others it will be negative.
Charging occurs in two ways.
- A special tungsten filament with a carbon coating and gold/platinum particles is supplied with high voltage, under the influence of which a magnetic field is created. During the laser printing process, the filament often becomes contaminated, which reduces the quality of the printed image.
- Instead of a tungsten filament, a charge roller is used. Externally, it looks like a metal cylinder coated with a conductive substance (special rubber, foam rubber). When the image drum touches the roller, a charge is transferred. The roller does not get dirty as quickly as the thread, but its service life is much shorter.
Creating an Image (Exposure)
During exposure, an invisible image is formed on the photodrum, which is an exact copy of the image sent by the user for printing. Depending on the printer model, the pattern will be formed in areas with a negative or positive charge. The charge is replaced by a laser beam striking first the mirror and then the lens.
The first line is formed when the laser is turned on/off. Then the drum is rotated and a new part of the image is applied. This takes a split second. The remaining toner is cut off with a squeegee and dumped into the waste compartment.
Development
At this stage of the printer’s working circuit, the main element is the magnetic shaft. It looks like a metal hollow cylinder with a magnetic core inside. The magnetic roller fits tightly to the photo roller and toner compartment. When the shaft rotates, a magnetic core located inside attracts toner to the surface of the shaft and is simultaneously applied to the photocell. In places where the charges of the dye and the surface do not match, toner particles “stick” occurs.
Transfer to paper
The stage involves a transfer roller. The metal base can change the charge and transfer it to the paper sheets. The principle of transferring toner from the photodrum to paper is the same as from the magnetic roller. The dye is held on the surface due to static tension; without it, it would scatter across the page.
Pin an image
The toner contains components that melt under high temperatures. To fix the design on paper, the sheet passes through a stove inside the machine. It consists of two shafts, the top of which contains a heating element, and the bottom serves as a press that pushes the paper for more reliable fixation.
The thermocouple of the stove heats up to 200 °C and bakes the dye.
Cheap printers use thermal film, while more expensive ones use Teflon and lamps. The advantage of such models is the increased service life of the toner fixing mechanism.
What is a drum unit?
In low- and mid-price printing devices, the photodrum is combined with a toner cartridge into a drum-unit. The operation of such a printing unit is designed for 2-10 thousand copies, after which the cartridge will need to be refilled. After 3-4 refills, either only the drum or the entire cartridge is changed. In premium segment laser printers and copiers, the drum is located directly inside the device. The print resource in this case is about 10 thousand copies, after which the photodrum also needs to be replaced. It is important to understand that the drums presented at points of sale of consumables are compatible spare parts. Manufacturers supply original photodrums only to service centers.
| Toner cartridge | Drum unit |
How does a color printer work?
Color machines contain 4 cartridges with black, blue, violet and yellow toner. In expensive devices, the number of capacities may be greater.
The printing principle of a color printer does not differ significantly from the operation of a monochrome printer. The only difference is that the application of dye to obtain a color image is done separately by each cartridge. Depending on the number of passes, there are single-pass and multi-pass devices.
The multi-pass type has a special shaft or belt. One color is applied per revolution of the drum. The number of revolutions is equal to the number of colors used, due to this the total time of applying the image to the paper increases. In a single-pass device, the image is drawn with all colors at once. To achieve this, each cartridge is equipped with its own laser system and portable roller. This type of printer prints faster than a multi-pass printer, but is more expensive.
A color laser printer has its advantages and disadvantages. Compared to an inkjet, it prints faster, but the quality of the resulting image will be slightly lower due to the fact that dry ink conveys tones worse.
This color rendering is sufficient for printing graphs and diagrams, which is why color printers are bought mainly for offices. It is purchased less often for the home due to the high cost of both the device itself and maintenance.
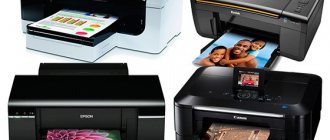
Popular representatives
- Xerox Phaser 3020BI. Black and white device for home and small offices. Practical and easy to maintain model. The cartridge can be easily replaced independently. There is a built-in wireless module that allows you to connect the printer via Wi-Fi. The printing speed of a page with text is 20 sheets per minute, photographs are printed 3 times longer. Even very small font prints legibly. Disadvantages - can withstand only light loads, takes a long time to warm up, the cartridge has a short lifespan.
- Kyocera FS-9530DN. High-speed monochrome device for medium and large businesses. It has several options for feeding paper with cassettes of different sizes. The developers provide the possibility of installing an additional device for stitching booklets and an automatic hole punch. The toner is not stored in a cartridge, but in a special container. One charge is enough to print 40 thousand A4 pages in normal mode and 100 thousand A4 pages in economical mode.
- Canon i-SENSYS LBP621Cw. Color printer for home and small offices. There is a module for wireless connection, direct and cloud printing is available. The printer heats up quickly and has a 250-sheet tray. There is no duplex printing and refills are expensive.
- Xerox Phaser. Compact color LED printer. It has high quality printing, but the price of original consumables may be higher than the cost of the printer itself. It connects easily, but prints quite slowly.
- HP Color LaserJet Professional CP5225 (CE710A). Large format color printing machine for medium and large businesses. As standard, it is connected only via a USB cable, but you can optionally install a wireless printing module. It is inexpensive, low cost of printing one page, but you cannot make double-sided prints.
5 / 5 ( 1 voice )
Preparatory activities
Before using the printer, you must correctly connect it to your computer, install drivers and configure all operating parameters. Only in this case will the device function efficiently and not malfunction.
Connecting the device
Any printer (inkjet or laser) will work well if connected to your computer correctly. To perform this work, you need to unwind all the cables that came with the device and remove the removable parts from the packaging.
Procedure:
- Install the printer on a horizontal surface. When choosing a location, you need to take into account not only the user’s preferences, but also the length of all wires. Most modern devices have an opening lid or a sliding paper slot. This also needs to be taken into account when choosing an installation location.
- The power wires are connected to the electrical network.
- One end of the double-sided USB cable is inserted into the corresponding socket on the back of the printer, and the other into the computer.
- Turn on the PC.
- Press the printer power button on the control panel.
Installing drivers
The process of using a printing device requires downloading special software (drivers). This is necessary so that the computer’s operating system can recognize the connected device.
Installation process:
- Turn on the PC.
- Take the installation disc that came with the device and insert it into the drive.
- After a few seconds, the printer software window will appear on the screen. In it select the “Install” item.
- On the page that opens, mark those program elements that you want to install. Experts recommend selecting “All drivers”.
- Confirm that you have read the license agreement by clicking the “Next” button.
- Turn on the printer and click “OK”.
- Waiting for the installation process to complete.
- Reboot the computer.
All well-known printer manufacturers (Samsung, Epson, Canon, Brother and others) create unique drivers that are suitable only for a specific device model. Therefore, experts are not recommended to lose or damage the installation disk. If this happens, you will have to look for software elements on the Internet.
Setting up equipment
After connecting the printer, you need to start setting up printing. To do this, turn on the device and follow a few simple steps.
Step-by-step instruction:
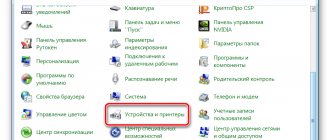
- On the computer click the “Start” button.
- In the menu that opens, look for the “Control Panel” item.
- After clicking on it, a window will open where you select the “Printers” section.
- The user will be prompted to select a device to use as the default. From the available options, find the name of the connected printer.
- Save the changes by pressing the “OK” key.
If you complete all the steps correctly, the name of the device will appear in the list of ready-to-use devices. To test it, you need to print a test page. To do this, perform the following steps:
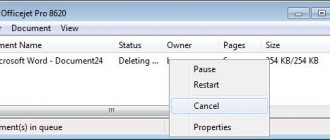
- Right-click on the printer icon.
- In the list that appears, select the “Properties” section.
- It opens the “General” tab.
- Find the “Test Print” button and click on it with the mouse.
If the printing was successful and the result satisfied the user, then you can start using the device.