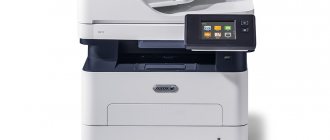
What can you print on your home printer?
You can’t even imagine how many possibilities open up to you when you have a color printer in your home, and even a multifunctional one. With this device you can easily convert electronic pictures, photos and text into printed form. The main thing here is to correctly set the parameters for printing - both for the object itself and for the printer as a whole. In addition to such basic printouts that even a beginner can handle, your device can implement several more incredible functions.
- Interesting activities for children, such as color pictures with tasks or mazes. Of course, this takes a lot of ink, but you can tinker with the settings and arrange for black and white printing. This is especially suitable for those who know how to work in a graphics editor.
- Stickers for baby by month. They are usually made in subtle shades, so they won’t waste much colored paint. At the same time, you must choose the right paper suitable for your printer model to ensure clarity and durability of the image.
- Portraits and interesting toys for children. Typically, such templates can be found on websites dedicated to educational crafts. You can download and send for printing animals, insects and any items necessary to get to know the world around you.
- Paper dolls with clothes for girls. Remember how we, parents, played with such dolls as children and independently built a house for them and dressed them? Now all these treasures can be found directly on the Internet and printed as templates.
- Various ideas for crafts, again with children or for a competition. Print out and keep in front of you the instructions that you will use to carry out Hand-Made.
In other words, a printer, even a black and white one, will be able to satisfy your and your child’s desires, and will also help pass the time usefully. You shouldn’t run to the store for “developers” when you can make them at home.
Interesting toys, useful tasks and puzzles that you can choose yourself can be easily printed at home.
GOOD TO KNOW!
If your printer has high-quality inks and is easy to refill, then you can print more serious things, from restoring old photographs to printing on fabric.
Printing the image
In any graphics editor, it is possible to print photographs or pictures. You need to follow the same principle as when printing text. Customization involves editing the size, the ability to multiply the image to the desired quantity, or printing several different pictures on one sheet.
In the same way, you can print Microsoft Excel tables and website text. The browser's File menu also assumes the presence of a printing service.
As you can see, there is nothing complicated about working with the printer. The most important thing is to configure everything correctly for correct operation and timely service the device.
Rules for setting up a printer to print from a desktop computer
To do something useful with your existing printer, it is important to connect the device correctly and configure it to perform its functions correctly. To do this, follow the instructions below.
Often, Windows 10 automatically configures and makes the printer ready for use.
There are several ways to connect the printer to a computer: using a USB cable, via a wireless connection via Wi-Fi or Bluetooth, or via a dial-up Internet connection. Today we will look at one of the most popular methods, which is usually implemented at home.
- First of all, start the PC and be sure to wait until it finally boots (you can check this using the response to any operation, which should occur quite quickly after loading).
- Then plug the printer's power cord into a power outlet, and the USB cable into the corresponding output of the computer system unit.
- A device search notification will appear on the screen, and after the computer has searched for the necessary drivers, you will receive a “Device is ready to use” notification.
If such a message does not appear on the screen, then you will have to install the printer manually. To do this, insert the disk that came with the printer into the drive, or download the driver for your device model from the Internet.
Many printing devices require additional software installation in addition to drivers.
Printer drivers are responsible for the correct operation of the printer, as well as for high-quality printing, so pay special attention to this installation.
Next, you will see a software installation wizard that will install the application in just a few steps with confirmation. Almost every printer model offers to print a test page after installation to make sure that the installation was completed correctly.
If the printing device is not installed
Previously, we considered a situation in which the printer was already connected to the “computer”, configured and ready to print. But this doesn't always happen. In some cases, you may need to perform these steps yourself. The first step is to connect the device, install the software on it, and then configure it.
Connection
If the printer is new and will be used only on one computer, then it is logical to connect via a USB cable. It may not be included with the equipment, so don’t be surprised. It will not be a problem to buy the cord separately at any store. Plug one end of the wire into the socket on the device body, and the other into the USB connector on the back cover of the computer or laptop.
The following connection methods are also possible:
- Via a Wi-Fi network if the printer itself supports it.
- Via an Ethernet (network) socket, which is more typical for offices where a local network is installed.
All ways to connect a printer to a PC. Detailed instructions for installing printing equipment.
Driver installation
The second step will be to install special software that will allow the computer to “talk” to the printer in a language they understand. The name “driver” is better known. Their installation can be simple and even unnoticeable, or long and problematic.
If you use a USB connection and your computer has Internet, then the chances of success are very high. The Windows operating system is quite capable of doing everything you need on its own. Wait 5-10 minutes for the process to complete (there will be a notification about its beginning and end in the lower right corner). Upon completion, the OS should inform the user about the result. But you can also check for new installed devices yourself.
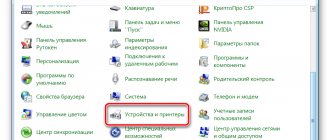
- Go to the control panel.
- From there, go to the “Devices and Printers” section.
- Find your model in the list.
- If the automatic installation fails, you should use the installation disk. This is exactly what all new equipment is equipped with.
- If there is no disk or the printer is old, then follow the instructions for installing the printer without the installation disk.
Settings
- The last step is to configure the device to print correctly. The first step is to make it the default master. If you do not do this, you will have to choose your model every time you print. This is simply inconvenient and time-consuming.
Ways to set the default printer All options to do this quickly and guaranteed. - It is also possible to slightly adjust print quality and other parameters. To do this, you need to go to the equipment settings. First of all, open the control panel section with printers. Find yours and the “Print Settings” item in the context menu.
In the window that opens, you can change the currently needed parameters.
To reset to factory settings, use the "Default" button.
How to type and print text on a computer with a printer installed
Almost every home computer has a text editor installed - a program designed to format text in various ways. This is often the Word office application, and of course the version may vary among different users. Let's see the whole process from A to Z in our photo instructions.
| Illustration | Description of action |
| We type the required text in the Word editor in normal mode and format it so that it is in perfect condition: after printing, it will not be possible to invisibly correct errors on paper - you will have to print a new version of the document. | |
| Once again, we carefully check everything and go to the “File” tab. | |
| In the list of this section, select the “Print” item, check that the printing device is connected, and then click the “Print” button if you do not need to make any additional print settings. |
GOOD TO KNOW!
Right in the Word text file, you can make print settings for multiple copies, as well as print multiple individual pages. This is done by the office application and the operation is not affected in any way by the printer model.
How to print on both sides of a sheet
Not every printer supports automatic double-sided printing, but some models offer this service. If your device has this capability, then simply check the box next to the Duplex option before printing.
Duplex printing in MS Word 2010
If the printer does not print on both sides, you have to turn the sheets over by hand. Here it is important not to make a mistake and position the paper correctly so as not to apply the text on top of the side where it already exists.
If you need to print a large number of pages on both sides, turning each sheet will be problematic. Then use the print settings, where you specify to print the odd pages first, then turn the stack of sheets over and print the even ones. It is better to first check by printing a couple of pages whether you are inserting the paper correctly, because it will be sad to see how the printer began not to print on both sides, but to overlay text on top of the previous one. On the monitor screen you will see instructions on which paper position will be correct.
What is text preview before printing and why is it needed?
The built-in preview option, which is found in all text and image editors, is a very useful tool that will help you see how a document will look in printed form. If you notice any error at this stage, it can be corrected directly electronically.
Only those pages that are selected for printing are included in the preview.
The preview is a whole page or a list of them, which we can see in the “File” section before printing.
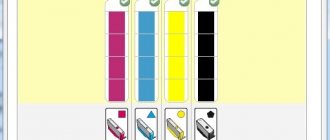
What to choose - PZK or CISS?
To print more economically and quickly, there are refillable cartridges (REC) and continuously supplied ink systems (CISS). Let's compare their pros and cons.
- Form. The PZK is similar in shape to the original cartridges. Their disadvantage is that it is impossible to monitor the actual ink level. If there is no ink left in the cartridges, the print head will become airy.
- Installation. The CISS consists of external tanks, a cable and cartridges similar to the original ones. The downside is that you will need an extra 10cm to accommodate it, but the external reservoir will allow you to monitor your ink levels. SPDs are installed in exactly the same way as original cartridges.
- Installation. CISS is carried out in 2 stages. The cartridges are installed, then the cable is laid and secured. The procedure is simple, and the CISS is installed only once.
- Refueling. To fill the PZK you will need syringes - separately for each color. No additional materials are needed to refill the CISS. Simply remove the caps and add ink from the can.
- Impact on the printer. Each time the seal is removed there is a risk of air entering the print head. The CISS is installed only once, so mechanical impact and the risk of airing are minimized.
- Economical. The cost of printing photos is the same. When buying a CISS you will have to spend about 3 thousand rubles, but this will be a one-time purchase, a PZK costs about 300 rubles.
If you print a lot, buy CISS
Methods for printing text from a computer: solving problems in different ways
You can print text documents not only using applications that allow you to format text. Our experts have selected several more methods that you can perform on a personal computer.
Quick access to printing via keyboard shortcut
Not everyone uses keyboard shortcuts when printing or editing text. We present to you a more simplified version of calling a dialog box to redirect the selected text to print.
Please note that when printing text from the Internet, you capture on the sheet not only the necessary information, but also blocks with advertising.
To do this, enter any application for working with text, and then simultaneously press CTRL + P. A window will appear in front of you with a preview and some printing settings, regardless of whether you found the text on the Internet or used the edited material in Microsoft Word.
Organize printing through the quick access panel
After finishing working with text in Word, there is often a need to print the text without additional settings. To carry out such an operation, follow our algorithm.
| Illustration | Description of action |
| Let's find a checkbox in our open file at the top of the application, call the drop-down list in which we select “Other commands”. | |
| In the window that appears, select the “Quick Print” function, click the “Add” button, then confirm your actions by clicking the “OK” button. |
After these steps, a quick print icon will appear in the top panel. If you click on it, your document will automatically be printed without the possibility of previewing, so it is recommended to carefully check the document for errors before clicking the button.
How to print using the context menu
You can quickly print the finished text using the context menu. To call it, you need to find the required file to convert to paper form, then right-click on it.
Printing by any of the methods is only available when the printer is turned on: make sure it is turned on in advance.
A context menu for this document will appear in front of you, in which you can click on the “Print” item. Activating the printer and printing the document will occur in the same way as in the previous method - without the possibility of configuration.
Popular typing programs
Wordpad
Wordpad is a special text editor that is included in the package of standard programs that are installed with the operating system. It contains a minimal set of tools and capabilities, which are quite enough for simple work. The text can be “decorated” by using different fonts, colors, and styles. It’s easy to insert a picture or the desired photo into a Wordpad document. The program works successfully with the following file types: TXT, ODT, RTF.
For those who have previously worked with Word, this word processor may seem very similar. But in reality this is not entirely true. In reality, this is a stripped-down version with minimal functionality and formatting.
Where is it located on a computer with Windows 7 and 10
- The easiest way to open Wordpad is to type its name in the search bar. Then wait until the search is completed and select the desired shortcut by clicking the mouse.
- More difficult (rather requiring more physical movements) is to find the program among the standard ones in the Windows assembly. Click the “Start” button, then “All Programs”, find the “Accessories” shortcut in the list.
Usage
- Typing. To separate words you need to use a “Space”. To install it, press the corresponding key on the keyboard once. Putting several is bad form. To start a word or sentence with a capital letter, press the Shift key and the desired character at the same time. Place commas and other punctuation marks together with the word before it. Separate dashes from words with spaces. To erase a specific character, place the cursor after and press “Backspace” or before and use the “Delete” key.
Divide large parts into paragraphs, which should begin with an indent. You can put it using the “Tab” key. To insert characters from the top numeric keypad, such as an exclamation mark, press "Shift"+"1". For a question mark - “Shift”+”7″. Similarly, you can insert: quotes, percent sign, colon, parentheses and similar symbols. - Formatting. A separate toolbar is provided for these purposes. The user can: highlight all or part of the text in bold, italic, or underline. And also change the color, indents, font, letter size. Insertion of simple and numbered lists is available.
- Preservation. To write a document to a disk or flash drive, go to the “Menu” tab at the top of the program window. Then find and click on “Save”. In the window that appears, you can specify the file name and its type (in 99% of cases it is RTF) to save.
- Printing. In the same list of the “Menu” tab, lower in the list there is a “Print” item. They should be used. Here you have three options to continue working. For more details on what you can do, see the screenshot.
- You can specify which printer to use for output. This is relevant if several printing devices are connected to a computer or laptop at once. This often happens in even medium-sized offices. You can also change the number of copies of one sheet.
- Immediately send text to print without specifying any special settings.
- Preview how your information will be arranged on paper. In order not to spoil the sheets, you can immediately correct the display of text, graphs or pictures, reduce or increase the margins.
Word
Where to download and how to install
If this text editor is not installed, then this should be done, but first you must have a disk with the distribution kit. When there is no such disk, you will have to download the program from the official Microsoft website via the link https://products.office.com/ru-RU/compare-all-microsoft-office-products. Installation is performed by running a file with the extension “exe” or “msi”. As a rule, its name will be “setup” or “install”. Installing Word is no different from other programs. You can use this word processor for free for exactly one month, and then you will be asked to pay for a license.
Launch methods
- You can find the program through the search bar in Start. Click the "Start" button and type "Word" in the search bar.
- View the presence of the icon on the taskbar. To launch the word processor, click on the desired mouse icon.
- Create desktop shortcuts yourself. On an empty area, right-click, select “Create”, and in the list, click on the desired version of the utility if you have several installed at once.
Provide a name for the shortcut and press Enter.
How to type text correctly and format it beautifully
The very basics of working with text are described above in the section on working with WordPad. There you will also find ways to quickly delete certain parts of text or insert punctuation symbols.
The Word program allows you to work more sophisticatedly with text information, so in this section we will pay more attention to this point. The design of both editors is very similar, so once you understand one, you can easily master the technique of working with the other.
Before you start typing the text, you need to come up with and print its title. There are several simple rules for formatting this type of text.
Basic recommendations:
- Select a font right away.
- Place the title in the center of the sheet. This can be done by indenting, dragging the ruler slider, or aligning to the center. The last option will be preferable and faster.
- Start writing with a capital letter or symbol.
- We don’t put a period at the end if it consists of one sentence. If there are several, then we put a period after each sentence except the last one. Punctuation marks are not omitted.
- The text size is an order of magnitude larger than the main one.
- You can also highlight the title in bold.
An easier way to create a title is to use a special panel for such purposes. Type the text, select it with the mouse and click on the desired design in the panel.
If the title is ready, then you can proceed to typing the main text. Proceed like this:
- Press the Enter key. The cursor will now be on a new line.
- Align left with the button on the panel.
- Next you need to make a paragraph. To do this, move the top slider to the right one point.
In the future, by pressing Enter, paragraphs will be created automatically. If there is no ruler, then you need to add it like this. - Start typing. As soon as it is ready, you should align it in width. Select with the mouse and click on the icon in the panel.
Certain blocks of tools are designed for various types of processing in Word.
- In the panel to the left on the “Home” tab there is a block that allows you to: change the font, size of letters, highlight in bold, italics, underline, specify the color of the text or fill of a certain area.
- In the same window on the right there is a block whose tools allow you to align text to the center, sides or width. And also insert a list with and without numbers.
Saving a document
Important advice!
You need to make a save before you start typing, and then only periodically click on the icon with the floppy disk. In a situation with power outages, this will help not to lose all your work.
If the document is typed and ready for printing, then it is better to save it before this, so that in the future you will be able to correct or change something in it. You can make a save to a hard drive (computer hard drive) or removable media.
To disk
In the top main menu of the program, to the left of the “Home” tab, there is a “File” section. Select it with the mouse.
Now in the list of items, find and click on “Save As”. In the new window that appears, enter a title for your text document.
On the left, select the save location. By default, documents will be stored in a folder with the same name. If all settings are completed, click the “Save” button.
To a flash drive
To save to a flash drive or to any other location on the disk other than the standard folder, select it in the list on the left. The flash drive will be designated in the list as “Removable Disk” with the first free letter for identification. Click on the desired disk option and save with the button at the bottom of the window.
Preview
Before printing information, it is recommended to first see how it will look on the sheet. This will prevent you from ruining the paper, which means saving money. For this procedure, we will use the document preview function. To activate it follow these instructions:
- Go to the "File" tab.
- Find the Print shortcut in the list.
If something doesn’t suit you in the current version (for example, all the text is not included on one sheet), then you can immediately change the fields. Use the "Page Options" link at the bottom of the window.
To correct an error in the text, you can return to the “Home” tab again. If everything is satisfactory, then we proceed directly to printing.
Printing a document from Word
In the same window (the “File” tab, the “Print” section), you can immediately click on the printer icon and print the document. There are also the following configuration options:
- Specify the number of copies of the document.
- If necessary, the user must change the desired version of the printing device that he will use.
- Next, the print area is indicated. This could be: a certain selected area from the entire text, specific page numbers of the document, only one current page.
- Two-side print. If the printer supports duplex technology, then you can print text on both sides of a sheet of paper automatically. For such purposes, use the “Double-sided printing” setting.
For printers without duplex it is a little more complicated. Go to the printer properties. О Click "OK". First, the sheets will be printed on one side, and then you need to manually transfer them to the other. The program will notify you when to do this with a notification on the monitor screen.
Another option is to print the even ones first and then the odd ones. - How to print a book or brochure. More difficult, but quite solvable even for inexperienced users, will be printing a brochure. For such purposes, the Word editor provides special tools. At the end of the page, find the “Options” link. In the next window, on the first tab, mark the orientation as “Landscape”, and in the list below select “Brochure”.
The most popular programs for printing text: a large selection of two dozen options.
Special cases of printing: printing pictures and pages from the Internet to the printer
It is often possible not to convert information into a purely text format, but simply print it in the form in which you have it on your PC. Typically, such cases include printing pages from the Internet or using Internet browsers. Let's look at several popular ways to print information.
How to print a document on a printer on both sides
To perform duplex printing on your printer, you can either use Word to make the settings, or you can use the settings in the printer itself. They are set differently in each device model. As an example, we recommend that you watch the introductory video that our experts selected for you.
How to print pictures on a home printer: step-by-step instructions
Pictures or photos are printed on the printer without any special settings. To perform this operation, do the following.
- Open the selected image with two mouse clicks.
- Then, in the viewer tool or graphic editor that opens, click on the “Print” icon (usually located at the top of the window).
- A window for setting up printing photos and images has opened in front of you.
- Make the necessary changes in the wizard, set specific parameters.
- If necessary, select a printer and click on the "Print" button again.
GOOD TO KNOW!
Photo printing must be done with the right choice of photo paper, because how bright and natural the photo will be depends not only on the correct settings, but also on the quality of the media.
How to print an entire page from a website without editing
Outputting information to a printer without additional formatting is one of the simplest options. To print a page from the Internet, you need to right-click directly on the selected information, then select “Print” from the drop-down list.
You, of course, can make it easier: call up the print menu using the keyboard shortcut CTRL+P.
For Internet pages, it is better to use ink sparingly, which means setting the settings to black and white printing.
A settings window opens in front of you, which clearly displays the number of output pages, the printing device used and other parameters that can be edited if necessary.
GOOD TO KNOW!
If you use virtual printer settings in Google Chrome or Yandex, the time for printing output is halved. However, you should understand that the settings will differ depending on the type of browser.
Selecting a printing program
For owners of Windows computers or laptops, it is best to use either Microsoft Word or WordPad. The programs allow you to print text and edit it in any way.
Attention: Word has more advanced functionality. This processor has the maximum tools for editing documents.
The user can launch applications in different ways. If program shortcuts are placed on the desktop, then you only need to double-click on them with the left mouse button. If any processor is attached to the taskbar, then to launch it you need to click on the icon with the left mouse button only once.
In some cases, there will be no Word or WordPad shortcuts on the desktop or taskbar. How then to open programs and print the desired text?
To work with Word, you need to right-click on any free field of the desktop, select the “Create” section in the context menu and specify “Microsoft Word Document” in the pop-up window.
You can quickly open WordPad on a computer or laptop using the following algorithm:
- Click on the search icon on the taskbar.
- Enter WordPad in the line and select the desired action (open, pin to taskbar, etc.).
- You can launch Word in the same way.
In fact, there are quite a lot of options for opening programs. If you have to type text quite often and in the process of work you need to use several editors at once, it is better to immediately put them on the taskbar or create a shortcut on the desktop. Let's look at creating a shortcut using WordPad as an example:
- Go to the search menu on the taskbar.
- In the line we enter WordPad and o.
- In the new window, right-click on the WordPad shortcut and select the “Copy” section from the context menu.
- Right-click on any free field on the desktop and look for the “Paste” option in the context menu.
- A Word shortcut on your desktop can be created in the same way. There are no fundamental differences.
Why the printer does not print: searching for problems with the device
Do you need to urgently print a document from your computer, but the printer does not respond and refuses you or displays information on paper incorrectly? Perhaps the device has run out of paint, or it is completely disconnected from the desktop PC. Let's figure out what the problem is.
- If the device does not print after successful print settings on the PC, and does not give any signals at all, it is most likely due to incorrect settings. Check the reliability of all wired connections, check the software, replace or update drivers.
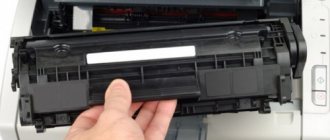
- Lack of ink in cartridges. You can understand this if a message is displayed on the printer or computer screen from the printing program, which clearly indicates that the ink cartridges are low. Refill or replace the cartridges and do a test print to ensure that excess ink remains on the draft.
- There is a problem with the print head or it is dirty. If all the sheets are printed with streaks or the text is not visible at all, and you clearly know that you recently changed the ink in the device, this is usually the reason. You need to go to print settings and clean the print head.
Using Printing Techniques
After opening any of these programs, the user can write the desired text, save the created file or send it to print. There are many options. However, before you type your first document in Word or WordPad, you need to learn the basics of working with these processors. In this case, let's look at:
- typing words, editing them, creating a paragraph;
- placement of punctuation marks;
- working with font.
Of course, the functionality of the presented applications does not end there, but beginners should first master the first stage of working with these programs.
Words that begin sentences or belong to the category of proper names are usually printed with a capital letter. To create upper case, you must simultaneously press the Shift button and the letter itself. After this, you can enter text as you wish.
You can delete a letter or any other character in the text using two keys. They are called Delete and Backspace:
- Clicking the Delete button deletes the character located after the cursor.
- Pressing the Backspace button deletes the character located before the cursor.
Using these keys you can delete words and entire paragraphs. Moreover, doing this is no more difficult than learning to copy and paste using the keyboard. You need to select any text element and simply click on the corresponding button.
You should not type continuous text on a computer or laptop. Sentences must be combined into meaningful paragraphs and separated from each other. To create a new paragraph, press the Enter button.
Learning to use punctuation on the keyboard is also quite easy. Even beginners will not have any difficulties:
- You can write an exclamation mark in the text by simultaneously pressing the Shift and 1 buttons.
- To type a question mark in a document, you need to press Shift and the 7 button at the same time.
- If you need to type a colon, press Shift and the 6 button at the same time.
- You can add a semicolon if you press Shift and the 4 button at the same time.
- To put a simple point, you need to press the corresponding key (located next to the letter “U”).
- If you need to type a comma, press Shift and the period button.
- To open brackets, press Shift and the 9 key, and to close them, press Shift and the 0 key.
- Quotes are placed by simultaneously pressing Shift and button 2.
- If you need to put a dash in the text, you need to click on the corresponding button.
As you can see, learning to type punctuation marks on a computer is not difficult. In most cases, to set the desired symbol, you need to press Shift (this key is also called a modifier) and another button on which the corresponding symbol is applied.
Attention: for convenience, the methods of setting symbols are shown on the virtual keyboard. It is practically no different from the physical prototype. The virtual keyboard does not only have function buttons and a key to turn off the computer or laptop.
If necessary, you can edit the style. Moreover, there are as many options for changing the font in Word as in WordPad. In this case, the programs do not differ from each other. All changes can be made on the “Font” tab, located in the “Home” section.
To edit, you must first select a fragment in the text and click on the corresponding button. At his discretion, the user can change the color of the letters.
Or make the font bold, italic, underlined, or strikethrough.
If you want to make the selection more obvious, you can change the text fill.
After this editing option, the highlighted words or sentences will look as if they were underlined with a felt-tip pen. If necessary, you can change the size of the letters. To do this, click on the appropriate button and select the appropriate option.
Solving problems using the example of the Epson Stylus TX210/219 printer
Let's start with the simplest thing - checking drivers.
| Illustration | Description of action |
| We go to Device Manager on your computer, find the “Printers” item, open the device that is displayed there. | |
| In the window that opens there should be an entry “The device is working normally” if there are no problems with the software. If you see a yellow triangle with an exclamation point, try updating your current driver. |
Let's move on. Let's start cleaning the print head. Here you need to use the software that is installed on your PC when you connect the printer.
| Illustration | Description of action |
| We go into our printer via PC. We move to the “Printer Settings Wizard” and go to the “Service” tab. Here we press the “Print head cleaning” button and follow the instructions in the software. |
Replacing ink if there is insufficient ink for color or black and white printing is also done through the settings window.
| Illustration | Description of action |
| Go to the settings window again, where we click the “Replace ink cartridges” button. | |
| A window opens in front of you, in which you must follow the instructions to open the compartment with installed cartridges. After replacing them, be sure to click the “Finish” button to install the resource in its place. |
In addition, the problem of malfunction of any printer model can be caused by the hardware of the device. It is not recommended to disassemble the device yourself unless you are a master in this matter. There are many small parts inside the printing equipment that require delicate work, so it is better to entrust the matter to specialists.
Dear readers, leave your questions in the comments below the article. Our team is happy to receive feedback, so we will answer you as soon as possible and advise you on any thematic issue.
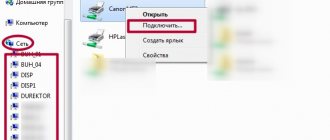
Connecting a printer
Regardless of the model of the connected printer and its set of functions, the connection principle will be the same for wired devices.
- Turn on your computer or laptop.
- Connect the wires from the printer to the appropriate connectors. It is important that the device is turned off when connecting to the computer, otherwise incorrect operation may occur in the future.
Connecting the printer to your computer
- Connect the printer to a power outlet.
- Press the power button directly on the device itself.
Preparing a sample photo
The photo is most likely large in size and now needs to be cropped. However, there are certain requirements for documents. To avoid searching and calculating anything for a long time, use the website https://photodocs.ru/.
- The service of this site is paid, but only if you order the photo to be sent to your mailbox, and this is not necessary.
. - At first
, for example, you need a 3x4 color photograph. - Download
. - Enter your address and click
. - In the next window on the right, we can look at the documents and, if necessary, take a photo again and change the file ().
, but it can be edited by moving the markers.- Place the markers like this: the top red one at the level of the top of the head,
- yellow - on the pupils,
- lower red - under the chin,
- green - in the middle of the bridge of the nose.
, then another photo is needed, in this one the distance from the top and bottom of the face to the edge is too small.
. There is no need to go anywhere else on this site. Zoom in using the keys
for better visibility. The main thing is to leave the tab open for the sample.
Features of the print dialog in Word and Excel
In the new Microsoft Office, the print dialog does not open in a separate window, but occupies the entire area of the main program window. A preview function is also available, allowing you to see exactly how the document will look based on the settings of the selected printer.
It is worth noting that the preview function is not available in every program that has a document printing function. Preview is, so to speak, a pleasant bonus from the creators of the program.
I would especially like to note the setting of document margins when printing. Often, some users, in order to fit more information on one printed sheet, set the margins too narrow or even set them to zero, i.e. Print without borders. You shouldn't do this, since most printers, both laser and inkjet, have a limit on the minimum margin size. If you set the margins in the document too small, then part of the document will simply be cut off when printing, that is, it will not be printed at all. And in the case of an inkjet printer, ink will also fly past the sheet, which contaminates the printer.
Be careful when setting print margins in your document: do not make the margins too narrow!
Margins of 1 - 1.5 cm are quite suitable. You can also set 0.5 cm - most printers print them normally, despite Word or Excel warnings about too narrow margins. The minimum margin size can be found in the documentation for your printer or found out experimentally.
How to print from a smartphone
Working with browsers indirectly affects the problem of printing from a phone. More precisely, there is no problem with this - today a large number of services have appeared that will help you send the necessary information to the printer directly online.
If the printer does not have Bluetooth or Wi- Fi technology, registration with Google Cloud Print is required . This service technology will allow you to carry out your plans from anywhere on the planet with an Internet connection. The service allows you to work with almost all printing devices currently produced, but this connection works best with Cloud Ready devices. But even the simplest printer can be fully connected to this “cloud” printer:
- launch Google Chrome browser;
- select the advanced option in the settings menu;
- at the bottom you need to find “add a printer”;
- then you should log in with your Google account;
- All that remains is to “add a printer” once again, after which the user will confirm registration.
It is important to understand: for this to happen, the equipment must be connected to a device with an Internet connection.
You need to do the following on your phone.
- Download Cloud Print to your smartphone. Connect to it through your account.
- Select a file.
- Select your printer again in the new screen.
- Conduct settings.
- Click on “paper plane” - the information will be printed.
How to connect a printer to a laptop.
How to connect a printer to a laptop is a question that arises immediately after you decide to print a document - a receipt, a letter or even a book. By following a certain sequence of actions, you can ensure reliable operation of the connected device and the system as a whole. So, how to connect a printer to a laptop, make basic settings and print a document?
Let's assume that since we asked this question, we already have a printer. As for typing text on a computer, you may find the article How to Type Text on a Computer useful.
Driver.
It is not enough to connect the wires in a certain sequence. Your computer may simply not “see” the connected device. Especially if the printer model is much “younger” than the operating system installed on the computer. Typically, a CD is included with the printer. This disk contains an auxiliary program - a driver, which will help the printer and computer “get to know each other better.”
So, open the drive, insert the above disk and follow the system prompts, confirming all the points that require it. Once the installation is complete, the system will inform you that the driver is installed, i.e. she is ready to “adequately perceive” the new device.
In rare cases, the disk with the required driver is not included. There is no disk, but there is a way out of the situation. We go to the website of the manufacturer of this printer and download the driver from there.
How to connect a printer.
It is necessary to pay attention to the following important point - the devices that you are going to connect to the laptop must be TURNED OFF. Thus, first of all, you need to connect the printer and laptop, and only after that you can connect the printer to the network. This way, you will eliminate possible malfunctions in the operation of both devices (different printer models may have different problems). Most likely, the connection to the laptop will be via the USB-2 port. The laptop has several of them, so think in advance about where to put the printer, which ports on the laptop to connect to, so that the connected devices (modem, printer, flash drive, for example) do not interfere with each other. For convenience, you can purchase a USB splitter.
So, for example, consider connecting a Windows 7 laptop to a black and white Samsung printer. All cables and connectors are connected in the correct sequence and the printer power button is pressed. The system will notify you that the device is connected with a characteristic sound and, most likely, will inform you in the system window about the use of the driver. In any case, you can find out if your laptop has detected a printer as follows:
- go to the Start Menu (Start button on the left of the Taskbar or the Windows key on the keyboard);
- select Devices and Printers;
If the connection is successful, in the window that opens we will find a picture icon of our printer.
Printing the document. Basic settings.
Open the page you want to print.
There are several ways to print a document:
- use the keyboard and press Ctrl+P;
This method works in all cases: both when printing a document typed in any of the editors, and when printing the necessary page of a useful website.
- You can print using the interface capabilities of programs that display text.
That is, if you are viewing a document in the Microsoft Office Word editor, no matter which tab you are in (Home, Insert, Links, etc.), the printer icon and the Office button are displayed in the top left row with icons. To enter the print settings menu, you need to click on one of these buttons.
If your file is displayed in Notepad, click on the File button and select Print.
Our final goal in all of these cases is the print settings window.
In this window you can set the very convenient function of printing only even or only odd pages. This is necessary when you need to print a multi-page file (a book, for example). By default, the Enable line is set to All pages in the range. To change this value, click on the arrow located to the right of the line and select the desired option in the menu that opens. If you need to print only one of a large number of pages, open this page and place the pointer to Current.
The next step is to click on the Properties button.
In the Properties window, in the Basic tab, we can define the page orientation. The default is Portrait, i.e. vertical page orientation. If we need the image (text) to be positioned horizontally (as in an album), check Landscape.
Go to the Graphics tab.
Here you can enable the printer operating mode to save toner (dye powder). By default, toner consumption is controlled by the printer. By turning on the economy mode, we will refill the cartridge less often. For comparison, you can try printing in both options and choose the optimal one.
Don't forget to confirm your settings with OK or Apply and OK and click Print.
That's all for today.
Now we know how to connect a printer to a laptop, and in the next article we will discuss shutting down a program (in general cases) and how to close a frozen program using the Task Manager.
Waiting for your comments.
komponauka.ru
How to do without a driver disk?
If you have a modern printer model and a USB cable, connect it to the printing device and computer. Turn on both devices and connect them to the Internet. The drivers should download automatically.
If there is no USB cable or the driver cannot be loaded automatically, use the capabilities of the operating system. Through “Start” go to “Settings”. Select "Devices", and then select the line "Printers and scanners". Go to the “Add a printer or scanner” line. Click on the line with your device type and follow the prompts to install the drivers.
The program allows you to use only basic printer functions. To use all its capabilities, install drivers for the specific model and brand of printing device.
To download drivers for a specific printer and install them manually, you need to find out the model number. Look for this information on the front panel of the device.
Enter the name of your device and the phrase “download drivers” into the search bar of your browser. It is best to download from the official website of the manufacturer. Launch the drivers, install them following the program prompts.
Installing drivers
When you connect new equipment to a PC or laptop, the system begins scanning and searching for the necessary drivers. Windows will likely find the right software for your printer, but it's still best to install drivers specific to your specific model. They come on a disk along with the device, and can also be found and downloaded on the manufacturer’s website. Let's look at installing drivers from disk:
- When you turn on the disk, as a rule, the Installation Wizard should start.
- If the launch does not happen, you can call it manually, to do this, go to the My Computer folder and find the name of the drive there, click on it and in the pop-up menu click Open, run the boot file with the extension
- The Installation Wizard will launch, which will carry out the standard procedure for installing drivers; only minimal participation is required here.
HP Printer Installation Wizard
How to print a photo or picture
Images are output from the computer according to a slightly different principle. First of all, this concerns the purchase of special photo paper. It can be glossy or matte - the main thing is that the quality will differ from the result obtained on plain paper.
Once you select an image, you can start printing it.
- Right-click on the image and select “Print”. Following this action, the Print Wizard will open.
- The further sequence is: “Next” - “Print settings” - “Media” - “Photo paper” (here we set “Best quality”) - “Next”.
- It is worth paying attention to the menu on the right: it indicates the size of the photo that will be printed. The menu must include visual examples.
- If after this the user is satisfied with everything in the preview, then all that remains is to click “Next” one last time to print the photo or picture.
Printing a document
Printing a document on a PC or laptop is quite easy. It will not be difficult to print the text from your computer to a printer. All work in this case takes place in several stages:
- We are looking for the “Preview” button.
- If you are completely satisfied with the current version of the document, click on “Print”.
- After this, select the printer, specify the remaining required parameters and confirm the action.
Even choosing the right laptop is more difficult than sending a document written in Word or WordPad for printing. Even a beginner can quickly learn this.