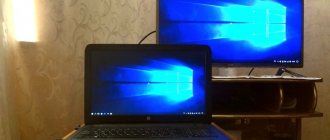
The vast majority of modern TVs have USB and HDMI ports that allow you to play media content on them. But sometimes this is not enough, and you need to connect directly to the computer for direct access to the multimedia library, or to duplicate the screen, for example, to display YouTube without connecting the TV to the Internet. There are a lot of ways to connect a TV to a computer, and the article will list the most common ones.
What do you need to connect your PC to a wireless network?
The TV can be connected to the computer either directly or through a router. In both cases, the TV must support wireless connectivity. New smart TV devices are equipped with Wi-Fi adapters (such as LG Smart TV, Samsung, Philips, etc.); for older TVs, you need to purchase additional external modules. External adapters may not be compatible with a specific TV; this needs to be clarified further. It is recommended to buy a module from the same manufacturer as the TV itself.
Before turning on an image from a computer to a TV, the computer must either be connected to the router via cable or have a wi-fi module. It is present in laptops by default; you can buy it for a desktop PC. There are 2 types of adapters: an external USB module (similar to an ordinary flash drive) or a hardware one, inserted into the PCI slot inside the system unit.
USB WiFi adapter
PCI WiFi adapter
Additionally, it is worth clarifying what standard the WiFi modules can operate on.
The most optimal is IEEE 802.11n. It allows you to use your TV as a monitor without any freezes or delays. Useful: 12 ways to connect a Samsung TV to a phone
It wouldn’t hurt to update all drivers on your PC related to the Internet connection (Wi-Fi adapter, network card) before connecting the TV and computer.
Using Wi-Fi adapters
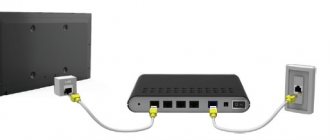
To connect your laptop to your TV via Wi-Fi, you may need an adapter. This is relevant for those who do not have a smart TV. Modern routers perform various functions: they amplify the signal, are used as an access point, or a wireless bridge. To connect you need:
- buy a router, you can use inexpensive Tonolink or Netis;
- configure as an adapter, i.e. it receives a signal from the main router and transmits it to the TV panel via cable;
- configure the reception of your home network in the TV device menu.
Such an adapter is cheaper to buy than a branded Wi-Fi module, and it can be found in almost any store.
But for those who prefer proven official products, special adapters are provided:
- Google Chromecast;
- Android Mini PC;
- Intel Compute Stick.
Google Chromecast
One of the most popular Google Chromecast adapters, which allows you to broadcast images from a computer to TV. To configure you need to do:
- Connect the device to the TV panel and outlet.
- Install Google Home on your TV with Android software.
- Connect all equipment to one Wi-Fi network.
- Open Google Home and click “Settings”, then register your account, to which Chromecast will then connect.
- Start searching for devices that are nearby.
- Having found the TV, click “Next”.
- Set up a connection to a Wi-Fi network. You may need to enter a password.
- Start the video for transmission.
Now it’s clear how to display video from a computer to a TV.
Android Mini PC
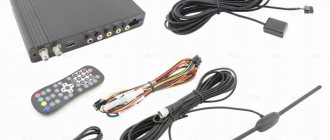
To create a wireless connection from your laptop to your TV, you will need an Android Mini PC adapter, which is an excellent alternative to Google Chromecast. The gadget connects to the TV via an HDMI or USB port. The gadget looks like a small flash drive, but allows you to turn a simple TV receiver into a Smart TV. You can view images from your computer on your TV, play games and applications, listen to music and read books.
Intel Compute Stick
A small but powerful tool for turning your TV panel into a mini computer. It has the Windows 8.1 operating system and a quad-core Atom processor. Contains 2 GB of RAM and 32 GB of internal memory. There is even an antivirus to protect against malware. All you need to do is connect it to your TV panel. For the convenience of Internet surfing, you can additionally connect a mouse and keyboard. Synchronization with TV occurs in a matter of seconds.
How do I know if my TV supports Wi-Fi?
Before you connect your TV to your computer via WiFi, you should make sure whether your TV supports this feature. The necessary conditions that make it possible to connect a TV to a computer are as follows:
- Smart TV technology support. These TVs are equipped with a wireless network module by default.
- If there is no smart TV technology, the TV must have at least a USB or HDMI connector that allows you to connect an external wireless network module. You need to choose it carefully, depending on the company that produced the TV.
- Also, to synchronize the image on the screen with a computer, you can use a smart set-top box instead of a Wi-Fi module. It will allow you to use Smart-TV technologies on a TV whose manufacturer does not include this function by default.
If you don't know whether your TV supports the Smart-TV function, you need to do the following:
- Read the device specifications, usually found on the box or in the instructions.
- The remote control must have a button that controls smart functions.
- You can also find the TV model on the Internet and read about the presence or absence of Smart-TV in it.
What devices are needed for connection?
Depending on the TV model and the presence of a built-in Wi-Fi module, the list of devices for connecting a computer to the TV expands significantly.
- Standard Wi-Fi router. Connecting via a router is the easiest and most convenient way to connect.
- Wi-Fi repeater. This device will be a great help for TVs without a Wi-Fi module.
- Google Chromecast. A device designed specifically for relaying to a TV.
What can be used as an access point
When connecting wirelessly, you can use a router as an access point (if there are capabilities built into it from the manufacturer), under certain conditions you can use a laptop, computer or even a smartphone. But there are also devices specially made for this.
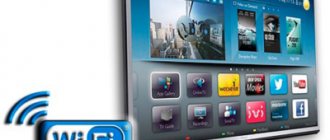
How to broadcast an image via WIDI and Miracast
Miracast makes it possible to transfer an image from a computer to a TV via WiFi, i.e. use it as a full-fledged monitor, without any cables. This connection is made via Wi-Fi Direct, without the need for a router. WIDI in general is not much different from Miracast, and they are even compatible with each other.
For a PC with Windows 10 and a wireless network module, this broadcast is quite easy to set up. It is important that Vidi or Miracast is supported by the TV. For outdated devices you will have to purchase additional adapters. The setup is as follows:
1. Turn on the TV, open the settings using the remote control, activate the corresponding function (WIDI Miracast). In most cases, you can skip this step, since it should be activated by default, but it is better to double check. Below are the LG TV settings
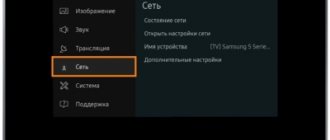
In Samsung devices, the item that allows you to use the TV as a monitor is called “Screen Mirroring”. It is located in the "Network" submenu.
2. Now let's move on to setting up the computer. When working with WIDI technology, you will need the Wireless display program. Open the program, find the “wireless monitor” item. You may have to enter a code that will be shown on the TV screen. Vidi is the most convenient way to configure image projection from a computer with Intel HD Graphics and a processor of the same name, even the installed OS does not matter.
The absence of Miracast or WIDI items in the TV menu indicates that there is no support for this technology.
3.To display an image via Miracast, you need to open the tray on the desktop, click on “Devices”, then “Projector”. In the window that opens, you can add a wireless screen. If there is no such item, then the PC does not support this technology. This can be fixed by updating the wireless module software. After this, you can duplicate the image of the PC screen on TV.
Despite the recommendation for use on computers with an Intel WIDI chipset, video card and network card, Intel can also support Miracast technology.
Benefits of wireless connection
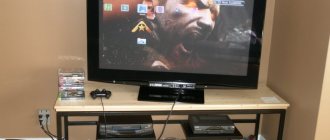
On a plasma TV screen it is more comfortable to watch interesting movies and photographs stored on your hard drive, as well as play games and simply surf the Internet.
Wireless connectivity has clear advantages in terms of:
- aesthetics - the absence of unnecessary cables in the room is more pleasing to the eye;
- mobility - the laptop can be placed in absolutely any convenient place, there is no need to move it as close to the TV as possible;
- safety - no risk of accidental damage or tearing of the cable;
- financial savings - there is no need to buy a cable if it is not available.
Wirelessly connecting a laptop to a TV
Connection using DLNA technology
Before you connect your computer to the TV via a router, you need to make sure that the TV supports Wi-Fi technology. For example, not all Sony Bravia models support it. Most new models are equipped with appropriate modules, but for older ones you need to purchase special adapters separately. DNLA technology allows you to create a home network and connect phones, TVs, computers, tablets, etc. to it.
Important! The device must support the DNLA set of standards. Information about this can be found in its characteristics. Any Smart TV supports this protocol.
First you need to configure the router:
- Turn it on, activate DHCP mode. Access to the local network should only be with a password, so you need to set it.
- Next, turn on the TV and go to the main menu. It should have a section related to the network (for example, in Sony Bravia it is called “Network”), open the network settings.
- In the settings there will be a line “Wireless connection”; when you click on it, a list of available networks will open; you need to select yours. Enter the password you set.
If the router supports WPS technology, then it will be much easier to organize a connection to transfer images from a computer to a TV. To put the router into WPS/PBC mode, press and hold the corresponding button on the back of the device.
- After the TV is successfully connected to the network, all that remains is to configure its connection with the computer. To do this, you need to organize a Media server on your PC. You need to collect all the multimedia files (movies, photos, music, videos) that you want to share and transfer them to one or more directories.
- The final step is to open extended access to folders for all members of the home network (including TV). There are a number of utilities that provide this opportunity: Smart Share, Share Manager, PlexMediaServer. For a Samsung Smart TV, for example, it is better to download the proprietary Samsung Share Manager program.
- The connection setup is complete. After launching the utility and organizing access to folders, you can open media files on the TV.
Methods for connecting a laptop to a TV via Wi-Fi to transfer images
To connect to your TV via Wi-Fi, you will need to check whether there is a module for receiving the signal. If you bought a TV panel with a Smart function, then, of course, there is one. For the rest, you need to check whether you can connect to WI-FI. You can transfer an image in several ways:
- using DLNA;
- using Intel's WiDi software.
Using DLNA
A home DLNA server provides the ability to access movies, clips and other content from various devices, in our case a TV. To do this, you will need to connect all the devices that you plan to use to your home network, and it doesn’t matter whether it is done wired or wireless. But now we will look at connecting a laptop to a TV via Wi-Fi. Then you need to open access to the folders where the files are located. To do this, follow these steps:
- in the directory properties there is an “Access” tab, go to it;
- click “Advanced settings”;
- o and click “Ok”.
You can also synchronize your laptop and TV panel using Explorer:
- Click on the “Network” menu item.
- A window with the message “Network discovery” will appear, you need to click on it.
- To make the settings correctly, follow the assistant's recommendations.
- On the TV panel you need to check the availability of external connections. To do this, turn on the TV device and select a laptop from the proposed signal sources.
- After you have managed to activate DLNA and synchronize the two devices, right-click on the file and select “Play to” from the menu and then select the TV model.
Remember that modern TV panels do not support the .mkv format, so the broadcast will not start.
Intel's WiDi program
To create synchronization via DLNA between your computer and TV, you will need to allow access to the folders in which the content is stored. But the WiDi function works much simpler - it provides the ability to duplicate the laptop screen onto a TV panel using a local network connection.
However, for synchronization to be successful, the laptop must be equipped with an Intel processor, a discrete graphics card and an adapter for connecting to a Wi-Fi network. It should be noted that most modern laptop models from Samsung connect to TV devices precisely through this function. Before you start setting up, you will need to download and install the driver for wireless broadcasting. You can find them on free resources or on the official Intel website. The only thing that can become an obstacle is that not all modern TV panel models support the WIDI function, so you will have to buy an adapter.
To configure correctly, you must:
- Press the main menu button of the TV device.
- Go to the “Network” section.
- Select the “Miracast/Intel`s WiDi” function from the list.
- On your laptop, go to the Intel Wireless Display program, which is designed to synchronize with TV.
- Select the TV model from the devices that appear on the screen.
- If it requires you to enter a password, then it is mainly the numbers 1111 or 0000.
- To complete the setup, go to the Gharms section on your laptop and select “Devices” and then “Projector”, where you indicate that the broadcast should be carried out to your TV model. If your model is not highlighted in the list, then you need to update the Wi-Fi driver.
How to stream video from your computer to your TV using Chromecast from Google?
Chromecast is an adapter that connects to a TV via an HDMI port and makes it possible to broadcast video and audio from a PC, as well as from mobile devices. This module is capable of displaying Google Chrome content on the TV. The ability to display the entire desktop is still at the experimental stage, although it can already be fully used.
To send a video display to your TV, you must first buy a Chromecast device, then:
- We place the device in the corresponding connector on the TV (for example, on Philips TVs it is located on the side).
- Download and install the extension of the same name for the Google Chrome browser.
- Click on the extension, click on the drop-down line “cast entire screen”. Now Chromecast will duplicate the entire desktop onto the TV screen.
Chromecast plugin
Since the function is still experimental, it is not always possible to transfer the desktop image to the TV screen.
Connection via HDMI
Connecting to a TV via an HDMI cable is the easiest and most convenient way. The vast majority of TVs are equipped with a connector for an HDMI cable. The main snag is the presence of the wire itself, which, unfortunately, does not come as standard to either the TV or the laptop.
Fortunately, HDMI cable is a fairly common product, and you can see a huge number of varieties in your first electronics store. The cost of the simplest cord is low, only 150 rubles. Moreover, this device is universal and suitable for absolutely any equipment.
The main advantage of the HDMI connection method is not only due to the simplicity of the process. This method also allows you to transfer the image to the TV screen in its maximum resolution, so projecting video onto the screen in this way is not only simple, but also pleasant, as you will get real pleasure from watching it.
What advantages does this method have?
- Every laptop and every TV has an HDMI connector.
- Connection is as simple as possible.
- The cable is absolutely available for everyone to purchase.
- You won’t have a question about how to connect sound, because the cord transmits it too.
- You can view files in Full HD resolution.
There is only one drawback of this method. Very often the cord spoils the aesthetic appearance, but there is no escape from this.
So, find the HDMI cable connector on the back of the TV. If it suddenly happens that there is no such connector (this only happens if you are trying to use very old equipment), you will have to purchase an additional adapter.
On the other hand, the cable is inserted into a special connector on the laptop.
Next you need to configure the connection correctly. You must connect via a laptop. To do this, select the “screen resolution” context menu button by simply clicking on the desktop. Open a special window in which you need to select the method of using an additional monitor in the form of a TV that is acceptable to you. Several options will appear in front of you.
- For example, use two screens at once as the only space.
- The TV will serve as a second monitor, which means you can work and watch a movie at the same time.
- You will be asked to clone or duplicate the picture, which means that on the TV screen you will get exactly the same image as on the monitor screen.
- Also, your laptop may offer additional options.
Select the resolution that will be displayed on the screen. Maximum 1920 by 1080 pixels
Setting up the TV is also carried out according to a certain algorithm. You need to open the software menu and check the box next to the required signal source. You need to select the HDMI connector that your cable was connected to. At this point, the preparatory steps are completed and you can enjoy watching TV.
How to connect a regular TV to a laptop via WiFi
Setting up image output from a laptop is much easier than from a desktop computer. Its wireless network module can be used as an access point to which the TV can directly connect. The easiest way is to use the command line:
1. Through the search in the Start menu, look for and open Command Prompt. (You can also press the Win+R key combination and type cmd ).
2. In the window that appears, write the following: “ netsh wlan set hostednetwork mode=allow ssid=My_virtual_WiFi key=12345678 keyUsage=persistent ” and press the Enter key.
3. Then enter the following command - “ netsh wlan start hostednetwork ”.
This command will enable the access point. 4. Now the TV can be connected to the laptop. You need to open the TV menu, find the “Wireless networks” item and select the one you need. Then, using the Smart Share, Share Manager, PlexMediaServer programs, set up a media server and share those files that the TV should have access to.
If the TV supports Wi-Fi Direct, then you can do without using third-party programs. Just create a folder, place files there and set up sharing by clicking on its properties and selecting “Sharing” in the “Access” tab.
What you need to connect your laptop to TV via Wi-Fi
Network transmission capabilities
There are many models of laptops and TVs. Not every technology can communicate with each other wirelessly. It is recommended that you review all the features and functions of your devices before purchasing to ensure they are optimal.
To communicate via a wireless network, the functions of both devices must indicate that they have Wi-Fi. Almost every modern model has this option, but equipment older than 3 years was not always equipped with Wi-Fi modules.
Apart from a wireless network, two modern devices do not need anything else. Previously, to connect, you had to buy a special wire to fit the USB port. More advanced models are currently being produced.
Many people believe that connecting devices to each other is not always necessary. For example, there is a Smart TV application, thanks to which you can watch videos or programs. But not all films can be watched through it. Therefore, sometimes it is easier to connect a computer.
For reference! If the TV model is old, it is possible to organize the reception of a Wi-Fi signal using a special device - a wireless network adapter.
Setting up via Windows Media Player
Windows Media is a program for watching movies, playing audio and video. After using one of the above methods, the TV has been connected to the same network with the computer (via a router) or to the computer itself (to a laptop, via an access point), you can configure access to content via the network using Windows Media Player. The player also allows you to transfer video from a computer to a TV via a PC. The procedure is as follows:
1. Open the player (for example, through the search near the Start menu).
2. We find the library in the window, click on the “Stream” button and turn on multimedia streaming (this is the transmission of video, audio, etc.). The action must be confirmed.
3. A list with devices connected to the created network will open. In the screenshot, the TV is outlined in a rectangle. Now you can send video or audio to it. If necessary, the name of the shared directory can be changed.
4. Next, go back to the player and share content for your home network. In the side menu there is a line “Music”, click on it and click on the line that appears “Manage music library”.
5. Click on the “Add” button on the right (if there are third-party folders, you can delete them by selecting them and clicking “Delete”).
6. A window will appear asking you to select a directory, look for the one you need and add it, then confirm the action.
7. The library will be updated and can be viewed in the player itself.
8. Now you can stream video or audio by simply right-clicking on it and selecting TV in the “Play to” line.
9. You can also open multimedia files on the TV itself, instead of playing video files on the TV display via a PC. Just find the signal source selection on the TV (using the corresponding button on the remote control) and click on the desired network. A directory with shared files will be displayed, any of which can be played.