Analysis of the Zanussi front washing machine
Typically, the body of washing machines consists of a top cover, a front, a back and two side panels. Sometimes there is a bottom pan. Zanussi's technique is slightly different - instead of four panels, the body is divided into two halves, connecting at the sides of the washing machine.
To disassemble the equipment, you need to perform the following steps:
- Unscrew the screws, move it back a little and lift the top cover.
- Under the cover in the middle there is a metal plate, along its edges there is a fastener that holds the front and back panels. You need to unscrew it.
- There are plastic plugs on the sides of the machine at the panel joints. They need to be pryed and pulled out. There are screws underneath that will need to be removed.
- On some models, two more screws are located on the bottom of the back of the washing machine. They also need to be removed.
- Now both halves are fixed only with a plastic holder. To remove it, you need to carefully press the latches. Sometimes it may consist of two halves connected by a screw. Unscrew the fasteners, press the latches, after which the holder rises up and moves to the side.
- Now you can move and remove the back half of the case.
Partial disassembly of the washing machine has been completed. Now the owner of the device has access to the motor, pump, heating element, belt and many other components for repair or replacement.
In some cases, for example, to replace a bearing, it is necessary to completely disassemble the Zanussi washing machine.
- First you need to disconnect the wiring from the heating element and motor, pressure switches and pump, and water inlet valve. It is recommended that the wires be marked or photographed before disconnecting. If errors in its connection are made during assembly, this can lead to serious consequences.
- Remove and pull out the temperature sensor.
- Unscrew the upper counterweight.
- Rotate the pulley and remove the drive belt.
- Unclench the clamps and disconnect the pipes.
- Unscrew the fasteners holding the motor.
- Lightly tap the pulley to move and remove the engine.
- Unscrew the nut between the contacts of the heating element, carefully so as not to break the contacts, and pull out the heating element.
- Unscrew the tank struts.
- Disconnect and remove the pressure switch, loosen the clamps, release the fill pipes and pull them out along with the water fill valve.
- Unscrew the drain pump, disconnect the hose from it and move it aside.
- Disconnect the pipe at the top of the tank.
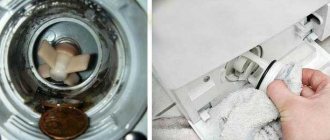
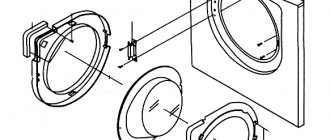
- Open the hatch, pull the cuff back and pull it towards you. Use a screwdriver to pry up the clamp, find and release the latch, and remove the clamp.
- Pull the upper part of the cuff, find the watering pipe, loosen the clamps, then disconnect the part.
- Unscrew the interference filter.
- Unscrew the two screws, stick your hand inside the tank and pull out the hatch locking device.
- Close the hatch, unscrew the fasteners, remove the hatch.
- Pull out the detergent cuvette, unscrew the fasteners under it and on top that hold the control panel. Release the latches, disconnect the wires, remove and put it away.
- Remove the tank from the springs and pull it out of the housing.
- Disconnect the counterweight.
- Place the water tank with the hatch down, block the pulley, and unscrew the bolt. If it does not budge, lubricate it with WD-40, wait a while, and then try again.
- Grasp the pulley with both hands and, swinging it to the sides, separate it.
- If the tank is collapsible, unscrew all the screws and remove the top part.
- If it is non-separable, select the screws with which it will be connected during assembly and drill holes for them along the seam of the tank. Next, saw the tank along the seam.
- In place of the screw that held the pulley, screw in a similar old screw and knock out the shaft with hammer blows at a right angle.
- You can then remove the drum from the bottom of the tank.
Now you can disassemble the drum, replace the bearings, inspect and clean the shaft and cross, and perform other work. Complete disassembly of the washing machine has been completed.
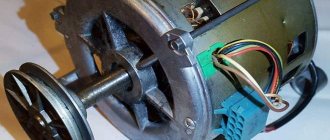
Tips: how to disassemble the motor from a washing machine
The “heart” of any mechanism is its motor, and if it malfunctions, then uninterrupted operation of the device is almost impossible. The same is true with washing machines. The motor is responsible for rotating the drum, rinsing and spinning. It can be removed and disassembled quite simply and this will not be a problem for those who have minimal knowledge of how household appliances work.
There are two types of motors for washing machines:
- Collector;
- Asynchronous with one phase.
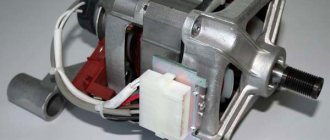
Before you begin the analysis, you should understand what type is present in this machine. Let's say this is a collector. To remove it, you need to remove the back cover and disconnect the straps. Then unscrew the bolts holding it.
The motor is very easy to remove from the washing machine.
You must remember to remove the electrical terminals from the motor to disconnect the motor from power.
If the engine is clamped by the tank, then the latter needs to be lifted slightly, which will allow you to easily reach the engine. If the back cover does not allow access to the motor, you can remove one of the sides.
Dismantling the Zanussi vertical washing machine
The disassembly process for vertical washing machines manufactured by Zanussi is a little simpler. So, to replace the bearings there is no need to disassemble the tank. Procedure:
- Pry up the sides of the control panel and release the latches.
- Pull up and then move back a little, tilt, disconnect the wiring, remove the panel.
- There is a guide at the top of the panel, and a special groove on the side, which can be used to fix the panel.
Now the user has access to the pressure switch, control board, water inlet valve and interference filter.
To get to the remaining nodes, you need to:
- Unscrew the fasteners from the back of the machine, slide the side panels back, remove and put away.
- Remove the fasteners holding the front wall and remove it.
- To remove the base panel, you need to pry it from above with a screwdriver and press the latches. This will give you access to the drain filter.
- Now the user has access to all important components of the vertical washing machine.
Guide: how to remove the control panel on a washing machine
When it becomes necessary to repair a washing machine, you have to disassemble it. But this does not always require dismantling everything completely.
To remove the control panel you must perform the following steps:
- First, remove the bottom panel, which is attached to the latches - you just need to pull it towards you, and if that doesn’t work, bend the latches with a screwdriver;
- Then you can proceed to the top panel - first remove the powder tray - to do this, you need to press on the marked area in the middle of the tray, and then unscrew all the screws that secure this tray to the panel;
- After this, all that remains is to unscrew the screws holding the panel and pull it towards you.
Removing the control panel on a washing machine is quite simple.
You can leave the socket hanging on the wires, but this is undesirable, so it is better to carefully place it on the top of the washing machine or completely disconnect all the wires.
Recommendations for replacing parts and assembling a Zanussi washing machine
After repair, reassemble the Zanussi washing machine in the reverse order. If photographs were taken during the work, it is recommended to check them, especially when connecting wiring, in order to avoid mistakes.
If the tank was disassembled, then during reassembly the joints of both halves should be carefully coated with silicone sealant that can withstand aggressive environments and high temperatures. After assembly, the machine should sit for the amount of time recommended by the sealant manufacturer to allow it to dry completely.
In addition to replacing the main part, you need to carry out preventive maintenance on other components of the washing machine: descale the heating element, tank, inspect and clean the shaft and cross, etc.
After the machine has stood for the time required for the sealant to harden, it should be connected to the communications and a test wash should be performed, adding a small amount of powder. If during the execution of the program there are no water leaks under the washing machine, the equipment behaves correctly, there are no signs of malfunction, this indicates that disassembling and repairing the device was successful.
Common problems
One thing is certain: all problems in the operation of the machine are most often associated with the negligence of the owner. This may be an ignored instruction or incorrect installation. Housewives often overload or underload the drum, creating imbalances.
Even more cases of breakdowns are associated with improper operation and foreign objects entering the working paths of the device. There are also options when repairs are made due to wear and tear of system components.
Blockage
Clogging is a problem for all Zanussi cars without exception. This can be either a simple model or a fairly advanced device, for example, Aquacycle 800 or 900. All brand machines are very sensitive to the quality of tap water.
When installing the machine, it is recommended to install a separate fine filter at the inlet. It’s inexpensive and you won’t have to frequently remove the consequences of blockages.
If the machine is connected directly to the water supply, you need to clean the inlet filter mesh. Removing the blockage looks like this:
- the supply hose is unscrewed;
- unscrew the input filter from the machine body;
- the mesh is removed;
- cleaned and, if necessary, soaked in vinegar or a mild descaling agent;
- the filter is assembled, screwed into the housing, and a supply hose is connected to it.
You can often repair a machine with your own hands in this way. The filter device includes a procedure for removing and cleaning the mesh.
Extraneous noise during operation
Extraneous noise is the most common problem. This phenomenon may be caused by the following reasons:
- drum imbalance due to underloaded or overweight laundry;
- damage to the bearing block.
It is worth noting that malfunctions of a Zanussi horizontal-loading machine in the form of extraneous noise in any operating mode will most likely require the intervention of a qualified specialist. The cause is parts of mechanical components. This could also be a fairly harmless case when the shock absorber of the engine block is weakened or unbalanced. But the reason may lie in damaged bearings. In this case, the entire unit must be replaced.
Top-loading machines use a different type of drum mounting. In devices of this type, the unevenness of the load in the area of the bearing block is small, so extraneous noise, if it does not arise from loading laundry, but is present in all operating modes, necessarily indicates the complexity of the problem. Specialist intervention is required.
Bad spin
Poor spinning of laundry is always associated with the inability to achieve the required drum speed. The reasons for this phenomenon may be:
- insufficient supply voltage. Checked with a meter;
- poor belt tension causing slippage. The damage can be eliminated either by tightening or replacing.
But most often the machine begins to spin poorly when the laundry is loaded incorrectly. It may be overweight or underweight. In all cases, imbalance occurs and electronic control does not allow the engine to develop the required speed.
The problem can be solved either by dividing the laundry into two portions for separate washes, or by adding a clean towel and other things to the tank to gain sufficient weight.
Malfunctions related to water supply, heating, drainage
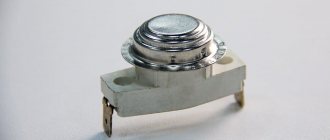
Partially the case when water is not supplied to the machine is described above. The problem can be resolved by cleaning the device's inlet filter. But the machine may not take in water due to a broken pressure switch. This happens rarely, but it does happen.
Zanussi devices have a rather complex unit of this class (in most models it is electronic), so you should contact a specialist to check and replace it. Water may not be drawn due to insufficient pressure. In this case, the pressure switch simply does not detect its presence at the input. Solving this problem also requires the intervention of a specialist.
Lack of heating may be due to a broken heating element. Most Zanussi car models have a display or display system. If the heating element breaks down, an error appears on the warning device.
This may be a character-numeric code or a combination of diodes. Based on the display readings, you should find the “faults and troubleshooting” section in the instructions for the Zanussi washing machine and determine the cause of the breakdown.
To repair the heating element, you will need skills in using measuring instruments and a soldering iron. An electrical tester will be required. By measuring the resistance of the heating element, its serviceability or winding breakage is determined. In the latter case, the wire leads to the heater contacts are unsoldered, the element is unscrewed from its socket and replaced with a new one.
The most unpleasant situation is when water is thrown out of the machine during washing. There are cases when water flows in and at the same time it is discharged into the sewer. Such problems are associated with incorrect installation of the device. The upper level of the drainage path must be raised no lower than the level specified in the instructions for the model.
Typically, Zanussi devices require the hose to be positioned at a height of at least 60-80 cm from the point of entry into the sewer. There is a special clip on the body of the machine for attaching it. Therefore, if the machine begins to drain water at the same time as filling or throws it away during washing, you should check the location of the outlet hose.
Hatch lock
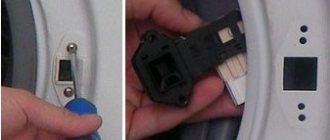
Zanussi cars are equipped with a rather fragile blocker. Its locking system (locking teeth) is made of plastic. In addition, electrical control elements are located inside the unit. If the blocker refuses to lock the lock, you should:
- open the door;
- in the area of its handle, find on the body a block with two screws securing the safety plate with a square hole;
- carefully bend the rubber cuff in this area, after first removing the thin wire clamp that holds it in place;
- find the blocker with your hand and fix it;
- unscrew the screws;
- remove the cover and pull out the blocker;
- disconnect the terminal with wires.
The blocker needs to be changed in any case. The device may show obvious mechanical damage in the form of broken plastic teeth. The unit may not turn on due to a breakdown of internal electronic components, so the only solution is to purchase a new blocker model.
If the unit breaks down during washing and you cannot open the door, you should remove the lower decorative panel of the washing machine; a special cable is hidden behind it. To open the door, just pull it. Then you should follow the above scheme to remove the blocker. The new node is installed in the reverse order of steps.
Drum jammed
For users, the concept of “jammed” is quite broad. In the form of a list of options and methods for troubleshooting, it looks like this:
- entry of a foreign object. The drum refuses to spin or stops unexpectedly during the washing process. On top-loading machines, blocking may occur due to the loading doors not being closed. The problem is eliminated by removing the interference that has fallen between the parts of the structure;
- initial startup failure accompanied by a humming noise. This is a clear indication of problems with the bearing block. It is recommended to call a specialist;
- no rotation with the sound of the engine running. The problem may be either a break in the drive belt or it flying off the pulleys. If it is possible to disassemble the case and check the condition of the element and correct it, this must be done.
The most difficult locking problem is a broken bearing or drum spider. In these cases, expensive repairs will be required. It is also unpleasant for foreign objects to get into the machine. When the drum jams, the structure of the apparatus is inevitably damaged.
Washing machine prevention
To avoid breakdowns of the washing machine, you must follow simple operating rules.
The equipment must be leveled; for this you need to use adjustable feet.
You should only load the washing machine with the amount of laundry that is allowed by the technical characteristics of the device and the program being run. Overload has a negative impact on the condition of the equipment.
If you need to wash bulky items, you need to load them into the machine with care, distributing them evenly inside the drum. Imbalance also harms technique.
The washing machine should be connected to electricity through a stabilizer or at least a surge protector. Voltage surges are detrimental to the device.
When washing clothes, you can only use automatic powders; periodically it is recommended to use products to clean equipment from scale and other contaminants.
Cover first
The difficulty is that the design of the Zanussi washing machine does not imply the presence of a back wall at all. There are no side parts either - the unit consists of two halves. Therefore, you will need to almost completely disassemble the machine and remove the back half of the body. We start by turning off the water, disconnecting the equipment from the electrical network, sewerage, and water supply.
Attention! Since you will have to disconnect the drain hose and water supply hose, you can take advantage of the situation and immediately rinse and unclog them.
Then remove the top cover. To do this, we use an 8 mm wrench. We move the machine to a convenient place, go in from behind and unscrew the bolts holding the top cover by the eyes. We move the panel towards us and try to open it up. If the lid does not budge, gently tap the edges and it will pop off the plastic clips.
Bottom line
To replace or repair a particular part in a Zanussi washing machine, the equipment will need to be partially or completely disassembled. You can do this yourself if you have the necessary tools. During the process, it is recommended to take photographs of each step in order to correctly assemble the washing machine, especially when connecting the wiring. Observing this rule and following the instructions, many will be able to disassemble the equipment and replace the necessary part. However, if you are not sure of a positive result, you should call professionals and trust them to disassemble and repair the washing machine.
Features of model repair
Most Zanussi washing machines have a similar design, so you don’t have to rack your brains about finding certain elements. However, there are some features that, if taken into account, will save time.
Top loading
Top-loading washing machines are extremely common due to their compactness and functionality. There are also almost never any problems with their repair, since all the main elements are located under the back cover. These machines do not require any special lid sealing as there is very little chance of water leaking through the top.
Horizontal loading
Horizontal loading machines seem more familiar to many. However, this type of work requires some specific repair methods. Malfunctions of a horizontal-loading Zanussi washing machine are very often associated with a leak in the hatch. In this case, in addition to the main possible malfunctions, a leak may also occur at the seals.
Filters in such machines are often located at the front, hiding them under special decorative panels.
Aquacycle 1000
Aquacycle 1000 washing machines boast reliability, durability, functionality and fairly simple repairs. All key elements are located under the back cover and often it is not even necessary to completely disassemble the equipment.
Most often, the heating element fails here, the malfunction of which leads to the appearance of an error on the device display. After replacing the component, the device's functionality will be restored.
Zanussi produces reliable, affordable washing machines that are easy to repair. In most cases, do-it-yourself repair of Zanussi washing machines comes down to replacing certain components, for which the user only needs instructions and a minimum set of tools.
How to disassemble the Malyutka machine
Disassembling the Malyutka washing machine is much easier than other models. The only problem will be the lack of a special key for removing the activator, which is not difficult to make yourself. The following disassembly steps are simple:
- remove the plug from the engine casing;
- stop the engine rotor;
- unscrew the activator housing;
- disconnect the tank and electric motor.
After performing these operations, the Malyutka can be considered disassembled. The help of professionals is not needed here. The structure of the machine is clearly visible in the diagram.
Thus, in the event of a breakdown, after watching the thematic video and instructions, we can safely disassemble any washing machine. A little plumbing experience and minimal knowledge of electrical engineering will contribute to success.