Manufacturers of electric drills do not suggest disassembling the chuck, so this information cannot be found in the operating instructions for the tool. But there may be cases when it is necessary to perform such manipulations. For example, to lubricate and clean the component parts, when the cartridge begins to be clamped tightly, and great effort is required to bring the jaws together. This may occur due to its contamination with construction dust or rust after exposure to moisture.
Seemingly non-separable, the cartridge can be divided into its component parts. The most common three-jaw units of a household electric drill are of two types: key and quick-clamping.
How to disassemble a drill chuck with your own hands
Manufacturers of electric drills do not suggest disassembling the chuck, so this information cannot be found in the operating instructions for the tool.
But there may be cases when it is necessary to perform such manipulations. For example, to lubricate and clean the component parts, when the cartridge begins to be clamped tightly, and great effort is required to bring the jaws together. This may occur due to its contamination with construction dust or rust after exposure to moisture. Seemingly non-separable, the cartridge can be divided into its component parts. The most common three-jaw units of a household electric drill are of two types: key and quick-clamping.
Disassembling the key chuck
The key cartridge can be disassembled in two ways: using a hammer drill and using a hammer.
Perforator method
In order to disassemble the cartridge in the easiest way, using a hammer drill, you must perform the following steps:
1. Spread the cams until they are completely hidden in the body.
2. Attach a blunt metal insert in the hammer drill of such a diameter that it fits freely into the threaded spindle hole of the chuck.
3. Rest the cartridge against a solid surface, having previously placed a shock-absorbing pad (for example, in the form of a rubber plate several centimeters thick). As a stop, you can use a thick metal plate held with your free hand, a table, a workbench, or the floor.
4. Start the hammer drill, and after two to three seconds the sleeve (shirt, adjusting sleeve) will be knocked off the chuck.
5. The cams can now be removed from the housing. Attention! When performing this operation, it is necessary to make appropriate marks on the body and on the cams so that they fall into place during assembly. Otherwise, the clamped drill will not be centered.
The disadvantage of this method: when knocking down the clip, some parts may fly apart (for example, a ring with teeth; it usually consists of two halves), and for an inexperienced user it will be more troublesome to put all the components together.
Having disassembled the cartridge, it is possible to clean it from dust, rust and dirt, as well as lubricate the parts.
The cartridge is assembled in the following sequence:
1. Manually extend the cams to maximum.
2. Place the two halves of the serrated ring into the corresponding groove in the housing.
3. Holding the ring with your fingers, you need to hide the jaws inside, turning the chuck body.
4. Put on the sleeve (shirt, adjusting sleeve) until it stops. This cannot be done completely. It must be pressed in with a hammer.
5. To do this, you need to install the cartridge vertically on a special washer so that the sleeve (shirt, adjusting sleeve) rests against it, and the body can freely pass into the hole. Instead of a washer, you can use a bench vise with jaws set to the required size or a piece of pipe of a suitable diameter.
6. Place a gasket on top of the chuck in the form of a thick plate of soft metal (aluminum or copper alloy), and use a hammer to press the body into the sleeve (jacket, adjusting sleeve). That's all. The chuck can be mounted on the spindle and operated.
Using a hammer
This disassembly method is very similar to the previous one, but not all users have a hammer drill, so you can use a hammer instead:
1. First you need to “hide” the fists inside, spreading them to the required position.
2. Install the cartridge vertically on an open bench vice to such a position that the body can pass between the jaws, and the sleeve (shirt, adjusting sleeve) rests against them.
3. Quickly heat the sleeve (shirt, adjusting sleeve) with a hair dryer. Instead of a hairdryer, you can use a blowtorch.
4. Place a shock absorber in the form of a soft metal plate (aluminum or copper alloy) on top of the cartridge.
5. Using a hammer, knock the body out of the sleeve (shirt, adjusting sleeve).
6. After this, clean and lubricate the parts and assemble in the order specified in the punching method. In this case, you can reheat the sleeve (shirt, adjusting coupling) using a hair dryer or a blowtorch.
The disadvantage of this method is the increased “traumatic” nature of the parts.
Also, it is advisable to use heating only in cases of extreme necessity, when it is impossible to knock down a sleeve (shirt, adjusting sleeve) without it. After all, exposure to high temperatures can lead to a change in the structure of the metal, which will make the parts soft.
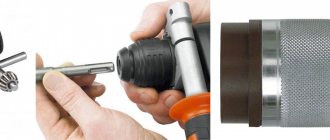
Disassembling the keyless chuck
The design of a quick-release chuck is much more complex than a key chuck, therefore, in order for the process to be reversible, the entire assembly should not be disassembled: 1. Using a screwdriver, you need to move the coupling apart and pry it up in a circle. This operation must be performed carefully and carefully so as not to tear the plastic.
2. Once the coupling has moved, it can be removed by hand.
3. Then you need to spread the cams as far as possible, insert a metal rod into the chuck (a long bolt will do) and hit it with a hammer to knock the body out of the second part of the plastic coupling.
At this point, the disassembly process must be stopped. All places accessible for lubrication are open. If you continue to disassemble further, it will become irreversible.
The assembly process is performed in the following sequence: 1. Installation of the upper part of the plastic coupling.
2. Pressing the end cap washer with a hammer through a gasket in the form of a wooden plank.
3. Pressing on the lower part of the coupling using your hands.
The cartridge is ready for use.
instrumentiks.ru
Chuck: simple design – the key to long service life
The first hammer drill was produced by the German company Bosh in the 1930s. The device immediately appealed to skilled men; they appreciated its versatility and irreplaceability. After all, the tool allows you to do more than just drill a hole. The pulse chiselling it provides speeds up and simplifies the work being done.
Using a chuck, the drill is secured to the hammer drill
In the design of the tool, an important role is played by the clamping device, which secures the drill or drill. However, it is the hammer drill cartridge that turns out to be an unreliable design element. It quickly fails due to the fact that it accounts for the bulk of the impact force.
After some experiments, manufacturers realized: a simple design of a hammer drill chuck is the key to long-term operation of the element and is less subject to destruction during operation. Therefore, experimentally we came to the creation of three main types of this part.
How to disassemble a drill chuck
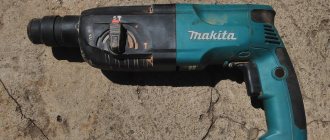
The drill is one of the most popular electric construction tools on the market today, along with screwdrivers. As is the case with other devices, the drill breaks down quite often, as a result of which users rush to the store to buy a new tool, which, by the way, should be in every home. Don't rush to conclusions. Your device may be able to be mastered. After all, a common cause of drill failure is the failure of the working chuck. First, read how to disassemble a drill chuck.
The photo below shows a diagram of a standard drill based on a model from the Russian manufacturer - Interskol. In principle, all drills have approximately the same design. During disassembly, difficulties can only be caused by the tightness of the fastenings and the close proximity of small parts. Detailed instructions will help you deal with such problems.
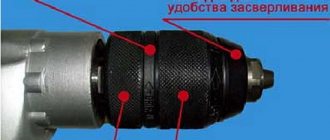
The most popular type of drill chuck in a modern drill
The chuck is the main part of any drill, screwdriver or even hammer drill. It is this element that is responsible for fastening the drill. This means that the quality and speed of drilling depends on it. If the cartridge is completely faulty, the nozzle will simply stand still, which, of course, will not give any result.
The most popular type of chuck in a drill is the cam chuck. In this case, the upper assembly of the chuck is equipped with a set of small cams, the direction of movement of which you can adjust yourself. Thus, if the jaws move clockwise, the attachment goes with them. Counterclockwise - stands still.
Depending on the type of the lower unit, that is, the attachment to the device itself, the cartridges are threaded and conical. The first option is attached to the working shaft using a cut thread. In the second case, the device is simply clamped according to the Morse cone principle.
Both options are common in modern drills.
How to disassemble a drill chuck. Step by step
- Remove the part from the main shaft of the drill.
As stated, it is attached either to a thread or to a cone. In any case, you will first need to release the locking jaws. Only after this you will see the fastening screw. Unscrew it clockwise. Perhaps there will be two such screws - on top and bottom. Next, fix the drill itself with your hand or pliers and unscrew the chuck clockwise.
- Features of unscrewing the cartridge.
The device may not give in to you the first time, as it is securely attached by the manufacturers for maximum safety. In this case, you can use a gas wrench. If this does not help, go to the last resort option. Take two keys. With one, firmly clamp the shaft, with the other, unscrew the cartridge. Please note that the gas wrench may damage the cartridge case or the operating shaft cover. It is advisable to use gaskets to avoid trouble.
- How to disassemble the keyless chuck of a drill. Frame.
Everything is simple here. Clamp the body in a vice through the gasket.
Types of chucks for hammer drills
Hammer drills can use different types of chucks . Everyone has their own differences.
Gear-crown
It is also called a key cartridge . This variety allows you to install a nozzle with a cylindrical shank. Fastening is carried out using a special slotted key. They move the cams, which securely clamp the working body. The advantage of the toothed chuck is the reliable fixation of devices with a cylindrical and hexagonal tail. But in order to fix or remove a drill in these chucks, you need to spend a lot of time.
Quick-release
Quick-clamping ones are mainly used in the design of screwdrivers. There are single-coupling and double-coupling types . They are fixed in the same way as key ones, only without using a key, everything is done manually. Double-coupled chucks provide more reliable fastening. But since the clamping is done by hand, the reliability of the fixation is inferior to clamping with a key.
The disadvantage of a quick-release fastener is that during long-term use it does not securely fix large-diameter drills. As a result, the tool rotates during drilling, which negatively affects the quality and speed of work .
Keyless Drill Chuck
SDS
This variety is considered the best option for hammer drills, although it appeared not so long ago. Many people call SDS cartridges quick-release cartridges . They are suitable for drilling concrete, wood and metal. But their clamping equipment comes in different types, so you need to know their features.
They are equipped with several types of clamping devices:
- Plus . Tail part for a tool chuck intended for use at home.
- Top and Quick . Very rarely used. It is not easy to buy attachments for installation in these types of cartridges. Few companies produce them. Therefore, when purchasing, you should look at the modification of the retainer.
- Max . These parts are used only in specialized models of rotary hammers.
The hammer drill chuck securely holds drills. Fixation is carried out using 2 guide wedges and 2 locking balls . The advantages of SDS chucks are that working with the clamping device is simple and safe. It perfectly combines torque and impact force. 90% of all manufactured rotary hammers are equipped with these easy-to-use devices.
Reliable fixation of the shank is a guarantee of effective and high-quality work.
DISASSEMBLY AND REPAIR OF THE DRILL CHUCK
radioskot.ru
| Currently, I am intensively engaged in repair and maintenance work around the house. There's a lot of drilling to do. Using one electric drill is more than difficult because you constantly have to change drills. Therefore, at work there were always two electric drills and a brace for delicate drilling of holes to large diameters. And so I decided to add a hand drill to this arsenal for countersinking holes, even if it is old, but it works. But the cartridge needs to be put in order - it rotates heavily, and there is a fair amount of runout. So, the cartridge needs to be disassembled. I looked at what the virtual space of the Internet offers in such cases - everything is very clear but somewhat complicated, because for example, it is proposed to perform the disassembly operation using an electric hammer drill. What if you just pick up the cartridge and use a hammer and metal striker to disassemble it? |
Standard sizes and markings
Before disassembling the screwdriver, it is necessary to determine the type of cylinder mounting. The marking will tell you this. An inscription of the form 1-6В14 indicates the type of fixation Morse taper, where the numbers before the letter are the diameter of the bit shank in millimeters, and after that the size of the conical hole. There are 9 articles – from B7 to B45.
For cartridges with threaded fastening, markings of the form 1.5-13 M12x1.25 are provided. Here the numbers before the letter also show the permissible diameter of the tail of the bit, and after the letter there are thread sizes in millimeters.
Important! Foreign screwdrivers use markings in inches - it looks like this: 2-13 1/2 - 20 UNF. 1/2 means inch, and 20 means the number of threads per inch.
Threaded cylinder