Types of knives for electric planer
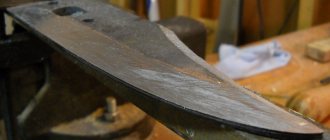
The tool has a rotating drum on which the cutting parts are fixed. The drum is secured with ordinary nuts. If you loosen them, it will be possible to remove the knives. Since the blade has two sharpening sides, if one of the sides becomes dull, the knife can be quickly turned over.
The industry produces several blades for such a tool . They differ in their design and shape:
- Direct. Planing of small workpieces. You can choose a quarter.
- Wavy. They imitate “aged” wood.
- Rounded. They are used for processing wide surfaces when it is necessary to make a neat shaped transition between planing planes.
Knives differ not only in their shape. Their size also plays a major role. There are several groups:
- Plates - 82x5.5x1.2 mm. They are used on foreign equipment such as Black&Deccer. Carbon steel is used to make the blade.
- Special knives. They differ from plates in their dimensions. They are much thicker and wider. Available in lengths of 82 or 102 mm. The large thickness makes it easier to sharpen the tool.
- Blades for a specific device. Typically the blade width does not exceed 110 mm. To secure the blade, special holes are provided.
Disposable knives
Knives intended for disposable use are made of steel-based hard alloys in the form of plates sharp on both sides. Such cutting parts cannot be sharpened. After the edge being used is completely worn out, the blade is turned over and placed on the drum with the other side. At the same time, the tool continues to work. If the second cutting edge becomes dull, then the blade is simply thrown away.
Disposable knives are intended only for performing work that does not require high precision and quality of workpiece processing. But they are convenient for practical use: during installation they do not need to be precisely adjusted and balanced.
The shapes of disposable products are:
- straight;
- wavy;
- straight, but rounded at the ends.
The first type of product has a straight cutting part. It is convenient to use such consumables to process parts that have a smaller width than the length of the installed blade, and to select quarters. Wavy knives are used when it is necessary to carry out rough processing of lumber. With their help, you can give a wooden surface a different texture, for example, to simulate “aging.” Straight cutting edges, rounded at the edges, are good because they do not leave marks (grooves, steps) on the surface of the wood being processed. This is a suitable option if you need to work with wide wooden pieces.
Disposable blades have a longer service life, but can break quite easily if they accidentally collide with metal (for example, a nail, bolt). They are the best option for attachments when it is necessary to work with hard wood workpieces.
Reusable cutting attachments
Products that are intended for reusable use differ in both their shape and size from disposable cutting attachments. They are made using high quality steel, which ensures ease and quality of processing of wooden surfaces.
Using reusable knives, you can achieve such a smooth surface of the workpiece that grinding is not required. They are marked HSS (fully High-Speed Steel, which translates as high-speed steel). These blades are considered professional. Their installation is accompanied by high-precision balancing and adjustment. The sharpening must also be of excellent quality. In this case, tool high-speed steel can be sharpened so that it is very sharp.
It is more profitable to buy reusable cutting attachments because they can be sharpened multiple times. But high-speed steel products do not allow processing hardwood (for example, larch or oak).
The working drums of most models of electric planes can be equipped with both disposable and reusable cutting attachments. But there are also devices that can only be equipped with blades that are not intended for sharpening. For this reason, when purchasing an electric planer, it is recommended to give preference to universal power tools.
Classification by size
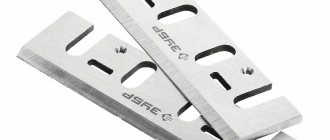
Knives for electric planers can be standard or non-standard sizes. Products of the first type, called “plates,” have a length of 82 mm, a width of 5.5 mm, and a thickness of 1.2 mm. Such cutting attachments are suitable for most models of electric planes from foreign companies Makita, Skil, Bosch, Black&Dekker.
Straight knives for electric planers Bosch, SKIL
Non-standard cutting attachments with larger blade widths and thicknesses are typical for electric planers from Baikal and Interskol. Due to their parameters, they are stronger and better than standard plates. When they come into contact with metal, such knives do not break. They can be sharpened using sandpaper. The width of the nozzles is about 1 cm. The length can be 82 mm, 102 mm, and for products from the Rebir company it reaches 110 mm.
Straight knives for electric planer Rebir IE-5709
The price of the cutting attachment depends on the manufacturer. Also, this factor often determines the quality of the product. If you purchase knives from well-known companies (for example, Bosch), you can count on their long service life.
Some models of electric planers are equipped with cutting attachments of unusual shape and design. In order not to be mistaken with the dimensions, it is recommended to take the old blade with you for comparison before purchasing.
Classification of modern knives
Cutting elements for electric planers are classified by size.
Imported planers, for example, from Skil, are equipped with standard 82 mm knives, the common name for which is “plate”. If you choose inexpensive and at the same time durable options, craftsmen recommend “Bison” knives, which are made of carbon steel. Such products are universal, as they fit most planes from various foreign manufacturers. They are even used in famous tools like Bosh and Makita.
Plane sharpening angle diagram.
The exact dimensions of standard knives are available: length 82 mm, width 5.5 mm and thickness 1.2 mm. Today, on the shelves of specialized stores and markets you can find knives from different manufacturers, and their price will fluctuate depending on the company that produces these products. For example, Bosh knives cost twice as much compared to simple “Bison”, “Stayer”, etc. But, of course, the quality of the products itself will vary noticeably.
There are knives made specifically for individual plane models. Quite popular electric planes “Interskol” and “Baikal” have individual knives, whose width and thickness are greater than those of ordinary plates. Thanks to their parameters, they have higher quality and are strong, which means that if you suddenly get a nail or a knot while working with an electric planer, the knife will not break, and the jagged edges on it can be easily removed with sandpaper.
Such knives are usually about 1 cm wide, and they are visually different from their counterparts. The length of such knives is 82 and 102 mm, and it corresponds to the model of the plane. If they become dull, you can sharpen them without any problems even on your own.
There is also another type of knives for electric planes. They are made wide and thick and equipped with holes for fastening. This model of knives is extremely specific, as they are suitable only for certain models. Such models include planes from Rebir; they have a power of 2000 Watts. A distinctive feature of these knives is their great thickness and power, and their width can reach 110 mm.
Knife design
Before you start learning how to sharpen knives on an electric planer, you need to understand their designs. It consists of two main parts - supporting and working, which contain several elements:
- working angle;
- front corner;
- chamfer on the back of the blade;
- back angle of the chamfer.
When sharpening the cutting element of a power tool, the greatest attention should be paid to the front angle. The smoothness of the surface after planing, the load on the blade, and the efficiency of removing sawdust from the working area will depend on how correctly it was sharpened.
Rules for replacing and adjusting knives
Correct installation of electric planer knives is the key to professionally clean processing. Before starting work, it is better to make several test runs using the workpiece. Then the result must be thoroughly checked. If the surface is smooth after processing, you can proceed to the main work. But various defects often arise. When planing, sometimes a defect occurs called a “staircase” - an indentation and a beveled surface. The occurrence of such a problem indicates that the knives are installed incorrectly.
The first time you encounter this problem, it is better to contact a person with relevant experience to install the knives correctly. If for some reason this is not possible, you can try to adjust the blades yourself.
When do you need to adjust or replace electric planer knives?
The knives on an electric planer wear out over time. They need to be removed and sharpened or replaced altogether, and then installed back on the drum. Newly installed cutting attachments need to be adjusted in order to process lumber as efficiently as possible. The blades of new power tools also need to be pre-adjusted before use.
The following signs indicate that adjustment is necessary:
- change in sound when processing workpieces;
- vibration of the tool during operation;
- deterioration in the quality of planing lumber (formation of waves, chips, grooves, protruding fibers and other defects);
- increase in effort spent on work.
The change in sound is not typical for all models. This symptom may also indicate a number of other problems.
If, after adjusting the blade blades, the symptoms discussed above do not disappear, then more serious repairs to the power tool will be required.
Setting the correct position of the cutting attachments is carried out according to the following parameters:
- the height of the part of the blade that protrudes above the sole of the power tool;
- the size of the side protrusion of the knife intended for picking out quarters.
By correctly adjusting the position of the knife blades on the drum, high final quality of lumber processing is achieved.
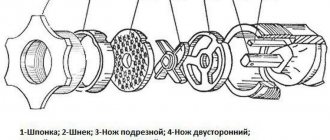
Planer design and features
The main working element is the knives, secured with locking screws in special slots of the cylindrical cutter. Often the cutter body is also called a drum.
Typical dimensions of an electric planer.
There are designs that provide for the installation of different numbers of knives. Despite the fact that with an increase in the number of blades, the quality of surface treatment will be higher, in practice, two-blade options are still most often used. Occasionally there are models that use three knives.
The use of such a limited number of processing edges is due to the complexity of the design and, as a consequence, a decrease in the reliability of the tool. In addition, an electric planer is a hand tool, and installing a dozen blades on a drum is simply physically impossible.
In addition to the drum and knives, the design of the instrument includes:
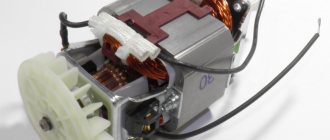
- Engine.
- Frame.
- The sole is made of aluminum-containing alloys. A distinctive feature of the sole is its division into two parts. One half acts as a fixed base. The position of the second is adjustable, providing the required planing depth.
- Regulatory and management bodies.
Adjusting, sharpening and installing knives for electric planers
Modern craftsmen who process lumber must have an electric plane in their arsenal. It has significant advantages over hand tools. To ensure maximum equipment performance, proper installation of the knives on the electric planer is necessary. The precise position of sharp knives increases the productivity of the machine.
Adjusting tool knives
A woodworking master knows very well how to adjust the knives on an electric planer . To perform this work you must have:
- Hexagon included with the product.
- Metal ruler.
In order to set up a tool with several knives quickly and correctly, it is necessary to follow a certain technological sequence:
Turning the device over, you need to remove tar deposits from the canvas with a solvent.
- The front side of the sole is exposed. Its position must correspond to the minimum planing depth.
- Each blade is installed in the gap between the plates.
- The ruler is placed on the base plate. Moreover, the cutting edge must touch the supporting surface. If this does not happen, you need to loosen the fastening bolts and set the desired level.
- Then tighten the bolts.
- All attachments are subjected to the operation. The exposed gaps must have the same dimensions. As a result, vibration and tool imbalance are eliminated.
- To determine the ease of rotation of the drum on the shaft, you need to turn it by hand.
- To check the correctness of the settings, process the unnecessary workpiece.
If the knife has a straight shape, the protrusion of the working part should reach 0.5 mm. For a rounded shape, this size should be more than 1 mm.
How to properly adjust knives
Adjusting the knives on the drum yourself is not a big problem. To set the position of the tool blades before work, you will need:
- hex wrench included with the plane;
- metal ruler or piece of glass of suitable size.
The setup is carried out by performing all operations in this sequence.
- Turn the electric planer over, placing it upside down on a table or workbench.
- If necessary, remove resin deposits from the nozzles using a solvent.
- Set the front part of the sole to a position that provides the minimum planing depth.
- Rotate any blade, placing it in the slot between the plates.
- A ruler is placed on the surface of the base plate.
- If the cutting edge does not touch it, then the knife bar is raised to the desired level, loosening (slightly) the fastening bolts using a hexagon.
- After alignment, tighten the fasteners.
- The procedure is repeated with all attachments, while setting gaps of the same size to prevent imbalance of the drum and vibration of the power tool during operation.
- By turning the drum by hand, determine the ease of its rotation.
- Check the correctness of the settings on the unnecessary workpiece.
In the considered sequence, the working position of the cutting edges is adjusted for models of electric planers with one, two or three knives.
It should be taken into account that the working parts of straight-shaped knives should protrude by approximately 0.5 mm, and rounded ones by 1 mm or more.
If the adjustment is carried out correctly, the cutting edges on the drum should be parallel to the sole of the power tool without distortion. A number of new models contain adjustment screws that simply need to be tightened to set the blades in the desired position. To set up the tool, it must be disconnected from the power supply, and in cordless models, the battery must be removed. This will ensure that the power tool does not start spontaneously.
Hand electric plane
The first electric planer was released by Makita. Today it is difficult for a master to imagine life without this incredibly useful tool.
How to adjust an electric planer
Adjustment of electric plane knives should be carried out according to the situation using a special adjustment mechanism, which is located on the front handle of the electric plane. By rotating this handle, we achieve the required amount of release of the knives (0-2 mm); they should be positioned evenly, parallel to the bed. Excessive release makes work difficult and puts additional stress on the plane motor.
Electric planer blades
After prolonged use, the blades begin to wear out. They need to be resharpened or completely replaced. Adjustment and sharpening of the blade is necessary when characteristic symptoms occur:
- A sharp sound appeared.
- The tool operates with high vibration.
- Defects appear on the treated surface.
- The work requires a lot of effort.
To adjust the normal position of the cutting blade, several parameters must be taken into account. The quality of the processing depends on them
- The height of the blade protruding above the sole of the plane.
- The amount of side protrusion of the canvas, which is used to select a quarter.
Safety requirements
If you use the tool correctly, you can quickly and efficiently complete a fairly large amount of work. However, if you do not adhere to safety requirements, you can suffer significant injuries.
- Before work, the workpiece must be securely fixed, otherwise it may move or even fly off during work.
- During the technical inspection of the blades and their adjustment, the electric planer must be de-energized by unplugging the cord and plug from the socket, because accidental starting can lead to very unfavorable consequences.
- You need to start processing only after the knives have started and warmed up, that is, the cutting elements must accelerate to the required speed.
- The instrument must be placed exclusively on its side.
When working, avoid bending or tangling the cord that supplies power. Electrical insulation and integrity are also required.
Maintaining safety when working with a plane
If the tool is used correctly, you can get a fair amount of work done in a short period of time, but serious injury can result if you do not take proper precautions.
Before starting work, it is important to secure the workpiece properly, otherwise there is a risk that it could be pulled out during work and could cause injury to workers or others nearby.
When performing a technical inspection of cutting elements or when adjusting knives, the tool should be completely de-energized by disconnecting the electrical cord from the mains, since accidental starting can cause irreparable harm to health.
Products should begin to be processed by turning on the device in advance and allowing the knives to gain the required speed until the cutting elements come into contact with the wood.
If it is necessary to put the plane to the side to check the surface being processed, it is important to place it on its side.
During operation, avoid kinking the electrical cord. The integrity of the electrical insulation must be maintained. It must be undamaged, and current-carrying elements must be carefully insulated.
Using a device with dull blades increases the load on the motor, which can lead to premature wear. In addition, the quality of processing deteriorates.
Sharpening power tool knives at home is not that difficult if you are careful.
Necessary materials
- sharpening stone: coarse-grained - for primary sharpening, fine-grained - for final sharpening;
- two laminate boards, a wooden block - if you need to make a sharpener yourself.
Tools
- hacksaw;
- grinder;
- knife clip;
- ruler;
- screwdriver;
- pencil;
- wood knife;
- chisel;
- hammer;
- mounting screws and studs;
- electric drill;
- plane knife;
- two identical bearings.
How to properly sharpen with your own hands:
2. Carefully screw them to the clamp so that the edges lie in the same plane.
3. Gently, with light pressure, move the knives along the abrasive. It is important to ensure that the blades are sharpened at the same time. This way the original sharpening angle will be maintained.
Advice : to prevent dust from the abrasive being ground from flying into your face, it is better to wet the stone in advance.
4. Check the work: inspect the knives for defects, make sure that the cutting part is sharp enough.
How to properly align knives on an electric planer?
- 25-01-2015
- 17
- 994
In the age of modernization, the market is rich in various construction tools that simplify and speed up the work process. Also, not a single repair or construction can be done without an electric planer.
Each tool has additional components, but for a plane these additional elements are knives, with which the wood is processed. These knives are double-sided and come in a set of two pieces.
If the cutting elements become difficult to remove chips, it means that they have become inoperative and need to be sharpened.
Electric planer device.
But, before you start disassembling the tool, you need to know how to position the knives on the electric planer. In this regard, it is important to study in detail the principles of disassembling a plane.
Installing knives: recommendations
The cutting elements are mounted on the plane drum, which rotates. The purpose of the knives is to plan the top layers of wood during the processing of products. This design is equipped with one or two cutting elements.
The knives standing last are rotary; if necessary, their position can be easily changed if one of the sides is dull. Electric planer knives are made from tungsten carbide or tool steel.
Products made of steel can be re-sharpened.
The blades have different configurations and are divided by shape:
- Straight - they are installed when selecting quarters and when processing small parts.
- Rounded - used when planing wide areas of parts, since the transitions between planed lines are made smoothly.
- Wave-shaped - similar knives are used when simulating antiquity on wood.
Diagram of options for sharpening a plane knife: a – on a whetstone, b – on a whetstone, c – position of the cutter blade chamfer when sharpening on a whetstone, d – sharpening on a whetstone disk using a stop device.
Features of working with power tools
Electric planers are used to perform various types of work; they can be used to:
- chamfer;
- choose quarters;
- plan boards.
But it’s not enough just to know how to plan a wide board or other parts correctly with an electric planer; you also need to use high-quality lumber:
- thoroughly dried;
- without branches;
- without fasteners: bolts, nuts, etc.;
- with a smooth surface, without bulges;
- no cracks.
The part is firmly fixed in the machine. Which requires at least 2 stops. Free movement of the power cable is also ensured.
Working with an electric planer will require some experience Source equipnet.ru
Selection of quarters
To perform this operation you will need 2 stops:
- the first determines the sampling depth;
- the second controls the movement of the power tool along the part in the required direction.
The stops are installed according to the required dimensions, taking into account the instructions for the products used. Moreover, the distance is measured, focusing on the edge of the knife, which is in the upper position.
Work is carried out in several ways:
- moving the part around the machine;
- moving the electric planer over the workpiece.
Attention! One way or another, the movement of a tool or part must occur smoothly at the same speed.
Self-adjustment of electric planer knives
Timely and correctly adjusted adjustment of the electric planer knives allows you to fully use the full potential of this magnificent tool.
With the correct adjustment of the electric planer blades, you can handle large volumes of material without much effort.
New models of electric planers allow you to cope with large volumes of material without much effort. An electric planer can be used to do both rough and finishing wood processing. Some models of electric planers allow you to obtain such good results that there is no need to grind the surface.
The cleanliness of the treated surface directly depends on the depth at which planing is carried out. The planing depth for some models is set in increments of 0.1 mm. When purchasing a tool, you need to pay special attention to this parameter. In general, setting up knives for work should always be done very carefully.
Characteristics of knives for power tools
The electric planer device includes two knives, which have two cutting surfaces and are simply removed.
An electric planer allows you to process the surface with high quality, while maintaining certain dimensions. But the outcome of the work directly depends on the selection of knives. Often during use an unpleasant defect occurs - the surface looks wavy. The reason is the slight difference in height. The problem can be solved by correct adjustment and replacement of electric planer knives with spiral ones.
Power tools usually come with two blades. They are most often made from high-strength hardened steel. Less common are tungsten blades. They are sharpened using a special mechanism in which the knife is secured and the sharpening angle is set.
When purchasing knives, you need to consider their safety. Most often, power tools are equipped with two types of protection:
- protection of the surface being processed;
- finger protection.
Many electric planers have a protective plate, which, when working, covers the drum, allowing you to process the surface at different depths and at any distance.
The regulation mechanism is located on the handle of the electric planer. Activating the mechanism causes the knives to extend. Adjustment depth 2 mm.
Electric planer knives are sharpened according to the same principle as for hand tools. The only difference is the number of blades. The electric planer has two of them and they are replaced only in pairs. Using blades from the same set avoids imbalance. Violation of this rule will lead to very low processing quality and accelerated tool failure.
Safety precautions
An electric planer is a device, when using which it is imperative to follow safety rules. The main danger is the current passing through the device and the operating drum.
Safety precautions:
- Do not use electric tools in rooms where there is a high probability of fires due to the presence of flammable liquid or gas compositions.
- the workplace must be clean and well lit;
- you should not be distracted by other things while working, as this will disrupt control of the power tool;
- It is forbidden to allow strangers near the switched-on plane; it must be stored in a place inaccessible to children;
- if an extension cord is used, it must be selected taking into account the load and be without damage;
- It is unacceptable for liquids to come into contact with a working electric tool, or to carry equipment while holding it by the cord;
When working with an electric planer, be sure to use safety glasses and headphones Source jet-online.ru
- When working with an electric planer, the operator must not come into contact with ungrounded surfaces (for example, batteries);
- The power cord must be located away from sources of high temperature and sharp objects;
- It is necessary to periodically perform preventive maintenance of the device;
- If you are intoxicated or under the influence of medications, you cannot use a power tool;
- Do not touch the rotating drum with your hands.
On a note! Connecting an electric planer via an RCD will increase the safety of using the tool. Protection is selected taking into account the load.
Features of the work
Before you start sharpening, you need to select the sharpening angle of the plane knife. This indicator is influenced by various factors:
- Properties of the tree that will be processed. To work with soft wood (larch, linden, pine, aspen), the optimal angle range is from 40 to 50 degrees. For hard wood (oak, hornbeam, maple, pear), set the angle to 55–65 degrees.
- Setting the tool at a certain angle. The quality of planing also depends on this indicator. For soft wood - about 40 degrees, for hard wood - about 25.
- The material from which the cutting edge is made.
After thoroughly studying the tool and selecting the materials to be processed, you can begin resharpening the plane at home.
Hand planes
Step-by-step instructions for sharpening a hand plane:
- Determine the sharpening angle.
- Unscrew the clamping bolts and remove the blade.
- Place a coarse-grit whetstone in a vice.
- Use the chamfer of the blade to make circular movements on the abrasive material.
Movements should be slow. When sharpening, the metal is moistened with water. After processing with large grains, a fine-grained stone is used. Sharpening of a plane, which is intended for manual planing, can be carried out on a special machine.
Electric planers
The main difference between electric planer blades and hand tools is double-sided sharpening. When one side becomes dull, the knife is turned over to continue planing. Their sharpening is carried out using sharpening machines. Step-by-step instructions for sharpening planer knives:
- Unscrew the blade from the tool.
- Moisten the abrasive stone with water and set the speed to low.
- Start the engine.
Minor damage and unevenness can be restored using sandpaper. We must not forget that blades for electric tools can be made of hard alloys. If such a cutting edge is dull on both sides, the element will have to be replaced.
Knives for electric planers become dull faster than those for hand tools. This is due to high planing speeds. To sharpen them, it is necessary to use specialized equipment, accurately set the angles and the number of revolutions of the abrasive wheel. Exceeding the speed will lead to loss of hardness and destruction of the cutting edge.
Sharpening electric planer knives at home
With regular use of an electric planer for processing wooden surfaces (planing, quartering, chamfering), its cutting edges become dull. If the knives are intended for repeated use, then you can sharpen them yourself. Sharpening is carried out according to the same principle as with hand planes. The differences are only in the number of cutting edges that need to be sharpened.
You cannot use power tools with dull blades for the following reasons:
- the load on the electric motor increases, as a result of which its wear accelerates;
- The quality of surface treatment of lumber is significantly reduced.
Specialists from service centers or special workshops will help you sharpen the cutting edges of working attachments correctly. If it is not possible to turn to professionals, then you can do all the work at home. To sharpen your blades yourself, you can use the following tools:
- knife sharpening machine;
- an ordinary whetstone (abrasive stone, whetstone);
- emery;
- metal file;
- grinding wheel.
You will also need a special clamp to hold the piece being sharpened.
Sharpening a blade using an abrasive stone is done as follows.
- Remove the working attachments that need to be sharpened from the electric planer drum.
- The knives are secured using special screws in the clamp so that their cutting edges lie in the same plane.
- The fixed blades, with light pressure, move smoothly along the surface of the abrasive, ensuring that they are sharpened at the same time.
- Inspect the sharpened parts for deviations, repeating the entire process if they are detected.
- Check the sharpness on any piece of board.
- Install the knife plates on the drum, adjusting their position.
Before performing work, it is recommended to pre-moisten the abrasive stone with water. It should be taken into account that coarse-grained abrasive is intended for primary processing, and fine-grained abrasive is intended for finishing. It is recommended to maintain the original sharpening angle of the blade (approximately 30 degrees).
The considered manual method is well suited for sharpening. If the edges are very dull or have jagged edges, then we sharpen them on a machine. When doing this, you should be careful not to remove excess metal from the blades.
If a grinding wheel is used, the part removed from the drum is moved along its surface in translational movements.
With your own hands, all actions should be carried out carefully, carefully handling the blades to avoid injury. High quality sharpening will come with experience and skill.
The condition of the electric planer knives - their adjustment and sharpness - should be checked before starting to process lumber. Not only the quality of planing, but also personal safety depends on this. All operations for replacing, sharpening, and adjusting working attachments must be performed only with the power tool disconnected from the mains. To give initial sharpness to the cutting edges, it is enough to use a regular whetstone.
When do you need to change knives?
During the processing of wood, the drum performs rotational movements. As the tool moves forward, the cutting edge of the knife cuts off particles of material as it rotates. Gradually the sharpness of the blade decreases.
The treated boards may contain foreign inclusions (nails, dirt, pieces of hardened mortar, if the boards were previously used for formwork or under plaster), leading to rapid wear.
Knots found in the wood also reduce the sharpness of sharpening. In this case, planing will occur perpendicular to the location of the fibers.
Self-sharpening of electric planer blades
Reusable knives require re-sharpening after long-term use. Sharpening a plane with your own hands at home is done in the same way as a hand tool. The difference is the number of cutting edges that require sharpening.
Read also: Clamp for cutting with a jigsaw
To sharpen the blade yourself, you need to have several special devices:
To work, you will need a clamp to secure the part to be sharpened on the workbench. The knives are fixed so that the cutting edges are in the same plane.
All blades are sharpened simultaneously with a file or emery. There should be no deviations. The sharpness of the blade is checked on any wooden board.
To make the work easier, pre-moisten the abrasive stone with water. For initial processing, coarse-grained abrasives are used, and fine-grained abrasives are used for finishing. It is desirable that the sharpening angle of the knife is 30 degrees. When the cutting edge is severely damaged, it is better to sharpen it on a special sharpening machine.
An electric plane is an indispensable tool for planing wood, both at home and in professional workshops. Maintaining the cutting elements in proper condition ensures ease and comfort of working with the tool. Therefore, it is extremely important to know or at least have a general idea of how to change knives on an electric planer.
How to replace knives on an electric planer
To remove old bits, you need a set of wrenches. A screwdriver may also come in handy.
How to do:
- turn the drum of the electrical appliance so that the bolts become accessible;
- loosen the fixation;
- remove the working attachment;
- insert new blades into the vacated grooves;
- secure them with bolts.
Important ! To avoid imbalance, all cutting parts must be replaced at once.
Now it's time for adjustment. To do this, you need a complete hexagon and a metal ruler.
How to adjust electric planer blades:
- Place the instrument on the table so that its drum faces upward.
- If necessary, wipe off resin from cutting accessories.
- Set the minimum planing depth.
- Place the blade in the slot between the soles.
- Place a ruler on the back plate.
- See if its edge touches the consumable. If not, raise the bar. To do this, you can slightly loosen the fasteners using the hexagon from the kit.
- Tighten fasteners.
All this needs to be done for each nozzle. For balance, the distance between the knives should be the same.
Correctly sharpening the knives of an electric planer yourself is not so difficult. If the situation is not critical, you can do everything manually using a sharpening stone. If the blade is completely dull, a special device is needed. You can purchase it or make it yourself.
How, when and why they change
Dull electric planer knives do not necessarily need to be immediately replaced with new ones. Most often, it is enough to remove them, straighten or sharpen them and put them in place. In addition, new analogues from other manufacturers may be of worse quality than factory ones.
When to change
Most often, knives are replaced with new ones (or double-sided ones are turned over) when metal gets into the wood being processed. A pothole forms. If it is more than 1-2 mm deep, when you try to resharpen the knives, their height decreases. Sometimes, to critical values, the knives simply do not reach the working height.
Both knives have to be sharpened to ensure balance in weight. A difference in weight of even a few grams at such high speeds is unacceptable. The knives must weigh exactly the same, otherwise the drum will begin to work like a vibrator with an eccentric.
If there is a large difference in weight, it will simply be impossible to work. When it is low, sooner or later the drum bearings are destroyed due to beating.
Other cases:
- after many sharpenings the height decreased critically;
- the canvas is damaged, burst or chipped;
- if sharpened incorrectly, the tip overheated and lost its hardening (the metal “sank”);
- a large amount of urgent work, no time to sharpen, blades are simply quickly changed.
We show how to set it correctly using the example of Interskol R-82
The Interskol R-82/710 model has simple (without holes) narrow double-sided knives. They are removed for sharpening, replacement, or to turn them over to the sharp side.
Operating procedure:
- Work is carried out with the plug unplugged from the electrical outlet.
- Using a 8mm wrench, unscrew the three mounting bolts clockwise. The bolt heads no longer rest against the wall of the drum groove, and the knives are released.
- When the knives begin to move, they are removed.
- If the planting grooves are clogged with resin or compacted wood dust, clean them.
- They put sharpened ones in place, new ones or inverted old ones, one at a time.
- The two outer bolts are unscrewed until the heads lightly stop against the wall so that the knives no longer move arbitrarily, but they can be raised or lowered.
- The correct position of the knives is checked. They must stand at the required height, without distortion. If the old ones were positioned correctly and the new ones are exactly the same size in height, no adjustment will be required. However, the height is checked in any case as follows.
Algorithm for replacing knives on an electric planer
To remove the knives from the electric planer and replace them with new ones (or properly sharpened ones), you will need a set of wrenches, and also, in some cases, a screwdriver. There is no need to completely assemble and disassemble the electric plane to change working attachments. Replacement is performed in the following sequence:
- rotate the drum, placing it in such a position to gain access to the knife mounting bolts;
- loosen, but not completely, these bolt clamps;
- remove the working attachment manually or using a flat screwdriver;
- the rest of the blades are treated in a similar way;
- place new knives in the sockets, securing them with bolts;
- put them in the correct position.
The main point is the need to place the blades exactly in the sockets and securely fix them so that they do not fall out while using the tool. Due to the fact that different models of electric planers may have different attachments for working attachments, it is recommended that you first read the operating instructions for the equipment you are using.
On sale you can find knives whose blades rotate. This is very convenient because it is enough to simply turn over the dull edge, replacing it with a sharp one.
When there are two cutting attachments installed on the drum of an electric planer, both need to be changed at once. This will prevent the occurrence of an imbalance, which results in a decrease in the quality of lumber processing and failure of the electric planer.
Installing knives into the drum
Remove the first blade using a slotted screwdriver.
The process of installing knives into the drum is basically little different from the process of removing them: all operations are done in the reverse order.
- the knife is installed in the working socket;
- tighten the clamping bolts;
- the plane is turned over and brought into working position.
An important point to note is the correct orientation of the blade sharpening angle. When installing the knife into the socket, the sharpened side of the blade should face in the direction opposite to the surface of the cutter. In this position, the fibers are cut. The tool moves smoothly and the resulting surface has a high quality finish.
Otherwise, the blade will cut off particles of material. The quality of the treated surface and ease of use in this case are out of the question.
Correct setting of the plane
It is not enough to simply install the electric planer knives into the mounting sockets; you also need to make their correct adjustment (tuning).
Adjustment of the position of replaceable working elements, depending on the design of the plane, can be done either manually or using a screwdriver, by tightening or unscrewing the adjusting screws.
If there are adjusting screws, the adjustment process is not difficult.
Use a screwdriver to tighten the screws one by one, and install the knife in its place. After achieving a satisfactory positioning of the tool, the knife is finally fixed using clamping bolts.
On older models of electric planers, devices for setting the installation level may be missing, and the position must be adjusted manually. The overhang of the blade edge in this case is established by raising or lowering the knife using your hands or by placing auxiliary spacers of varying thickness on the bottom of the groove. Final fixation also occurs using bolts. Tuning the instrument in this way requires some experience and patience.
When tightening the fixing bolts, you should be careful and do it gradually and evenly, preventing possible shifts in the position of the blade relative to the sole.
The correct setting of the working tool is checked by the relative position of the edges of the knives and the stationary part of the sole of the plane.
The cutting edge should be flush with the stationary part of the plane sole. In general, a slight elevation above the plane of the sole is allowed.
The correct setting of the blade extension can be checked using a wooden ruler or a rack with a smooth, straight edge. The ruler is applied to the stationary half of the sole. When turning the drum, the blade should slightly lift it and move it forward. When the drum moves back, ideally the ruler should remain motionless, in extreme cases, rise a little and fall back to its original place.
By applying a small plate simultaneously to the sole of the plane and to the blade, you can check their mutual parallelism. The plate should lie flat, without any distortions.
It is very important to note that it is unacceptable to carry out any work with cutting elements while the power cord is connected to the network.
By following these simple instructions, you can easily and safely replace the knives on your electric planer.
Correct setting of the plane
It is not enough to simply install the electric planer knives into the mounting sockets; you also need to make their correct adjustment (tuning).
Adjustment of the position of replaceable working elements, depending on the design of the plane, can be done either manually or using a screwdriver, by tightening or unscrewing the adjusting screws.
If there are adjusting screws, the adjustment process is not difficult.
Before removing the second blade, you need to rotate the drum and loosen the bolt.
Use a screwdriver to tighten the screws one by one, and install the knife in its place. After achieving a satisfactory positioning of the tool, the knife is finally fixed using clamping bolts.
On older models of electric planers, devices for setting the installation level may be missing, and the position must be adjusted manually. The overhang of the blade edge in this case is established by raising or lowering the knife using your hands or by placing auxiliary spacers of varying thickness on the bottom of the groove. Final fixation also occurs using bolts. Tuning the instrument in this way requires some experience and patience.
When tightening the fixing bolts, you should be careful and do it gradually and evenly, preventing possible shifts in the position of the blade relative to the sole.
Plane sharpening angle diagram.
The correct setting of the working tool is checked by the relative position of the edges of the knives and the stationary part of the sole of the plane.
The cutting edge should be flush with the stationary part of the plane sole. In general, a slight elevation above the plane of the sole is allowed.
The correct setting of the blade extension can be checked using a wooden ruler or a rack with a smooth, straight edge. The ruler is applied to the stationary half of the sole. When turning the drum, the blade should slightly lift it and move it forward. When the drum moves back, ideally the ruler should remain motionless, in extreme cases, rise a little and fall back to its original place.
By applying a small plate simultaneously to the sole of the plane and to the blade, you can check their mutual parallelism. The plate should lie flat, without any distortions.
It is very important to note that it is unacceptable to carry out any work with cutting elements while the power cord is connected to the network.
By following these simple instructions, you can easily and safely replace the knives on your electric planer.
Electric planer - How to properly change knives on an electric planer?
How to correctly change knives on an electric planer? – Electric planer
An electric plane is an indispensable tool for planing wood, both at home and in professional workshops. Maintaining the cutting elements in proper condition ensures ease and comfort of working with the tool. Therefore, it is extremely important to know or at least have a general idea of how to change knives on an electric planer.
Editing on the touchstone: recommendations
Electric planer knives are mounted on the top of the tool’s rotating drum.
The quality of planing directly depends on the sharpness of the knife used. But this does not mean that if the blade is slightly dull, it should be changed immediately. After all, such parts are not so cheap that you have to buy new ones after each job. The way out of this situation is to edit the edge. A grinding wheel is used for this purpose.
Sanding is a fairly simple process. To do this, the knife is placed on the flat surface of the grinding wheel, and during the grinding process you need to move it from one side to the other. During this action, the parts will heat up, so you should not use excessive force. Otherwise, it may cause the edge to lose hardness or turn blue.
After the blade is polished, it needs to be straightened. For the manual process, whetstones are usually used. They are artificial or natural bars. If you use the machine method, then in this case a finishing disk is used.
When dressing Belgian donkeys, you must use water, and for Arkansas ones, a mixture of oil and kerosene. In turn, bars made of artificial materials can differ in grain size: coarse and fine. The first side carries out a rougher edit, while the second requires a more “jewelry” approach. If you use whetstones without lubrication, it will ruin the knife as it will lose its hardening. In addition, the bar should be washed well after each procedure, otherwise it will become greasy.
The edge of the blade must be rested against the block and moved in a cross-shaped motion until its surface acquires a shine similar to a mirror. In addition, there should be no burrs left on the electric planer knife. The front side is straightened with up and down movements.
The machine finishing disc is made of artificial materials, as a result of which its surface becomes abrasive. Mechanical straightening takes much less time than manual straightening, but purchasing the appropriate equipment will be somewhat more expensive.
Electric planer Interskol R-110/1100M
The power is more than enough for home work - even the “brutal” smolyak planes well. I consider its main advantage to be its width - 110 mm. After working with the tool, I came to the conclusion that if I had taken it to 82 mm.
— there’s a lot that the tool allows me to do that I technically couldn’t do, if you’re wondering whether to go for 110 mm. (and their choice is quite small) or take 82 mm. and, as they say, don’t suffer - think 10 times....my advice is only 110 mm.
And now about the shortcomings - during the work I discovered only one - the hole from where the sawdust comes out is in close proximity to the air intake (for cooling the tool) and sometimes it turns out that the sawdust is sucked back. I can’t say yet how critical this is, but after a long period of work I have to unscrew 2 bolts (of the same air intake mesh) and clean the inside a little.
Read also: Pump increasing water pressure
Behind:
Price, planing width, rich set, power.
Against:
There is a design flaw - if you plan in a limited space (in a corner or close to a wall), the chips are partially sucked inside.
I bought it a year ago for construction.
Planes the board well, you don’t need to press it, the plane is heavy enough, move it along the board and that’s it. The tool for stationary installation came in handy when I needed to plan small boards.
Behind:
Planing width 110, soft start, stationary installation, powerful
Against:
Not yet
Knives for planes INTERSKOL
Knives installed on INTERSKOL planes have a number of differences from analogues produced by other manufacturers:
- Higher density plates.
- Thanks to the increased density, the plate of the INTERSKOL plane knife allows sharpening with emery.
- The dimensions of the knife depend on the specific model, and the numerical index in the model name indicates the length of the knives. Thus, the electric planer R-110-01 has a blade length of 110 mm. At the same time, the width of the knives for all models is the same and is 10 mm.
- Thanks to high-quality metal (high-speed steel), INTERSKOL planer knives will not break even when in contact with a nail driven into wood. The resulting jagged edges on the cutting edge can be removed using sandpaper.
Read also: Adjusting a chameleon welder’s mask
Replacing knives on an INTERSKOL electric planer should only be done with analogues that have strictly the same dimensions in length and width.
How to work with an electric planer
Unfortunately, not everyone knows how to work with an electric planer correctly. Behind the appearance of ease of use there are several important nuances.
- Electric planer: how to choose
- Which hand router is the best?
- How to use a wood router correctly: video tutorial
Selecting and getting started with an electric planer + (Video)
First of all, you need to determine how often and for what purposes you will use the tool. Its power and design will depend on this. The power of an electrically driven planer ranges from 0.5 to 2.2 kW; the design may differ in the number of knives. Mostly on the market there are models with two blades.
- For household purposes, it is better to buy a tool at an average price. This series includes models for short-term work, but of good quality. The approximate weight of the device will be 3-4 kg, motor power – 1 kW
- The passport of an electric planer indicates not one power, but two. The first is maximum, the second is effective. To work with hard rocks, the effective power should not fall below 400 W.
- The electric motor speed of the tool for small volumes may not exceed 10 thousand revolutions per minute.
- If you need an electric planer with more power, a professional level, then the power will not be lower than 1.5 kW. And his weight will reach 10 kg
So, you have chosen the unit you need. It would be a good idea to check the cutting edges of the knives for flaws - they should not be chipped or uneven, and the sole of the plane should be as smooth as possible. As a result, these factors will affect the quality of the treated surfaces.
Before processing the main product, make several training cuts on unnecessary bars. This will allow you to get used to the tool, master the planing depth switch and, in general, evaluate the capabilities of your tool. During trial work, it is possible to identify functional shortcomings of the new “assistant”. They are removed by adjusting the plane.
How to properly configure the instrument + (Video)
It is best, of course, to seek help from a service workshop, where professionals will quickly and efficiently help you set up the plane. When this is not possible, you will have to cope on your own. Following the instructions, use a hex wrench to loosen the blades on the drum. Next, to place the knives in the exact position, use a bench ruler.
Beginning carpenters should remember that the shallower the cutting depth, the higher the quality of processing and the easier it is to move along the surface of the board. The more the knife protrudes beyond the sole of the plane, the greater the layer of wood it removes. After adjusting the blades, you need to thoroughly tighten all the fasteners. To make sure that everything is done correctly and the cutting surface does not come into contact with the body, you need to rotate the drum several times by hand. All setup work must be carried out with the instrument disconnected from the network.
Working with wood - wide board + (Video)
Before starting work with a wood surface, you should determine the mode that is convenient for you - manual or stationary. For example, consider processing a wide board.
For better safety of the worker and his environment, it is necessary to properly secure the future product. If there is even minimal play, the quality of work deteriorates. Afterwards, you need to check the freedom of movement along the board. No foreign objects should interfere with the operation of the tool. It is very important to hold the electric planer firmly and with both hands.
Before turning on the tool, the knives should not come into contact with the surface being processed. You can carefully bring the power tool from the end of the wooden blade immediately after starting and move forward. Keep the sole of the plane level, parallel to the board. The pressure of both hands should be equal.
Different forces are applied only at the beginning of the passage through the wood, where more emphasis is placed on the front handle, and on the back - at the end. During work, it is necessary to avoid jerking, stopping or acceleration. With experience, correctly completing passes on the back of the workpiece and adjusting the cutting depth of the knives will become more accurate. The direction of movement of the plane for processing lumber is carried out along the fibers. In the case of a prefabricated product consisting of several bars or boards with high unevenness in the joints, movements with an electric planer are performed diagonally.