Freon is an inert gas, odorless. At atmospheric pressure it boils at a temperature below zero. But the compressor creates such pressure that the refrigerant condenses into liquid, heating the circuits, before turning back into gas in the evaporator. The cooling process of the chambers requires a certain amount of refrigerant. Leakage reduces the cold performance of the device. The technician’s task is to find where freon has leaked from the refrigerator, eliminate the fistula and pump in a new portion of refrigerant.
Signs of a freon leak in the refrigerator
An insufficient amount of freon disrupts the thermal balance and uses less heat for evaporation. The cause of a refrigerant leak from a refrigerator is almost always due to a violation of the operating instructions:
- Improper transportation of the refrigerator, loading and installation with sudden jerks can lead to the destruction of welding seams.
- Speeding up defrosting by mechanically removing the ice using a knife or fork can damage the tubes in the freezer.
- Rare defrosting, accumulation of ice, and melting near the door contribute to rusting of the tubes in the heating circuit. Fistulas form at the bottom where moisture seeps through the seal.
- Natural aging of the material, corrosion.
- Manufacturing defects.
If there is not enough freon in the refrigerator, the compressor will work without stopping, and the chamber will be warm. A specialist with the necessary equipment can accurately determine both leaks and other faults. Similar signs may occur when the door is not tightly closed or the integrity of the gaskets is compromised.
To independently determine whether there is freon in the refrigerator, you should defrost and dry the device. If, after turning it on, the cold does not build up in the chambers, the condenser grille is cold, the freon has leaked out. What to do? Need refueling.
The procedure for performing work to replace freon
Before you begin replacing the refrigerant, you need to make sure that you have all the necessary tools and materials at hand to carry out the work.
Step #1 – diagnose the problem yourself
Refrigerants do not burn, but their absence or insufficient quantities in the system can cause premature wear and damage to other parts.
In addition, a violation of the specified heat exchange will lead to the fact that the refrigerator will become too warm, food will spoil, an unpleasant odor will appear, etc. Therefore, it is important to learn how to quickly identify signs of a leak and eliminate them.
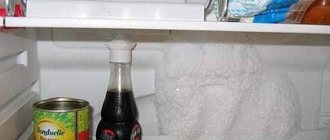
The presence of snow inside the refrigerator compartment may be a sign of a malfunction, especially if the snow cap appears again after defrosting
Here are the points to pay close attention to:
- the temperature inside the chamber is too high;
- interruptions in engine operation have been noticeably reduced;
- the compressor runs continuously;
- Condensation appears inside the device;
- the refrigerator emits an unpleasant odor that is not associated with the presence of spoiled food;
- the evaporator becomes covered with snow or ice, etc.
Sometimes a leak can be detected immediately. If you do not carefully remove ice from the evaporator, the circuit tube may be accidentally pierced.
As a result, gas will come out of the narrow hole with a characteristic hissing sound. If you pay attention to this point, you can quickly fix the problem.
Housing corrosion may be a sign of a lack of refrigerant in the circuit: the temperature inside the chamber rises, condensation accumulates, moisture affects the metal, and rust appears
Step #2 - preparatory work before replacement
Before starting repair work, of course, the refrigerator should be disconnected from the power supply. All heating devices and open flame sources should be turned off or moved away from the place where freon is being charged.
Electrical equipment that will be used during repairs must be grounded in accordance with the operating instructions.
When carrying out soldering, you should also take care of fire safety. Although freon is not dangerous for people, it is still better to ventilate the room during the work, as well as after completion of the work.
First of all, you need to unplug the refrigerator and prepare the entire set of necessary tools
Before starting repairs, it doesn’t hurt to find and re-read the operating instructions for the refrigerator to take into account the features of a particular model. When filling the refrigerator with freon, you should be guided by the information indicated on the tag, as well as the marks on the filling cylinder.
Step #3 - remove remaining refrigerant
Before pumping gas into the system, you need to remove any refrigerant remaining inside the system. To do this, you need to find a filter drier; it is clamped using a needle grip.
After this, a hole is made in the filter on a section of copper. An element damaged in this way will have to be replaced with a new one in the future.
When charging with refrigerant, the filter drier will be damaged and will have to be replaced with a new, working element. In addition, you will need to unsolder the circuit and install additional valves
It is better to prepare the place for soldering the valve in advance. It needs to be removed from the fitting and the excess length cut off. Then it is recommended to immediately solder the valve to the compressor.
After the remaining refrigerant has left the system, you will need to purge all pipes with nitrogen. This will allow any moisture that may have entered there to be removed from the circuit.
To pump gas into the working circuit of the refrigerator, a Schrader valve is installed, which prevents the outflow of freon in the opposite direction.
Cylinders in which the gas pressure exceeds 6 atmospheres should not be used for such work, as this can damage the system. Internal pressure information is usually indicated on the container.
If a cylinder with suitable characteristics is not available, you need to supply gas to the system using a reduction reducer.
The brand of freon is indicated on the refrigerant bottle, as well as the operating pressure. If the gas inside is compressed to more than six atmospheres, you need to use a reduction gear
The system needs to be purged for approximately 10-15 minutes. After this, the valve on the needle gripper is closed and the filter is cut off next to the capillary tube.
Then you need to purge the circuit again. At the end of the purge, you need to install a new drying filter in place of the used one.
This should be done within 15 minutes after the end of the last purge, since the refrigeration circuit cannot be left open for longer.
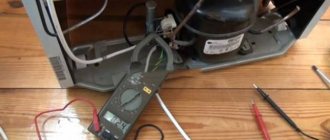
Professional craftsmen use a whole set of special tools to perform this type of work: leak detector, tester, vacuum pump, wrenches, thermometer, pliers, pinch pliers, etc.
To perform soldering, you should stock up on protective screens; you will also definitely need a Schrader valve and a new filter drier.
To perform a one-time refill of the refrigerator, it does not make sense to buy a separate set of equipment. It will be cheaper and easier to rent everything you need.
Step #4 – pump in freon
To perform this operation, you will need instruments that will allow you to control the pressure in the system. Appliance repair technicians use a filling station consisting of two pressure gauges with shut-off valves and three hoses.
Pressure gauges vary in color: red and blue. The first one measures the discharge pressure, while the blue one measures the suction pressure.
This is a simplified diagram of connecting a filling station and a refrigerant cylinder to the refrigeration circuit. In this version, the red hose and pressure gauge are not used
When working with a regular household refrigerator, only the readings of the blue pressure gauge are usually taken into account.
The hoses to which the pressure gauges are attached are also color coded differently: red and blue, which are connected to pressure gauges of the same color, and yellow, located in the center.
Before starting work, you need to make sure that the valves on the hoses with pressure gauges are completely closed. After this, the yellow hose is connected to the gas cylinder.
The blue hose is connected to the pipe through which refrigerant will be supplied to the circuit. A special fitting is used for this.
The red hose is mounted at the other end of the system. It requires a Schrader valve to be attached.
The blue pressure gauge is needed to control the suction pressure, the red one is needed to monitor the pressure at the outlet of the system, freon is supplied from the cylinder through the yellow hose
When all the necessary elements are connected, you need to open the shut-off valves on the blue and red hoses. After this, open the valve on the refrigerant cylinder and begin filling the system, observing the readings of the pressure gauges.
When the pressure reaches approximately 0.5 atmospheres, the pressure gauge valves should be closed.
Now apply power to the compressor for about 30 seconds. Instead of a cylinder, a vacuum pump is connected to the yellow hose. It is turned on for about 10 minutes.
Evacuation allows you to remove air trapped in the system and improve the quality of filling. Now you need to reconnect the yellow hose to the freon cylinder.
A vacuum pump is necessary to remove any foreign gases from the refrigeration circuit and ensure high-quality refueling
At the same time, make a small gap between the manifold and the hose so that the incoming refrigerant displaces the air from the hose, and apply a small amount of gas to the hose.
Then the yellow hose, from which the air has been bled, is securely fixed to the manifold. You need to open the blue valve again and continue filling the circuit with freon.
At this stage, turn on the compressor again and observe the pressure gauges to ensure that the system is operating normally. If the pressure remains stable, the pipes are bent and carefully sealed.
Do not pinch the service pipe or seal it until the system is tested. At this stage, the needle of the blue pressure gauge should constantly be in the region of zero.
At home, when filling the system with freon, you can use household scales to control the amount of refrigerant moved into the circuit
Some craftsmen fill the circuit with freon using only one pressure gauge. In this case, the amount of refrigerant that was transferred into the circuit is determined by weighing the freon cylinder on a household scale.
Otherwise, the downloading process is practically no different from the method described above.
What does freon look like leaking from a refrigerator?
How to detect a leak yourself? In open areas, the puncture site will be indicated by a black spot - the gas has escaped, and the oil in the circuit is non-volatile, it remains around the fistula. If a tube rupture occurs in the foamed part of the refrigerator, the chamber wall will swell, indicating the location of the leak. A specialist in finding freon leaks in a refrigerator uses a leak detector - a device that works on the principle of a metal detector. Having detected the location of damage, the device beeps.
You can determine that freon has leaked from the refrigerator if the chambers are warm and there is a brown oily puddle on the floor near the compressor. The refrigerant evaporated at room temperature, leaving oil, decomposition products, and condensation as a trace. You can understand that freon has leaked from the refrigerator yourself as soon as puddles of melted food and the uniform noise of a running compressor are detected. If you touch the capacitor - the grille on the end part - it will be cold. This is the surest indicator that the freon in the refrigerator has run out.
Is freon dangerous for humans or not?
As for the danger to humans and animals, freon has a generally toxic effect. In order for the gas to cause harm to the body, it must be inhaled for a relatively long time - more than 5 minutes. In this case, it is important to take into account the physical condition of a particular person, the concentration of the substance in the air and the number of impurities. Only the leakage of large volumes of freon in a closed and poorly ventilated room can pose a tangible danger to human health and the environment.
At the same time, during the first 2–3 minutes of poisoning, the body’s state resembles mild intoxication. Then there is a feeling of suffocation, lack of air, dizziness, irritation of the mucous membranes of the eyes. Then the trembling of the eyeballs begins, disruption of the heart.
If symptoms are ignored for more than five minutes, the body suffers serious damage to the nervous system, respiratory tract, and other organs. This can lead to loss of consciousness and even death. It is worth adding that non-toxic refrigerants are used for household models of refrigerators and freezers, so they are not dangerous. Poisoning situations are potentially possible when working in the production of climate control equipment, where freon is present in large volumes.
In the case of a household refrigerator, a leak of a critical volume of refrigerant is a serious breakdown - the equipment stops freezing.
How to check for freon leaks in a refrigerator
When users complain about the unpleasant smell from the refrigerator and associate it with a freon leak, they are right. Yes, the gas is colorless and odorless. But the refrigerant gradually evaporates into the microscopic hole. The climate in the cell changes. Microparticles of pathogens appear, creating an unpleasant odor. This is due to high humidity. What to do if you suspect that freon is coming out of the refrigerator?
- Check how often the compressor stops or whether it runs continuously.
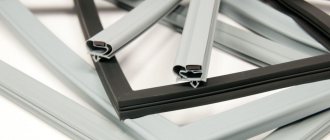
- Check the integrity of the door seal and the tightness of the circuit connection. Take a sheet of thick, high-quality paper, cut a strip of 5 cm and stretch it through the closed door. It drags with difficulty - the seal is normal.
- The compressor does not stop, there is no cold, check the voltage in the network. The compressor performance is 0 if the network is 185 V. The motor will work, but there will be no compression.
If other causes are excluded, contact a specialized center for diagnosis. A specialist knows how to determine the presence or absence of freon in a refrigerator.
R-290
The R290 freon label hides regular propane. Recently, it has begun to be considered as an alternative to traditional refrigerants. The characteristics of R290 refrigerant allow it to be used in domestic and commercial refrigeration installations.
The ozone depletion potential ODP of R290 refrigerant is 0. The global warming potential GWP is 3. It is used with polyolester synthetic oils. Its characteristics and chemical activity are similar to R600a.
In 1994, the production of household refrigerators using R290 refrigerant or its mixture with R600a began. More than 1000 pieces were produced in Germany. Since then, the following countries have been actively producing them:
- Argentina;
- Brazil;
- India;
- China;
- Türkiye;
- Chile.
Internal freon leak in refrigerator
The most expensive repair if freon has leaked from the refrigerator is considered to be changing the refrigerant circuit. The price of the work depends on the location of the leak. If it is a door heating circuit, it is turned off and the tube is laid along the rear wall. If a fistula has formed in the body, it is necessary to remove the insulation, re-lay the circuit and foam it.
The work is expensive, but even in a workshop it is impossible to recreate the factory circuit. Repairs that damage the thermal insulation change the thermodynamic properties of the chambers. Some companies, for example, Liebherr, consider refrigerators with a freon leak in the foam part beyond repair. Within 10 years of operation, they, according to the conclusion of their own service center, can change the device, contrary to Russian trade rules.
Where does freon most often leak?
There are three places where refrigerant leaks are more likely to occur:
- Welded joints. We are talking about any joints of parts of the circuit: tubes, compressor and evaporator. Seams are always an issue, especially when equipment costs are low.
- Technical connectors. Leakage can also occur through the filling valve. In different models, it may be provided by the design initially or installed independently by a master, for example, during repairs.
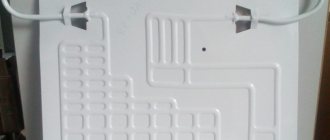
- The surface of the “crying” evaporator. This part of the structure can be isolated by the walls of the internal chamber or open, resembling a radiator. The evaporator can be damaged during operation as a result of mechanical stress or corrosion when the protective layer is destroyed.
Fixing a freon leak in a refrigerator
Various methods of restoring tightness are used in the circuit. An aluminum evaporator uses solder to an aluminum base to repair punctures.
The junction of a copper tube with an aluminum one is performed by argon welding on a special installation. It is possible that gas escapes at the junction of the fitting and the compressor, and the rest of the circuit does not require repair. The technician has several ways to determine the location of the freon leak in the refrigerator. The repairman's actions occur in the following sequence:
- fault diagnosis;
- detection of cracks and fistulas in the cooling circuit tubes, troubleshooting at home or in the workshop;
- vacuuming the system to remove condensate and freon residues;
- filling the circuit with gas in a certain volume;
- checking the system for tightness and cooling ability.
If, after pumping in the refrigerant, the cooling effect has decreased and the suction tube into the compressor is frozen - a lot of freon has been pumped in - recharging is required at the expense of the technician.
Freon line installation
Most equipment that works for cooling has the same operating principle. The exceptions are refrigerators without freon and air conditioners without refrigerant. Main elements of the freon system:
- Compressor;
- Capacitor;
- Filter drier;
- Capillary tube;
- TRV (thermostatic expansion valve);
- Evaporator;
- Return pipeline.
All nodes are connected to each other by copper pipelines. The capillary tube is also made of copper. All this together is called the freon route. Below we will consider why different system nodes are needed.
Compressor
It compresses the refrigerant so that in the condenser it changes from a gas to a liquid. At the same time, its temperature increases significantly. The heating and cooling capacity depends on the switching frequency and operating speed.
Capacitor
It is a radiator in which freon is compressed. When the gaseous refrigerant cools, it turns into a liquid state (condenses).
Filter drier
The filter is a cartridge filled with adsorbent granules. As liquid refrigerant passes through it, the adsorbent “pulls out” the moisture. Without it, water in the form of ice crystals can enter the compressor, causing increased wear.
Filter drier for refrigerator.
Filter drier for air conditioner.
Capillary tube
It is a copper coil of narrow diameter. Performs three functions:
- Prevents more liquid refrigerant from entering the evaporator than necessary;
- Equalizes the pressure in the evaporator and condenser, making it easier to start the compressor;
- Reduces the load on the compressor.
TRV
The thermostatic valve doses the amount of freon that is supplied to the evaporator. The efficiency of cooling or heating (in air conditioners and heat pumps) depends on the quantity.
Evaporator
A dosed volume of refrigerant under pressure is supplied to the evaporator. When it gets inside, its pressure drops and it boils (evaporates). In this case, the temperature of the refrigerant decreases significantly. As it circulates through the evaporator, it removes heat from the environment, cooling it. The freon itself heats up.
Refrigerator evaporator.
Return pipeline
Through it, the heated refrigerant passes from the evaporator to the compressor. Represents a regular copper tube without additional components.
Freon leak in the refrigerator - is it worth repairing?
Compared to replacing the compressor, finding a crack and restoring the circuit is much cheaper. The refrigerator gets a second life. There are cases when an evaporator, repaired 15 years ago, still works in an old refrigerator in exile in the country. Freon cannot just leak out of the refrigerator. The cold circuit is sealed. Over the years, a leak may develop at the junction between the copper and aluminum tubing. In Russian models, leaks are often found in the door heating circuit. Inexpensive repairs return the device to full functionality. That’s why, as soon as you find out that freon has leaked from the refrigerator, you need to call a technician as soon as possible. This operation cannot be performed independently - the risk of adding several more to one problem is too great.
Banned R-12
According to its characteristics, freon R12 is one of the most efficient refrigerants. It was used in car air conditioners in the West. Also used in almost all Soviet refrigerators, such as:
- Dnieper;
- Minsk;
- ZiS and ZiL;
- Smolensk;
- Biryusa;
- And in many others.
This refrigerant has a high ozone depletion potential. Therefore, its use was regulated by the Montreal Protocol on Substances that Deplete the Ozone Layer of 1987.
According to the protocol, the production of the refrigerant has been prohibited in developed countries since 1996, in developing countries since 2010. It is allowed to be used only as a fire extinguishing agent in submarines and aviation.
How to find a freon leak in a refrigerator yourself
If the compressor doesn't stop running, remember how it all started. Perhaps there was meat in the freezer, and you tore it off the wall with ice. Or maybe, in an effort to defrost the chamber faster, they “gently” pushed the ice crust away from the surface with a knife. At that moment, a slight hiss was heard, and soon everything became quiet. Was? Then the cause of the leak is obvious. The problem itself will not be solved; soon all the gas will be released, and the food will begin to spoil. It is necessary to call a technician to repair the damage or replace the evaporator.
The most common types of freon
Science knows more than 40 types of this substance, most of which are obtained industrially. The temperature of freon at which it boils is different for each type:
- R11 - trichlorofluoromethane (boiling point 23.8 °C).
- R12 - difluorodichloromethane (boiling point -29.8 °C).
- R13 - trifluorochloromethane (boiling point -81.5 °C).
- R14 - tetrafluoromethane (boiling point -128 °C).
- R134A - tetrafluoroethane (boiling point -26.3 °C).
- R22 - chlorodifluoromethane (boiling point -40.8 °C).
- R600A - isobutane (boiling point -11.73 °C).
- R410A - chlorofluorocarbonate (boiling point -51.4 °C).
As a rule, home refrigerators operate on R-22 freon (freon), while industrial and commercial refrigerators use R-13.