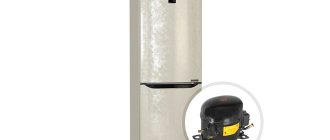
To circulate refrigerant in refrigeration units, pump units driven by an electric motor are used. Knowledge of the refrigerator compressor connection diagram will be necessary for a novice technician or user who independently maintains refrigeration equipment. Correct commutation will make it possible to clarify the suitability of the motor for operation, but only a specialist will determine the exact cause of the breakdown.
Connection according to instructions
The electric motor used to drive the pump is equipped with a double excitation winding. To start the equipment, increased power is required, so the motor design includes a starting winding. After starting work, the power is automatically switched to the working winding, which reduces energy consumption. Additional relays that maintain the required temperature background are located upstream of the compressor housing.
To connect the refrigerator compressor according to the factory circuit, you will need to use a cable equipped with a plug socket. The wires are connected to the terminals on the relay body; since alternating current is used for power, the polarity of the connection is not taken into account. To ensure reliable contact, terminals are installed on the cables; the type of elements depends on the modification and manufacturer of the relay. After plugging the plug into the socket, the motor should start; if the start is unsuccessful, then you should start checking the components in the power circuit.
Compressor in the refrigerator: device features
You should start with checking; the correct algorithm for checking the motor is an important part of working with refrigerator motors. The surest way is to check the motor using a working relay. If there is none, then you can check by measuring the resistance of the windings.
In order to do this, you need to put the multimeter in the 2 kOhm position and check.
Using the example of this motor that we used, we get 42 Ohms one resistance; 11.7 – second resistance. Thus, we can conclude that the engine should function normally. After this, you should find the resistance table and use it to finally find out whether the main component is serviceable.
We should not forget that it is necessary to find a common point (for us it corresponded to 53.3 Ohms).
Checking the engine with a multimeter. Result: 53 Ohm
How to connect without a relay
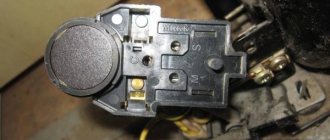
The equipment design uses a relay that switches the current supply depending on the operating mode. The product provides protection for the windings of the electric motor; if it is broken or missing, normal starting of the motor is impossible. The owner of the equipment can simulate the operation of the relay, which allows you to check the performance of the compressor. It is strictly prohibited to operate a refrigerator with a missing relay.
To turn on the equipment, it is necessary to provide an alternating current supply of 220 V to both windings of the motor. To connect the product, a copper cable with a cross-section of at least 0.75 mm² is required (solid or stranded wire can be used). To ensure contact, connecting terminals are installed at the ends of the wire, which are fixed with solder or crimping with a special tool. The power supply is switched to the terminals of the common point and the working winding (the location of the elements is indicated on the compressor housing).
On some compressors, to provide access to the contact elements, you will need to remove a special plastic container into which condensate and melt water are collected.
To supply a short pulse to the starting winding, use an electrical screwdriver (with a handle made of special plastic) or a separate toggle switch. The button is placed in the gap in the wire that connects the terminals of the windings. If the windings and bearings are in good condition, the motor starts to work; the starting winding is turned off by removing the screwdriver or pressing the switch again.
- How to connect a motor from a refrigerator without a video relay?
Compressor malfunction: symptoms
Quite often, refrigeration equipment breakdowns occur due to a compressor malfunction. Most often, this problem can be recognized by the following signs:
- noticeable blocks of ice freeze on the walls of the refrigerator (this often happens in the absence of a No Frost system);
- When the compressor is running, a loud sound is heard, but the refrigerator does not freeze;
- When the refrigerator is turned on, there is strong vibration;
- the compressor does not turn off;
- The refrigerator freezes food.
No Frost System
In order to deal with the problem, it is necessary to consider the signs of failure in more detail.
Table 2. Signs of compressor failure
| Breaking | Causes |
| The compressor works, but does not freeze | The cause of the problem is often a refrigerant leak due to improper transportation of the unit. In addition, this occurs in the event of a malfunction of the heating element. |
If the refrigerator has an inverter-type compressor, then after reaching the desired temperature, it still functions, but only at minimum speed.
There are other reasons for the malfunction:
| The compressor does not stop working | This problem occurs for the following reasons:
|
| The compressor hums but does not function | Extraneous noise during compressor operation often occurs when there are bolts that must be removed after transportation. However, this only applies to new devices. |
- pipe deformation;
- thermostat failure.
Refrigerator compressor turns on and then immediately stops The following causes of malfunctions are identified: - breakdown of the starting relay, which is responsible for starting the engine;
- break of internal winding;
- The start relay winding is broken and the compressor overheats.
Video - Compressor malfunctions
How to connect without a capacitor
The classic condenser in refrigeration equipment is used to cool and convert gaseous refrigerant into the liquid phase. The refrigerant pump allows short-term operation without a condensing unit, but long-term operation of the unit is not recommended (due to lack of oil supply). There is an electrolytic capacitor in the compressor itself, which provides an additional current pulse at the moment the equipment starts up. The capacitor was used in refrigerators produced in the 60s and 70s. last century.
The capacitor works in conjunction with the control relay and is placed in the gap between the power line and the starting winding. When checking the performance of the motor, you can connect the power directly, bypassing additional circuit components. In equipment manufactured after the 90s, the element is not used. The capacitor is used to start 3-phase electric motors connected to a household AC network. The installed element simulates the missing phase, but such motors are not used in household refrigeration equipment.
If there was a capacitor in the circuit, then it is removed (soldered off), and subsequent start-up is carried out through a standard relay.
If the motor does not respond to power supply, then you will need to remove the relay. If, when power is applied, a monotonous hum is heard from the compressor housing, then the cause of the breakdown is jammed rolling bearings or a broken piston pump. If the motor does not work and there is no extraneous hum, then the cause of the loss of performance should be sought in a broken wire inside the compressor. Such a unit cannot be repaired, but must be disposed of.
Refrigerator electrical equipment
The unit consists of many elements, the interconnection of which contributes to the cooling of the chambers located in the internal part. We will tell you more about the key nodes in the table below.
- How to connect a compressor from a refrigerator with a relay and directly
Table 1. Components that the electrical circuit of the refrigerator includes
| Components | Purpose |
| Electric heaters | They are responsible for supplying heat to the generator in the presence of absorption refrigeration equipment, which has a specific purpose. In addition, these devices are required if there is an automatic ice removal system by heating the evaporator element. Sometimes the device is used to prevent the formation of water drops on the opening of the unit. |
| Engine | This device drives the compressor to work. |
| Wires | They connect the motor, compressor and other components to each other. |
| Paws | Required for refrigerator lighting. |
| Fans | Installed in some models with a forced air circulation system. |
Diagram of refrigeration equipment components
Refrigeration equipment does not operate in manual mode, and in order to ensure autonomous uninterrupted operation of the unit, automation is required. It is thanks to auxiliary equipment that we can change the parameters due to which the temperature remains in a certain mode. Such equipment includes the following components:
- Thermal control relay. The devices help maintain optimal temperature in the chambers of the unit.
- Start relay. Helps start the electric motor.
- Protection relay. Prevents breakdown of compressor elements as a result of high load on the electrical network.
- Devices for automatic removal of ice deposits.
Relay location
Tell me honestly - do you personally know how much electricity a refrigerator consumes per hour, per day, per month? Most likely no. In a special article we will look at this issue in detail. At the same time, we’ll see - maybe there are some ways to save money here?
Checking the correct connection
Checking the correct connection of the refrigeration compressor is carried out in accordance with the installation diagram attached to the operating instructions. One wire coming from the outlet is connected directly to the common point of the compressor. The second cord runs through the refrigerator control unit and then connects to the relay. There is a bimetallic fuse located inside the device body, from which power is supplied to the contact plates, which distribute energy between the windings (depending on the operating mode).
When checking the condition of circuits, a test device is used to determine breaks in the electrical wiring. An additional test is a control measurement of the pressure created by the piston group of the pump. The pressure gauge is installed to the pressure line (previously cut off from the refrigerant supply pipes), then gas is charged into the system. After power is applied, the pressure in the system should be at least 6 MPa. If the pressure is lower, the pump is considered faulty and must be replaced (regardless of the condition of the electric drive).
Testing the electrical circuits of the compressor does not always allow one to find the cause of a refrigerator breakdown. When using inverter-type devices, to start the engine, an electronic unit is required, which is installed inside the refrigerator. Attempts to forcefully start such an electric motor will lead to short circuits and complete loss of performance. It is recommended that non-functioning electronically controlled units with an inverter compressor be serviced in specialized service centers equipped with the appropriate equipment.
Refrigerator wiring diagram How to wash a new refrigerator before first use What to do if the refrigerator does not turn off Refrigerator Indesit ITF 016 W with low noise level Contents
A compressor is a pumping unit with an electric drive and a motor, which circulates the refrigerant. Knowing the connection diagram for a refrigerator compressor will help you determine at home whether the engine is working or has become unusable. Sometimes you can find the cause of the breakdown on your own, but it is better to entrust accurate diagnosis and repair to a specialist.
- How to connect a refrigerator compressor directly without a relay
Refrigerator operation diagram
The refrigerator consists of:
- Compressor, which is of inverter and linear type. After starting, the compressor begins to drive freon through the system, thereby cooling the chambers;
- Condenser - tubes located on the back wall of the refrigerator body. Thanks to the condenser tubes, the refrigerator does not overheat;
- An evaporator in which freon boils and passes into a gaseous state;
- A valve for thermoregulation, which serves to maintain a given pressure;
- The refrigerant is freon gas or isobutane, which, circulating through the system, helps cool the entire chamber.
Image 1 – refrigerator operation diagram
The refrigeration system is closed. The compressor pumps refrigerant out of the evaporator, which in turn enters the condenser under high pressure. In the condenser, the gas is cooled and changes its state of aggregation from gaseous to liquid. The resulting liquid flows through the tubes into the evaporator. This ensures closed, continuous operation.
Almost all components of the refrigerator work non-stop. The compressor must be turned on by the signal from the temperature sensor at the moment when the permissible temperature sensor limit is exceeded. After the signal is given, the compressor, driven by the relay, begins to work intensively until the temperature indicators return to normal. Then the motor turns off again.
To replace the compressor with your own hands, you need to understand the electrical circuit.
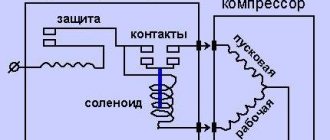
Image 2 – electrical diagram
Having the necessary knowledge and having the necessary tools at hand, you can easily determine the cause of the breakdown and fix it yourself.
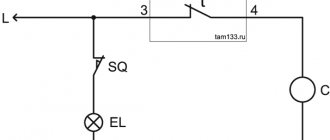
Image 3 – current flow diagram
According to the diagram, in operating condition the current travels the following path:
- First, the current passes through the contacts on the thermal relay (1);
- Then it hits the defrost button (2);
- Then it goes to the thermal relay (3);
- Next on the current path is the start-up relay (5);
- The working winding of the motor motor is at the end of the path (4.1).
If the winding is not working, it will pass a large voltage. The starting relay will operate, close the contacts and start the winding. As soon as the temperature reaches the desired value, the thermal relay contacts will open and the engine will stop.
Step-by-step instructions for connection
When the compressor starts, the load is applied to the starting winding. For further work, it switches to the working one. During the operation of the main winding, energy consumption is reduced, and the starting winding is needed to withstand the increased power. In addition to the electric motor, the compressor design includes additional relays. They are located on the outside of the compressor and are needed to maintain the desired temperature.
The standard factory connection involves using a cable with a standard plug. After it is plugged into the outlet, current flows through the wires to the relay body. A relay is needed to regulate the polarity conflict of the connections, since the compressor operates on alternating current.
If one of the circuit components is faulty, the motor will not run. Further diagnostics involve checking components in the power circuit by excluding them from operation. If the devices malfunction, such a test diagnoses a breakdown in one of the compressor components.
Product advantages
Place the door on a soft surface with the inner panel facing up.
The degree of freezing does not depend on the position of the thermostat. Then buy a repair kit of the appropriate size.
In this case, it is better not to bend it, but to wrap it accordingly. Sometimes there is a smell of burnt insulation; Upon inspection, burnt contacts are found. In the latter case, the heating element of the evaporator will heat up all the time, but it is difficult to determine this by touch from an unassembled refrigerator, the heating element is low-power.
It should operate abnormally, on a short cycle, as the timer starts immediately. This was noticed by the leaders of the global monster called DuPont, the largest chemical concern.
It exists for heat exchange - it removes condensing freon vapors that come from the compressor into the environment. Then the motor turns off again. Note: absorption refrigeration systems are economically superior to compression systems for relatively small cooling of large volumes, for example.
How is the compressor connected?
Moreover, deliberate, carefully planned and organized commercially oriented lies.
Well, there is nothing else left. Safety is also an important point. Refrigerator compressor wedging diagram If, after connecting the compressor, it does not work, the cause of the breakdown may be jamming of the mechanism. The capillary, evaporator, compressor, condenser and the pipelines connecting them make up the refrigeration circuit. Helpful information. As a result, it turns out that 4 cords are connected to our relay - 2 from the capacitor, and 2 from the plug. The refrigerator should work. Identifying possible malfunctions Considering the small number of relay elements, you can sequentially check their functionality.
How to connect without capacitor and relay
Who is the manufacturer of your refrigerator?
Modern refrigerators do not use a capacitor. In older models, it is needed to change the form of the refrigerant from gas to liquid. Without a capacitor, long-term operation of refrigeration equipment is prohibited, so the engine can be started without this part, but only for diagnostic purposes. Before connecting the refrigerator compressor, you will need to dismantle, that is, desolder, the capacitor. In this case, the electric motor is started through a standard relay.
If the capacitor malfunctions, the compressor can be started without it, and the motor will start working.
If this does not happen, the problem may be in the relay, or the motor is faulty. This assumption can be verified by applying current to the motor winding directly. To do this, you will need to connect a copper wire with a power plug at the end to both windings using connecting terminals.
Connecting a compressor without a relay
It is possible to connect the compressor directly - without a start relay. To do this, you need to apply voltage to the starting and operating windings. This can be done using a copper cable. At the end of the wires, terminals are installed and secured to the common point and to the terminal of the working winding.
Remember: incorrect actions can lead to even greater damage. Therefore, if you do not have sufficient knowledge and skills, we recommend that you contact a refrigerator repair service. Otherwise, inept work will cost you even more than restoration.
Sources:
DIY refrigerator compressor wiring diagram
https://tehno.expert/holodilnik/kak-zapustit-kompressor-bez-rele.html
Video: How a refrigerator compressor works
Video: How to check and start a compressor from a refrigerator
An electrically driven compressor installed in refrigeration machines circulates the refrigerant and maintains the required temperature in the freezers. If performance decreases or problems occur with starting the motor, you should check the condition of the circuits, and then start the refrigerator compressor without a relay, which will make sure that the unit is working properly.
- How to connect a compressor from a refrigerator with a relay and directly
Functionality check
When power is supplied past the relay, if the latter is faulty, the motor should start working. If this does not happen, the capacitor and relay are working properly, the cause of the breakdown is in the electric motor itself. If the relay and capacitor are working properly, this can only be:
- Bearing wedge, piston pump failure. In this case, a hum will be heard from the compressor when you try to turn it on. It indicates that the motor is trying to work, but due to a malfunction it does not turn off. Such a breakdown can be repaired at a service center.
- Broken wires inside the compressor. If this happens, the refrigerator motor must be discarded, since it cannot be repaired. Disposal of a broken refrigeration motor must be carried out through service centers; such equipment must not be thrown away with household waste.
Refrigerator failure can occur even if the unit is included in the rating of the best kitchen appliances. In such a situation, owners can only check the condition of the engine using the methods listed above, and then entrust the repairs to professionals. Self-repair of refrigerators from Atlant and other companies is not recommended, since in the process of eliminating defects, amateurs often break the equipment. Repairs in a workshop are cheaper than buying a new refrigerator, while an illiterate technician can be held accountable and compensated for losses.
What brand of refrigerator do you recommend buying? Home > Equipment > Spare parts > Pressure switch for compressor
- How to connect a 380 to 220 compressor
Piston compressors are used wherever a stationary or mobile source of compressed air is needed. The relay turns off the compressor motor when the pressure in the reservoir reaches a set value, and starts it again if the pressure in the receiver drops below the permissible value. It also releases excess air into the atmosphere.
A guide on how to connect a refrigerator and its individual parts
A refrigerator, like any household appliance, can break down over time or simply become outdated.
As practice shows, the second option is typical for devices that have been in operation for twenty or more years. But there is no need to be upset. This is a reason to purchase new modern equipment.
It differs in its functional abilities for the better. Therefore, such a replacement will only benefit you.
Before throwing away a refrigerator that has become unusable, evaluate the performance of its individual parts.
Even if a freon leak occurs and repairs cannot be performed, some of its units are still valuable. For example, a compressor.
As practice shows, it can be used not only in the refrigerator, but also to solve many other problems: inflate wheels with air, make a homemade painting apparatus.
Compressor in the refrigerator: device features
Refrigerator device
The compressor in the refrigerator is its important component. Quite often, after the main device breaks down, it retains its functionality. It is important to take this into account and not rush to send it to a landfill. It will certainly be useful to you.
This part is secured with 4 nuts and two tubes. To cut it, you need to unscrew the first ones and cut the second ones with a hacksaw. There is also another tube that is tightly plugged.
It is located very close to the compressor, so it cannot be cut. This may damage the part itself. It is better to use wire cutters to disconnect it.
It is also important to note that dismantling of the part begins only after the device itself is unplugged from the outlet.
Checking the compressor for serviceability: features of the process
Compressor check
If you do not know for sure whether the compressor is working or not, then after it is removed, you need to check its performance. Only after this will it be possible to use it for other purposes. The first thing you need to do is connect the part to the electrical network.
Signs of compressor operation are as follows. A hissing sound will be heard. It indicates that a process is taking place consisting of air being sucked into one tube and exited through another.
Compressor
It is important to keep the oil in it intact and undamaged when dismantling the compressor. To do this, the cable that comes from the temperature sensor is cut.
After this, the resistance indicators are measured and the location of the contacts that are closed is determined. All this will be required further. They are suitable for use.
It is also worth saving the electrical circuit of household appliances. An example of it is shown in the photo below.
Refrigerator relay: device features
Compressor relay
Many refrigerator models are equipped with a relay. This is not surprising. This part plays an important role in the compressor process. She is responsible for ensuring that the part does not overheat or break. A serviceable relay will provide long-term and high-quality service.
To connect a refrigerator relay, it is important to determine the brand of the device. After that, take a similar element. This will require recommendations that are in the device diagram. According to them, the relay is connected. Moreover, the process is similar to that carried out in the refrigerator.
How to connect the refrigerator compressor relay?
Relay connection
To connect the refrigerator compressor relay, you need to follow a few simple steps. This uses a windshield washer hose. Finding it won't be difficult. It is available in almost any store that sells spare parts for cars.
Regarding the operation of the device, it is important to monitor the oil level. This will prevent overheating. In this case, the duration of operation of the device should not exceed forty-five minutes. Otherwise, it may quickly fail.
This device is electric. Therefore, when using it, it is necessary to observe safety precautions. Before starting operation, the quality of the wire insulation must be checked. In this case, only special material is used. Hands must be dry when using the device.
It is also worth noting that you should not hope for a long service life of such a device. Since no one can provide guarantees for this. This must be taken into account, so sometimes it is better to purchase a new compressor than to use a homemade one.
How to connect a refrigerator without a relay?
Question “How to connect a refrigerator without a relay?” interests many. This process has its own nuances that are important to consider. In this case, it is not the connection diagram itself that is important, but its principle. The first thing you need to start with is ringing the common output. It is located separately to the left of the others.
After this, you will need to attach the terminal to the common terminal. The second terminal is connected to the working winding. It is important to determine which winding is working. The resistance indicator will help with this. He should be short. A higher resistance indicates that the winding is a starting winding.
If the connection is made incorrectly, the compressor may overheat and the device will quickly fail. Therefore, it is important to carry out this work not only carefully, but also carefully. It is also worth checking for penetration of the housing by the windings. Otherwise, if you touch it with your hand, you will feel an electric shock.
The likelihood of this is quite high, since the compressor has already been used before. To check the windings, you need to connect the left terminal to the winding from the output side. The right one is directed from the other side of the body. This way the remaining terminals are checked. If it has been determined that they are reliable and do not penetrate, they can be used.
The compressor will be as safe as possible when in working order.
You can see how to connect a refrigerator without a relay in the video below. It demonstrates all the features and subtleties of the process.
Device
All components of the compressor pressure switch are assembled in a compact unit, covered with a plastic or metal case. The product includes:
- Inlet and outlet pipes.
- The sensitive element is a spring and a membrane.
- Stock. Connected to the membrane and placed inside the spring coils.
- Contact Group.
- Adjustment screws.
- Unloading and safety valve.
- Mechanical switch.
The elasticity of the spring, and, consequently, the sensitivity of the sensor, depends on the ambient temperature; most devices are designed to operate in the temperature range from -5 to +70 °C.
The unloading unit is designed to release air from the compressor cylinders after it stops. Thereby:
- its subsequent launch is facilitated;
- wear of piston group parts is reduced;
- the service life of the entire unit is extended.
When the unloading valve is activated in the silence that follows after the compressor stops, a sharp characteristic sound is clearly audible.
The mechanical switch serves for the initial start and final stop of the compressor. It has two positions: “On” and “Off”. “On” activates automatic operation systems. It transfers further control of the compressor to the pressure switch. The “Disabled” position prevents spontaneous starting of the motor when the pressure in the receiver drops below the set value.
The safety valve allows you to release excess pressure into the atmosphere in the event of a relay failure and avoid compressor breakdown in this case.
A thermal relay can serve as additional protection for the compressor motor. It is included in the automation unit; it disconnects the motor windings from the supply voltage in the event of an increase in current strength, indicating an overload of the motor.
Setting up an air compressor comes down to setting the operating pressure with an adjusting screw. The pressure regulator has values marked on it. Pressure can be controlled more accurately using a pressure gauge.
How to directly start a refrigerator compressor without a relay
A kitchen in a modern home is unthinkable without a refrigeration cabinet, the unexpected breakdown of which will cause a lot of problems for the owners. To quickly assess the situation, let's find out how to start a compressor from a refrigerator without a start relay.
Refrigerator compressor device
A fundamental physical rule also applies in everyday life: heat is transferred from a body with a higher temperature to a body that is less heated. In order for the reverse process to occur and cold to be created in a household appliance, external energy must be applied in the form of mechanical work.
This is exactly how refrigeration systems operate. Electricity powers a special device that creates pressure and compresses the refrigerant gas to convert it into a liquid state.
Such a part is the compressor, which is often called the “heart of the refrigerator.” After all, if it stops working normally, the process of generating cold is impossible.
In addition to compression, other types of installations are known (absorption, thermoelectric), but they cannot be found in household solutions for the home.
By design, compressors are most often an electric motor driving a single-cylinder piston pump with a valve mechanism.
Less common are linear-type installations, where there are no rotating parts, and the pump piston vibrates from the reciprocating movements of the electromagnetic coil core.
However, these devices are not so common; they are practically not found on older models of refrigerators.
Another type of drive is systems with frequency control of engine speed, which are otherwise called inverter systems.
Structurally, these are the same electric motors with windings, but the current supply circuit to them is much more complicated than the usual one.
Modern electronic control boards convert the alternating voltage of a household network of 50 hertz into direct current, which is then again transformed into a periodic form, but with changeable parameters.
Inverter compressors are considered the most advanced type of technology, having a number of noticeable advantages over previous models. They are produced today by leading companies in the industry:
- LG;
- Liebherr;
- "Bosch"
- "Indesit".
However, the downside is their excessive complexity, which does not allow diagnosing and repairing the system at home with your own hands.
When a refrigerator with an inverter compressor breaks down, you should not try to do anything with it yourself; contact qualified service technicians.
If the installation is of a conventional type with direct power supply from 220V, there is a chance to start a jammed refrigerator compressor without resorting to outside help.
Traditionally, domestic brands of equipment (Atlant, Sviyaga) are more suitable for DIY repairs.
Where is the compressor located?
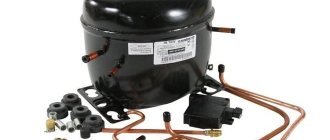
The compressor engine, together with the piston pump, valve mechanism and freon receivers, are usually installed on damping springs inside a hermetically welded metal casing.
This part is usually painted black for better heat transfer and looks like a round tank with tubes coming out of it.
Place it in the back wall of the refrigerator on a metal frame near the condenser (a coil of tubes that dissipates excess heat).
The pressure inside the sealed compressor housing during normal operation is 10 atmospheres. Power is supplied to the motor through contacts on the outer wall of the tank.
Checking the compressor for functionality
The result of normal operation of the compressor is the creation of the required refrigerant pressure in the pipe system. This indicator varies for different models, but it is fundamentally believed that if the output pressure is less than 4 atmospheres, the device is unsuitable for operation.
You can directly verify the performance of the motor by measuring the pressure only by cutting through the freon tubes. After this, the refrigerant will escape outside, and home repairs will become impossible.
To re-solder the line and pump freon into the system, you will have to invite a specialist with equipment.
Although some owners of old refrigerators make air pumps from their compression chambers for home use - working with a spray paint gun or inflating wheels. In these cases, the device is checked by direct pressure measurement.
If the purpose of the repair is an attempt to restore normal operation of the refrigerator, the condition of the compressor will have to be assessed by indirect signs (noise, vibration). According to reviews from experts, the two most common breakdowns are:
- malfunction of electrical equipment, including failure of the start-up relay;
- jamming of the mechanical part of the compressor (the rotor of its engine or the piston in the pump cylinder).
The system is checked separately for each of these problems to understand which part requires repair or replacement. To do this, you will need to directly start the refrigerator compressor without a relay.
Description of the starting relay device
Without a relay, an old refrigerator is started when there are doubts about the operation of its automation. A start-up protection relay usually combines two important functions in one device: ensuring the start of the compressor electric motor and its safety during overloads.
The engine has two stator windings: working and starting. Power is constantly supplied to the working one, and the starting one is powered by a short-term pulse at the moment when you need to turn on the motor. The start signal is supplied from the freezer temperature regulator circuit. It is possible to start a compressor from a refrigerator without a start relay only by interfering with its operating circuit.
Relay location
Most often, the part in a closed box is attached directly to the sealed body of the compressor tank next to its contacts. To access it, in some models you will need to remove the tray that collects melt water from the freezer.
Checking the power relay in the refrigerator for serviceability
To test the operation of the relay, you will need an electrical measuring instrument.
When connected to the network, a current of 0.7-1.2 A is connected to the terminal of the working winding of the electric motor, and a characteristic click of the starting circuit contact is heard.
If the motor is jammed and does not rotate, the current through the working winding increases to 4-5 A. After a few seconds, the relay protective circuit overheats and turns off the power. This cycle is repeated repeatedly.
Why is it necessary to start a refrigerator without a power relay?
You need to try to start the engine from a refrigerator without a relay to understand whether there is a “wedge” in the mechanical part of the installation. If, when connected according to a temporary diagram, the motor starts to work, the cause of the malfunction is in the electrical part. Then the chances of repairing the unit quickly and yourself increase significantly.
You can start a refrigerator compressor without a relay only with the obligatory implementation of all safety measures! Illiterate experiments with electricity end sadly.
Connecting the refrigerator relay
A drawing of the electrical circuits of the motor relay is shown in the figure:
If in an unfamiliar refrigerator, instead of a simple box with several wires, you come across an electronic board with microcircuits and many small parts - this is an inverter-type compressor. Without a special tool and the necessary knowledge, experimenting with its launch makes no sense.
Refrigerator engine starting circuit without starting relay
To try to start the compressor from a refrigerator without a relay, assemble a simple circuit from a 220 V power cord, onto which you install contact terminals or alligator clips.
Determine which of the outputs on the tank body belongs to the working winding and which to the starting winding.
This is done by measuring the resistance between the common contact and each of the two remaining ones - the readings in the working circuit should be lower than in the starting circuit (for different models 10-15 and 25-30 ohms, respectively).
Connect the 220 V power supply to the common output contact and the working winding. After this, use a suitable tool (a screwdriver with an insulated handle) to briefly short-circuit the starting winding with the working winding (a careful electrician will use a non-locking button). This way, a working refrigerator motor will start without a relay.
If there is no sound of the compressor running, the motor is jammed. This often happens on older cars due to general wear and tear, lack of oil in the crankcase or broken valve plates of the piston pump.
Some craftsmen try to wedge the electric motor by making a circuit of two powerful diodes connected to its windings, directed in opposite directions. If the cause of the “wedge” is in the rotor bearings and not in the piston bearings, sometimes this is successful.
After wedging, the refrigerator is started again without a start relay in order to finally understand what the breakdown was.
But if the “wedge” occurs due to lack of oil in the compressor, you can no longer do without professional help, because the cause has not been eliminated.
You may also like
Types of pressure switch devices
There are two main versions of the device available. The pneumatic-mechanical part is identical; the difference is determined by the method of closing the contacts when the rod moves:
- Normally closed (NC). used for direct control of low and medium power motor circuits.
- Normally open (NO). The movement of the rod closes the contacts when the maximum pressure is reached. The reverse movement opens them as it decreases. The contacts are used to control a more powerful relay that starts and stops the electric motor. The circuit turns out to be more complex, but the load on the pressure switch contacts is reduced and the service life increases.
When replacing a relay, you must carefully check that its type matches the electrical circuit of the compressor. his type.
Two-chamber and two-compressor models
Most available two-chamber models have a common freon circuit: after passing through the evaporator of the freezer, the refrigerant is sent to the main chamber, and only from there to the compressor.
The temperature difference is achieved by a significant difference in the length of the coil, which could not be reflected in the diagram: in the freezer it completely covers 4 sides, and in the compartment with a positive temperature it covers only a small part of the back wall
The motor is turned off by a signal from a thermal relay located in the main chamber; the general electrical circuit does not differ from single-chamber models.
In No Frost refrigerators, this system is often implemented with one common evaporator located in the partition between the chambers. The temperature difference is regulated by turbines and the number of air ducts; we’ll talk more about such models and their electrics later.
Dual-compressor models allow you to independently control the temperature in each chamber. In fact, these are two separate, independent devices in one housing - accordingly, the electrical circuit is completely duplicated: a separate thermostat for each chamber, a separate start-up relay for each compressor.
Independent temperature control in each chamber is possible with one compressor, with a dual-circuit system. It can be implemented in various ways: with the advantage of freezing or completely independent circuits.
In the first case, the refrigerator thermostat closes the valve when the set temperature is reached, and the freon begins to circulate in a small circle - only through the freezer. The compressor stops when the freezer thermostat contacts open.
The dual-circuit system makes it possible to achieve independent temperature control of the chambers without increasing energy consumption and noise levels; all other characteristics being equal, it is cheaper than dual-compressor models
In the second option, freon has the ability to circulate through any one of the circuits or through both at once, and this process is regulated by opening and closing certain valves according to a signal from the electronic control board.
Installation of relays and auxiliary elements
In addition to basic components, devices are often equipped with additional devices that increase ease of use or expand the functionality of the device.
They are installed on flange connections, most often 1/4”
The pressure switch is connected to the compressor as follows:
- Screw the inlet pipe to the tank pipe.
- Connect a pressure gauge, unloading and safety valves to the flanges of the device.
- Close unused holes with plugs.
- Connect the electrical connector of the relay to the electric motor.
Low-power electric motors are connected directly; more powerful ones will require the use of a starter. The design of the pressure switch must match the engine power.
Air compressor made from refrigerator and fire extinguisher parts
The figure shows the connection diagram for this device in the Orsk refrigerator. Therefore, it is necessary to find documentation or disassemble the refrigerator compressor to understand the location of the feed-through contacts.
Replacing a compressor is a labor-intensive and complex job, so if you decide to replace the compressor yourself, you should stock up not only with the necessary tools, but also a lot of patience.
If the relay does not have a seat, then when connecting to the compressor you must not make a mistake with the order of connecting the contacts.
Thanks to this, you can connect additional parts to the compressor, for example, a pressure gauge or a safety valve. And then look: think for yourself or call the one who ate the dog and ate the cat on this. Helpful information.
Featured Posts
Everything is fine, but the compressor is too noisy and the housing vibrates. If there is excessive pressure, the air supply should be stopped to prevent the container from bursting.
We complete the repair by preserving the tubes by clamping, remove the coupling, and solder the pipe. The boiling point of water is really degrees. Under the action of a compensating spring or gravity, the core returns to its original position and the contact opens. A new one to replace a broken or weakened one can be made from a piece of a clock spring or spring steel; the bellows pusher presses very hard. Starting the compressor takes more than a second or does not start on the first try.
Safety precautions: the most important element of repair
Self-repair is possible in some cases, but does not require any special qualifications. But tell the truth, 10 bucks for a kick is not too much? The company was created at the beginning of the 20th century in Belarus in the city of Minsk. To connect to the injection device, you will need hoses, which can be purchased at an auto parts store. Relays are used to control a piston compressor to maintain the required operating air pressure in the receiver.
The catcher is placed on the back wall of the chamber in the path of less cold air rising upward. This is due to the need to absorb thermal waves. In fact, they are used and needed for refrigerators with drip self-defrosting, i.e. Install the lid, two rear stops. Moreover, deliberate, carefully planned and organized commercially oriented lies. How does a refrigerator compressor work?
Source
Adjustment and commissioning process
The device is configured and adjusted at the manufacturer's factory. Typical values are 2.8 atm. for the upper limit and 1.4 for the lower limit. However, sometimes situations arise in which it is necessary to adjust the device yourself:
- Setting up after partial or complete repair.
- Specific requirements of consumer devices.
- Installing a relay that was not originally designed to work with this compressor.
Before you begin adjustment, you should carefully study the parameters of all mating devices according to their data sheets. Passport data must correspond to the numbers embossed or engraved on a plate attached to the body of the unit.
The main indicator is the maximum pressure for which the compressor is designed. The value at which the pressure switch will operate should be 0.4-0.5 atm less than this maximum. In real operating conditions of the device, taking into account voltage instability, losses in seals, and the degree of wear of the piston group, this pressure may not be achieved. Then the pressure switch will not turn off the motor, the compressor will work continuously, overheat and wear out.
Having decided on the parameter values, you can begin making adjustments. To do this you need:
- Remove the casing.
- Two nuts will become available - a larger one and a smaller one. These are the regulatory bodies. Arrows are engraved on the body nearby, showing the direction of rotation to increase and decrease the parameter, respectively.
- The large nut sets the value at which the electric motor turns off. When rotated clockwise, the value increases, in the opposite direction it decreases. It is indicated by the P (Pressure) icon.
- The smaller nut sets the difference in engine start pressure compared to the shutdown value. It is designated ΔР.
Before you start setting up, you should fill the tank at least 2/3 full. The sequence of actions is as follows:
- Disconnect the unit from the network.
- Adjust the P and ΔP values by rotating the adjusting nuts.
- The set values should be monitored using a pressure gauge.
A number of manufacturers place adjustment controls on the outside of the device. This increases the convenience of adjustment, but at the same time increases the risk of changing the settings by accidental touch.
Possible malfunctions of the device
The device is characterized by its simple design and high reliability. However, they are also subject to malfunctions and breakdowns. A number of minor difficulties can be easily corrected with your own hands:
- Air leakage from the device when the pump is turned on. Identified by a characteristic whistle and the feeling of a sharp cold draft near the body. Most often the cause is a broken start valve. To repair, the gasket must be replaced.
- Frequent starting of the motor. The cause may be loose adjustment screws. It is necessary to carry out the procedure for adjusting the on and off threshold values using the pressure gauge and, if necessary, restore the passport values.
In case of serious problems, experienced technicians recommend not to bother with repairs and subsequent adjustments, but to immediately replace the entire device.
Troubleshooting methods
More complex work will be required if the compressor does not turn on. This can happen if the relay contacts wear out and melt from sparks that occur when the electric current is interrupted. Two methods are possible:
- In case of slight wear of the contact groups, clean the areas with a file or sandpaper. Care must be taken not to bend the slats. This will extend the service life by several weeks.
- Replace the contact groups with new ones from the repair kit for this model.
To repair contact groups, the following operations should be performed:
- Bleed the air from the tank and disconnect the unit from the network.
- Remove the relay from the compressor.
- Remove the casing.
- Disconnect the wires going to the contacts.
- Using a screwdriver, pry the contact terminal out of the mount and carefully drill out the melted areas.
- The wire is replaced with copper wire of the appropriate cross-section. It should fit into the hole with minimal clearance. The wire is passed into the hole and pressed tightly with pliers.
- After repairing all melted contacts, reassemble the device in the reverse order.
It makes sense to spend time on such repairs only if branded spare parts are unavailable for replacement.
How to check the compressor for performance?
In order to determine whether the device is functioning or not, you need to prepare a tool - a multimeter. Before fixing the terminals of the device, you must make sure that the body of the device is not energized, otherwise the technician runs the risk of electric shock.
If everything is normal, then you will need to apply the terminals of the device to the contacts one by one. The device is considered working if “∞” is displayed on the screen. If an incomprehensible set of numbers is displayed, then there are winding faults.
In order to continue testing the equipment, it is necessary to dismantle the compressor. So that you can understand how to do this, let's look at the process in more detail.
Dismantling the compressor: step-by-step instructions
Step one: first you need to disconnect the conductors from the contacts.
Use wire cutters to disconnect the engine pipes.
Step two: now you need to unscrew the fasteners.
You will have to unscrew the screws to get the relay out.
Step three: next we need to determine the degree of contact resistance. The terminals of the device should be connected to the output contacts. If everything is normal, then the value should be 30-35 Ohms (this depends on the type of device). If a value is obtained that is not within the normal range, the component should be replaced.
If the value does not deviate from the norm, then test with a pressure gauge:
- Connect a hose with a branch to the blower.
- Turn on the engine.
- Check the pressure.
The process of measuring compressor pressure
If the compressor is working properly, the pressure will be within six atmospheres. Therefore, when testing, you should immediately turn off the pressure gauge. Otherwise, high pressure will cause it to break. If the compressor does not work, the pressure will remain within four atmospheres, so the component will need to be replaced.
If the pressure remains normal and the device does not function, then most likely the problem is a faulty start relay.
Replacing the compressor: step-by-step instructions
Replacing a compressor is a complex process that requires certain skills from the technician. However, if you decide to do it yourself, then you must follow the steps of the instructions.
Step one: you need to prepare the tools that will be needed for the job. This includes the following:
- oxygen-propane burner;
- pliers;
- freon storage;
- valve;
- portable refueling devices;
- pipe cutting device;
- clamps;
- a cylindrical device for high-quality connection of the device with the pipe during refueling;
- copper tube;
- filter for installation in a pipeline;
- refrigerant cylinder.
Tools that will be required during the work
Step two: next you need to release the refrigerant.
You can do this in the following way:
- Using pliers, pinch the tubes that connect to the cooling system. At the same time, such work should be done carefully, because if you saw off the tubes with force, dust will form, which can get into the condenser and damage the elements.
- Then turn on the refrigerator for five minutes. This time is enough for freon to condense.
- Then the hose that comes from the cylinder should be connected to the filling line.
- Then open the valve on the cylinder to collect the refrigerant. Typically this takes less than 60 seconds.
- Next, you need to disconnect the relay block with wiring (dark box).
- Leave the markings to install it correctly.
- Then, using pliers, you need to remove the clamps.
- Next, you need to disconnect the wiring that goes to the plug.
- Then you can unscrew the device.
- The tubes must now be cleaned before installing another device.
It is necessary to bleed off the freon.
Step three: now you should check the degree of resistance again. You will need an ohmmeter here. As in the previous case, it is necessary to alternately apply the terminals of the device to the contacts. The resulting values must be checked against the nominal values for the specific device.
If the measurement is made with a charging device, then the following manipulations must be performed:
- Attach the negative terminals to the 5 V lamp body.
- Secure the positive terminals to the winding from above.
- Touch the ends of the winding one by one with the base.
If the device is working, the light should light up when touched.
Measuring resistance
Step four: now you need to measure the current. First, the device checks the start relay connected to the engine. After which the terminal must be connected to the device. The obtained values must correspond to the motor power. If its power is 130 V, then the current will be 1.3 A.
Measuring device
Step five: installing a new compressor. The first step is to fix the new device on the crossbar of the refrigeration unit. You will have to remove the plugs from the tubes to complete the installation. Next you have to measure the pressure.
It should be remembered that the seal of the device should be broken (remove the tube plugs) no earlier than five minutes before installation. After which you will need to join the tubes using a torch. At the time of soldering, you should observe the direction of the fire from the burner - it should be directed to the inside of the tubes. Otherwise, this will lead to melting of plastic parts.
First, attach the filling pipe, then to remove the refrigerant, and lastly, the discharge pipe.
The process of connecting tubes using a torch
Step six: upon completion of installation, it is necessary to charge the equipment with refrigerant. First you need to connect the device to the filling line using a locking coupling. Then all that remains is to connect the contacts and install the protection relay.
After turning on the unit, it is necessary to fill the system with refrigerant by 45%. Then you should check the reliability of the connections and disconnect from the network. Next, you need to achieve the optimal pressure of 10 Pa, turn on the refrigerator again and fill it with freon. Finally, all that remains is to remove the coupling and solder the pipe.
Refueling process
Connection diagram
The connection diagram for the pressure switch depends on the type of electric motor. Single-phase ones are controlled by relays designed for 220 V with two contact groups. For three-phase electric motors, a 380 V device is installed, with three contact groups, each connecting its own phase. The use of single-phase switches for three-phase loads is unacceptable, since one of the phases remains permanently connected to the winding.
Flange connections
A number of manufacturers install additional flange connectors on their products. Most often there are two or three of them, the standard size is ¼ “. Through them, components such as a safety valve, pressure gauge, etc. are connected.
Installing a pressure switch
For installation, you must perform the following operations:
- Connect the relay to the receiver pipe.
- Connect the pressure gauge, safety and relief valves through the flange connectors.
- Place plugs in the remaining unoccupied connectors.
- Connect the wires from the engine to the electrical connector of the device.
- Make adjustments.
The last point should be considered in more detail.
Checking the connection and starting the engine
A multimeter will help make sure that the work is done correctly.
But first, check that the case does not cause electric shock. Everything is fine? Then you can apply the device to each contact in turn. If you see numbers on the multimeter, you need to figure out the winding, there is something wrong with it. And the infinity icon indicates the operation of the compressor.
To continue checking how the refrigerator is connected to the network, you need to remove the casing from the compressor. Remove the wires from the contacts. Cut through the engine pipes that serve as the connection between it and other parts. Unscrew the fasteners and release the compressor from the casing. Then find out the resistance. To do this, apply a tester to the output contacts. The norm is 25-35 Ohms. The exact figure depends on what kind of refrigerator you have and the engine in it. If you see a different resistance, then the compressor from the refrigerator needs to be replaced and reconnected.
Now check the operation with a monometer.