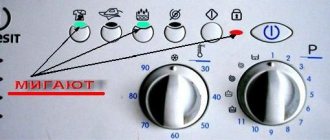
Possible causes of error E8 on the HP LaserJet 1132 printer
Error E8 when working with an HP LaserJet 1132 printing device is associated solely with the scanner and does not affect printing in any way. There are four different reasons why it may appear, and each of them requires its own approach to solving it, checking certain components and replacing them. The most common is the jamming of the scanner carriage, which happens due to damage to the gears or their clogging, so you should check them first. This will be discussed further, but now let’s briefly look at three other reasons:
- Firmware error. There is a small chance that the error that appears is actually false and is due to corruption in the software of the all-in-one. It is solved by flashing it, which can be done both with the help of special chips and through third-party software. It is better not to do this on your own, especially in cases where there is no experience. Contact the service center for further diagnostics and repairs.
- The scanner cable is broken. If you scan frequently with your HP LaserJet 1132, the cable on the top cover of the scanner is constantly bent and worn out. Accordingly, this can lead to its malfunction, but correcting the situation is not so difficult: you will need to take the equipment to a service center, where for a small fee they will change the cable to the one corresponding to the scanner model, after which you can again begin full interaction with the equipment.
- The formatter board is faulty. We will not go into details about the operation of the formatter board, but will only clarify that its failure in the HP LaserJet 1132 causes the same error. Any service center can purchase this board separately and replace it, so again, contact a specialist.
Now let's start looking at the most common mistake that was mentioned above. You can deal with this yourself by following simple instructions, and if it turns out that the component being tested is working properly, you will have to contact the service center to diagnose and correct the problems listed above.
Troubleshooting E3 code
Often, users of HP MFPs observe the appearance of the E3 code on the device’s display. If you look at the instructions for the device, this code is deciphered as “The cartridge is missing or installed incorrectly.” Undoubtedly, the cartridge may be installed incorrectly, foreign objects may get under it, or it may simply be broken. But sometimes a situation arises when the device does not see the cartridge due to the fact that the lever, which has a shutter, simply does not reach the optocoupler. To get to it, you need to remove the back (metal) cover of the MFP. How to unlock the lever, after which the E3 error will be reset, is clearly shown in this video from a foreign resource (knowledge of the language is not necessary).
Diagnostics of the scanning line of the scanner
We will divide the entire stage into simple steps, describing each in detail. This way you will not get confused in the sequence of actions and will accurately perform each of them correctly, without causing damage to the printing device or causing other problems associated with its operation.
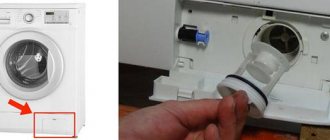
Step 1: Removing the scanner cover
Remove the top panel of the scanner to gain access to its components. First, lift the top cover and locate the screw holes in the four corners. Unscrew them sequentially, but do not remove this panel yet.
At the junction of the covers there are also two screws that need to be unscrewed so that the panel can be removed without any problems. Only after this can you pry up this part of the scanner with a handy object and carefully remove it, placing it nearby at your workplace.
In the image below you can see what the scanner looks like after completing the previous step. Once you have completed the steps described, you can move on to the next step and conduct diagnostics. It is important not to touch anything unnecessary and to perform each action carefully so as not to damage the components.
Step 2: Releasing the Scanner Unit
A stuck scanner unit can also cause an E8 error, so it will need to be freed by moving it closer to the center. By the way, now you can temporarily complete the diagnostics, tighten the lid and check the operation of the device. If this doesn't help, move on to the final step, which involves cleaning the gears.
Step 3: Clean the scanner unit mechanism
The scanner unit moves thanks to a motor that controls two gears. They often fail or become clogged with small debris. The following image demonstrates their appearance - carefully turn the scanner unit over, find these gears, check their rotation and make sure there is no debris. You can also clean the surrounding parts from dust by using a small brush or cotton swab.
Once complete, reassemble the scanner, placing the block in the center to normalize its movement in the future. Try scanning absolutely any document and make sure that the error in question has disappeared. If this is not the case, contact a professional to continue the diagnosis and find out which of the three remaining reasons is preventing the HP LaserJet 1132 MFP from working correctly.
We are glad that we were able to help you solve the problem. In addition to this article, there are 12,304 more instructions on the site. Add the Lumpics.ru website to your bookmarks (CTRL+D) and we will definitely be useful to you. Thank the author and share the article on social networks.
Describe what didn't work for you. Our specialists will try to answer as quickly as possible.
Troubleshooting Error 79
Error 79 in HP printers usually means that there is a problem with the machine's software. To fix it, do the following:
- turn off the power to the device using the power key;
- pause for at least 30 seconds;
- turn on the unit again and wait until it initializes;
- in the case where the device was connected through a surge protector, try plugging it in directly into a power outlet this time;
- If the code message continues to appear, then sometimes clearing the print queue or reinstalling the driver helps get rid of the problem.
Printer error E8 M1132: what to do?
An HP printer may produce various errors. Their code depends on the cause of the failure. However, they can have varying degrees of complexity. Some require the help of a specialist, others can be fixed with your own hands. Error E8 refers to the second option. Dealing with it will not be difficult. At the same time, you will also save your money on paying for the work of the master.
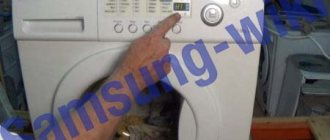
Unscrew the bolts
To do this you will need a screwdriver and the ability to use it. In principle, this is a common procedure that not only men, but also women can cope with. You will need to unscrew two bolts. After this, press the engine as hard as possible. This needs to be done a little to the side. This pressure will cause the backlash to shift by several centimeters. This will be enough for the wheel to return to its normal position - the center of the pair.
HP P2035P2055 printer engine
How to fix if the printer says “print error”
One of the most common mistakes when working with a printer is that the documentation is prepared for printing, the device is connected, but there is no result. After numerous unsuccessful attempts to print the required document, the user may see the message “Failed to print.”
A review of the device does not yield any results; paper is loaded into the tray, but the printer stubbornly refuses to work. He can “spit out” a blank sheet or a sheet with smeared blots. What to do in such a situation?
Other Reasons for Printing Failures
In fact, there are many more error messages. But the reasons listed above are the main ones.
Software failure
There are times when the printer refuses to work due to a failure of the software necessary for the correct operation of the device. There is an easy solution to the problem. But the required program is no longer installed manually. It is necessary that the plug and play function is activated on the PC, which allows you to determine the configuration of devices connected to the computer and quickly find the software they need on the Internet .
Ink problems
It's not uncommon to see warnings about ink problems. So, in inkjet printers, for example, in the DeskJet 4615, the print head is often filled with ink and needs to be cleaned. The computer considers the head to be faulty and warns about this using the following code - 0xc6fd0813.
Paper jam
Even more often we receive messages about jammed paper. There may be several reasons:
The elimination of these reasons is obvious: remove the chewed sheet and foreign objects (as described above), clean the roller of dirt and use paper of the appropriate standard.
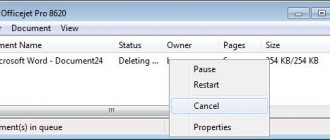
Print queue failure
There are often cases when the printer refuses to print for no reason. Or it writes that there is not enough memory, although the document being printed is negligible. In addition to all this, for some reason it becomes impossible to cancel or delete the task. In this case, only resetting the print queue will help.
Important! If a document does not print after a power surge, simply canceling the print queue will not solve the problem. The hang of the operation in this case is due to corruption of the file that is created when the task is executed. A corrupted file will not allow the process to complete.
You can solve the problem like this:
Other ways to solve the problem
If the method described above does not help, then you can use another one. It is as follows. It is necessary to remove the cover that is located on top of the device. In this case, the device itself does not need to be disconnected from the network. The ruler is removed and the small roller is examined to see how it rotates. This creates resistance that prevents it from working. It is necessary to slightly loosen the fastening, which is located on top. Thus, the gain will be less.
The fastening turns out to be practically not tightened. Leave everything like that and assemble the equipment, put the ruler and lid. Then turn off and turn on the device. See what happens. As practice shows, this leads to the ruler twitching. Thus, this procedure did not bring the desired result.
You can try removing the gear. There are different assumptions about this. But it is better to experimentally check whether this measure will help when this error occurs. If the ruler jerks again, the part must be returned. It will not help in any way with error E8.
Now you need to check the engine for serviceability. To do this, you can pull out the ruler and turn it over. After this, take out a small gear and turn on the device. In this case, the movement will be smooth, but the error will still be issued. By returning the small part that secures the large gear, the problem immediately appears. If you look at the lamp, it doesn’t shine either. This all points to a breakdown of the engine or coupler. You can also observe a shift in the sensor, which should be in the center.