What you need to do first to fix your earphone
If the sound in one of the headphones is not audible or regularly disappears (wheezing), then the first step is to diagnose the cause of the problem. First, you need to determine whether the headphones themselves are to blame, or whether the reason is in the device to which the headphones are connected (phone, computer, set-top box, etc.).
To do this, connect the earbuds to another working device and check the quality of the reproduced sound. If “broken” headphones work normally, this means that the cause of the problem lies not in them, but in the phone, PC and other devices. To be extra sure, connect other headphones to your phone (PC). If there is also no sound in one of them, then it is definitely a problem with the underlying device that needs to be repaired.
If one of the headphones also does not work on another device, then it is necessary to move on to further identification of the problem and its solution.
Common Causes
If your headphones suddenly stop working, don't despair. You can probably fix the problem yourself. Both full-size computer headphones and compact earplugs can break. There are many reasons why they fail. We will look at the most common ones.
- Sulfur contamination. Usually occurs in people who lead an active lifestyle and play sports with their favorite player. Usually 1 earphone or both immediately begin to play quieter, distortion appears or the sound becomes muffled.
- The battery is placed incorrectly. This happens with wireless models, especially among inattentive people. But sometimes even experienced users confuse the polarity.
- The headset is not positioned correctly. Each person is unique, and headphones are manufactured standard. Therefore, they may not fit properly on your head and the speakers will be blocked.
- Connection problems. They come in both wired and wireless models. Wired ones may have the plug connected incorrectly, and models with Bluetooth do not always synchronize correctly with the player and with each other.
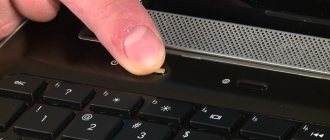
- Settings not set. This is especially true for models for working with a computer. Due to a driver failure or simply lack thereof, the sound does not play. This usually happens with new headphones bought in a store. Then a perfectly good thing may not work with your source.
- Other. Other reasons that are less common. For example, the headphones fell or water got into them. As well as careless handling.
So if one earphone isn't working for you, consider what could be causing it. And then feel free to start repairing.
Basic steps if one earbud doesn't work
When identifying a problem where one of the earbuds stops working, pay attention to the following:
| Things to check: | Explanation: |
| Check the balance of your headphones. | If you're using headphones with a PC, check your speaker side balance settings to make sure the balance isn't set to just right or just left. |
| Check to see if the track you are playing is mono. | Monaural tracks may only use one headphone speaker (right or left), while the other may have no sound at all. |
| Turn off and on the headphones. | And make sure the problem remains or goes away. |
| Disconnect and connect Bluetooth on your phone (PC) if you use wireless devices. | Try playing the audio file to see if the problem persists. |
| Insert the headphone plug all the way into the audio jack. | In some cases, a loose plug may be the reason why sound is not heard in one of the headphones. You can unplug and plug one audio cable into a jack multiple times. This can often solve the problem of a nest becoming clogged with dirt and dust. This repeated switching on and off will allow you to clean the internal contacts of the connector from contamination. |
| Reset your wireless headphones. | This may resolve the issue you are experiencing due to the earbuds not pairing properly with your phone. |
This may be useful: How to properly charge wireless headphones.
Recommendations
But it is still easier to prevent a malfunction than to deal with the consequences. To do this you need to follow a number of simple rules.
- Handle the equipment carefully , do not drop it. Always fold the wires to prevent them from breaking.
- When connecting, keep the plug straight and not at an angle. Otherwise, the connector will become loose, contact will deteriorate, and other negative consequences will appear.
- Keep your headphones clean and do not throw them on the floor or in dust. Do not allow dirt to accumulate in the headphones and their connectors.
- Clean your ear pads periodically This will not only provide good sound, but will also be beneficial from a hygiene point of view.
- Do not use the headset in wet or rainy weather unless it is a waterproof model.
- Store and carry your headphones in the case. This will protect them from mechanical damage.
And finally: respect the equipment, then it will respond to you with uninterrupted operation and a long service life.
The reasons for the failure of one of the headphones and how to eliminate them can also be found in the following video.
Finding a break in wired headphones
If one of your wired headphones does not make sound, then use the following option to find the break point. Connect the headphones to your phone (PC), start playing music on them. And begin to sequentially crumple the wire with your fingers, starting from the plug to the problem earphone. When any sound (crackling) appears in the speaker of a non-working headphone, mark this section of the wire with a marker. Usually this area is problematic, and it is where the wire breaks.
Most often, a break occurs at the cable entry into the plug, at the cable entry into the speakers, and at the branch on the jumper.
There may also be a break in one earphone itself, where one end of the wire has simply become detached from the contact, so it does not work and requires repair.
In some cases, the headphone wire may break from contact
Next, you will need to remove the problem section of the cable and solder the ends of the remaining wire to each other.
Remove the problem section of the headphone cable
How to properly solder wires
Having found the problem area, we cut the wire a little below it, clear the break point and the entire wire from the braid. Then we heat up the soldering iron and carefully solder both exposed wires. Especially for those users who are doing such repairs for the first time, we provide a detailed algorithm for all actions with a soldering iron.
After stripping all ends of the wire, you need to properly tin them with solder.
using a soldering iron. You will need:
- planed wooden board (an old kitchen cutting board will do);
- organic flux
, for example, brand F-99, which can be bought at any store that sells spare parts for radio amateurs; - ready-made solder
in the form of tin wire with special additives in the hollow inner part; - soldering iron heated to the optimum temperature.
We do all successive operations carefully and without fuss or haste; haste can only do harm here.
To apply flux to a wire, place it on a board, press down the applied flux with a soldering iron for a few seconds, then make movements as if we were removing varnish from the surface of the wire. The result is the following picture:
Then on 1, 2 and 3 (in some wires there are only two of them) we put small pieces of heat-shrinkable tubing
, which will serve as an insulator between them. You need to solder the wires, push the tubes into place where they are soldered, and use a lighter to crimp them.
We slide the heat-shrinkable tube over and crimp it using similar actions as before - we get an aesthetically attractive connection that guarantees reliable insulation of the connected wires.
Performing soldering when one liner does not work
If the wire breaks right next to the plug and insert, it will be better to cut it off. For example, if the cable breaks near one earphone, it will be necessary to disassemble the earphone. Then unsolder the broken piece of cable from it, and then cut off the damaged part of the cable. The remaining edge of the whole cable must be cleaned, the copper core must be tinned with tin and flux, and soldered to the speaker contacts. This way you can repair the device.
Undamaged parts of the wire will need to be soldered
Perform the same operation with a plug if a break occurs right next to the plug.
In this case, the break occurred right next to the plug
How to fix an earphone if the damaged area is in the middle
If the wire breaks somewhere in the middle, the break will need to be cut with a knife. Then remove the top insulation (braiding) and release three wires approximately 3 cm long for easy soldering. Since the wires are coated in different colors, they cannot be mixed up. All cores must be soldered in accordance with their colors, connecting the remaining intact parts of the cable together. The stripped ends are heated with a soldering iron and tinned with flux and tin.
Treat the ends of the cable and solder them
A heat-shrink tube is put on each soldered wire, heated with a hairdryer or other handy tool, and crimped. To avoid breaking the connection, it is reinforced with a thick thread, tying three wires together.
It would be better to wrap the soldered wires with thick thread
It is better to put a heat-shrinkable tube on the resulting bandage in order to give the work an aesthetic appearance.
With a thermal tube it will look aesthetically pleasing
Diagnostics and repair
The first thing the user needs to do before starting repairs is to conduct diagnostics and determine why one earphone broke and the other did not. To do this, you need to connect the headphones to your phone or other sound source, turn on music or video and start checking the cable. On a non-working earphone, you need to carefully probe and bend the wire along its entire length - if sound appears, then the cable needs to be repaired . Otherwise, twist the plug and gently press on it. If sound appears, the problem is in this node.
Advice! If the wire on the headphones is detachable, you can check the functionality of the gadget with a different cable. If after replacement the music does not appear, this means that the problem is in the speakers. To verify this, you need to connect the cable to other headphones. There is a high probability that sound will appear.
For headphones where the wire does not disconnect, the user will need a multimeter. On the device you need to select a mode to check the sound, and then connect the wires correctly: black to COM, red to mA. Now you need to carefully make neat cuts near the non-working earphone and plug, and then attach the probes to them. If the cable is intact, the multimeter will notify you of this with a corresponding signal. Then the problem lies in the speakers. If the device is silent, you need to make a cut in the middle and then ring each half of the cable. On one of them, the multimeter will emit a beep, which means that the part being tested is intact. The second one needs to be divided in half again, find the intact and faulty parts, etc. Actions must be continued until a faulty section a couple of centimeters long is detected.
After diagnostics, you should begin to repair the detected fault, be it a damaged cable, connector or speaker. If the user has a soldering iron and the skills to use it, then it is recommended to prepare this device.
Cable repair
Once the faulty piece of cable has been identified, repairs should begin. It is necessary to cut off the damaged area and then remove the top insulation to get to the inner cores. You can connect them using a soldering iron (this method is more reliable) or, if the user does not have the appropriate experience, twist them.
Advice! To cover the exposed wires after completing the work, you can use electrical tape, but it is much more convenient to work with heat shrink. These are small tubes that are placed over exposed wiring and then, when heated, shrink and tightly enclose the wire.
To connect cut pieces of cable, they need to be stripped of their insulation and then twisted or soldered in pairs (according to color). To solder, you need to melt a small amount of solder, connect the wires and wait a little until it hardens. If the user wishes to do without a soldering iron, he can make a twist by connecting the cable together and braiding it in the form of a pigtail. Then you need to put heat shrink on the bare area and heat it with a hairdryer so that it narrows and tightly grips the wire.
On a note! In cases where the headphones are equipped with a detachable cable (for example, large full-size Sennheiser), you can simply replace the damaged cable with a new one.
Replacing the plug
To replace a faulty plug, you will need to first buy a new part. It is better to choose a metal element with a stereo signal measuring 3.5 mm - a universal diameter that today is suitable for any gadget, be it an iPhone, Samsung or a smartphone from a Chinese manufacturer .
You can separate the old plug in several ways: unscrew it from the cable or cut it off. It is better to choose the second method and, stepping back a couple of centimeters from the plug, remove it along with a piece of cable. As a rule, breakdown occurs in this place due to regular kinks. Next, you need to remove the insulation from the cable and cores and connect them to the contacts on the new plug, pressing them tightly with pliers. If there is a grounded cable (bare or two-color insulated), it is attached to the sleeve. Next, the wires need to be soldered to the contacts, pre-treated with sandpaper - this makes the fastening more reliable. After the work is completed, you need to put the cap on the plug.
Important! The wires under the cover should not touch each other, otherwise there will be no sound.
Speaker repair
If during diagnostics it is discovered that the problem is in the dynamics, the headphones will need to be disassembled to get to the faulty unit. This can be done in various ways depending on the type of device. You can find a disassembly diagram on the Internet by the model name.
- As a rule, on expensive full-size headphones, for example, Sennheiser HD418, you will need to unscrew the screws hidden under the pads.
- Smaller devices (such as a headset for a computer) are connected using latches. To disassemble them, you will need to use a slotted screwdriver or other flat tool.
- Small in-ear headphones for phones are usually glued together. To disassemble them, you need to squeeze them in a vice - they open into two parts at the junction.
Typically, one or more wires are broken inside the speaker. As a rule, they are tied inside to eliminate the possibility of damage due to careless handling. It is necessary to cut the wire at the input to the speaker, remove the insulation, make a safety knot again and solder it.
If the wires are intact and in their places, this means the speaker itself is faulty.
Important! A new speaker is expensive, so replacing it is only advisable for high-quality premium headphones. In this case, it is recommended to contact a service center, where they are guaranteed to supply a suitable model and carefully fix the breakdown.
If the user decides to replace it himself, he needs to cut the rubber seal, remove the speaker and carefully install a new one, avoiding touching the membrane. If you bought a smaller speaker than the old one, you can fix it with a few drops of glue. Vacuum headphones are more difficult to repair; you will need to look for a disassembled diagram on the Internet.
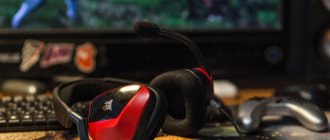
Features for models with volume control and microphone
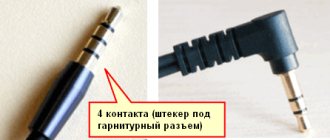
Headphones with a microphone and volume control have almost the same structure as regular devices, so their setup and repair are carried out in the same way. So, if the user needs to restore a damaged section of the cable by stripping the insulation, he will find not three, but four wires - grounding, two for headphones and one for the microphone. They are connected in the same way by twisting or soldering, as described above.
Features for wireless models
Wireless headphones are characterized by malfunctions typical of wired devices, as well as breakdowns associated with the structural features of these devices. Additionally, there may be such problems.
- The meshes of wireless gadgets become clogged with sulfur without proper care. To avoid this, you need to clean them regularly.
- Wireless headphones operate from a built-in battery or from batteries. When the batteries are discharged, the headset does not function correctly, for example, one of the headphones stops playing. The problem may also be an incorrectly installed battery, but in this case the equipment does not work at all.
- Another possible reason is a Bluetooth headset that is not worn correctly. Some models can only work in a certain position due to the location of the antenna.
- Incorrect connection of a wireless device or incorrectly set speaker balance can also lead to the disconnection of the left or right earphone.
Depending on the type of failure, you need to clean the headphone meshes from wax, charge or remove and reinstall the batteries, read the instructions and put on the headset correctly, reconnect the equipment, set the settings correctly on your phone or PC.