How to properly format a flash drive for a TV. Flash drive format
Formatting a flash drive becomes an urgent need in cases where the TV does not initially see it. But it happens that the USB device first opened and then lost visibility. But in the absence of an Internet connection or built-in memory on a smart TV, this device allows you to watch TV without restrictions in choosing a movie, animation or music.
Usually, different models open the flash drive almost instantly after connecting it, but it happens that individual files from its contents are not played. Most often, this indicates that the player on a particular TV does not accept a certain recording format. But there are other cases.
The first thing to do in such a situation is to test the device. For this:
- Connect it to your PC. If the flash drive opens, the problem is with the TV.
- If there are multiple ports, try connecting the drive to a different connector.
- If the connector is labeled Remote Control or Service, this is a so-called “service” input, which is used only in a service center for repair or diagnostics. There is no point in connecting a flash drive to it.
- Alternatively, try connecting another device to evaluate the functionality of the TV.
- To eliminate the possibility of your TV freezing, unplug it for 5 minutes, and then try connecting the flash drive again.
If the suggested tips do not work, you will have to format the USB device. First we need to decide what format we need. The most popular today are FAT32 and NTFS. The exFAT format is less popular.
The essence of the procedure is to find out what type of flash drive you have and change the format to another until you find one that is readable by the purchased TV.
To determine the format, connect the device to the PC and go to My Computer. Right-click to open the context menu of the drive and select the “Properties” menu.
In the menu that opens, look at the File System, which is what designates the format.
After this, close the window and begin formatting.
To do this you should:
- Right-click to open the USB device menu again.
- Select "Format".
- In the presented list of formats, select one that is different from what is already installed by default.
- Click the “Start” button.
- After studying the warning that appears, click “Ok”.
Having completed formatting, we again load the desired content onto the flash drive and insert it into the TV. If it doesn’t help, we repeat the procedure, changing the format to something that has not yet been tested.
What problems may arise
- The plasma panel does not see the flash drive - the reasons for this problem may be the following: the device may not turn on due to a breakdown or due to incompatibility of systems. In this case, you need to determine in which file system the device operates; to do this, you need to insert the drive into the computer, open the “Explorer” file, select “Properties” and select the desired device. If the system type is NTFS, then it is formatted to FAT32. And the failure of the drive is determined quickly; if the personal computer does not see it, it means that it has failed.
- The TV initializes the drive, but the files do not - the equipment does not support the format in which the video materials were downloaded. It is recommended that you read the instructions to find out what parameters are needed to view video from the drive. And download material only in the format that the plasma panel supports. There are also many different programs and applications that can be used to convert files into the appropriate type of format.
How to connect a flash drive to a TV in order to watch a movie downloaded from the Internet, photos from a vacation, or listen to musical compositions is a question often asked by owners of modern models.
Almost all new panels are equipped with a USB connector for connecting a flash drive. If there is no connector on the TV, then this problem can be easily solved with special devices. You should also know that you can only download movies or other materials to the media from certain portals and in formats supported by the device.
What video format is suitable for TV
Sometimes the format of a flash drive is not to blame for its lack of visibility, and you won’t be able to view the video due to its type. In this case, only content with the "correct" format may be displayed, or an error notification may appear stating that the format is not supported. Also, the video can be displayed without an audio track, because it is its type that is not supported by a specific TV model.
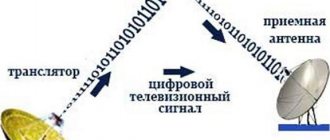
If the TV is obsolete, a tuner capable of decoding the format is used to display video. Modern TVs are capable of decoding information without additional devices. The formats available to them are:
- MPEG – divided into the first generation, necessary for decrypting CDs; MPEG 2nd series, used for DVD decoding and on modern PCs and laptops. The fourth version of the format is current and is actively used. The third version of this protocol quickly lost popularity and ceased to be used, because functioned only with HDTV;
- H264 – this protocol stands for maximum compression of a video stream while maintaining optimal picture quality. The format is based on MPEG 4. It is used in HD DVD and Blu-Ray set-top boxes;
- DivX or Xvid are the latest versions of MPEG 4. Their algorithms are part of the basic versions of modern TV panels, so they help decrypt most videos.
If you don't know what format your TV supports, record MPEG video, because... This protocol is read by almost all modern TVs. But for an accurate “hit”, study the instructions or look for information on the official websites of the manufacturers.
Other popular video formats include:
- WMV(9/VC1);
- MP;
- NTFS;
- AVC;
- FAT (12, 16, 32);
- Asf.
Unblock USB on LG TV
In this article we will talk about TVs from the well-known brand LG. Many modern models have a USB port that allows you to connect external devices and media. This feature is widely used by ordinary users to connect flash drives or external hard drives.
style=”display:block” data-ad-client=”ca-pub-2575503634248922″ data-ad-slot=”3433597103″ data-ad-format=”link”>
This allows you to play movies and videos directly from a flash drive - very convenient and efficient. But on some TVs, next to the USB connector there is an inscription “service only” or “remote control”. This means that the installed port is a service port. This limitation means only one thing - this connector cannot be used to play back any multimedia files. It is intended for service and repair work, TV diagnostics and flashing. However, this is not a big problem. With a little effort and ingenuity, you can unlock USB and use it for any purpose.
Important! The manipulations outlined below were tested on LG TVs of the 2009 model series (video playback is impossible on TVs before 2009). The methods may or may not work on TVs of other brands. And finally, all operations related to firmware and changes in the service menu can “kill” the TV and render it inoperative.
Whether or not to use the proposed methods is entirely your decision) But many have already activated USB connectors and are enjoying all its capabilities.
In general, you can unlock the USB port from the service menu. There are two types of them on LG TVs: EzAdjust and InStart. We get to the menu, change a couple of values and everything works. Let's look at the main methods.
1. Go to the service menu using the remote control. If the TV has firmware version 3.15 or older, then getting into the service center is very easy. Press the “Menu” button on the remote control. After this, you need to hover over the “Options” item. Next, simultaneously press the “OK” buttons on the remote control and on the TV and hold it for about 5-6 seconds.
Unblocking! If everything went well, then a window with cells should appear on the screen where you need to enter the password “0000” (four zeros). We get to the menu where you need to select Tool Option 3. It is necessary to change several values, which, in fact, are responsible for the operation of USB. Go to the EMF(JPEG,MP3) item and set the value to “1”. Go to the DIVX item and set the value to “HD”. We don’t touch anything else, exit all menus, and reboot the TV. We go to the TV menu using the “Menu” button and see the desired USB item. Operation was successfully completed.
2. Install the older firmware version 3.15. This method will bring a lot of trouble and may lead to the TV losing its functionality. There are many reviews about problems that arise after installing a lower version of the firmware. Possible problems include the failure of some connectors (HDMI or SCART), the TV not turning on, or problems with functionality. But along with negative reviews there are also positive ones.
To roll back the firmware you need to carry out a number of manipulations. To get started, download firmware 3.15 for your model or. Unpack the archive onto a flash drive that is formatted in FAT32 format. Insert the flash drive into the TV and go to the menu using the “Menu” button on the remote control. Move the cursor to the “Options” item, press the “Fav” button on the remote control 7 times and get into the firmware update window. Roll back the firmware to version 3.15. After this, we perform all the steps described in method 1.
3. Go to the service menu using LEDs. This method will not cause any harm to your TV. True, before using it you will have to carry out some preparatory operations. So, in order to get into the service menu, you can emulate a special signal using a pair of red light diodes (some have succeeded with the help of green light diodes, by the way, infrared light is not necessary). The diodes must be connected in parallel. Moreover, the connection is made with different poles.
After this, you need to screw the wiring to the LEDs (you can use a soldering iron, but this is not essential). Next, you need to play a special sound file and feed it through an amplifier to the LEDs. The easiest way is to use speakers as an amplifier, or rather the output from an active speaker to a passive one. Play this sound file (turn on repeat in the player so that the file is played cyclically and not 1 time). Gradually increasing the volume level, bring the diodes to the signal receiving panel from the remote control on the TV. The LEDs will blink with a certain cyclicity and soon a window will appear on the screen where you need to enter a password. Next, we perform everything as in method 1 Unlocking.
4. Use the irRemote program. This program is installed on smartphones and is used to enter the TV service menu and subsequently unlock the USB port. First you need to download the irRemote program and install it on your phone. Next, follow the instructions described below.
1. Launch the installed application on your smartphone.
2. In the menu that appears, go to the “Add Device” item.
3. Next you will see several options, select “TV”.
4. Click "Refresh" and wait. At this time, the phone connects to the Internet and downloads information (the wait won’t be long).
5. Select “LG” (namely “LG”, not something similar).
6. Click “Refresh”, the list of devices will be updated.
7. Next, you need to select the profile “IN-START Service Menu + EZ Adjust Service Menu” and then click “Refresh”.
8. Select “mon” and install a new profile.
9. Go to options and make settings, namely in the “IR mode” item, set “Method 1”.
10. If you did everything correctly, you will see the following on your phone screen:
If you want to get to the IN-START menu, press 1. If you want to get to the EZ Adjust service menu, press 2. Next, we perform everything as in method 1 Unlocking.
conclusions
In this article, we looked at all the ways to unlock USB on an LG TV. As you can see, activating a USB port is not such a difficult matter and after carefully reading the information, you can carry out the procedure yourself.
How to connect a USB flash drive to a TV if there is no connector
It is impossible to connect a USB flash drive to some TV models for the simple reason that there is no corresponding connector. In this case, alternative methods will come in handy.
Adapter
This method allows you to connect a flash drive using a special adapter - a wire with an HDMI connector on one end and a USB port on the other. The length of such a cable is short (20 - 30 cm), but it is usually sufficient.
Media or DVD player
Older models of TV panels did not even have a USB port, but they probably had a media player for playing video. This device is connected to the TV using “tulips”, and the flash drive is connected to the connector on the player.
Digital set-top box
The latest models of digital receivers, like Android set-top boxes, are mostly equipped with a port for connecting a flash drive, with the exception of Apple devices. The connection follows the same principle as with a media player.
Laptop or computer
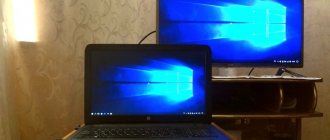
If you don’t have everything listed above, but you have a PC or laptop, you can do without a flash drive at all. But the TV panel needs to be synchronized with them.
For this you will need:
- HDMI cable;
- adapters with HDMI port;
- DVI and adapters for such a port;
- not very popular SCART connector;
- VGA output and adapters for it;
- RCA adapters.
It's even easier to view media content wirelessly. The only thing that is required for this is that both devices support the Miracast function, which offers mirroring of a PC or laptop monitor to the TV.
The most convenient way to view the contents of a smartphone or tablet is on the TV panel. To do this, you need to connect the devices wirelessly and select “Broadcast” and the desired device in the video options. An important point: both the TV panel and the gadget must connect to the same Wi-Fi source.
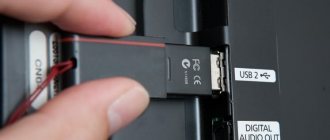
Connection via USB connector
Most modern TV models have a USB connector. If this is exactly what you have, then you can breathe a sigh of relief - connecting a flash drive to such a TV is easier than changing the channel. To do this, follow the further step-by-step instructions.
Important! This manual is worth reading even if your TV does not have the appropriate connector, as it will cover the basics of the connection process. They will be mentioned in the rest of the article, but will not be described again in the same detail.
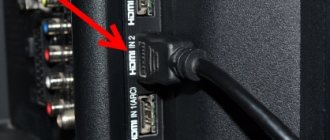
Step 1: Find the USB port on your TV. This is perhaps the most difficult step of the entire instruction. Its difficulty lies in the fact that there is no universal answer to the question: “Where is the USB connector?” It all depends on the model of your TV.
Why doesn't the TV see the flash drive?
There are several reasons why your smart TV is ignoring the flash drive. Next, we will consider the most common of them and methods for solving the problem.
Multiple partitions on a flash drive
If the USB device is larger than a certain size, such as 64 GB, or has previously been used to create a bootable drive, sometimes more than one partition is found on it. But the user does not see this, since the partitions may be so small that they are not visible on the PC. The TV panel does not display such a drive. The only solution in this case is formatting.
USB device capacity is too large
Some models have restrictions on the volume of connected external drives. Interestingly, such limits depend on the type of device. Thus, LG brand smart TV supports an external drive with a capacity of 1 TB, but a USB flash drive only supports 32 GB.
On the official websites of other manufacturers, in particular Sony or Samsung, there is also information only about USB HDDs and nothing about regular flash drives. But in fact, problems often arise with detecting the latter. There is only one solution here - use another flash drive.
Connection via additional devices
If the connection is made using a hub (USB splitter) or extension cable, but the device is not visible, try a direct connection. If there are additional devices connected to these accessories, disconnect them if possible.
A USB device makes the possibilities of the TV panel almost unlimited, thanks to the ability to watch your favorite videos. All that remains is to explore the capabilities of the TV so that watching video content using a flash drive is fully accessible.
What problems may arise
- The plasma panel does not see the flash drive - the reasons for this problem may be the following: the device may not turn on due to a breakdown or due to incompatibility of systems. In this case, you need to determine in which file system the device operates; to do this, you need to insert the drive into the computer, open the “Explorer” file, select “Properties” and select the desired device. If the system type is NTFS, then it is formatted to FAT32. And the failure of the drive is determined quickly; if the personal computer does not see it, it means that it has failed.
- The TV initializes the drive, but the files do not - the equipment does not support the format in which the video materials were downloaded. It is recommended that you read the instructions to find out what parameters are needed to view video from the drive. And download material only in the format that the plasma panel supports. There are also many different programs and applications that can be used to convert files into the appropriate type of format.
Technological progress is developing by leaps and bounds. Once upon a time, people were happy to go to the cinema to watch silent black and white films, and they could hardly imagine that in the future it would be possible to watch any film at home, which would also be full of many beautiful visual effects. But now this opportunity can be realized with only a TV and a flash drive. If you still don’t know how to do this, then the instructions given in the article will help you fix it.
Creation and configuration
We will need a project from which we will make a video. The finished version will retain all the transitions and effects, as well as the sound and even the pointer. Not bad, right?
Open the project and go to the “File” tab in the control panel. Next, “Save and send”, “Create video”. In the interface that opens, we can adjust the quality:
- computer monitors and high-resolution monitors - high;
- Internet and DVD - average;
- portable devices - low.
And you can also specify whether the sound and pointer will be turned on. Click “Create video” and wait for processing to complete. The output file will have a WMV extension; you can convert it to another format using the appropriate programs; there are plenty of them on the Internet.
After preparing the project, you can transfer it to a flash drive, which, in turn, can be inserted into a port on a special TV panel, and then start the video.
Possible problems and solutions
Conventionally, all the problems that users encounter can be divided into two groups: the TV does not see the flash drive and the TV does not see the files. We will carefully analyze what causes such problems and select the optimal solution that will allow users to reproduce the desired content.
The TV does not see the flash drive
The most common problem is that the file system does not match. The operating system primarily works with two file systems – NTFS and FAT. It is possible that the flash drive uses a format that the TV does not support. That is why even after connecting the device nothing happens.
Built-in USB connector
Modern TV models can never do without connectors for USB drives and provide a built-in mechanism for reading the necessary information. To watch movies or photos, just connect the flash drive and start the movie you choose.
The location of the connector is determined by the make and model of the TV. For example, Samsung and LG TVs have a USB port on the back of the case. Some manufacturers place such a connector on the side, or less often on the front of the device.
There is a situation when the TV does not see the contents of the flash drive. Very often this is due to the fact that the saved file formats are simply not played by this TV. To view them, you will have to convert the contents of the drive to other formats.
In modern TV centers, the following technical means can be used as a USB drive:
Typically, such devices are connected via a USB or HDMI cable. To do this, simply connect two devices using a cable and use your TV as a means of viewing photos or videos from your tablet. There are other ways to connect a tablet and laptop to a TV. It is worth mentioning Apple products separately: connecting an iPhone to a TV has its own nuances, just like connecting an iPad.
New Smart TV models have wireless connectivity. Using Wi-Fi Direct and other similar technologies, you can connect your tablet or smartphone to your TV without much difficulty. Thanks to the same technology, you have the opportunity to view Internet resources from a large screen.
Connect via tablet