Classification of cartridges
The following types of cartridges exist:
- quick-release or self-clamping device;
- collet-type sds devices;
- cam
On a drill with a quick-release chuck, you can change a drill or other attachment quite quickly, without the need to use any additional devices. The cartridges of the first option are divided into single- and double-coupling devices.
Single-coupling devices have a shaft locking system that is activated during tool replacement. They have a significant negative point - very low strength of the fixation elements; the external parts of the cartridge are made of plastic, which greatly increases their damage and breakdown of the entire device.
Repair of this type of cartridge is not provided - only replacement.
Manufacturers use cam-type products on impact models and hammer drills because their design is stronger - they mainly use key-type chucks to securely fasten the drill.
The collet-type chuck was created back in the 70s of the last century; its design differs in that there are two grooves in the tail part, and the drill must be deepened by screwing movements by 40 mm. There are 4 grooves: 2 fixing, 2 for guiding the wedges, the cutting tool is fixed with locking balls.
With a classic gear device, the tightening is adjusted using a chuck key that comes with the drill. To properly unscrew the cartridge, you must follow the recommendations of an experienced technician; to do this, watch this video:
Which drill chuck for a drill is better according to the clamping method?
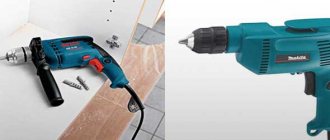
In household drills and screwdrivers, one type of chuck is usually installed according to the method of clamping the working tool: using a key and quick-clamping. Key jaw chucks have been around for a long time and are well known to any home craftsman. Keyless chucks have only recently come into use, and they quickly gained great popularity.
In the photo on the left you see a quick-release chuck, and on the right you see a key chuck with a key. There is an opinion that a key chuck clamps drills better, but from many years of experience in using both a key chuck and a quick-release chuck, I dare say that there is no difference. Both types of cartridges are clamped with equal success. Only the convenience and speed of changing drills in a drill with a keyless chuck are undeniable. There is no need for a key, which is always lost during work, unless it is secured to the drill or tied to it with a rope; you need to use two hands to clamp the drill.
The method of clamping the chuck is not related to the method of attaching it to the drill shaft, so if you change the chuck with a key clamping method, I advise you to install a chuck with a quick-release method of fixing drills instead.
Main types of clamps
There are two main types of drill clamps:
- Tooth-crown. The shank is clamped with a special key.
- Quick-clamping. The clamping sleeve is actuated by manual rotation.
Jaw chucks, which are installed on modern drills, allow reliable fixation of devices with a shank diameter of 1-25 mm. A device of this type has virtually no disadvantages, the most significant of which is the rather high price.
The most popular clamping device installed on modern drills is the BZP, that is, the quick-release chuck. It takes a few seconds to fix the tool in the BZP, and a special key is not needed. The shank is clamped by manual rotation of the adjusting sleeve, on the outer surface of which there is a groove that facilitates screwing. To adjust the mechanical impact on the tool shank, this type of clamp is equipped with a locking device.
Serious disadvantages of BZP include:
- Rapid wear of its elements.
- Insufficiently reliable fixation of the shanks of drills with large diameters, as a result of which the tool rotates during operation.
But gear-rim products ensure reliable fixation. The only significant disadvantage of these devices is that they require a key, which is easy to lose. However, you can save yourself from this problem by securing this part to the drill wire with insulating tape or rope.
A very popular mini-drill clamp, which is installed on compact drilling devices. Mini-drills are preferred by jewelers. The mini chuck is included in the quick-release chuck category. It is made mainly of brass and is used for fixing tools with a shank diameter of 0.1-4.5 mm.
Gear-crown
Classic, refers to cam or collet type clamping devices. They clamp tools with a round shank and cylindrical workpieces for further processing. The main elements of jaw clamps are as follows:
- Cylindrical body.
- An adjusting ring or sleeve that rotates on the outer surface of the housing.
- A collet or cam mechanism in the interior of the housing.
Mounting methods
The chuck is attached to the shaft of an electric or manual drill in two ways - a cone connection and a thread, so there are a minimum of varieties here. In practice, there are devices with metric or inch threads, and on the body of the product, even the smallest one, there is always a marking.
For example, a designation of this type 1.5-15M13x1.2 is deciphered as follows:
- 1.5-15 is the diameter of the tail part of the cutting tool in millimeters;
- M13 - metric thread with a diameter of 13 mm;
- 1.2 - thread pitch.
When using a thread in inches - UNF and the diameter is indicated: 1/2”. This type of connection is considered international and is used in all instruments from foreign manufacturers. For special reliability, a stopper is placed on the shaft, in the form of a screw on the left thread - this must be taken into account when you are confused about how to disassemble the chuck of an imported drill. It only needs to be unscrewed clockwise.
The second method uses a Morse cone, which today is more often called an instrumental cone. The shaft has a conical part at the end onto which the device is mounted, and a small force must be applied for a tight connection. The marking is as follows: B10, where the letter indicates the use of a cone, and the number indicates the diameter of the tail of the cutting tool. This type of fastening is common with screwdrivers.
Morse cone
Some drills are equipped with an adapter for the clamping mechanism, which allows drilling with maximum accuracy.
Selecting a New Tool
If the old cartridge could not be carefully disassembled and repaired, then it is necessary to replace it. You'll have to choose a new one. It should be noted that different types of cartridges can be installed in the design of screwdrivers. They can be keyed or keyless, as well as quick-clamping. The key product is different in that the clamp on it can be done better. Keyless chucks are not inferior in this parameter, but they have to be changed quite often, since the clamping mechanism very quickly becomes unusable.
If you have to frequently change the equipment when removing the chuck, it is preferable to choose a quick-clamping option, since if you replace the old part with it, you can save time on this procedure. When using large-diameter equipment, it is best to purchase a key chuck.
There are cartridges that are secured inside the device using a cone. They are also available with a key or are quick-release. The choice always remains solely with the buyer.
Analysis of a drill with a Morse taper
There are drill models that use a chuck not with jaws (jaw chuck), but with a threaded connection (or Morse taper). You can choose an adapter for it, or continue to work with this cone - it all depends on preference. In order to repair a drill or screwdriver, it is important to decide which cartridge. They have a similar appearance, so you need to look at the markings that are stamped on the surface of the part. If the cartridge is marked with the letter B, it is a device with a Morse taper. In this case, you can remove the cartridge using a drift and a plumber's hammer.
How to disassemble a drill chuck
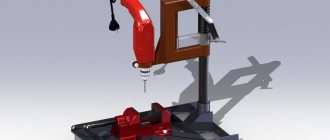
Disassembling the device is necessary in order to extend the service life of the product. During disassembly, product parts are cleaned and lubricated. Disassembly can be done as follows:
- We use a hammer drill with a special adapter onto which a jaw chuck with a threaded connection is placed.
- The fists should be hidden inside.
- A sheet of polystyrene foam or expanded polystyrene is applied to the end of the device. After this, the back side of the foam should rest against the wall.
- The hammer drill is started in impact mode. The cartridge will be disassembled within 2-3 seconds.
The video describes the disassembly process in more detail. The video also shows the process of reassembling it. There are many other disassembly options, but the simplest and most acceptable is the one described above.
In conclusion, it should be emphasized that if you want to extend the life of your tools, be sure to set aside time for diagnostic procedures.
How to change?
Morse taper is mainly used on equipment of machine-building enterprises. But some manufacturers also equip hand drills and hammer drills with this design for private, home use. The conical cartridge is marked with a letter and numbers. For example, B12, where B conventionally denotes the name of the cone, and the number 12 is the size of the diameter of the shank of the working element, for example, a drill.
These indicators must be taken into account when replacing.
To change such a cartridge, you need to knock it off the drill with a hammer or a special puller. The new product is installed by placing its back side on the conical shaft.
The toothed chuck is used in the manufacture of not only home, but also professional construction drills, designed for heavy loads and a long service life. When uninterrupted, almost non-stop operation of a tool for several hours is important - when assembling various building structures, furniture, and machine tools. Therefore, it provides for quick replacement so that workers do not waste a lot of time on this. You just need to unscrew the shaft of the worn mechanism from the pin mounted in the drill body and screw a new chuck in its place.
The keyless chuck changes the fastest. Guided by the indicators on the body, you only need to fix its upper part with your hand and turn the lower part until you get a characteristic click.
The new product is mounted in the reverse order - placed on the splines and clamped by turning the locking sleeve.
Specifics of cone fastening
In modern hand-held electric drills, the Morse taper is rarely found. Such models are equipped with special pullers, and the dismantling process is displayed in the technical description.
In old Soviet drills, the design of the gearbox made it possible to remove the chuck using rather crude methods. One could try to separate the conical surfaces with a wedge-shaped object, lightly knocking it from different sides.
Another option was to take the drill with one hand with the chuck facing down, and with the other to apply light blows to the end with a hammer. If that didn’t help, we lubricated the landing site with a penetrating compound (kerosene or WD-40), let it sit for several hours, and tried to knock the cartridge off again.
This method can be used if the shaft bearing is installed inside the housing. For most drills used today, this method is unacceptable, as it can lead to damage to the bearings or gearbox.
When selecting a new chuck, pay attention to the type of fastening, bore diameter and the ability to operate in impact mode, if your drill has this option.
How to remove a keyless chuck from a threaded drill
A feature of the threaded connection of the chuck with the shaft is the left-hand thread of the fixing screw. This is done so that, by rotating the drill and “biting” into the material, the shaft simultaneously tightens the chuck mount. Therefore, the answer to the question of how to remove a self-clamping chuck from a drill of this type is simple - you need to rotate the chuck, firmly holding the body, clockwise.
Usually, simple rotation is not enough; you have to tap the joint so that the tightly tightened thread opens up a little and makes it possible to rotate the connection freely.
The process of how to remove a self-clamping chuck from a drill is shown in more detail in the video.
- Since there is a retaining screw inside the chuck, it must be accessed. To do this, the jaws (cams) of the cartridge are spread as wide as possible, and a screwdriver is inserted inside. Using clockwise movements, it is unscrewed from the socket. It is impossible to immediately determine the type of head, so you must first illuminate the inside of the cartridge and, most likely, try two or three different screwdriver bits.
- After removing the screw, the cartridge is easily unscrewed from the shaft.
Some models do not have a locking screw. Then the cartridge simply screws together, but more effort will have to be made. It is necessary to secure a key or other part convenient for work in the jaws, and use an open-end wrench to fix the shaft.
Next, we rotate the tools in different directions (as shown in the photo).
WD40 helps a lot in its operation - it is used to spray both the shaft and the fixing screw inside the chuck. This is especially useful if the screw head is clogged and its type (cross slot, straight slot) is not determined. After treating with WD40, the splines are easy to clean, and the threads are better.
Threaded connection
This structure must be disassembled in this order.
- Carefully unscrew the locking screw.
- We unscrew the cartridge counterclockwise, if the thread is tightened properly, we clamp the tool shaft in a vice. A gas wrench is used to unscrew it. Then we remove the device and inspect it for integrity and serviceability.
- If the drill is jammed in the jaws, then we apply not strong, but precise blows with a hammer using a drift on the cams from above.
Installation is carried out in reverse order. When screwing in a new device, the shaft must be secured against rotation with your free hand. Lastly, tighten the locking device. Video to help home crafters:
Cone connection
Removing the cartridge from the tapered part of the shaft is quite easy. The drill kit should have a special device for these purposes, but many experienced craftsmen use this method: they turn the tool over with the drill down, secure it, and evenly hit the back side with a hammer to knock the device out of the shaft.
Threaded removal
If the connection was made with a thread, then the holder was screwed onto a rod installed in the diold (power tool). When determining which direction to unscrew the drill chuck - in the opposite direction from the initial twist.
The threads on the elements are cut in different directions:
- the right-hand one has a drill pin;
- left-handed – cartridge.
During operation of the product, the seat rotates, which automatically screws it onto the shaft
In case of failure, when you need to change the fastening device, the actions are carried out in the following order:
- push the clamping tabs apart with a key so that the fixing screw becomes accessible;
- a Phillips or flat-head screwdriver is inserted into the head;
- deepen the screw in the threaded hole with a blow;
- The locking screw and chuck are unscrewed counterclockwise; if there are grooves, a wrench is used to fix the position.
Watching the video will help you avoid making mistakes.
When there is not enough physical strength to turn the open-end wrench, a vice is used.
There the wrench is clamped and the shaft is fitted. A tetrahedral head is inserted and clamped into the collet. Thread displacement also occurs after hammer blows along the axis of the cartridge body, when the tool is held by hand. You can install a long lever in the collet, an open-end wrench will hold it, and you will have to unscrew it with force in the opposite direction.
Cartridge mechanism problems
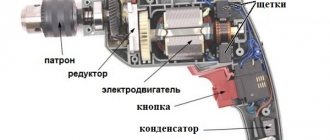
In modern drill models, such as Interskol or Makita, the drill or other attachments are secured by a chuck with a cam mechanism: 3 or 4 cams securely hold the cutting tool; they can only move along the axis of the drill shaft. The keyless chuck is adjusted manually; more complex designs used in modern drills are adjusted using a key.
During operation, a beating of the clamped bit may occur; the cause is wear of the cams during long-term operation. The tool is repaired as follows: you need to remove the device from the shaft; the same actions are necessary when the drill jams, because it can only be removed after completely disassembling the cartridge part of the product.
The following malfunction also occurs: the chuck rotates relative to the tool shaft. The reason for this behavior is damage to the threaded part of the device mount, or subsidence has occurred at the landing cone. The way out of this situation is to replace the cartridge with a working analogue.
Tool for work
Replacing a drill chuck is easy if you know the design of this unit and the methods for attaching it. To carry out repairs you will need a simple set of tools:
- bench vice, you can use not the standard one, but a smaller version for home needs;
- steel hammer;
- carpenter's mallet;
- pliers or pliers;
- medium size pipe wrench;
- set of wrenches;
- calipers;
- screwdriver;
- file;
- sandpaper for sanding.
The list shows the minimum set; there are situations when other plumbing equipment may be required.
How to open a drill chuck?
The purpose of the drill chuck is to securely fasten the drill or other attachments (construction mixer, grinding wheel, etc.). Fixation is carried out by three mechanical “fingers”, which are brought together and apart using a threaded mechanism.
There are two main types of cartridge:
- Keyless variety. To open such a structure, it is enough to wrap your fingers around the body and, turning on the reverse rotation, briefly press the trigger of the tool. The drill itself will rotate the shaft, spreading the “fingers” that fix the drill. Such a chuck is easier to use, but the reliability of fixing the tool will be somewhat lower.
- A type equipped with a key. The key is a T-shaped device, at one end of which there is a bevel gear. The other two ends serve as a handle for rotation. To unscrew or tighten the cartridge, the key is inserted into the hole in the housing and rotated while holding the housing with the other hand.
Typically, a key is included with the power tool. It either lies in the box or is attached to the power cord with a special fastener.
Removing the threaded cartridge
To remove it you will need a screwdriver.
It turns out a screw screwed into the tool spindle and installed inside the product. After which it twists off the spindle. As mentioned above, the internal screw has a left-hand thread, therefore it rotates clockwise. True, the cartridge is unscrewed counterclockwise, since, on the contrary, it has a right-hand thread. If the screw does not want to come out, tap it with a hammer using a screwdriver . There should be no difficulties with the cartridge; it unscrews easily. Although if difficulties arise, you can use open-end wrenches and gas wrenches. Attach the spindle to the drill first, and grip the chuck last.
In addition, when the chuck has functioning clamping jaws, a thicker hexagon can be installed to turn it out. You also need to secure the spindle using an open-end wrench. Most modern battery-powered drills do not require any additional attachments to mount the drill. However, changing the cartridge for them is very difficult.
When this does not help to remove it, the tool body is disassembled . Thus, it is possible to reach the spindle, since it is hidden when assembled. Then everything is put back together, but without using keys.
What to do if the internal screw is damaged during the replacement process? In this situation, it is better to purchase an adapter for a chuck for a cam-type hammer drill, since it comes with a screw.
How to replace a cone specimen?
There should not be any difficulties when removing the element mounted on the shaft cone. You can use a special tool that is used to replace bearings.
But the easiest way is to place the tool vertically, with the drill pointing down. Then you need to gently tap the entire surface with a hammer until the cartridge is disengaged. If necessary, it is polished. The new part is inserted with light blows from above.
What to do if the key is lost?
If the key is missing, removing the drill will be quite difficult. The easiest option is to deal with the problem with brute force. The parts of the clamping device are held by the right and left hands and rotated in opposite directions. However, if the chuck is tightened too tightly or the drill has been used for a long time, it is unlikely that you will be able to unscrew the thread.
During operation, parts of the power tool become hot and the metal expands. This leads to jamming. To make releasing the chuck easier, wait until the tool has cooled completely.
To enhance the applied impact, use various tools or homemade devices. Here are some ways:
- Experienced craftsmen loosen the cartridge with several tangential blows with the edge of the right palm. The drill is held with the left hand in a position with the drill facing away from you. The disadvantage of this method is that if you are not used to it, you can injure your palm. And even with a tightly tightened (and even more so misaligned or jammed) mechanism, this is not a way to deal with it.
How to remove and disassemble an electric drill chuck
Even small, minor repairs will require proper disassembly of the structure. Today, there are only two mounting mechanisms on the working shaft, so the process of dismantling work may vary.
With the threaded fastening method, the structure must be disassembled in the following order:
- deepen the cams inside the body and spread them as far apart as possible;
- Unscrew the fixing screw located in the central bottom part of the device. Fasteners with left-hand threads must be turned clockwise;
- Using an open-end wrench placed on the shaft, the device is unscrewed.
If there are no flats, the housing is disassembled, as well as the rotor shaft is subsequently fixed in a vice. It is advisable to unscrew the element using a gas wrench.
The most popular and frequently used in modern instruments is the cone connection. In addition to the exceptional strength of the cone connection, this option, with the right approach, can be quite easily disconnected on its own. For this purpose, the housing is first tapped in a circle , after which the element is knocked off the shaft using a sharp and precise blow to the rear of the shaft.
After the cartridge is removed, it is necessary to correctly determine the type of malfunction. You can carry out repairs yourself if there is no significant damage to the parts and jamming caused by metal shavings trapped inside adjacent parts. As a rule, restoring functionality in the event of such a breakdown can be achieved by washing the elements in oil or kerosene using a soft, medium-sized brush. After this cleaning method, assembly is carried out in the reverse order.
Most often, owners of actively used tools are faced with a number of malfunctions caused by wear, as well as damage to threaded or gear parts. Minor local damage of this type can be easily eliminated by grinding. For this purpose, it is recommended to use a needle file or a standard sanding cloth. In the most complex cases of breakdowns, a complete replacement of the failed cartridge is most often required.
How to disassemble the cartridge
The clamp with a threaded connection is removed taking into account the left-hand thread.
The threaded element is located in the internal part of the device, and therefore the clamping jaws are first moved apart as much as possible, thereby providing access to the fixing screw, which can be unscrewed with a regular Phillips screwdriver. In drills without this screw, the chuck is twisted from the shaft without the preparatory work described above.
The left-hand thread screw that secures the threaded chuck may wear out later. To restore connection reliability , it is recommended to do the following:
- insert a Phillips screwdriver into the head of the clamp screw;
- Using a hammer, lightly press the screw into the threaded hole.
These actions will not lead to damage to the drill mounting unit and will allow you to fix the clamping device on it more accurately and reliably.
Replacing the threaded cartridge can be done using a 14mm wrench. To avoid making mistakes, it is recommended that you familiarize yourself with the theoretical material and watch the corresponding video.
To replace a worn chuck, the old clamping device is removed from the drill and a new one is installed. Both regular and mini drills are equipped with chucks with threads and a cone connection.
When replacing threaded drills, it is important to take into account the markings, which look like this:
The interval 1.5−13 indicates the minimum and maximum diameters of the cutting tool. The new clamping device must have identical markings to the previous one.
Replacing a drill chuck with your own hands
There are several most common problems that can be observed during the operation of the tool and will require replacing the chuck:
- quite often a fixed element falls. This problem occurs not only on old tools, but also on completely new models, which are characterized by a conical fastening of the cam part. As a rule, the fall of a part accompanies the process of drilling deep holes. In this case, when lifting the drill and freeing it from accumulated chips, the cartridge falls off the cone. This problem can be solved by increasing the tension of the cone joint. For this purpose, you need to heat the cartridge in oil to a temperature of 110 ° C, and then place it on the fixing part of the cold tool;
- If, when performing work that is accompanied by the release of a significant amount of dust, chips or dirt, the clamping lips jam, then you need to properly disassemble the chuck, and then carefully, but as thoroughly as possible, clean and rinse all moving, working elements. Before assembling the part, it is very important to lubricate the internal parts with a brush and lithol. A good result is obtained by using a homemade protective casing that prevents clogging of the working parts;
- If chuck runout is observed during drilling, the cause may be significant wear on the seat cone. An equally common cause of this phenomenon can be uneven wear of the cams, which must be replaced. If necessary, the broken cartridge is completely replaced.
Reassembling the disassembled part is carried out in the reverse order of disassembly, observing the rules for fastening to the tool.
Sources
- https://instanko.ru/elektroinstrument/kak-snyat-patron-s-dreli.html
- https://tehnika.expert/dlya-remonta/drel/kak-snyat-patron.html
- https://stroy-podskazka.ru/drel/kak-snyat-i-pomenyat-patron/
- https://stroy-okey.ru/house/instrument/kak-snjat-patron-s-dreli/
- https://mschistota.ru/sovety/otkrutit-drel-bez-klyucha.html
- https://stanok.guru/oborudovanie/dreli/kak-snimat-patron-s-dreli-metody-krepleniya-i-demontazha.html
- https://DachaDecor.ru/sadoviy-inventar/kak-pravilno-razobrat-i-otremontirovat-patron-dlya-dreli