Materials used
A suitable material for homemade manual tamping is a square beam with a side of 100 or 150 mm. It will be difficult to work with a round log in the corners and will have to be compacted with a significant overlap of the previous impact point.
It is not at all necessary to take new lumber; a used lumber will do. The main thing is that the wood is free from rot and splits. Choose a piece of timber that you can lift. The height of the manual tamper can be waist-high or chest-high, depending on ease of use. If you have no experience working with this tool, take a longer block, try it out and shorten it if necessary.
Drawing of a manual tamper for soil compaction.
Materials for the manufacture of manual soil compaction.
How to assemble a vibrating plate yourself
Materials
- Sheet of steel measuring 50x80cm and thickness 8 mm;
An area vibrator and an electric motor for it, for example IV-98E. Some craftsmen build vibrating plates with a washing machine motor- Two pieces of channel up to 45cm long;
- M10 and M12 bolts with nuts and washers;
- Metal pipes 1.5 m long and 20-25 mm in diameter;
- Shock absorbers.
Tool
- Welding machine,
- hammer,
- grinder with cutting wheels,
- drill and a set of metal drills for it,
- set of wrenches,
- tape measure and marker.
Prepare the timber
Saw off the ends of the workpiece according to the dimensions exactly at right angles. Using a plane, adjust the plane of the lower end of the beam to a square. Remove 5 mm wide chamfers from sharp edges.
Preparing timber for tamping.
Decide how high-quality a finish you want. Before painting, the block will have to be sharpened and sanded. When a beautiful look is not needed, it is enough to clean the surface a little so that there are no splinters.
Possibility of reverse movement
Movements of a homemade vibrating plate made as described above are only possible in one direction. Therefore, after walking a certain distance, you have to turn it around and only then move in the opposite direction. This reduces the speed of work and requires additional physical effort on the part of the operator.
Another drawing of a variant with a gasoline engine.
In order to provide the vibration machine with the ability to reverse movement, it is necessary to install a device that changes the direction of rotation of the motor. After its installation and connection, the vibrating plate will be able to move in two directions.
When the edge of the treated area is reached, the operator turns off the engine and starts rotating it in the opposite direction. The vibrator eccentric will also become reversible and provide the machine with a return movement.
Make a shoe
Transfer the dimensions of the workpiece from the drawing to the steel sheet.
Cut out the plates for the shoe.
You can simply align the timber vertically installed on the metal and trace the outline with a pencil.
We make a soil compactor shoe.
Depending on the thickness of the plate, cut the workpiece with metal scissors or cut out the excess with a grinder. Remove burrs with a file, holding the part in a vice.
Mark and drill holes for the screws, make recesses for the caps with a countersink or a drill of a larger diameter.
Sand the surfaces with sandpaper.
Tamping shoe.
Bend the wings of the workpiece in a vice, which will be easy to do with the first two opposite sides. When bending the two remaining sides, the vise jaws may turn out to be wider than the shoe, then use a timber prepared for tamping.
Plate and frame
The plate is a sheet of metal, the thickness of which can provide sufficient rigidity.
Typically, steel sheets of 8 mm and thicker are used.
The average size of the working surface of the stove is 60*40 cm, although there are other options.
The front and rear edges of the slab are raised for unhindered movement along the surface of the site.
The frame consists of a stand for the engine and eccentric shaft. It also serves as an additional load, which gives the vibrating plate greater efficiency and increases the amount of forcing force. Another task that the frame solves along the way is strengthening the rigidity and strength of the base, compensating for mechanical loads from the rotating rotor.
The design of the homemade frame can be anything. The main task is to strengthen and weigh the slab, so they use pieces of channel bars, rails and other massive and durable elements. The only thing to remember is that the vibrating plate must sooner or later be placed in storage, which may require carrying it manually. Excessive weight will create difficulties.
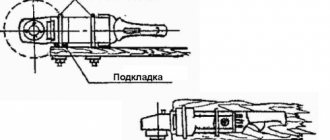
Secure the shoe
Check the fit of the steel plate on the beam, if necessary, tap the metal or sharpen the wood. The shoe should fit snugly against the end on all planes. Drill holes for screws in one wing, pointing the drill at a slight angle into the wood, and tighten the screws.
We attach the shoe to the prepared timber.
Turn the beam over to the opposite side and fasten the other wing in the same way. Make sure that the shoe does not move away from the end.
When drilling subsequent holes, guide them past the already screwed in screws.
A shoe attached to a manual tamper.
Surface preparation and painting
To work with paint and varnish materials you do not need special knowledge or expensive tools. You need to buy a standard painter's kit: paint container, roller, brush. Despite careful application, difficult-to-remove drops may remain on the floor, so the coating should be covered with cellophane. Window sills, frames, doorways are covered with paper tape.
As a surface preparation measure, you need to carefully level the wall. Separating pieces of putty must be removed, old wallpaper must be removed, although smooth canvases can be painted on top after preliminary priming. If the wall is old, the ideal option is to completely remove the coating layer, perform leveling according to the standard scheme, and only then paint. The last layer is always a high-quality primer (regular, for the corresponding surface).
Painting a wall is pretty easy
It is important that there is no dirt or dust on the base that could settle after priming. You need to mix the paint in a jar, pour it into a small container
Using a dampened roller or brush, carefully spread the material over the wall surface. After 2 hours, you can apply the second layer, and you can use the surface (drawing) after 3 days
If necessary, a day after application, magnetic priming is additionally done with a composition containing iron powder. During the first month of operation, it is allowed to wash the wall only with water, and after that it is permissible to use not too aggressive household chemicals.
Set the handle
Mark the drilling center at a distance of 100 mm from the top end. Select a drill bit with a diameter 2 mm smaller than the cross-section of the handle. Make a through hole perpendicular to the surface of the beam.
We make a hole for the handle of the tamper.
Even with careful drilling, the outer parts of the hole will be slightly larger than the inner diameter. Sharpen the wood with a file, periodically trying to insert the handle into place.
Bed and door
Now let's figure out how the bed in the bedroom should be positioned relative to the door according to Feng Shui. Here, too, there are a number of rules that must be strictly adhered to if you want harmony and peace to come to your life.
And the very first of them says that you cannot install a sleeping place opposite the doorway, much less sleep with your feet towards it. After all, this will cause a feeling of discomfort and insecurity. The ideal location of the bed relative to the entrance is diagonally, that is, in the opposite corner.
It would be a very bad idea to place a bed between the entrance and the window, where powerful energy flows, including negative ones, circulate. As a result, they will constantly pass through the sleeping person and take away his positive energy, thereby causing harm. But, there is a solution! For example, you can put a fluffy flower on the windowsill or hang a glass ball with many edges opposite the window at a height of 1.5 meters from the floor. These items will dissipate and ultimately soften the energy.
- Position the bed in the bedroom so that the entrance to the room is visible. This maneuver will bring peace into your life and a feeling that you are in control of any situation.
- If the layout of the room allows you to place a sleeping place only opposite the entrance, then take care to protect yourself. Place a piece of furniture between the bed and the door: a chest of drawers, a soft bench, a table, or a small shelving unit. They will prevent creative energy from flowing out of you.
If there are two doors in the room, one is the entrance, and the second leads to the bathroom or to the balcony, then you still try to position the bed so that it does not look at either of them. And it is best in this case to turn the bed sideways or with your feet towards the window.
You should not lean your sleeping place against the wall in which the doorway is located. This is not the most reliable support. For the same reasons, it would not be the best solution to turn the bed with the head of the bed facing the window. After all, this will lead to a constant feeling of anxiety and uncertainty.
Interesting: Curtains for the bedroom: design in a modern style
Scope of application and operating principle
Vibrating plates are actively used during construction and repair work of varying complexity, for example, when laying roads or sidewalks, etc. The unit has small dimensions, which allows it to be used in hard-to-reach places, including trenches. The design of the tool consists of four main elements:
The basis of the unit is a massive plate, in the center of which there is a vibrator. It is connected to the power plant using a V-belt drive or clutch. A vibrator is necessary to convert rotational motion into oscillatory motion. Internal combustion engines or electric motors can be used as the power plant of the unit.
Purpose of vibrating plates
A vibrating plate is a mechanism designed to compact loose soils and bulk building materials. In addition, such a mechanism is widely used for vibration processing of semi-dry concrete mixtures and asphalt when constructing floors and paving surfaces. The use of such a tool is very effective when working on a small plot of land and in cramped spaces.
Homemade electric vibrating plate.
The construction of sidewalks, garden paths, driveways and parking lots near a private house using a vibrating plate is carried out much faster, while ensuring high quality of work. Compacting the bottom of the trenches when laying utilities eliminates their possible damage in the event of subsidence of loose soil. These and other advantages encourage many home craftsmen to make such equipment themselves and use it in construction work.
Main technical characteristics
The most important characteristic of the unit is the weight of the working plate. It determines about 70% of the total productivity of a homemade vibrating plate, as well as the suitability of the tool for the work performed. Depending on this indicator, it is customary to distinguish four categories of units:
For home use, it is enough to make a vibratory rammer of the first category with your own hands. The power of the power plant also has a great influence on the productivity and quality of work performed. The optimal weight-to-power ratio is 5 liters. With. for every 100 kg of weight.
Among the additional characteristics of the unit, three should be highlighted:
Device selection criteria
Several conditions influence the quality of work. To obtain an excellent result, it is necessary to take into account all the properties of the model and select a site compactor, focusing on the tasks facing the unit.
Characteristics by mass
This is the main quality of a vibrator for compacting any surface, which affects the effectiveness of the task. You need to pay special attention to this when purchasing or making a homemade vibrating plate. A self-assembled device often has a bias towards one feature, so it is necessary to understand all the characteristics of the mechanism.
The weight of vibratory ramming devices is distributed as follows:
- Lightweight models weighing up to 75 kilograms are suitable for working on surfaces with a small (up to 15 centimeters) soil layer thickness: paths in the garden, local areas for laying tiles or rugs.
- Medium ones with a draft thickness of up to 25 cm are quite versatile. They can cope with light work with equal efficiency and help with laying asphalt and paving slabs. Their weight is in the range of 75–90 kg.
- At a construction site, when pouring the foundation and strengthening the bottom of communication ditches, as well as laying several layers of asphalt pavement, medium-heavy vibrating machines weighing up to 140 kilograms and a compaction depth of up to 60 centimeters are useful.
- Heavy slabs perform the same work as the previous ones and weigh more than 140 kg.
Manufacturing instructions
A self-made vibrating plate with an electric motor will allow you to save a lot of money, since industrial units are quite expensive. The design of the tool is not very complicated, and you can make it yourself quite quickly. Among the necessary materials and spare parts it should be noted:
From this entire list, wheels can be considered optional, but thanks to them, transporting the tool will become easier. You can also make your own tamper for soil compaction with reverse, which will make it easier to work on narrow or small areas of land.
On a steel sheet, use a grinder to make 2 cuts on both sides with a depth of 5 mm. They should be located approximately 10 mm from the edge symmetrically. Then the edges of the sheet should be bent, giving it the shape of skis, to avoid burying the slab during work. The places of the cuts must be welded, thereby fixing their position.
The vibrator is mounted on channels, which should not protrude beyond the level of the working plate. It is necessary to weld the channels securely, and therefore it is advisable to place the welding lines across. The distance between them is selected in accordance with the location of the mounting holes on the power plant.
The pipe will be needed to make handles, to which soft pillows must then be attached. Without them, working with the tool will be extremely inconvenient, because strong vibration will make it difficult to hold the plate. If the unit uses an electric power plant, then no special care is required.
The same cannot be said about a gasoline internal combustion engine. Before starting work, you should always check the reliability of all connections. It is extremely important to periodically clean spark plugs from carbon deposits to increase their service life. No more than 25 working hours should pass between the first and second oil change. Subsequent replacement can be carried out after 80 or even 100 hours.
Mechanism design
Device
The main element of the vibrating plate, from which the creation of the installation begins, is the metal base.
There are steel and cast iron samples, however, the use of cast iron at home is not advisable.
It is capable of cracking, cannot be welded, and is fragile.
Typically, steel sheets with a thickness of 8 mm or more are used. Additional elements are installed on the surface of the base to increase the mass.
They also serve as the basis for installing the engine and vibration mechanism. In most cases, this is a regular shaft mounted on two bearings, on which a load is attached in the longitudinal direction. The rotation of the shaft creates a driving force, which, due to its own weight and inertial force, forms frequent short-term loads on the ground.
Drawing
The operating efficiency of a vibrating plate depends on the weight, base area and rotation mode of the eccentric shaft. A slab that is too spacious is not capable of generating high pressure, since the weight of the installation is distributed over the area and reduces the specific pressure.
A small base gives greater efficiency, but it acts too selectively, pointwise. This mode does not allow uniform compaction of the soil over the entire area of the site. The rotation of the eccentric shaft creates a significant load on all structural elements. Too intense vibration can destroy the vibrating plate, have a negative impact on the operation of the engine, and negatively affect the well-being of the worker.
How to make your own hand tamper
When building foundations for houses, garages, country paths and much more, great attention is paid to the substrate, consisting of gravel and sand. To ensure that the concrete monolith is laid evenly and does not begin to move over time, it is important to carefully level the underlying layer. For these purposes, you can use specialized vibratory tamping machines or rolling equipment, but manual tamping will be much cheaper.
The principle of do-it-yourself processing is that with the help of a homemade tool, blows are applied to the surface, due to which the sand and crushed stone are compacted. In this case, compaction is performed after laying each of these layers.
Control handle and vibration damping system
During operation, thanks to the front location of the eccentric and the resulting vibrations, the platform with the engine installed on it begins to move along the surface independently. But to set the correct direction of movement, a control handle is needed.
According to its design, it can have one or two inclined posts with a transverse handle-crossbar. It is recommended to install a vibration damping device in the upper part of the handle so that vibrations are not transmitted to the hands during operation. You can use springs as protection; the stand itself can be made of two pipes, one of which will go inside the other. The springs are fixed by steel rings installed on the pipes.
If you have the financial opportunity, then instead of a homemade spring structure, you can install silent blocks from a passenger car. This will provide sufficient vibration damping, and the structure itself will be less noisy.
Features of crushed stone compaction
Any novice builder is sincerely perplexed as to why compact an already strong stone. However, there are several important nuances to consider:
In addition, when processing crushed stone, it is recommended to declinch the base. To do this, you need to divide the gravel into fractions. The larger material is laid first and compacted by hand. Then smaller material is backfilled, which is also compacted. The final top layer should consist of the finest material, which must be carefully leveled and re-compacted.
Thanks to this, the finished base will have increased strength. If you perform a similar manual tamping of sand, the effect will be even better.
What is a vibrating plate?
Why do you need a vibrating plate?
The processes of compacting various loose bases are integral to construction work. For example, crushed stone, sand, soil and other similar materials.
Basically, these are the stages of preparation for pouring concrete, asphalt, laying tiles or building a foundation.
In order to mechanize the compaction process, so-called vibrating plates are used. The mechanism of their action is quite simple.
The device creates vibrations under the action of which small particles of the compacting layer are knocked as close to each other as possible, excess air is displaced and at the finish a flat base of the required density is obtained.
Buying such a car for yourself is quite unprofitable. A homemade vibrating plate will cost much more profitably.
Structural structure of the mechanism
A vibrator is mounted on a weighty platform, and a motor is installed above it. The last two nodes are connected by a coupling and a V-belt drive.
The rotational movements of the engine are converted into oscillatory movements using a vibrator and transmitted to a heavy platform, which in turn acts on the compacted surface.
The device's reverse function makes it possible to perform work in narrow trenches and pits.
The stove itself is made of steel or cast iron, preferably of good quality. Otherwise, the service life of the device is significantly reduced, and cracks appear on the surface of the base.
The size of the working surface of the slab affects the pressure exerted by the mechanism on the compacted layer. A slab with a smaller area compacts the soil better.
The density of the finishing layer depends on the vibration force. The higher it is, the better the material is compacted.
Vibrating plate configuration options
Nutrition classification
- electrical,
- diesel and
- gasoline vibrating plate.
Electric. Electric is considered the most economical. This is exactly what they recommend collecting with your own hands for your own household.
Moreover, in terms of technical characteristics, vibrating plates with an electric motor are in no way inferior to their competitors. The only downside is the condition of having an accessible electrical network.
Gasoline. It will cost more than electric ones, but cheaper than diesel ones.
However, it will be more profitable to buy fuel for diesel engines, although the engine itself will be the most expensive of the three described.
Also, its disadvantage will be high noise, which reduces comfort at work.
The power of the installed motor must be sufficient to operate a heavy slab. Otherwise, the latter will load in bulk material.
Classification by weight
Highlight:
- Lightweight slabs. Weighing 75 kg. For processing layers up to 15 cm thick. Such slabs are used for landscaping work, laying paving slabs, and damping polyurethane mats.
- Universal plates. Their weight ranges from 75 to 90 kg. The maximum layer to be treated is 25 cm. They are used for landscape work, repair of road surfaces, including patching on asphalt.
- Medium-heavy. Weight 90-140 kg. The thickness of the treated layer is up to 60 cm. Application - laying road surfaces in layers, backfilling trenches along the perimeter of the foundation.
Classification by direction of movement
According to the direction of movement during the compaction process, vibrating plates can be straight or reverse.
Straight lines can only move forward, and if a second pass over the compacted layer is necessary, such a machine will have to be turned around. And this, albeit small, is still a waste of time.
Reversible vibrating plates can move both forward and backward. They give higher performance. Typically, devices with slabs weighing more than 100 kg are equipped with reverse.
Additions to the package
An additional advantage would be if the vibrating plate is equipped with an irrigation system.
It protects the unit from sticking to the compacted surface. They should carefully protect the engine from water.
This way, small particles of bulk materials will not clog into the mechanism, and the machine itself will last much longer.
Features of sand compaction
Tamping sand with your own hands has some nuances that should be taken into account when creating a solid foundation for a concrete slab.
First of all, you should decide on the type of sand that is best suited for these purposes. It is better to use gravelly material, but it is not recommended to use fine sand for compaction. The larger the grains, the greater the compression resistance of the base, which will help avoid shrinkage of the future house or parking area.
If you are planning to build a monolithic structure, then it is best to give preference to river or quarry sand of the middle fraction. However, even in this case, the underlying layer will be influenced by groundwater. Therefore, in order to prevent the process of erosion of the base, it is necessary to lay geotextiles at the bottom of the trench, and only after that add sand.
In addition, before adding sand, it must be sifted, since the presence of foreign impurities (especially clay) can affect its properties. Monitor the moisture level of the material; the ideal consistency will be if you can roll the sand into a small ball that will not crumble immediately. Accordingly, the sand moisture level should be in the range of 8-14%.
Torque transmission
It is recommended to use a soft V-belt drive as a transmission to transmit torque from the engine to the vibration mechanism. It will ensure reliable rotation of the eccentric and protect the motor bearings from the effects of vibration.
It is recommended to use double-belt pulleys. This will give greater grip to the belts and ensure trouble-free operation in the event of a break in one of the belts.
To protect against possible injuries, the belt drive must be covered with a protective cover, and if this cannot be done, then a bumper guard must be installed.
Making a manual tamper
There are many options for making a rammer with your own hands. Some people make massive structures entirely made of iron, but in this case welding will be required. Others prefer to make do with improvised materials. Let's consider the best option for manufacturing a manual tamper for compacting soil, sand and gravel.
To do this, you will need a standard square beam of 100 - 150 mm. It should not be rotten or flaking.
Healthy! Some use round logs, but with the help of such compactors it is impossible to fully compact the base in the corners.
You will also need to prepare:
Making blanks
We will prepare the structure according to the drawing shown below.
After preparing everything you need, saw off the ends of the timber at a right, even angle, according to the dimensions. After this, it is necessary to use a plane to level the plane of the lower end of the block and remove chamfers of about 5 mm from the edges of the workpiece.
To avoid getting numerous splinters during the work, it is recommended to sand and polish the surface of the block.
Making a “shoe”
The next stage of creating a tamping tool with your own hands is making a metal “shoe” from a sheet of steel. To cut the plate we use the following template.
Or, you can simply install the beam with its lower end on a sheet of metal and trace it with a pencil.
After this you need:
Installing the handle
Having retreated 100 mm from the upper edge of the block, it is necessary to mark the center of the future handle. To do this, you must first measure the diameter of the shovel handle. Let's say it is 36 mm. To prevent the handle from dangling, you need to use a drill whose diameter will be several mm smaller than the diameter of the handle. It should be taken into account that the outer part of the hole in the bar will be slightly larger than the internal diameter, so during the work process it is necessary to periodically insert the handle into the bar and check how tightly it fits.
If the handle does not fit into the hole, you should never try to hammer it in with a hammer. Otherwise, the timber may crack and making a rammer for earth, sand and gravel with your own hands will have to start all over again. It is much easier to slightly plan the cutting to the required diameter.
After the hole is ready, you need to apply glue to its walls and install the handle. Excess adhesive can be removed with a rag. In order for the handle to hold tightly, you need to fix it with a long screw, which must be screwed into one of the sides of the beam.
When the glue gains strength, you can begin to use the tamper. It is best to store a homemade tool in a dry place, or you can pre-paint the workpiece to make it last longer. If necessary, the steel nozzle can be easily replaced with a new one.
How to do it yourself: step-by-step assembly
Let's look at the process of how to make a homemade vibrating plate for soil compaction. Procedure:
- Using a grinder, a slab (base) is cut out. The size is chosen based on your own ideas, it is recommended to stick to the average value of 60*40 cm.
- Along the edges, cuts are made at a distance of 7 cm (front) and 5 cm (back), to a depth of about 5 mm. Along the line of cuts, the edges are bent upward by 25° so that the slab does not cling to the ground and does not get stuck.
- Two pieces of channel are welded onto the top of the slab, reinforcing the base and edges. It is necessary to ensure that they are in the same plane.
- On the back side, holes for mounting the engine are drilled or burned with a welding electrode in the channels. If necessary, a metal platform with mounting holes is pre-welded.
- The engine is installed using rubber cushions.
- Eyelets are installed for attaching the handle.
- The rotor with the eccentric is manufactured separately and installed on the plate in finished (assembled) form. It is a shaft installed in the hub. One of them is blind, the second is through. A section of shaft passes through it, onto which the pulley is installed. It is necessary to ensure the alignment of the pulleys, otherwise the drive belts will have to be changed every shift.
- The tensioning device is attached to the frame in a convenient place for use. It is usually installed in the middle, between the pulleys, at the point of maximum belt sag. It is important to ensure that all pulleys and the tension roller are placed in the same plane.
- It is recommended to cover the rotating rotor with a protective cover to prevent injury.
- The handle is installed, a test run of the vibrating plate is made, and the functionality is checked. Detected problems or flaws are eliminated and necessary amendments are made.
Putting the vibrating plate into operation is possible only after all defects have been completely eliminated. It’s rare that anyone manages to get the expected result the first time, but after corrections, the installation usually starts working in the desired mode. The main setting is to determine the optimal eccentric size and select the speed mode of operation.
A homemade vibrating plate, no matter how it turns out, will provide a much better result than trying to compact the backfill layer manually. All detected deficiencies will be eliminated, and additions or improvements to the design will appear as operation progresses. The final result can compete with industrial designs, if not outstrip them in terms of efficiency and quality of work.
The main advantage of homemade devices is the ability to correct or change the design at any time, or add additional elements. Such actions are impossible with ready-made vibrating plates, since the design of such technical means rarely allows for changes. The quality and speed of labor-intensive operations with bulk materials is worth the effort and time spent on creating homemade plants.
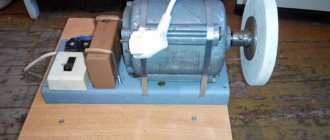
Vibration electric motor for table
In order for the level and strength of vibration to be sufficient, motors with a power of one-half to one and a half kilowatt hours should be used. It needs to be unbalanced.
To do this, you need to put the pulleys on the motor shaft. A bolt needs to be inserted into one of its sides, thanks to which you can change the strength of the vibrations by adjusting the position of the bolt.
However, this is a trick; the manufacturer did not count on such bypasses of the system, which means this will primarily lead to wear and tear on the equipment. Under such heavy loads, the engine will not last long.
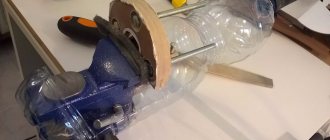
How to set up an electric motor
You can adjust the engine to the power required for the vibrating table in another way, but this method cannot be adjusted: you simply need to cut off the pulley from one part or attach nuts to it.
The design of these electric motors includes an unbalancing device, which allows you to exceed the maximum load threshold and withstand stronger vibrations. This improves the quality of work and the quality of the final result.
Note!
DIY vices: simple and reliable homemade vices from A to Z (190 photos)Do-it-yourself grain crusher - operating principle, types and features of creating a device for processing grain crops
DIY concrete mixer | A visual aid on how and what to make a concrete mixer yourself
To install the motor, a beam is attached to the reverse, lower side of the surface of the vibrating table, on which ears are specially prepared so that the motor can be hung on them.
Thanks to this arrangement, the vibration will be directed directly to the surface of the table and the workpieces will be of the highest quality.
As mentioned earlier, the motor can be mounted in either a vertical or horizontal position, however, for maximum quality it should be installed in a rotated position so that vibrations can go in several directions at once.
Please note that the engine must be protected from external influences of moisture or active mixture that will form on the back side of the vibrating table.