Good day... All modern laptops have a built-in WI-FI adapter. A hardware component that allows you to receive a WI-FI signal issued by a router or repeater. As well as any other device that acts as an access point to a wireless network. And today we’ll talk about how to set up Wi-Fi on a laptop...
In turn, with appropriate settings, many laptop models are capable of distributing the Internet themselves. Being connected to a wired or wireless network. How to set up Wi-Fi on a laptop is usually not difficult - both the Eight and Ten come with built-in network card drivers. Allowing the laptop to automatically detect wireless networks within their range.
The procedure for connecting a laptop to the network may differ in different versions of Windows. But these differences are insignificant. It's a different matter when a Wi-Fi network that you are sure exists is not detected. This will be indicated by the Wi-Fi indicator in the system tray. Marked with a red cross.
If wireless networks are detected, the indicator will be marked with an asterisk. Why is the network not detected? The reasons for this may be different, for example, the lack of a suitable driver or the wireless adapter being disabled...
Setting up a wi-fi router
Step 1.
We connect the router to the network using a power supply. Turn on the power with the ON button, if the router has such a button.
Step 2.
We connect the router to a laptop or computer using an ethernet cable (patch cord), which comes with the router. You need to connect the cable to the port of the computer’s network card and to the LAN1 port of the router. (In no case to the WAN port - you won’t be able to configure it through it)
Step 3.
We check that on the computer in the properties of the network card we have selected automatic acquisition of an IP address. To do this, go here: "Start" -> "Control Panel" -> "Network and Sharing Center" -> "" -> "Local Area Connection"
Attention! In the “Changing adapter settings” section, you may have several connections displayed. For example, “Local Area Connection”, “Local Area Connection 2”, “Wireless Network Connection”, “Bluetooth Network Connection 2”, etc. How to find the right one among these connections?
Firstly,
By default, a wired connection in Windows 7 and 8 is called "Local Area Connection". If no one managed to rename it manually, then it will be called that way. Unless there may be a number at the end - most often “2”. This is the case if the computer has several network cards installed (relevant for desktop computers, because in 99% of cases a laptop comes from the factory with only one wired network adapter)
Secondly,
the connection we need should be active, since you connected the computer and the switched-on router using a cable: the connection icon should glow bright (usually blue if your Windows uses a standard icon pack), i.e. the icon should not be grayed out. See picture:
Here, we have found the desired active wired network connection. Step 3.1.
Right-click on the active wired connection we need and select “Properties":
Step 3.2.
In the window that opens, click the “Properties” button:
Step 3.3.
Left-click “Internet Protocol Version 4 (TCP/IPv4)” and click the next button “Properties” at the bottom:
Step 3.4.
We set both switches to the upper positions so that it is “… … … automatically”:
Step 3.5.
Click the “OK” button to save the settings.
Step 4.
Open the connection window again:
Step 4.1.
Click the “Details” button:
Step 4.2
. In the window that opens, we find out the IP address of the default gateway:
In most cases it is 192.168.1.1
Step 5
. Open the browser to go to the router’s web interface.
Step 5.1
. In the address bar, enter the gateway address and press Enter:
Step 5.2
. Enter your login and password:
Attention! You can find out the login details in the instructions for your device. The router may include instructions on paper or in PDF document format on the supplied disk.
If the instructions are lost, you can try to download it from the manufacturer’s website. For example, https://dlink.ru, https://asus.com, https://tplink.com.
Often in a new device the default login = admin and password = admin. It also happens that login = admin and the password is empty.
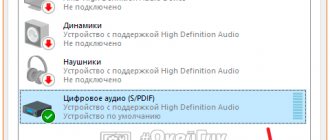
Step 5.3. After you have logged into the router’s web interface, open the wireless network (wi-fi) settings:
(illustrated using the example of D-Link DIR-300 NRU)
Step 6.
The actual setup of the wireless connection.
Step 6.1
. We disable WI-FI protected setup, because This feature is a serious security hole and could allow an attacker to hack your Wi-Fi network and gain access to your information.
Step 6.2
. Check that the Wi-Fi network is enabled: the “Enable wireless” checkbox is checked if it is D-Link
Step 6.3
. Let's set a name for our wireless network.
If the default is dlink or home, then it is recommended to specify some original name to avoid confusion with neighboring networks of the same name.
Step 6.4
. Set security parameters. We strongly recommend using the following options:
- WPA2 security mode;
- encryption type AUTO (TKIP+AES);
- PSK key type (aka Personal Key).
After specifying all the parameters, do not forget to click the save settings button!
Setting up Wi-Fi on a computer (laptop)
In this section we will show you how to set up Wi-Fi on a laptop with Windows 7.
Step 1
. Find the network connections icon on the taskbar near the clock and left-click on it once. A list of available wireless networks will open:
Step 2
. Find your wireless network in the list (it will have the name you specified in the previous paragraph) and left-click on this network.
Step 3
. Leave the “Connect automatically” checkbox checked and click the “Connect" button:
Step 4
. Enter the Wi-Fi network security key. This is the character set that you specified in the “Network Key” field. After entering the key, click "OK":
After clicking “OK”, the connection to your wireless network occurs.
After a few seconds, the previous window will disappear, and the network connections icon near the clock will change its appearance.
Now, when you click on the network connections icon, you will see that the computer is connected to your wi-fi network, but at the top you can see the inscription “Without Internet access”, because... We have not yet configured the Internet on the router:
How to turn on Wi-Fi using buttons
Laptop manufacturers provide two options for launching a wireless connection on the gadget - via keys and directly through Windows. Depending on the brand that created the device, the process of launching the buttons may differ in combination, but the essence does not change.
To turn on Wi-Fi on a laptop, you need to use a button specially designed for this: it is combined with one of the F keys and is indicated by the Wi-Fi icon . For it to work, it is pressed simultaneously with Fn. After this, the corresponding LED on the device will light up, and the screen will display that Wi-Fi is turned on. If the device has previously connected to this network, then no additional actions should be taken. You can disconnect the gadget from the Internet by pressing the same buttons again.
As mentioned earlier, in the vast majority of cases the Wi-Fi button on a laptop is combined with functional F:
- Lenovo, Asus - F2;
- Acer - F3;
- Toshiba, Irbis, Prestigio - F8.
The key combination for turning on Wi-Fi on a laptop within the same brand often differs, since there is no uniform agreement between manufacturers. Even models from the same company released at different times use different combinations.
If the laptop is old, then the button is not necessarily combined; this is rarely seen today, but in older MSI or HP models this is a common occurrence. However, a similar situation occurred in every brand. Later they began to care about the aesthetics of the device’s appearance, and buttons began to be combined with others. For older devices, the required button may be located either on the top panel directly among other keys, or it may look like a switch located on the side panel next to the USB outputs.
Important! Any laptop is equipped with an “airplane” mode. When you turn it on, all wireless connections stop working. If it is enabled on a laptop, then the key combination suggested above will not work; the “airplane” mode has a kind of priority.
Some manufacturers, such as Sony, Dell or Samsung, allow you to turn the flight function on and off from the keyboard; accordingly, an airplane is drawn on the button. If there is no such button, then you should disable the mode directly in Windows. At the same time, in older versions of the OS there is no separate mode; it appeared only in eight.
Setting up the Internet on the router
We set up a wi-fi network on the router and connected to it from a computer. All we have to do is help the router see the Internet so that the router can distribute the Internet to any devices that connect to it via wi-fi or cable.
Step 1
. In order for the Internet to appear on computers, you need to set up a connection with the provider on the router. We show the example of the same D-Link
Step 1.1.
Type the IP address of the router in the address bar
Step 1.2
. Enter your login and password and click “Log in”:
Step 2
. Go to the Internet settings section. Different router manufacturers may call it differently: WAN Setup, Internet settings, etc. In our D-Link this section is called “Internet Setup”:
Step 3.
We get to the WAN port settings section.
Step 3.1
. Uncheck “Enable Access Point Mode”.
Attention! For other manufacturers, this option may be called “Disable NAT”. The bottom line is that the “Access Point” mode disables NAT and turns the router into an access point. This option will be useful if this router is connected not to the provider, but to another of your routers.
Step 3.2
. Select the type of connection with the provider.
To find out what settings you need to select to connect specifically to your provider, you can:
- in the contract;
- on the provider's website;
- by calling your provider's hotline
The most commonly used type these days is Dynamic IP.
Step 3.3
. If your provider allows connections only from a registered MAC address, you have 2 ways to resolve the issue.
- Go to the provider’s office with your passport and register a new MAC address;
- Enter in the MAC address field the MAC address of the network card of the device from which you successfully accessed the Internet before purchasing the router. Typically, this is the MAC address of the computer's wired network card.
Step 3.4
. We specify the DNS server if the instructions from the provider require it.
Step 3.5
. Select the MTU value. If the provider does not require you to change this value, we recommend leaving it as it is: 1500.
Step 3.6
. Saving the settings
Attention! If you have lost the agreement document with your provider, which contains the details, then, as a last resort, you can always go to the office of your provider with your passport and find out all the comprehensive information: connection type, MAC address, login, password, MTU, etc.
The question of turning on Wi-Fi on a laptop interests many. Difficulties may arise due to the fact that each model has its own recommendations and instructions. Sometimes a key combination is enough, in other cases a mechanical switch is used.
Turn on Wi-Fi on a laptop using the Fn+F5 keys
Typically, the keys responsible for connecting to the Network have a stylized image of an antenna. It doesn’t matter which laptop – Acer or HP. You can always find such a button. But different combinations are created with it.
- Fn+F2 is a working combination for WiFi of the Asus model range.
- Fn+F12 should be pressed by those who purchased an HP laptop. Or there is a separate button that shows a wireless network.
- Fn+F3 – combination to enable WiFi communication on MSI models.
- For Samsung, there are two options: Fn+F12, or Fn+F9.
- Lenovo is different from HP or Acer. To establish the connection, mechanical switches are more often used in this model range. But the Fn+F5 keys also work.
- F8+Fn – keys that allow you to establish communication on any Toshiba laptop.
- The presence of a mechanical switch is also typical for the Sony Vaio model range.
You can look for a button that acts as a switch on the end of the device if Fn is missing. You managed to connect WiFi on your laptop, but something else is not working? Perhaps the problem lies in the WiFi settings of the Windows operating system.
Possible connection problems
Internet connection problems may include the following:
- The laptop does not see the Wi-Fi network;
- does not connect (incorrect password or error);
- connects, but there is no internet.
If the laptop does not see Wi-Fi networks, there may be the following solutions to the problem.
- The module is physically disabled (in this case it will not appear in Device Manager). You can check the presence of a module through the AIDA64 utility, which scans the gadget and lists its contents. If the Wi-Fi module is disabled on the device, it will not be included in this list. The second option, if it is not on the list, the module is broken.
- Wi-Fi is disabled in Device Manager or drivers are not installed. The solution to this situation was described above.
- If only the user’s Wi-Fi network is not visible, but there are others, then the problem lies with the router. It needs to be reconfigured or rebooted.
- A common reason why a laptop does not see the network is that “airplane” mode is turned on (how to fix it is described above).
- Sometimes the laptop does not see Wi-Fi due to a glitch, which can be solved by simply rebooting the gadget.
- Another reason is that the Wi-Fi connection service is disabled. In the Windows search we type in “services” and in the huge list we look for “Wi-Fi service connection manager service”, click “start” and check if the Internet is working.
If you succeeded in setting up Wi-Fi on your laptop, but at some point the device simply does not connect to the network, but there is a connection, then the reason is directly in the connection . The solution is to turn the router on and off. If this does not help, then calling the hotline will help; maybe there is no access due to work on the line. In some cases, the problem is caused by an insufficient balance on the user’s account; in this case, the provider does not disconnect the connection, but makes the speed so low that the gadget thinks there is no Internet, although technically Wi-Fi continues to work.
Sometimes the problem when logging in is that the device says that the password was entered incorrectly. In this case, you need to click on the selected network and select the “forget” option. The device deletes all settings about this connection, and the user re-enters the password, but it is worth remembering the correct input language and case. Sometimes it turns out that someone changed the password and forgot to say about it; it wouldn’t hurt to find out the correct option from people who have access to the router. If no one has changed the password, you will have to reset the router and reconfigure the wireless network.
Establishing communication in the Windows operating system
Sometimes the adapter is built into the operating system from the very beginning, at the software level. Then turning on Wi-Fi is as easy as shelling pears, without additional steps.
Open the desired item on the control panel, as our picture shows. We need a button that offers to change the adapter and its parameters.
A list will appear in which there will be more than one adapter. We need one that has the postscript Wireless or “Wireless Network”. This is the Wi-Fi adapter itself, we need to connect it.
Users may encounter two situations in this case.
- Gray icon when the adapter is turned off.
- The adapter is colored, but there is a red cross on it.
More about the first problem
You need to right-click on the image if the adapter is gray or remains completely colorless. A context menu will appear where we need to select the function to turn on Wi-Fi. After this, an image should appear with either a working network or a red cross.
What about the second situation?
The device was connected, but the Wi-Fi network was not turned on.
Sometimes this happens due to the operating mode "in flight". In other situations, disabling occurs in additional parameters. Just right-click on the Wi-Fi icon to enable communication. A separate window will pop up, where we need to select the function to turn on “Wi-Fi”. Or a wireless network. Once everything is turned on, a list of available Wi-Fi networks will appear that you can work with. All that remains is to connect.
Checking the drivers. Are there any problems with them?
Sometimes it is not possible to set up a Wi-Fi network due to missing drivers. Either when they are accidentally deleted by the user, or when they are not installed at all.
First, open the device manager. It is located in the Windows Control Panel, under Hardware and Sound. We need to see if there is any equipment with an exclamation mark next to it that is yellow or red. This especially applies to elements responsible for WiFi reception.
If there are problems, you will need to install WiFi drivers.
Procedure for Windows XP
The following sequential steps must be followed:
- Through “Start”, enter the “Control Panel”;
- Next, go to “Network Connections”;
- Then, in the window that appears, call up the context menu for the wireless connection and click on the “Properties” line;
- Open the “General” tab;
- Next, in the “Components” section, click on “TCP/IPv4 Protocol”;
- Click “Properties”;
- Activate receiving IP, DNS automatically or print them (depending on the router parameters);
- Exit the protocol properties and open the “Wireless Networks” tab;
- Set the network through which you plan to access the World Wide Web and click “Connect”;
- If Wi-Fi is protected by an access code, you will need to type it and press “Enter”;
- Ready"! Now you can go online.
Setting up WiFi for a local network
We connect the computer and router via cable. Before trying to configure or enable anything, make sure that the connection has been established. If everything is in order, a corresponding image will appear next to the clock. This operating scheme is equally suitable for Acer models. HP and others.
In the connection properties, you must enter a specific set of data.
IP address: 192.168.0.2 Subnet mask: 255.255.255.0 Default gateway: 192.168.0.1 DNS: 192.168.0.1
Some model manuals may provide different information. We insert exactly what is said in the accompanying documentation. Open the command line to explore other options. You can set up WiFi through the Start menu, just write “cmd” in the search. In the command line that opens, type the combination ping 192.168.0.1. In response, packets will be received from this address if everything went well. You need to find out what IP address the router accepts on the internal interface if a message appears that “wait limit exceeded.” Otherwise, you will not be able to configure and enable WiFi.
You can configure WiFi by changing the last two digits if the limit message continues to appear. 1. 1.2 2. 1.1 3. 0.2
Go to the Wireles Settings section to configure Wi-Fi. After this, we need to give a name to our own Wi-Fi network. This is done in the Name (Ssid) line. In the Channel item, select the Auto function and find your region from the list. Thanks to this solution, you can configure your Wi-Fi router so that it automatically searches for channels with the least amount of interference. Click on the Apply button to save what we managed to configure.
How to enable WiFi in Windows 8?
Setting up WiFi on this operating system is no more difficult than on others.
- Select Start, and then go to Control Panel.
- Click on switch to classic view. We find the center responsible for managing network connections. Here we will see a section with a wireless WiFi connection.
- Right-click on the utility. And select the item with WiFi properties. There should be a line here that automatically obtains an IP address. Click OK when there is a check mark.
- We return to the folder with network connection management. Again, you will need the WiFi section for your wireless network connection. Right-click on it and select “connect-disconnect”.
- All you have to do is select and connect to the desired WiFi network.
The corresponding icons usually appear on the screen in the right corner, at the bottom. If everything is done correctly, the WiFi image will always be active. If everything is in order with the network itself, you will always be able to connect to it.
Any modern laptop has a built-in module for working with wireless networks. This means that you can connect it to the Internet via a Wi-Fi connection and have access to the global network anywhere in your apartment, house or even cottage, without worrying about laying unnecessary wires to your workplace. All you need for this, except the laptop itself, is a wireless router connected via broadband Internet access and a modern operating system that supports wireless networks.
If all conditions are met, then all that remains is to configure Wi-Fi on the laptop. To do this you will need to follow the following steps.
- During setup, connect the laptop to the wireless router with an Ethernet cable. After turning on the laptop and the router, communication between them via cable should be established automatically, as evidenced by the LED indication on the corresponding Ethernet port of the router.
- All settings for routers from various manufacturers are carried out using the so-called device web interface, which is launched by typing a special IP address in any browser. Typically this is 192.168.0.1 or 192.168.1.1. You can always clarify this address using the instruction manual for your router.
- Log in to the router's web interface by entering your username and password.
Typically, the default login:password pair is set to admin:admin. If admin:admin does not work for your router, try finding the relevant information on the sticker on the bottom of the device. Usually the web interface address and login-password for it are indicated there. In cases where the standard password has been changed and subsequently forgotten, it helps to reset the device by pressing and holding the hidden Reset button for several seconds. Please note that after resetting the settings, you will have to reconfigure your Internet connections. - In the web interface, go to the wireless network settings. Give it a unique ID, or SSID. The name must be original and different from the names of your neighbors' wireless networks.
- Be sure to secure your network by enabling one of the suggested security modes WEP, WPA, and WPA2. WPA and WPA2 are preferred over WEP but may not be supported by some devices. Set a security key (password) that must be entered on all devices connected to the network. In order not to forget the key, you can write it down in a secret place. Reboot the router for the settings to take effect.
- Make sure the wireless switch on your laptop is turned on. It is usually located on the front panel of the laptop and is designed to save battery power during battery life without using wireless networks.
- A message should appear in the lower right corner of the laptop, the so-called system tray, indicating that you are within range of one or more wireless networks. Click on it, select your created network, enter the security key. This completes the Wi-Fi setup on the laptop.
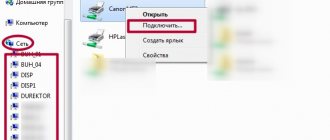
- If the message does not appear in the previous step, you can try to find the desired network manually. To do this, in Windows Vista and Windows 7, click the “Start” button and select “Network” from the menu that appears. In the window that opens, click on the “Network and Sharing Center” button on the left side of which go to “Manage wireless networks”.
- Click the "Add" button, select the name of your wireless network and click the "Connect" button. When prompted, enter the security key (password) and establish a Wi-Fi connection by clicking the “Connect” button.
You can find out that the connection has been successfully established by launching any browser and entering any website in its address bar.
For example, the address of this site When a user purchases a laptop, of course he wants to use all the features that it provides. I chose the topic of today’s article, how to enable WiFi on a laptop in Windows 7 or 8, for a reason. It would seem that there is nothing complicated here, but if you do not know some of the nuances, then this procedure will not seem so trivial.
Problems can arise and, fortunately, they can be solved quickly and easily, you just need to know exactly how. In this article we’ll talk about some of the pitfalls that may arise when turning on Wi-Fi.
Setting up a wireless module on Windows 10
The new operating system from Microsoft Windows 10 brings together all the best from previous versions. Connecting to the Internet is now possible in two clicks. Despite the fact that the OS interface is different from others, it is easy to understand for any user. In addition, all drivers are installed automatically. Software for the network card and WiFi module is no exception. But if you have problems with this, we will look at the solution below.
Before you enable the wireless network on a laptop running Windows 10 operating system, make sure that everything is in order with the settings. To do this, right-click on the connection displayed in the notification panel. In the menu that opens, select “Network and Internet settings”, then go to the item with adapter settings.
The window that opens will display a list of devices that are connected to the laptop. If one of them called "Wireless Adapter" is greyed out, you need to enable it. To do this, click on the RMB icon and in the context menu click on the “Enable” item.
If the adapter does not appear in the list of devices, there may be several reasons for the problem:
- The Wi-Fi wireless technology module is not built into the device.
- Drivers are missing or do not work correctly.
In the first case, you can purchase third-party equipment for Internet access. In addition, there are special programs for setting up a network connection and changing adapter settings. This is relevant if standard Windows tools do not recognize the WiFi module.
Maxidix WiFi Suite is a Russian-language utility for enabling Wi-Fi on a laptop, distributed free of charge. It is used not only by ordinary users, but also by professionals. The application allows you to control available connections. It detects access points and connects to them in a few clicks.
The developers have built into the program a special algorithm that allows you to connect to the Internet several times faster than using standard tools. Using the utility, it is possible to calculate consumed traffic.
Connecting to a Wi-Fi network
Connecting to an access point on a computer running Windows 10 is done in a few clicks. To do this, right-click on the network icon located in the tray. If you see a monitor icon with a cross, it means that the WiFi adapter is missing or disabled.
The antenna icon with a star indicates that access points are available. To connect to one of them, do the following:
- Click on the “Network” icon, a panel will open with a list of available networks.
- Select the network you want to connect to and click on the appropriate button.
- In the login window that appears, enter your password. To see it, click on the eye icon located to the right of the input field. The text will be available as long as the mouse button is pressed.
- After entering the password, click on “Next”. After some time, you will be connected to the Internet.
After connecting, the system will ask you to select a connection type. If you allow other devices to discover your laptop, then it will be possible to share files and data on the same network. If you refuse, you will only have access to the Internet.
Network card driver: update and check functionality
If you have enabled WiFi in hardware on a laptop that has a switch or function key, but Internet access does not appear, then you need to check the properties of the network adapter and the availability of the correct drivers. To do this, do the following:
- Click on Start and go to the main settings section by selecting the “Options” button.
- In the “Devices” section, go to “Device Manager” and look for adapters. Two adapters are displayed here, one of them is a network card. A special cable is used to connect to the Internet. The wireless adapter must have the word “Wireless” in its name. If the device is not in the list, then the Wi-Fi module is not provided by the manufacturer.
If the wireless device works normally, but the Internet does not appear, then you need to try updating the adapter drivers. Please note that sometimes the device does not appear in the network adapters section. In this case, it will be located in the tab with unknown devices. Try installing Wireless drivers on your equipment.
To enable the WiFi adapter on your laptop, download the drivers from the official website of the device manufacturer. To do this, enter the model name in the search on the website. You can also find the software through the menu by going to the downloads section. Look for a driver with "Wireless" in the name. It is usually possible to select the operating system version before downloading. If Windows 10 is not available, try downloading and installing software for your previous OS.
After saving the installation file in .exe format to your laptop's hard drive, run it. The process of installing drivers for network equipment will begin. After the procedure is completed, reboot the system and try to access the Internet.
Is there wifi at all
The first thing we need to do is find out if your computer or laptop has Wi-Fi. Modern laptops, laptops, netbooks, phones and other devices have Wi-Fi. You can check whether your device has one on Google, but I can assure you right away that if you purchased it a long time ago, then the built-in receiver simply may not be there.
When you look for the technical characteristics of your device, look for the Wi-Fi inscription of the same name. For example, description of an Asus laptop:
Physically turning on Wi-Fi
Some laptops have a special slider that you move to turn Wi-Fi on or off. So that you understand what I'm talking about now, look at the image:
Next to it there may be the following inscriptions: “OFF” or “0” - turn off/off, as well as “On” or “1” - on/off. It is usually located on the right or left side of the laptop, and can also be on the front of it.
There are laptop models where to turn Wi-Fi on or off you need to click on the corresponding button, which is in the image below (button on the left):
Often, laptop manufacturers make this button backlit: for example, when Wi-Fi is on, it lights up; if it’s off, the laptop will not light up this button.
Although this is not always the case, that is, this button is not illuminated when turned on, so you must determine for yourself whether Wi-Fi is turned on. To do this, pay attention to the indicators on the front of the laptop. If you turn on Wi-Fi, the indicator that is responsible for this device should light up, thus letting the user know that they can now use it.
Function keys (Fn +)
On laptops from different manufacturers, this procedure is slightly different. Let's look at the hotkey combinations that may be on your laptop:
- Acer. Press and hold the keys: “Fn+F3”.
- Asus. Combination "Fn+F2".
- HP. Here we press “Fn+F12”.
- Lenovo. Required buttons: “Fn+F5”.
- Samsung. Either "Fn+F12" or "Fn+F9".
Listed above are ways to enable WiFi on the most popular laptop models. However, there is no guarantee that you have one of these laptops.
The Fn button may simply be missing. Then carefully examine all the keys on the keyboard. The WiFi network icon should be drawn on one of them, click it and the network will turn on.
Below you can see what the Wi-Fi icon looks like:
In the screenshot you can see that on this laptop you need to press “Fn” + “F2”.
Turn on Wi-Fi in Windows
If you did the methods described above, but did not succeed in connecting to Wi Fi, do the following: go to the “Start” menu - “Control Panel” - “Network and Internet” - “Network and Sharing Center”. On the left, click on the item: “Change adapter settings.”
Right-click on: “Wireless Network Connection” and select “Enable”.
If there is no such item, but “Disable” is available, then Wi-Fi is enabled in Windows.
After this, Wi-Fi should work, but if it doesn’t help, or some error has occurred, or there is no network with that name, the question arises: “How to turn on WiFi on a laptop then?” Read on!
If our laptop is not automatically able to connect to the desired network, then the problem may be that the signal receiver device is disabled in the device manager. Now I will show you how to fix this using Windows 7 as an example.
Go to the Start menu, right-click on Computer and select Properties.
In the window that opens, click on “Device Manager” on the left.
From here you can see which components in the laptop can be controlled - activate or disable the necessary device. We find something whose name contains the word Wireless
. Right-click on it and select “Engage”.
By the way, if there is a yellow triangle with an exclamation mark next to the service icon, this means that the driver for this device is not installed on the laptop. In this situation, use another device (computer, laptop, netbook, tablet, etc.) through which you download Wi-Fi drivers, transfer them to the laptop and install them.
Checking the presence of a wi-fi module on a laptop
Most modern laptops support WiFi technology, but there are models that do not have it. Your task is to check whether you have a Wi-Fi module on your laptop. The first method is the simplest, it’s trite to see if there is a WiFi icon on the case. You can also look at the technical manual that comes with the device. Find the specifications of your PC, they will tell you whether the device supports Wi-Fi or not.
The second method is to view the presence of the radio module in the “Task Manager”. To do this, find the “My Computer” shortcut on the desktop, hover the cursor over it and right-click, a window will appear where we select “Properties” at the very bottom.
On the left side we find the “Device Manager” item, in it you will see “Network adapters” which you need to expand to see the presence of a WiFi module. If it is, then there is an opportunity to set up Wi-Fi on a laptop.
You may see this option in the screenshot below.
Other nuances of turning on Wi-Fi
Above, I described in detail how to enable WiFi on a laptop. But so that you can see the full picture of how to turn it on and how to connect to Wi-Fi, please follow the link further, since in this article I talk about other nuances that may arise in your case. The article “” was written using a “live” example, so it will be extremely useful for you.
If you are not familiar with installing drivers, then read: “”. To find the driver, go to the official website of your laptop manufacturer and enter the model in the site search. Then look for the Wireless driver in the list.
I do not rule out that users who read this article do not know the Wi-Fi password. If you don’t know it, then you won’t be able to log into the secure network. To find out how to view the Wi-Fi password, I recommend reading: “”. I also assume that some will ask about hacking, yes, it is possible to hack, but I won’t write about it.
Situations are different and there is no need to exclude the possibility that none of the above tips will help you. What to do then? Luckily for you, there is third-party software that you can safely use. Its meaning is that after installation, this program will automatically turn on every time you start Windows and, when you press a certain key combination, perform certain actions. For example, turn on Bluetooth or WiFi.
There are a huge number of such utilities; I can give SoftSwitch as an example. In addition to the above functions, it can also turn on the camera and TouchScreen. For each of these functions there is a specific combination of keyboard buttons, which you can familiarize yourself with if you decide to download this creation of programmers. Finding this program on Google will not be difficult for you, since it has a Free Soft license (free license). Download it, install it and enjoy!
And that’s probably all I have on this issue. Thanks for reading and I sincerely hope I helped you.
For clarity, watch the video:
Almost every laptop has the ability to connect to wireless. Using this technology, computers exchange data between themselves and network devices (printers, access points, etc.), and also access the World Wide Web.
There are many laptop models, but they all work according to the same communication standards. Can you imagine what their owners would have to do if each laptop did it differently?
Installing the Wi-Fi adapter driver
For the normal functioning of the hardware components of the system, appropriate software is required. Therefore, as a rule, any computer equipment is equipped with drivers. They can be found on the installation disc included with the device. Everything is simple here: launch the proprietary software and follow the instructions on the screen. Alternatively, you can use the OS itself to install the program.
Read more: Installing drivers using standard Windows tools
But it also happens that for various reasons such a carrier is not available. Typically, branded drivers for laptop computers are included in the recovery section on the disk or are included as separate DVDs with a system image. But it should be said that most modern laptops do not have built-in drives (DVD, Blu-ray) at all, and the process of using recovery tools requires reinstalling Windows. Of course, this option is not suitable for everyone.
The best way to obtain a suitable Wi-Fi adapter driver is to download the software from the laptop manufacturer's website. Let's use a specific example to show the steps required for this. We will use Google to find the required resource.
Go to Google website
- Go to Google using the link above and enter the name of your laptop model + “drivers”.
- Then we go to a suitable resource. Often, official sites are displayed in the first positions in search results.
- In the “Please select OS” field, indicate the operating system you have installed.
- The site will display download links for your computer model.
- Typically, a wireless adapter driver has words like “Wireless”, “WLAN”, “Wi-Fi” in its name.
- Click “Download” and save the installation file to disk.
- Launch the program and follow further instructions.
Read more: Downloading and installing a driver for a Wi-Fi adapter Searching for drivers by hardware ID
Many laptops - one Wi-Fi
The procedure for setting up a wireless network depends only on the operating system.
Some manufacturers equip their laptops with network utilities, but this does not provide anything new, except that it makes the setup process more convenient. Of course, you can use them, but it is more useful to know how to work with OS tools.
If you figure out how to set up WIFI on Windows 7, 8 and XP using the system, you can do this on any laptop, regardless of the model.