Using the Boot Menu
To begin with, we will tell you about the simplest way to solve the problem, gradually moving on to more complex techniques. When the power button stops working, it is best to take the laptop to a service center for repairs. If you urgently need to start your computer, then use the Boot Menu
. The main purpose of the menu is to select the operating system boot device. The user can install the file on the hard drive, external drive or disk.
Inspect the laptop case. In addition to the main power button, there may be a small additional button to launch the BIOS. It is intended for emergency situations, such as, for example, a non-functional starting mechanism for a laptop computer. Most often it is located with the power connector (the connector for connecting the charger cord) or directly next to the Power
. Again, depending on the model of the device, the method of pressing it also depends, but, as a rule, a pencil or pen is used for this purpose. On Acer models it is often located here.
On Lenovo, on the side or on top, under the keyboard; in different models, the location of the emergency power button may be different.
It should be said right away that it is not available on Samsung and Dell.
When you find an emergency BIOS settings switch on the case, of course, you need to press it. Then wait until the laptop turns on and starts the settings. The further procedure is just as simple: in the blue window that loads, you need to select Normal Startup
and press the Enter key on your keyboard.
After this, the operating system will boot in normal mode. True, it will be inconvenient to use this technique every time. If you cannot quickly repair your laptop, set Windows to go to sleep.
Starting a laptop without a power button
We do not recommend disassembling a laptop computer and attempting to repair a button if you have never worked with such equipment before. Incorrect actions can lead to damage to other components. It is better to use the services of professionals or turn on the laptop without a button. Sometimes only the upper part of the button breaks, but the switch remains intact. To start the device, you only need to press the switch with any convenient object.
Method 1: Boot Menu
Almost all modern laptop PCs are equipped with a special button that allows you to launch a special menu. Most often, it is located somewhere on the side of the case or at the top near the display and is pressed with a finger or a needle. You can turn on your laptop using it as follows:
- Carefully examine the device case or find the description in the instructions to find the right button.
Press it once and wait for the menu to launch. A small blue window should appear on the screen. Navigate through it using the keyboard arrows, select “Normal Startup” and press Enter.
After some time, the operating system will be loaded successfully. Of course, you can use this button all the time, but it is not always convenient and causes some difficulties. Therefore, it is better to set certain parameters through the BIOS. Read more about them below.
Setting up sleep mode
You will need to enable the ability to activate sleep mode if it was previously deactivated. This mode is designed to maximize energy savings. It is especially useful if you have to be away from your laptop for a long time, but you don’t want to turn it off or simply forget to do so.
First of all, look carefully at the designations of the laptop keyboard keys. You can find a crescent moon symbol, which indicates the ability to activate sleep mode by pressing this very button.
To exit the mode, just press one of the keys or click the computer mouse button. To configure automatic activation of the mode, go to the Windows Control Panel, then the “ Power Options”
" and "
Changing scheme parameters
".
Next, we set the time period after which the laptop will go into sleep mode. If the device is running on network power, then instead of “ Never
» set a specific time. Finally, do not forget to save your settings.
Nutrition
What to do if the laptop does not turn on at all, or nothing is displayed on the screen? First of all, let's check his nutrition. Take the power supply and plug it into an outlet. We look at the laptop itself - the charge light on it should light up.
If this does not happen, then look at the power supply, it also has a charging indicator - it should be on. If the light on the power supply does not light up, this may indicate a malfunction. You can also try connecting it to another outlet - you never know, maybe it’s just out of order.
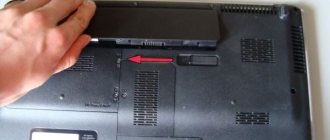
If both indicators are on, then leave the laptop for about half an hour to make sure that the battery is charged to at least 30%. Sometimes it happens that the battery runs down almost to zero, and it takes time for it to charge to the level to turn on the laptop. If after some time the laptop still does not turn on, then try removing the battery. To do this you will need to unscrew the back cover.
After that, reinsert the power supply and try to turn it on. If it turns on, there is a problem with the battery.
NOTE! It is advisable to turn off all devices connected to the USB connectors: mice, keyboards, hard drives, modems, etc. Also remove the disc from the CD/DVD drive, if there is one.
Closing contacts on the motherboard
Now a difficult way to solve the problem is to close the contacts of the power key. The Power mechanism is designed to close contacts that transmit an impulse to turn on the computer. This means that when the button does not function for any reason, you can close the contacts yourself. To do this, you will need any conductive object, such as a screwdriver.
You take further actions at your own peril and risk. If the laptop is under warranty, of course, there is no need to disassemble it and try to fix it yourself. Immediately go to the store where you purchased it to resolve the problem. Similar actions can be taken by owners of older devices whose warranty period has long expired. But even in this case, there is a small nuance: careless actions can easily damage expensive boards and aggravate the breakdown. The cost of subsequent repairs will be many times greater than replacing one faulty Power button.
If you are confident in your own abilities, then the procedure is as follows:
- Disconnect the laptop from the network;
- We take out the battery and disassemble the case;
- We remove the bottom panel: unscrew all the bolts, if necessary, use a plastic card to pry up the joint of the parts, and then draw around the perimeter;
- Unsnap all the latches;
- We find a connector on the motherboard to which the power button is connected via a cable;
- Now you need to determine a pair of contacts PWR and Ground (case), when closed, the device will turn on. This will most likely have to be done experimentally, because... There are a huge variety of motherboards for laptops, and finding a circuit diagram for a specific model can be problematic.
Video instruction
How to turn on a laptop without a button after opening the case
Here it all comes down to the fact that you need to close the circuit directly on the board. Depending on the laptop model, this can be done after partially or completely disassembling the device.
There is no universal disassembly method - each model has its own sequence of actions and instructions must be looked for separately. Also keep in mind that inside the laptop all the parts are located very compactly, and incorrect disassembly can damage the device.
We close the contact on the button
If the problem is that the mechanism of the button itself is faulty, then you can turn on the laptop by simply closing the contacts on the board to which it is soldered. To get to the board, you usually do not need to completely open the case - just remove the cover above the keyboard. The button contacts look something like this:
You can close the contacts with any metal object of suitable size - a screwdriver, knife, scissors or a piece of wire.
We close the contact on the loop
There is a possibility that the button is working properly, but the contact on the cable that connects the board to the button to the motherboard has burned out - then the previous method will not work. In this case, the sequence of actions is as follows:
- Disconnect the cable from the board with the power button. In some cases, this requires unscrewing it from the body. Then lift the latches and remove the cable.
- We assess the condition of the loop. Burnt out, worn out or broken contacts look something like this.
- Next, let's try to short-circuit the surviving contacts. If this does not help, then you need to cut them off, remove the insulation from the entire part of the cable and try to short-circuit the contacts again.
If the reason was in the cable, then the laptop will start. Then we glue a sealant onto the cleaned part of the cable and insert everything back into the board.
We close the contact on the motherboard + if the power button is on the keyboard
Essentially, this is the same method as in the previous example, only the contacts are already closed directly on the motherboard - in the connector to which the cable is connected. The sequence of actions is as follows:
- We disassemble the laptop and look for the power button connector on the motherboard.
The task is somewhat simplified if the button and keyboard do not work, and the power button is located near the keys. In this case, complete disassembly may not be necessary - you just need to remove and disconnect the keyboard.
- We connect the power supply or battery to the motherboard.
- We take the wire and touch the “ground” on the board with one end, and touch each of the contacts in turn with the other until the laptop starts.
In order not to accidentally short circuit too much, experts recommend for such purposes using not just a wire, but with a resistor soldered into it. Or the tester can be set to “continuity” mode – then a small resistance will also appear in the circuit.
Closing the button contacts
Perhaps the next method will be simpler. You can close the contacts not only on the motherboard connector, but also on the power button itself, even if it does not work.
Moreover, this is easy to do on models in which to access the power button you just need to remove the cover on the front panel above the keyboard.
The work is also not easy, but somewhat easier than disassembling the laptop to its core.
If the laptop does not react in any way to closing the contacts, most likely the problem lies elsewhere. Be sure to check the battery. She could have discharged. Check the power cable as well as the unit itself. You can never rule out the possibility of failure of the motherboard or processor. If there is a power surge in the network, after which the laptop stops turning on from the button, you should contact the service center so as not to waste time.
The laptop does not turn on and shows no signs of life
In most cases we have problems with nutrition.
The first thing you need to do is connect the laptop to the power supply and check that there is voltage in the outlet :). Typically, power adapters have a light on them to indicate they are working. And on the laptop there is an indicator that signals when it is turned on and/or the battery is charged. Most often, the power supply does not work, or functions defectively (here, just try a similar working one), bad contacts in the connectors, broken or kinked wires. Look at this whole thing and draw a conclusion - at what stage the power is lost.
To avoid problems with the power connector, in the future I advise you to first insert the power plug into the laptop, and then only the power cord into the outlet. By doing this, we eliminate the possibility of a short-term spark occurring when the plug is connected, which damages the contacts.
If everything is “on”, but the laptop still does not turn on, then the problem may not be in the power supply. Try again removing the battery and turning on the device again without it, then after 10 minutes put the battery back. Also disconnect all connected external devices (you can also disconnect the Wi-Fi adapter if the design allows it).
Try turning it on, and if it works, then return the devices one by one, and this way you can determine what was wrong.
If your laptop does not turn on and there is still warranty left, then contact the service center immediately!
Perhaps this is all you can do on your own without disassembling the laptop, if it shows no signs of life at all or shows a black screen. More serious reasons may include a non-working motherboard, a broken internal power controller, a south/north bridge, broken contacts inside the device, a BIOS firmware failure, and others.
How to take screenshots without the power button on Android
Because of my job, I take a lot of screenshots on my Pixel 2 XL. Before launching Android P, I had to press the power and volume down buttons at the same time to take a screenshot. This is the usual way to do this on other Android devices as well.
In Android P, Google added a screenshot option to the power button itself. Truth be told, I miss the palm swipe gesture for taking screenshots that is present in Samsung devices. Some other brands have similar gestures or quick settings for taking screenshots. These shortcuts and features are very useful. But, unfortunately, not all devices have them. And it becomes a problem when the Power button does not work or the Volume Down button does not work in case of devices that require pressing both the Volume Down button and the Power button.
Also, when someone needs to take multiple screenshots, the usual combination of power and volume buttons is not convenient. And honestly, a small part of me is afraid that I might break the phone's buttons by pressing them multiple times.
So, I started looking for alternative ways to take screenshots without using the power button.
Note: The post is not limited to Google Pixel but will cover methods for all Android devices.
Let's get started.
Screenshot Shortcut Key
Many Android devices from manufacturers like Asus, Redmi, Huawei, etc. come with a screenshot shortcut key. All you have to do in the quick settings is to tap on the “Screenshot” option there. This will capture the part of the screen under the quick settings.
Here are the steps:
Step 1 : Go to the screen you want to capture.
Step 2: Pull down the notification panel by swiping down from the top bar. Quick settings will open. Find the Screenshot option and tap it. A screenshot will be taken and saved on your phone.
Note: This feature is not available on devices like Samsung, Google Pixel, etc.
Gestures for screenshots
In addition to quick settings, some devices also allow you to take screenshots using gestures. For example, Samsung devices come with a unique palm swipe gesture. In this case, you need to swipe your palm across the phone from left to right or right to left to take a screenshot. However, to use it, you need to enable it in settings. Go to Device Settings > Motions & Gestures > Turn on Palm Swipe.
Similarly, in Huawei devices, you can capture the screen using the Knuckle gesture. Basically, you need to tap the screen twice with your knuckles to capture the screen. You can enable it in the motion control settings under Smart Assistance in your device settings.
Other devices from brands like OnePlus and Redmi support the three-finger swipe gesture. All you have to do is swipe down on the screen with three fingers. This will take a snapshot of the current screen.
Using Google Assistant
Another built-in way to take screenshots is with Google Assistant. This is great because this method works on all devices that support Google Assistant. However, it also has disadvantages.
For example, you cannot save a screenshot taken using this method on your device. Likewise, you can't edit a screenshot before sending it.
If you're happy with the shortcomings, simply launch Google Assistant by holding the Home button and tapping the Share Screenshot button. You will then be asked to select the contact you want to share the screenshot with.
Using Third Party Applications
If none of the above methods work for you, try third-party screenshot apps. There are two apps that I personally like and I'll talk about them here.
Screenshot Assistant
With this app, you can take screenshots by holding the Home button on your device. However, you might be wondering that holding down the Home button launches Google Assistant, so how does the app work? Well, you are right and hence, to use this app, you need to say goodbye to Google Assistant as the Home button can only launch one thing at a time.
If you're fine without Google Assistant, download the app from the link below and follow the on-screen instructions, which include changing the Assist app from Google to Screenshot Assistant in Settings.
Download Screenshot Assistant
Screenshot Touch
If you use Google Assistant a lot and turning it off isn't an option, we have another third-party app for you. The app known as Screenshot Touch has a small floating button on the screen. When you press this overlay button, a screenshot will be taken. So simple.
The app has some interesting settings like you can change the size, position of the overlay icon and even take a screenshot by shaking your device. The app also allows you to record your screen without downloading additional screen recording apps.
Once installed, you need to click on the “Start Capture Monitoring Service” button in the application. Once you do this, a small overlay icon will appear on the screen. Simply tap this icon and a screenshot will be taken.
Download Touch screenshot
Good Bye Power Button
With the above screenshot methods, you don't need to depend on the power or volume buttons. Goodbye to frequent pressing of these buttons and even more convenience!
Last updated Jul 5, 2021 The article above may contain affiliate links that help support Guiding Tech. However, this does not affect our editorial integrity. The content remains objective and reliable.
.
The method for professionals - directly from the motherboard
The next method is suitable for those who have at least a basic understanding of PC design. This option involves closing the contacts, which activates Windows.
To understand how to open the motherboard, look at your laptop's instructions.
Usually it is enough to pry off the protective cover next to the Power button with a flat object; this is done quite easily. Next you need to close the contacts using a screwdriver.
If repairing the Power button is delayed for some time, you can remove the startup cable from the laptop case to the outside. This will allow you to close the contacts whenever you want, without opening the protective case each time.
Tip: If your laptop is under warranty, do not use this method.
Before using the above methods, make sure that the reason for the lack of Power response is the start button. The problem could be something else:
- If the laptop's battery is completely discharged, then no method will help. The device should be charged.
- A possible problem could be a faulty power supply or cable.
- Broken or damaged motherboard.
Solved: The remote has stopped working (except the power button) - Samsung Community
Thank you! This helped me. But I did it differently.
No. 1. First, I unplugged the power cord from the TV and waited 15 seconds before plugging it back in.
#2: Turn on the TV. (I turned on the TV with the remote control because the power button was the only working button on the remote)
#3. Hold the Back and Play/Pause buttons on the remote control to begin the pairing process. Keep the buttons pressed until the TV displays a message that it is connecting/pairing with the remote control.
Voila! Now it (can) work! =)
For me the pairing process did not work until I unplugged the power cable. I've tried several times before with no success.
Also, the remote control light (red) kept blinking as soon as I pressed any button after reinstalling the batteries.
All of this was fixed after following these steps.
And I didn’t lose all the settings on the TV.
Although I can’t promise that this won’t happen to you...
Good luck and buy the book!
View solution in original post
.