Many owners of portable equipment are often interested in how to connect a printer to a laptop via WiFi connection or USB cable. Some inexperienced users don’t even really know whether this can be done at all. If you are using one of the current versions of Windows 7, 8 or 10, then you can connect according to the instructions in this article.
First, let's connect the printer and laptop together physically, wirelessly, or over the network. Let's take a closer look at technology such as WPS (Wi-Fi Protected Setup), consider manual setup, installing drivers with and without an installation disk. We will give recommendations on how to set up printing from a laptop to any model of printer or MFP from HP, Canon, Epson, Samsung and others.
How to connect a printer to a laptop
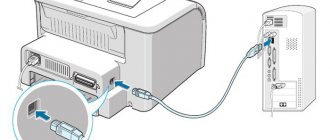
Via USB
A laptop, like any other personal computer, can be connected to a printer using a regular USB cable. This type of connection is supported by all models of printing equipment without exception. And the input itself is definitely present on the portable “device”. The main thing is that the versions of the interfaces used match. If USB 1.0 is no longer available, then 2.0 and 3.0 are at the peak of popularity.
When the connection is established, you need to wait a little until you hear a beep. After some time, the software will be automatically installed by the Windows operating system itself and you can proceed to the section on setting up printing. If this does not happen, then the drivers will have to be installed manually. There is nothing complicated about this and is easy to do even without an installation disk.
Via Wi-Fi
WPS
WPS stands for Wi-Fi Protected Setup, which means “protected Wi-Fi installation.” To use this technology, it must be supported by the router and the printer itself. The presence of Wi-Fi on a laptop is not questioned, since models without it do not exist in nature.
We make the connection according to the following scheme:
- We are looking for the WPS button on the router body. As a rule, it is placed on the reverse side in most cases.
- Within two minutes we activate a similar button on the printing device.
- We are waiting for the connection between devices to be completed.
- If the laptop is on the same Wi-Fi network, then there should be no problems with printing.
- We connect to the printer as if it were a network one.
If the WPS buttons are not found on the modem case or it is impossible to turn it on, then we will try to do this through the web interface for managing the router. In most cases, to access its settings, you need to enter the address in the IP format 192.168.0.1 in any browser, or try 192.168.1.1. Enter the login “admin” and the same password if it has not been changed. In the settings, find the “Wireless” section, and in its subsections, disable MAC filtering and enable the WPS function.
Learn more about connecting via WiFi. More detailed instructions with screenshots and explanation of each step.
Manual setting
If the automatic connection setup described in the subsection above is not possible on your equipment models, then the Wi-Fi connection can be made manually. All that is required for setup is to know the name of the network and its access code. This information may be listed on the modem's cover or in documents from your Internet service provider.
Manual setup procedure:
- On the printer screen, go to the menu.
- We enter the network settings.
- Select the WiFi section.
- Specify the network name and SSID password.
- After some time, the printer will be online and you can connect to it as if it were a network connection.
What to do if you can't connect to the printer
As already mentioned, solving the printing problem is quite simple. First of all, it is recommended to check the condition of the cable to see if it has come loose or is damaged. In the latter case, the cord will most likely have to be replaced.
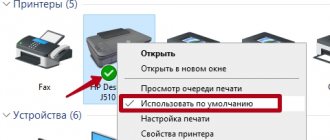
In addition, be sure to go to “Print devices” from the control panel and check that the system says “Use as default”. This is especially true if different printer models were installed on your PC or laptop.
It is quite simple to determine which one is being used; there should be a check mark next to it. If this is not what you need, you just need to right-click on the attached object and assign the specified function to it.
Network connection
Regardless of whether the printer was connected to the network via Wi-Fi, as described above, through another PC, or directly with a patch cord into an Ethernet socket, now you need to connect to it and install special software (drivers) for proper operation. There are several ways to establish a connection.
- Find a printing device over the network. To do this, open “My Computer” and find the “Network” shortcut at the bottom left. If the printer is connected directly to the network (via WiFi or patch cord), then click on the shortcut, and if through another network PC, then use a triangle to open the list. Using the right key and the context menu, we make a connection and agree to install the drivers.
- Use the installation wizard built into Windows. Through the “Start” button and “Control Panel” we go to the “Devices and Printers” section. In the menu under the address bar, click the “Install a printer” button, and in the next window, select the second option with adding a network printing device. We wait until all available devices are displayed in the list and select the model we need. Next, follow the instructions of the installation wizard.
Possible problems:
- Windows can't connect to the device.
- 0x00000002: During a connect operation.
- Error 0x000006d9 "Unable to save printer settings."
- 0x00000057: The specified port does not exist.
- 0x00000709: Check the name.
- Failed to open Add Wizard.
Detailed information on connecting a network printer Use our separate article if you experience problems connecting.
Basic connection methods
Considering the entire array of devices on the market, there are only three main ways in which you can connect a device and a laptop:
- USB . The usual connection is using a standard USB to USB “B” cable. The most common method.
- Wi-Fi . Rare mobile computers are now not equipped with a Wi-Fi module, so connecting the device wirelessly is as easy as shelling pears.
- Bluetooth _ It is present more optionally than on a permanent basis, since there is always Wi-Fi. But it is also found in modern models.
Let's figure out how each type is connected.
Connecting a printer via Wi-Fi
Before connecting your printer to your laptop via Wi-Fi, you need to familiarize yourself with several basic methods:
- with driver installation;
- via WPS;
- manually;
- connection to the router via USB.
A typical connection begins with installing drivers. They usually come included on a disk. If not, you can always download it from the official website. During the installation process, you must encounter a section that is responsible for the method. This is where you need to specify the wireless connection. After the installation is completed, you will have to temporarily connect the device to the PC via USB. The system should automatically detect the new device and prompt you to select settings. Here you will need to indicate the network to which you need to connect and the password for it. After you complete the settings, you can disconnect the USB cable and try printing a first test document.
The router must also support WPS
If the router and printing device support WPS, then before connecting the printer via Wi-Fi, just press the WPS button on both devices and they will be able to connect.
Using WPS is not absolutely safe, since the technology is vulnerable and, with due persistence, an attacker will be able to find the right key.
Manual setup is the safest way. It is more relevant for models with their own on-board settings system and display. Directly from the device’s control panel, you need to connect to the desired network and enter the password. Then install drivers and software from your computer. Using the software, you need to set up a wireless connection.
Routers equipped with their own USB port can use a direct connection and share it on a public network. There is nothing complicated here either. After connecting the devices, you need to go to the router’s web interface and check whether the device is detected. Then from the operating system you need to add a new printer over the network, “feed” its drivers to it and print the start page.
USB
This method is so simple that it can be described in literally 4 simple steps:
- connect the device and PC with a cable;
Cable connection
- turn on both devices;
Before installation, you need to turn on the printer and laptop
- install drivers from disk or downloaded from the Internet;
Installation Wizard Window
- print a test page.
Inkjet MFP test page
How to connect a printer wirelessly to a laptop - Bluetooth
Bluetooth is mainly present on modern models as an additional option. Therefore, it is used extremely rarely. Most often, this function is used for control from a smartphone or tablet.
Compact device for printing receipts using Bluetooth from a smartphone
In general, the entire connection process is not much different from connecting any other device. Bluetooth turns on on the printer, and so does the laptop. Then, when the system finds the device among the available ones, you just need to connect it. The necessary drivers are installed and the device is ready for use.
Installing drivers
Windows operating systems independently install drivers from their built-in database without user participation in this process. If this does not happen, then you will have to install the software manually. There are several ways to do this.
- We use the installation disk. This disc is included with any printing equipment, regardless of its manufacturer. Insert such a disk into the “SD-rom” and wait for the installation program to start. Next, follow the instructions of the installation wizard. If the printer is old or you simply cannot find the disk, then use one of the following methods.
- Download the package of necessary files from the device manufacturer’s website. On the official portal of your printer brand, go to the drivers or downloads section. Find your model by name and download the necessary files for the version and “bit” of your OS.
- We search in the Windows database. Open Devices and Printers through Control Panel. In the top menu, click the “Add a printer” button.
In the second step, select local (if connected via USB) or network (if using Wi-Fi) connection option. Follow the instructions of the installation wizard. After a few steps you will see the driver installation window. In it, select the manufacturer of your device on the left, and the model on the right. - We use Windows Update. To update the driver database for devices, you need to click the “Windows Update” button under the list of models in the screenshot above. After downloading all new versions of the software and rebooting the laptop itself, you will be able to see your printer in the list of models.
Installing a printer without a disk. Use these instructions if you were unable to install the driver.
Looking for a printer on your computer
First you need to connect the equipment to the PC so that it becomes visible to the operating system. This can be done using different methods, depending on the functionality of the device. The two most popular options are connecting via a USB connector or a Wi-Fi network. You will find detailed instructions on these topics in our other articles at the following links:
Next, the driver installation process takes place so that the device is displayed correctly in Windows and functions normally. There are a total of five options available for completing this task. All of them require the user to perform certain manipulations and are suitable in different situations. Read the material below - there you will find a detailed guide on all possible methods.
Now that the printer is connected and the drivers are installed, you can proceed to the actual procedure of finding it on the PC. As mentioned above, the recommendations given will be useful in cases where the peripherals for some reason are not displayed in the “Devices and Printers” section, which can be navigated through the “Control Panel”.
Method 1: Search the web
Most often, users who work on a home or corporate network, where all equipment is connected via Wi-Fi or a LAN cable, are interested in finding printers on their computer. In such a situation, it is carried out as follows:
- Through the “Computer” window, in the “Network” section, select the required PC that is connected to your local group.
Double-click LMB to go to the device operation menu. There you can view the print queue, add documents to it and configure the configuration.
If you want this equipment to appear in the list on your PC, right-click on it and select “Connect”.
Use the Create Shortcut feature to avoid having to constantly navigate to network settings to interact with your printer. The shortcut will be added to your desktop.
Using this method, you can find all devices connected to your local group. Full management of them is possible only with an administrator account. Read about how to log into the OS through it in our other article at the link below.
Method 2: Search in programs
Sometimes when you try to print an image or document through special programs, for example, a graphics or text editor, you discover that the necessary equipment is not on the list. In such cases, it should be found. Let's look at the finding process using Microsoft Word as an example:
- Open "Menu" and go to the "Print" section.
Click on the "Find Printer" button.
The “Search: Printers” window will appear in front of you. Here you can set preliminary search parameters, for example, specify the location, select the name and model of the equipment. Once the scan is complete, you will see a list of all peripherals found. Select the required device and you can start working with it.
Since the search is carried out not only on your computer, but also on all others connected to the same local network, the Active Directory domain service is used for scanning. It checks IP addresses and uses additional OS features. In case of incorrect settings or malfunctions, Windows AD may be unavailable. You will learn about this from the corresponding notification. For methods to solve this problem, see our other article.
Method 3: Add a device
If you cannot find the connected printing equipment yourself, entrust this task to the built-in Windows tool. All you have to do is go to the “Control Panel” and select the “Devices and Printers” category there. In the window that opens, find the “Add device” button at the top. The Add Wizard will appear in front of you. Wait for the scan to complete and follow the instructions displayed on the screen.
Before you begin this procedure, be sure to ensure that the printer is properly connected to your computer and turned on.
Method 4: Manufacturer's official utility
Some printer companies provide users with their own utilities that allow them to work with their peripherals. These manufacturers include: HP, Epson and Samsung. To perform this method, you need to go to the company’s official website and find the utility there. Download it to your computer, install it, then connect and wait until the list of devices is updated.
Such an auxiliary program allows you to manage the equipment, update its drivers, find out basic information and monitor the general condition.
Today we looked in detail at the procedure for finding a printer on a PC. Each available method is suitable in different situations, and also requires the user to perform a certain algorithm of actions. As you can see, all the options are quite easy and even an inexperienced user who does not have additional knowledge and skills can cope with them.
Thank the author and share the article on social networks.
A printer is a popular peripheral device that is widely used in offices, enterprises, government agencies and at home due to its ability to instantly print any documents. It is quite easy to use and does not require any special skills from the owner. However, sometimes owners of office equipment have problems setting it up.
Printing settings
After connecting the laptop to the printer and installing the drivers, you should make some settings on the device itself. You can select it as the default main one and open network access to it. To do this, go to the control panel, and then to the “Devices and Printers” section. There, find your model and perform the actions as indicated in the pictures below.
You only need to go into properties to “share” the printing machine for other network clients.
To print from any program that supports this function, just press the key combination “CTRL+P”. You can also first make some personal settings in the interface, if it allows you to do so. For example, in a program from the office package - “Word”.
Here we can configure:
- Select the desired printer to complete the task.
- Specify which pages to print and which not.
- Select the desired part of the document to print on paper.
- Mark even or odd pages of the document.
- Working with copies.
- Select the number of document pages to output per sheet of paper.
- Setting additional properties: duplex printing, quality, layout.
- Options.
Printer printing settings in Windows 7, 8, 10. More detailed instructions with explanations of actions for inexperienced users.
Installing and setting up a scanner in a printer on a PC. Recommendations, nuances, possible problems.
What you need to connect
Connecting the printer to a laptop
Before connecting the printer to a laptop, you need to do some preparation. What to do first:
- Check for working USB ports on the device. In any case, the device will need to be connected to a desktop computer or laptop.
- Find a place where you can place the printing device.
- Take care of drivers.
The last point is not always mandatory, since modern devices, along with an Internet connection, often install the necessary drivers after connecting. However, manufacturers usually include the necessary programs for operation with the device.
Nuances
When connecting a printer to a laptop, things may not always go smoothly and simply. Situations are different, and sometimes quite difficult, and you should be prepared for them. Let's look at some of them in detail.
- The device does not print. Check whether the default machine is correctly selected for printing from a laptop, whether it is offline, or whether there are documents stuck in the queue.
- The device is not detected. Try replacing the power cords, USB, and Ethernet patch cord (if used). Double-check the quality of the connection, restart the laptop, turn off the printer and turn it on again after a while.
- Drivers are not installed. Clean the Windows operating system from old versions or software from other printing devices.
- The printer does not connect to the laptop. Typical for Windows 10, and less often in Windows 7. Check if you have correctly understood the USB interface versions. It is important that this is a cord of at least 2.0 and connected to the appropriate input. Remember that blue indicates USB 3. Don’t get confused, which could very well have already happened.
All possible errors and problems with the printer. Instructions for solving other equipment problems.
Connecting to a computer or laptop
Let's start with how you can connect a printer to your laptop or desktop PC. There is nothing complicated here.
Any printer comes with a set of cords and cables. This is a power cable as well as a USB cable. Standard connectors and interfaces are used everywhere. But it’s still better to first clarify whether a specific model of printing device is suitable for your computer.
It is worth noting that there are 2 options for installing a new printer on a computer, that is, making a connection. Namely:
- wires;
- using wireless technology.
Whatever one may say, the printer needs power. Therefore, you still have to connect at least one cord.
To do this, just insert the cable into the power connector on the printer, and the mating part into the socket near the computer or the place where the printing device will be permanently located.
Next, a connection takes place between the two machines. Here you will need a USB cable or a Wi-Fi network.
You should understand in more detail how you need to connect your printer to the local network, which will allow the computer to easily recognize new equipment, etc.
Features of installing different brands of printers
It’s worth briefly going over the main installation features of popular brands of printing devices that can most often be found in homes and offices.
- Samsung. Hardware is usually easily adaptable to operating systems. But older models of their printing devices will not automatically install on Vista and Windows XP. Even if all the drivers are available, you will have to specify the path to the driver manually.
- Epson. Another very popular manufacturer. In most cases, Windows operating systems easily recognize these devices. But Windows XP users encounter problems if they previously installed drivers for another printer on their PC or laptop. Then, during installation, the system will automatically update old drivers, and will not search for software for new equipment. Therefore, before installing and connecting, it is recommended to remove old drivers, as well as the old printer itself from the list of equipment. A similar situation may repeat with more recent versions of the operating system.
- Canon. To begin, strictly follow the assembly instructions that came with your printing device. Most often, the operating system recognizes new hardware without problems, finds all the drivers and automatically installs them. But after installation, Canon brand printers usually require a print head alignment procedure. To do this, you will need to insert the supplied paper into the tray and print a test page. Only after this the setup will be completely completed.
- HP. As for HP, these printers have an important distinctive feature in comparison with the listed brands. The thing is that the installation must be performed when the device itself is turned off. That is, in this case, you should connect the printer to the PC without turning on the printing device, install the driver and only then turn it on. When the driver is installed, it will ask for connections to the printer. The user turns on the printer's power and the setup wizard completes.
Take this into account. Largely due to non-compliance with the instructions for a specific brand and brand of printer, certain difficulties may arise when connecting and connecting to a computer or laptop.
FAQ. Where to look for missing drivers
If there are no problems with the connection and the computer has already added custom printers to the “Device Manager”, but it is still impossible to start printing due to pop-up errors and problems, then you will have to experiment and turn to a couple of sources with files:
Download drivers on the official website
HP, Canon, Epson, Samsung - manufacturers often post current (and even archived) information in the “Support” section. It is also full of instructions on setup, warranty cases and repairs. To download patches and updates, just find the search bar and enter the name of the current computer peripheral. As a result, links to archives with drivers will appear.
Search for updates using standard Windows tools
If the site is empty, then Device Manager can also search for compatible firmware files. If you open the section with peripherals and right-click on the name of a half-dead printer, a small context menu will appear. At the top is the “update driver” button. Just below is a change in configuration information, and “Properties”.
ADVICE! You can also try removing the device and then updating the driver again.
The last point is the most important. Behind “Properties” there is a “Drivers” sub-item, and there is already an update, both manual and automatic.
If, after going to updates, you click on “search” on your computer.
Then within a second you will be prompted to view the list of drivers for compatible peripherals. The developers will offer to choose the brand, model, and other details. In some situations, it is impossible to restore the functionality of old printers other than through the “Device Manager”.
