Disassembling an old laptop
You can make a TV or monitor from an old laptop only if the screen is still working. In order not to damage the “healthy” components of the device, it is important to disassemble it correctly. In fact, it is not at all difficult, you just need to follow the following instructions:
- Disconnect the device from the network.
- Take out the external battery.
- Unscrew all the bolts on the device body, not forgetting the hidden screws.
- Open the lid.
- Carefully unscrew any parts that prevent you from removing the screen.
- Unwind the matrix itself.
When disassembling the device, do not touch the various boards, microcircuits and wiring under any circumstances. And all because the electricity of your body can disable those elements that may still be useful.
How to make a monitor or TV from an old laptop screen
Laptops break down and become obsolete, but some components in them remain working and can still serve. If the laptop screen is working properly, you can take it out of the case and turn it into a monitor. How to do it?
Disconnect the laptop from the power supply and remove the battery (if it is external and not installed inside the case).
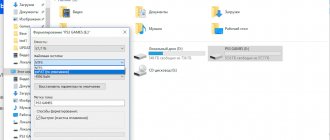
Disassemble the body. Opening different models of laptops is carried out in different ways, but in general there is nothing difficult about it: you need to unscrew all the bolts (including those hidden, for example, behind the DVB drive) and carefully open the cover. Then remove the elements that prevent you from removing the panel and unscrew its fastenings. Do not touch boards, microcircuits or wires under any circumstances. Static electricity can damage components that are still working and may be useful.
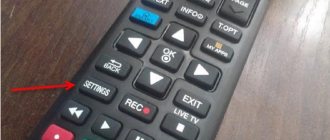
Connect the matrix to a universal LDC controller - for example, LA.MV29.P or its equivalent. You can buy it in online stores (AliExpress, Banggood, etc.)
This controller is powered by a 12-volt adapter and supports almost all LCD models. The image can be sent to the controller from a computer, laptop or tablet via the HDMI, VGA or AV port; the supported resolution is up to 1920x1200 pixels. In addition, this board can serve as a TV tuner and display TV channels on the screen. The package includes a remote control and an infrared sensor.
Before placing an order, you should tell the seller the model of your matrix so that they can select a controller that is guaranteed to suit you. An important point: you must find out what voltage the matrix operates with, this will be required for the correct pinout of the cable. Look at the model on the back of the matrix, go to datasheet4u, find that model and see its characteristics. Move the jumper on the universal controller to the appropriate position: 3.3, 5 or 12 volts. Be extremely careful: if you set a higher voltage than required, the matrix controller may burn out.
The controller will need to be flashed. To do this, copy the file lamv29.bin from this archive to the root of the flash drive, insert it into the USB port of the turned on controller, wait a minute, turn off the power, disconnect the flash drive, turn on the controller again and check if the matrix is working correctly. In the menu you can change the language from Chinese to Russian.
To configure the matrix to automatically turn on when power is applied, go to settings and enter 1147 on the remote control. The service menu will open. Go to the Advanced Setting sub-item and switch the AC on Mode option to On mode.
The controller can be hidden in some kind of case or simply glued to the back of the matrix. You can use a laptop or monitor case as a housing for the matrix. Of course, you can leave it as it is, although such a design will not look very aesthetically pleasing. If you use a matrix without a housing, it can be installed in a tablet holder with the ability to adjust the tilt angle.
Connecting the power supply and monitor inverter to the scaler.
Everything here is so simple that it even became somehow sad ((
All you need to do is connect: power to the scaler, control of the inverter and the brightness of the lamps.
We need 4 contacts: plus, minus, contact for turning on the inverter (backlight lamps) and controlling the intensity of the lamps. On the power supply itself these are the contacts:
BLON
- everything that is written ON is turning on the inverter.
BRI
- brightness control, often referred to as
DIM
.
+14V
- it’s clear that it’s + power supply, but don’t forget that we have a scaler of 12 - it needs to be lowered, more on that later.
GDN
- minus (ground).
Where should I solder all this on the scaler?
Scaler contacts and signal matching.
We find the inverter connector itself.
And according to the marking we connect.
Don’t forget that 14 volts is a lot of power for a scaler; I recommend installing a voltage stabilizer at 12 volts (for example, L MC 7812
) into the power supply section (any other 12 volt can be used, according to its connection diagram). In my case, the connection diagram for the stabilizer is as follows:
Connecting the matrix to the scaler.
In fact, I was lucky and my connection to both matrices was identical. I just had to disassemble the 17″ monitor cable and simply rearrange the contacts. The inputs to the matrix are also identical, in the end I tested 2 matrices of different monitors at once with one cable.
Connector and symbols on the matrix.
You can see 10 channels, the power supply is 5 volts and the gaps between the channels are massive.
Scaler connector.
Tryndets, this is where I got into a stupor. There is not a single marking on this connector.
It’s good that there are kind people who posted another version of the scaler with exactly the same pinout.
Everything on the cable from the matrix to the original scaler is mixed up. Need to fix it)
| Frequent designation | My matrix | Universal Scaler |
| LCD-VDD power supply for panel | VDD+5V | VLCD |
| LCD-VDD power supply for panel | VDD+5V | VLCD |
| LCD-VDD power supply for panel | VDD+5V | VLCD |
| GND Ground | GND | GND |
| GND Ground | GND | GND |
| GND Ground | GND | GND |
| RXO0-LVDS ODD 0 - Signal | RA_NO | BTXO- |
| RXO0 + LVDS ODD 0 + Signal | RA_PO | BTXO+ |
| RXO1-LVDS ODD 1 - Signal | RB_NO | BTX1- |
| RXO1 + LVDS ODD 1 + Signal | RB_PO | BTX1+ |
| RXO2-LVDS ODD 2 - Signal | RC_NO | BTX2- |
| RXO2 + LVDS ODD 2 + Signal | RC_PO | BTX2- |
| GND Ground | GND | GND |
| GND Ground | GND | GND |
| RXOC-LVDS ODD Clock - Signal | RCLK_NO | BTXC- |
| RXOC + LVDS ODD Clock + Signal | RCLK_PO | BTXC+ |
| RXO3-LVDS ODD 3 - Signal | RD_NO | BTX3- |
| RXO3 + LVDS ODD 3 + Signal | RD_PO | BTX3+ |
| RXE0-LVDS EVEN 0 - Signal | RA_NE | ATXO- |
| RXE0 + LVDS EVEN 0 + Signal | RA_PE | ATXO+ |
| RXE1-LVDS EVEN 1 - Signal | RB_NE | ATX1- |
| RXE1 + LVDS EVEN 1 + Signal | RB_PE | ATX1+ |
| RXE2-LVDS EVEN 2 - Signal | RC_NE | ATX2- |
| RXE2 + LVDS EVEN 2 + Signal | RC_PE | ATX2+ |
| GND Ground | GND | GND |
| GND Ground | GND | GND |
| RXEC-LVDS EVEN Clock - Signal | RCLK_NE | ATXC- |
| RXEC + LVDS EVEN Clock + Signal | RCLK_PE | ATXC+ |
| RXE3-LVDS EVEN 3 - Signal | RD_NE | ATX3- |
| RXE3 + LVDS EVEN 3 + Signal | RD_PE | ATX3+ |
This is how it happened for me.
Option to check.
The final version.
On the matrix, the two left power +5 are inserted first, then the red one is in the middle, this is common. If you turn the matrix over, you can see that they go to ground.
For control, I connected only the general and power supply, and turned on the scaler. It immediately became clear that the matrix was working, it immediately turned black
. Without power, when only the lamps work, it is brighter.
Laptop configuration
The Acer Aspire 6930G-644G32Mi laptop has the following configuration:
- Processor – Intel Core 2 Duo T6400 (2.0 GHz / 2 MB / FSB 800 Mhz)
- Display – 16″ WXGA (1366×768)
- Graphics – ATI Radeon HD 4650 with 1 GB of video memory
- Memory – 4 GB DDR II
- Hard drive – 320 GB SATA (5400 rpm)
- Optical drive – DVD-RW
- Communications – 10/100/1000 LAN, modem, 802.11a/b/g
- Built-in camera – 0.3 megapixel Acer CrystalEye
- Battery – 6-cell lithium-ion
- OS – Vista Home Premium
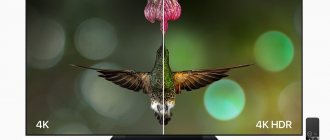
An important argument in favor of the Aspire 6930G is its video card - ATI Radeon HD4650. It has a Unified Video Decoder (UVD 2.0), supports DirectX 10.1 and HDMI (with 7.1 audio). UVD 2.0 hardware decodes video data in all the most common formats: H.264, VC-1 and MPEG-2. The video processor has been modified to support simultaneous decoding of two full-length (1080p) video streams (this capability is sometimes found on Blu-ray Discs). Improved video post-processing capabilities have also been added, such as DVD video upscaling to HD resolutions, as well as dynamic contrast adjustment, as shown in the photos below (photos provided by AMD at presentations).
At its presentations, AMD demonstrates photos showing the operating features of the decoder.
It can be seen that the vertical and horizontal clarity in the left image is noticeably higher than in the right.
In addition, the hardware decoder allows you to dynamically change the contrast of the video stream due to image post-processing.
Thanks to this, the image in the left photo is perceived by the human eye as clearer and brighter, allowing more details to be seen, despite the morning fog.
Another important feature of the ATI Radeon HD 4650 is the presence of 320 stream processors, which makes it extremely attractive for fans of 3D games.
These GPUs are manufactured using the second generation 55nm process technology. According to AMD, in demanding games such as Crysis, the superiority of ATI Radeon HD 4650 motherboards over competing products in the same price segment can be up to two times. The power consumption of the ATI Radeon HD 4650 does not exceed 60 and 50 W at full load, which eliminates the need for additional power connectors and is an excellent solution for a laptop.
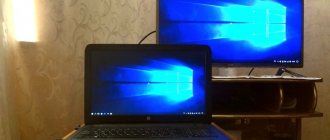
Connection via HDMI
Connecting to a TV via an HDMI cable is the easiest and most convenient way. The vast majority of TVs are equipped with a connector for an HDMI cable. The main snag is the presence of the wire itself, which, unfortunately, does not come as standard to either the TV or the laptop.
Fortunately, HDMI cable is a fairly common product, and you can see a huge number of varieties in your first electronics store. The cost of the simplest cord is low, only 150 rubles. Moreover, this device is universal and suitable for absolutely any equipment.
The main advantage of the HDMI connection method is not only due to the simplicity of the process. This method also allows you to transfer the image to the TV screen in its maximum resolution, so projecting video onto the screen in this way is not only simple, but also pleasant, as you will get real pleasure from watching it.
What advantages does this method have?
- Every laptop and every TV has an HDMI connector.
- Connection is as simple as possible.
- The cable is absolutely available for everyone to purchase.
- You won’t have a question about how to connect sound, because the cord transmits it too.
- You can view files in Full HD resolution.
There is only one drawback of this method. Very often the cord spoils the aesthetic appearance, but there is no escape from this.
So, find the HDMI cable connector on the back of the TV. If it suddenly happens that there is no such connector (this only happens if you are trying to use very old equipment), you will have to purchase an additional adapter.
On the other hand, the cable is inserted into a special connector on the laptop.
Next you need to configure the connection correctly. You must connect via a laptop. To do this, select the “screen resolution” context menu button by simply clicking on the desktop. Open a special window in which you need to select the method of using an additional monitor in the form of a TV that is acceptable to you. Several options will appear in front of you.
- For example, use two screens at once as the only space.
- The TV will serve as a second monitor, which means you can work and watch a movie at the same time.
- You will be asked to clone or duplicate the picture, which means that on the TV screen you will get exactly the same image as on the monitor screen.
- Also, your laptop may offer additional options.
Select the resolution that will be displayed on the screen. Maximum 1920 by 1080 pixels
Setting up the TV is also carried out according to a certain algorithm. You need to open the software menu and check the box next to the required signal source. You need to select the HDMI connector that your cable was connected to. At this point, the preparatory steps are completed and you can enjoy watching TV.
Is it possible to make a TV out of a monitor - conditions
In most cases, models with a liquid crystal display are used for this purpose. The cathode ray device is relatively massive, but it is more convenient if you need to use a built-in board.
The display usually has a VGA output. To work with modern set-top boxes, you will need an HDMI connector. In this case, you can use the appropriate adapter or find a set-top box that can work with a VGA input.
Adapter between VGA and HDMI connectors
Since sound is not transmitted through this connector, corresponding outputs are usually provided for speakers or a media center.
Some display models have built-in speakers. They may be sufficient for a user who works at a computer, but not for those who watch television programs. In the second case, you need a stronger and better sound. At the same time, when viewing indoors, the processes of reflection and absorption of sound play a more significant role. Therefore, when using a display, it is more convenient to use sound speakers, but the equipment will look more bulky.
The disadvantages of using an old display in this quality are that the sound and image quality will be lower, and you will have to purchase expensive devices and parts. Additional time will have to be spent on re-equipment.
The following disadvantages of this solution should also be noted:
- Modern TVs have a large diagonal and high resolution. Older displays will range from 15 to 19 inches. They can only be used for a small room. Even for installation in a living room, displays measuring 24-32 inches diagonally will be required.
- The old display had been in use for a long time. During this time, the quality of color reproduction decreased. Therefore, the display quality will be inferior to the new TV.
- When using an LCD display, be aware that it has a relatively narrow viewing angle, which will limit viewing options.
- The displays do not have a speaker. Therefore, you will need to connect speakers to use it.
Carrying out the work requires professional experience. If the owner is new to this field, he will have to turn to specialists.
The main advantage of using a display as a TV is that the financial cost will be less compared to buying a new TV.
Although most models can be used, when choosing, pay attention to the following:
- The old device must be in good working order.
- For work, it is advisable to use displays from well-known brands. Despite the fact that the models are outdated, the quality of work will remain quite high. LG, Sony or Samsung devices are suitable for use.
- Devices measuring 20 inches diagonally or larger can be used. But it's not profitable. It is better to use such screens for their intended purpose - for working with a PC. They can be sold to recoup some of the cost.
Before use, you need to make sure that the devices provide good clarity and color reproduction. Otherwise, the owner risks damaging the vision of himself and his loved ones.
TV tuners
To watch TV shows and listen to the radio on your laptop, you need a TV tuner. Tuners are:
- internal with PCI and PCI-E interfaces (for installation in desktop computers);
- external with USB interface;
- stand-alone models of external TV tuners, but they operate without a computer and it is impossible to record programs on it;
- tuners for installation in laptops with PCMCIA and ExpressCard interfaces. However, not all laptops are equipped with such interfaces, especially in the budget version. Therefore, such tuners will also not be considered in this article.
For working with a laptop, tuners on a USB 2.0 interface are the ideal solution for compatibility. For review, we chose the GOTVIEW TV tuner based on a number of indicators: high functionality of the software included with the tuner, affordable price, good technical support for users and regular software updates.
So, a hybrid tuner with a USB interface was chosen - GOTVIEW USB 2.0 HYBRID MASTERSTICK , which has already proven itself well.
Such a tuner actually does not take up space on the table, has an interesting appearance that can be combined with any laptop, as well as a color indication that serves to diagnose the operation of the tuner: the blue LED lights up if the tuner is connected and drivers are installed for it, and the green diode lights up, if there is a useful signal on the selected frequency that flashes when you press the remote control keys.
Connection methods
The simplest way and does not require any special equipment is to connect to Internet television. In this case, all the user needs to do is connect to the Internet, open any search engine in the browser, find the desired channel and enjoy online viewing.
Attention! For online broadcasting of television channels, not only high Internet speed is required, but also uninterrupted operation of the modem, and unlimited traffic is also desirable, because a constantly turned on broadcast can very quickly “eat up” all gigabytes if we are talking about metered traffic.
If we are talking about digital television, then most providers provide two or more access points to broadcasts. In this case, the cable transmitting the signal is connected directly to the laptop. After the cable is connected, you must:
- Download a special utility from the service provider’s website that will manage the broadcast.
- Launch the application and log in.
- Using the utility, start the broadcast and select the desired channel.
Providers usually try to provide their customers with a large selection of channels and uninterrupted access to television broadcasting, which distinguishes this type of broadcasting from watching television channels over the Internet.
In order to enjoy watching TV broadcasts using an external tuner, you need to connect it correctly and configure it to work with a laptop. It is noteworthy that some laptop models have such a tuner integrated into the body, which allows them to combine the functions of both a laptop and a mobile TV, but not all models are equipped with such a device, so most often you have to connect the tuner “manually”.
A modern TV tuner is connected via a USB connector, which can be found on every modern laptop. The quality of the signal will often be better than when viewing via the Internet, and the picture will be more pleasant.
Many users may wonder why they would even need to use a laptop as a TV. In order to answer this question, it should be noted that:
- A laptop is much more mobile than most TVs, which opens up opportunities for its use in the country or outdoors.
- With the help of special software and cable, you can enjoy digital broadcast quality.
- And with the appropriate software, you can record the desired broadcasts directly to your laptop for later viewing.
All of the above advantages prove that using a laptop as a TV is completely worth it.
DIY TV from a laptop
Experts identify only three ways to use a laptop as a TV. They are carried out through:
- Connections to Internet TV.
- Connecting a cable instead of an antenna using specialized software.
- Switching through an external T2 tuner (as in the previous case, specialized software is required.
In order to understand how this or that method is implemented, it is necessary to dwell on each in more detail.
Connection
However, after turning on your homemade TV, you may find that it still does not work. The fact is that the purchased controller requires firmware. To fix the problem you need to:
- Download the required file from the Internet and place it on a flash drive.
- Turn on the controller and insert the USB flash drive into the USB port.
- After a minute, turn off the power and remove the flash drive.
- Turn on the device again and select the appropriate matrix settings.
You should also configure the TV so that the matrix turns on immediately after connecting to the power supply. To do this, go to the TV settings and enter code 1147 on the remote control. In the menu that opens, go to the “Advanced Setting” sub-item and switch the “AC on Mode” option to “On” mode. The device is now finally ready for use.
If your old laptop is broken, don't rush to get rid of it. The device can make an excellent TV or monitor for a set-top box. You just need to buy some parts on the Internet and connect them correctly to the matrix. And after changing some settings, the TV will work with a bang.
(
7
ratings, average:
2,29
out of 5)
Loading…
How to make a monitor or TV from an old laptop screen
Laptops break down and become obsolete, but some components in them remain working and can still serve. If the laptop screen is working properly, you can take it out of the case and turn it into a monitor. How to do it?
Disconnect the laptop from the power supply and remove the battery (if it is external and not installed inside the case).
Disassemble the body. Opening different models of laptops is carried out in different ways, but in general there is nothing difficult about it: you need to unscrew all the bolts (including those hidden, for example, behind the DVB drive) and carefully open the cover. Then remove the elements that prevent you from removing the panel and unscrew its fastenings. Do not touch boards, microcircuits or wires under any circumstances. Static electricity can damage components that are still working and may be useful.
Connect the matrix to a universal LDC controller - for example, LA.MV29.P or its equivalent. You can buy it in online stores (AliExpress, Banggood, etc.)
This controller is powered by a 12-volt adapter and supports almost all LCD models. The image can be sent to the controller from a computer, laptop or tablet via the HDMI, VGA or AV port; the supported resolution is up to 1920x1200 pixels. In addition, this board can serve as a TV tuner and display TV channels on the screen. The package includes a remote control and an infrared sensor.
Before placing an order, you should tell the seller the model of your matrix so that they can select a controller that is guaranteed to suit you. An important point: you must find out what voltage the matrix operates with, this will be required for the correct pinout of the cable. Look at the model on the back of the matrix, go to datasheet4u, find that model and see its characteristics. Move the jumper on the universal controller to the appropriate position: 3.3, 5 or 12 volts. Be extremely careful: if you set a higher voltage than required, the matrix controller may burn out.
The controller will need to be flashed. To do this, copy the file lamv29.bin from this archive to the root of the flash drive, insert it into the USB port of the turned on controller, wait a minute, turn off the power, disconnect the flash drive, turn on the controller again and check if the matrix is working correctly. In the menu you can change the language from Chinese to Russian.
To configure the matrix to automatically turn on when power is applied, go to settings and enter 1147 on the remote control. The service menu will open. Go to the Advanced Setting sub-item and switch the AC on Mode option to On mode.
The controller can be hidden in some kind of case or simply glued to the back of the matrix. You can use a laptop or monitor case as a housing for the matrix. Of course, you can leave it as it is, although such a design will not look very aesthetically pleasing. If you use a matrix without a housing, it can be installed in a tablet holder with the ability to adjust the tilt angle.
When is it convenient to use a laptop as a TV?
It is convenient to use a laptop in many cases, and the ability to watch TV channels is no exception. First of all, this is a mobile technique that is easy to transport. The only problem is the small screen size. You can watch your favorite shows via PC anywhere you can connect to a Wi-Fi network. If your TV breaks down, it will be a lifesaver.
A very common occurrence in families is the “fight” over TV. Some want to watch films, others want to learn about the main events of the country. Children are always happy to see cartoons. If you have only one TV, it can be difficult to find a compromise and establish a priority.
A laptop will also come in handy in a one-room apartment. By connecting wireless headphones, the TV can work without any problems and the channel can be broadcast through the laptop. At the same time, no one will interfere with each other.
Use your laptop as a TV
If you are looking for an online laptop store in Odessa and want to buy a cheap laptop from a warehouse at a good price from a supplier, we recommend that you familiarize yourself with the assortment of our catalog.
There are many reasons to use your laptop like a TV . Despite the relatively small size of the monitor (although modern laptop computers can also have a widescreen display), it is very mobile and allows you to watch TV programs almost anywhere.
You can take your laptop with you on vacation and install it in any room in your apartment. The main thing is to have an Internet access point or an external TV signal source for this. Let's look at the main ways to connect a laptop like a TV.
Options for using a laptop as a TV
A home laptop can do more than just view images, play games, or work. Its technical resources allow you to watch television programs. This is not difficult to do. It is enough to have access to the World Wide Web and follow simple instructions.
TV program for the week.
It’s hard to surprise owners of satellite receivers with this; for users of regular TVs, a newspaper is more familiar, but with the advent of digital DVB-T broadcasting, owners of TV tuners can always have a TV program “at hand.” Each TV channel is accompanied by an EPG (electronic guide), thanks to which the GOTVIEW PRO program automatically generates a TV program without using an Internet connection.
If you have access to the Internet, the TV program guide is automatically available for all channels, including analogue ones. You can search and create viewing or recording tasks in it.
It is enough to type the desired word or letter combination (for example, x/f) in the “Search” field, and all programs in which it appears will be highlighted. This makes the search much easier. Moreover, such a weekly TV program can be printed on a printer, where the necessary programs are highlighted in color.