Via BIOS
Many Acer, Lenovo, MSI models allow you to disable the keyboard via BIOS.
Advice! How to enter it is necessarily described in the instructions for the laptop. To do this, you need to press both one of the function keys and a special hardware button.
In one of the BIOS sections there is an item USB Support Via. To lock the keyboard on a laptop from a child while the operating system is running, the value of the parameter must be set in the BIOS. After this, exit to boot the system normally.
Advanced laptops that use the USB bus to connect the keyboard allow for a dangerous locking method. In the BIOS settings, in the USB Legacy Support item, just set the value to Disabled. In this case, turning on the keyboard can only be done by resetting the CMOS, which requires reaching the switch on the motherboard. External devices other than Bluetooth will also not work.
HP laptops only allow you to child lock the function keys .
In the BIOS of many models from this manufacturer there is an Action Key Mode item. By setting its parameter value to Disabled, you can disable only the top row functional buttons. This will not allow you to adjust the sound, display brightness, or other operating modes.
Method 7: Manage Windows Updates
Windows 10 updates affect the performance of your laptop in a variety of ways, even affecting the keyboard. There may have been minor or major system updates installed before it stopped functioning. You can wait several days for the developers to fix the error, and only then, provided that the problem is really in the update. Therefore, it is better to immediately check this assumption: uninstalling the update is not difficult, but installing it again if necessary is not difficult.
Rollback to previous version
Windows 10 currently allows you to roll back to a previous build within 10 days after installing a major update. If a major update was installed in your case, use the built-in tool to upgrade to the previous build. Of course, this can be done provided that you did not delete the “Windows.old” folder yourself.
- Open Settings and go to Update & Security.
- Using the panel on the left, switch to “Recovery” and in the main part of the window, find the “Return to a previous version of Windows 10” block. The "Start" button must be active. If so, click it.
- Preparation for this operation will take a few seconds. Please note that depending on the build of Windows, the sequence of actions may differ.
- Check the box next to the most appropriate reason. Ours is not on the list, so indicate “For another reason” and, if you wish, briefly say for what reason. Then click Next.
- You will be asked to check the release of the update, which in theory will fix bugs and errors. Decide for yourself whether you want to try installing it, or roll back to a stable build.
- Anyone who has chosen to rollback will have to read the information in the next window. It describes the features of Windows return and how to properly prepare for it.
- The next window will display information regarding your login password.
- Only after this the rollback itself will become available.
- After starting the procedure, you will see a black screen, during which the OS will return to the previous state.
Uninstalling a minor update
Minor updates affect the keyboard much less often. However, they, individually, can lead to various problems in the performance of Windows. Small updates are better known to the user as KB0000000, where 0 is a set of numbers identifying the update. It is even easier to remove a problematic update of this kind than a major one.
Unfortunately, you will be able to find out for yourself in advance, without reviews on the Internet, whether a specific KB update is to blame only after its removal. But don’t worry if it was uninstalled by mistake - in the future, nothing prevents you from running the search for updates again and reinstalling the removed one. Read about removing this kind of updates in Method 1 of the article at the link below.
Read more: Uninstalling updates in Windows 10
Windows 10 update
Instead of rolling back to a previous version, you can try an update. The method is relevant as an alternative to unsuccessfully returning the system to a previous version, which helps in many cases. In Windows, Update Center works automatically, independently checking for updates, but if we are talking about critical fixes, Microsoft can release an update faster than the operating system checks it according to its schedule. Accordingly, the user will need to run a manual search and, if an update is found, install it.
Read more: Installing Windows 10 / Windows 8 updates
Fast way
The easiest way to disable letters on the keyboard is through the DOS command interface. This technique makes the keyboard completely inoperable. To open a window for entering commands, you will need:
- press Win+R;
- select Start, at the bottom of the menu click Run;
- go to Start-Programs (All programs for Windows 7), find the Accessories subsection, find the Command Line item (for Win 95, XP);
- Enter Start, find System Tools at the very bottom of the list of programs, select Command Prompt (for Windows 10).
After this action, a window with a black background will appear on the screen. In it you need to type the command rundll32 keyboard,disable and press enter. There is no need to confirm anything. If you make a shortcut to launch such a command, you can turn off the keyboard with just one click. This method relates to the operating system software environment and works on all laptops, be it Lenovo, Asus, Dell or Packard Bell. You can unlock the keyboard on a laptop in the same way, only in the command you write enable instead of disable.
Advice! How to enter characters when the buttons do not work? The on-screen keyboard is useful for this. You can call it through Start - Programs - Accessibility or activate it by right-clicking on the taskbar and selecting Toolbars from the menu.
Important information
Certain instructions, which will be discussed next, require the user to enter information. If you don't have an external keyboard, use a virtual one - in Windows you can easily call up the on-screen keyboard for typing. In addition, you can copy some input commands from the article and paste them into operating system windows using the mouse and context menu. For those who do not know how to call up the virtual keyboard, the following material will be useful.
More details: Launching a virtual keyboard on a Windows laptop
Do not forget that if you encounter difficulties already at the stage of logging into your account when you turn on the laptop, you can also enter a password or PIN using the on-screen keyboard. The button for calling up special features, including the tool you need, is located in the lower right corner of the window.
Disable in the device list
Locking the keyboard on a laptop through the device manager is a very effective method. It will be disabled even when booting into Safe Mode. You will need to call the device manager. You can do it like this:
- go to the control panel (Start-Programs-Control Panel), select the System icon, launch the dispatcher with the corresponding button;
- right-click (PC) on the Start icon and find the corresponding menu item (for Windows 10);
- go to the command interface (as described above) and type devmgmt.msc.
In Device Manager, look for the Input Devices or Keyboards section in the list. There is a device there that is usually called the Standard Keyboard. On the line with the name, right-click on the touchpad or mouse and select Disable. If it is not there, the device must be removed. After this, the system will ask you to confirm your actions.
The method to enable the keyboard on a laptop through the device manager is almost the same as the steps to disable it. During the last operation, you need to select the Engage item in the right-click menu. And if the device was deleted, you will need to click PC on the computer name (the very first line in the list) and activate Update configuration.
Reasons for blocking
The keyboard can be deactivated in the following cases:
- It was unintentionally blocked by the user himself, accidentally pressing a combination of “hot” keys.
- There was a system failure that caused Windows to no longer “see” the input device. In this case, you will need to diagnose the laptop for problems. Further actions will depend on the complexity of the failure.
- The OS has been infected with viruses that deactivate the keyboard when you use it. First, the user needs to determine what software spreads viruses on Windows and remove it. If this does not help, you will have to look for files that were damaged during the operation of the virus.
- The equipment does not work due to mechanical damage.
Reasons for locking the keyboard
The sequence of actions to unlock the keyboard will depend on the reasons why it was blocked on the laptop. Next, we will consider various ways to return the keyboard to functionality.
Disable the small numeric keypad
The right numbers on the keyboard operate in two modes. They can act as navigation controls but are capable of printing numbers. To disable the side keyboard in input mode, you can use BIOS tools. In one of its sections there is an item Boot Up Numlock Status. By setting the parameter value to Off, we get the laptop loading with navigation in the side. To enable the numeric keypad on the right side of your laptop, just press the Numlock key.
Turn on the side keyboard with numbers
Have you ever wondered why on the keyboard, in addition to a row of keys with numbers, there is also a separate square block also with numbers? In fact, the order of numbers like on a calculator speeds up entering characters into the computer, especially if you enter them with one hand and hold the mouse with the other or take some notes.
But this numeric keypad can be disabled by a specific key or key combination. Let's figure out how to enable it:
For computer
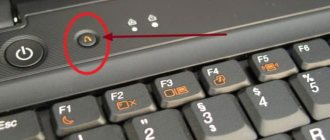
For the standard keyboard layout there is a special key labeled Num Lock.
It is located immediately above the block with numbers. When it is activated, the indicator above it lights up, so you can immediately understand whether you have the side keyboard with numbers turned on or not.
For laptop
To save space on small laptops, the number pad was retained, but moved to the letter keys. At first glance, this may seem completely stupid, because the numbers are lost on the keyboard with other symbols. However, once you get the hang of it, you can easily begin to cope with it. To switch, you will need the same Num Lock key, which literally means “lock numbers.”
On some laptop models it will be called exactly the same, and on others it will be called NmLk, Num or NumLk . They can be located on the F1-F12 , all this is also done to save space. In this case, you need to hold it down simultaneously with the Fn, Alt or Shift function key.
It makes no sense to list for which laptops which key combinations will be correct. Over the past 20 years, many series of laptops have been released from each manufacturer, and each such release has its own key combination. It will be much easier for you to find this combination at random than to look for your laptop model in a multi-page list.
Useful programs
Today, common programs allow you to do more than just disable letters on the keyboard. They can set key combinations to be blocked. This makes it easy to set up bans. For example, turn on the keyboard backlight, block service key combinations.
One such useful utility is called Toddler Keys, which is free. You just need to download and install the program. After the first launch, it appears in the tray near the clock. By right-clicking on it, you can disable and enable the keyboard.
Kid Key Lock is even more useful. It can not only completely disable the keyboard, but also block pressing of individual letters. This is useful not only as a child protection device, but also as a tool for restricting access to the functionality of a particular software.
Method 6: Checking the value of the UpperFilters parameter
There is a parameter in the Registry Editor that also affects the operation of the keyboard. In the course of a variety of events, changes could have occurred to it, which is why it now does not work. It can be quickly edited or recreated.
- Open Registry Editor (how to do this, see Method 3).
- Follow the following path: HKEY_LOCAL_MACHINE\SYSTEM\CurrentControlSet\Control\Class\{4D36E96B-E325-11CE-BFC1-08002BE10318}. In the central part there should be an “UpperFilters” parameter with a value of “kbdclass”.
- If so, close the window and move on to the next instructions. If not, double-click on the parameter and in the window that opens, change the value yourself to the one indicated above.
- If there is no parameter as such, right-click on an empty space and create a “Multi-line parameter”. All that remains is to rename it and then set the desired value.
- The change will be applied after restarting the operating system.
Let us clarify that “UpperFilters” is affected by one of the older versions of Kaspersky Anti-Virus. If you have this program and you notice that after fixing or creating a setting, it has changed again or disappeared, uninstall/disable/update your antivirus to check whether it affects the setting in question.
The most difficult way
The keyboard can be literally disabled. To do this, you need to edit system policies. The procedure is as follows.
- The device manager starts, as already written above.
- Having found the keyboard, right-click on the line with its name.
- By selecting Properties and going to the Information tab, we find in the lower list window the line ID of the device (equipment, instance).
- By clicking on the value written on the right, select and copy it.
- We go to the command window as described above.
- Type gpedit.msc and press enter.
- In the editor window that appears, go to Computer Configuration (these are settings that apply to all users).
- Find Administrative Templates and expand the section by clicking on the plus sign.
- Device management is located in the System section. It can also be expanded by clicking on the plus sign next to the name. Inside you will need the Device Installation subsection. You need to click on it.
- In the right part of the window, where a list of available options will be displayed, select Prohibit the installation of devices with the specified codes.
- Double click to enter the settings window. There is an Enable checkbox that you need to check.
- Then go to the Settings tab. It has a Show button. Let's press it.
- Then just paste the copied keyboard identifier value.
Close the windows one by one by clicking OK and confirming your selection if necessary. For the settings to take effect, you just need to restart the laptop. If this cannot be done at the moment, you can programmatically update the policies. To do this, go to the command prompt and type gpupdate /force and press enter. After this, the keyboard will be disabled.
Important! This blocking method is used not only for protection. It is optimal if you need to replace the keyboard on a laptop, since it disables only a unique product, and not the functionality of the input device.
Method 3: Force the ctfmon process to start
When the keyboard works, but only selectively, not everywhere, perhaps the whole problem is in the unstarted process responsible for it. Before trying to fix it, you should check whether the process is working or not.
- To do this, go to the “Task Manager” by right-clicking on “Start” and selecting the appropriate item. Instead, you can right-click on the taskbar and select the same item - this option is universal for different versions of Windows.
- In the list of processes, look for “CTF loader”. If you don’t have a process like the one in the example, it means it really hasn’t started and may be causing a problem with the keyboard.
You can fix this by manually adding the process to startup.
- Right-click on “Start” and bring up the “Run” window. In Win 7, find this application in Start by name.
- Type regedit using the on-screen keyboard or copy and paste, and then click OK.
- Navigate to HKEY_LOCAL_MACHINE\SOFTWARE\Microsoft\Windows\CurrentVersion\Run. Windows 10 users can copy and paste this path into the address bar by pressing Enter to navigate.
- In the central part of the window, right-click on an empty space and select “New” > “String Parameter” from the context menu.
- Give it the name “ctfmon”, then open the value editing window by double-clicking with the left mouse button. In the appropriate item, paste the following address: C:\Windows\System32\ctfmon.exe. Click OK to apply the changes.
We also recommend that you go to the “Task Scheduler” and see if the process is disabled there too.
- You can launch the application by calling “Computer Management”. In Win 10, to do this, right-click on “Start”; in Win 7, find it in the main “Start” menu, in the “Administration” section.
- On the left side of the window, select “Task Scheduler.”
- Again, through the left panel, expand the “Scheduler Library” > “Microsoft” > “Windows” > “TextServicesFramework” folders. The “MsCtfMonitor” parameter will be located in the central part of the window - check that its status is “Ready”.
- If this is not the case, enable the task by right-clicking on it and selecting the appropriate item.
Finally, reboot your laptop and check if the problem associated with this process has been resolved.
I can’t unlock the keyboard: what to do?
Most often, the keyboard is locked on a mobile computer by the user; software rarely affects this. But to make sure that there is no prohibition, you need to check the system hardware:
- Go to Start and select Run. Type gpedit.msc, then “Enter”. Afterwards, you need to go through the tabs in the following order: “Hardware Installation”, “Equipment Limitations”.
- Find "Prohibit installation of hardware."
- You must select the “Show” button and make sure that there is no data in the section that appears. As for the ban, it must be in the “Disable” mode.
Hardware failures
Probably in the keyboard itself: for example, it got wet during wiping or was subject to mechanical deformation. In this situation, only a replacement can help. Buy a similar keyboard for your mobile PC and, taking into account the training video on the Internet, replace it on your laptop.
If you have knowledge of hardware, then you can try to determine the cause and complexity of the malfunction yourself. First, you need to check the correct operation of the USB connectors and the socket where the touchpad power cord is connected. If the touchpad or port is not working, then the reason is the south bridge.
If there are problems with only one keyboard, you need to disassemble the device and determine the condition of the cable (this can only be done if the warranty on the mobile PC has expired). Before disassembling the case, read the operating instructions - this will help prevent errors and unexpected breakdowns during operation.
In almost any laptop design, the keyboard is attached to the case using latches; the easiest way to remove them is with a regular flat-head screwdriver. Experienced craftsmen advise disassembling starting from the left end of the case
Then you need to lift it using a thin flat object and carefully begin to pull the Esc key
This way you will be able to get the entire end of the keyboard, and then completely remove the panel with the keys. In the space that appears, you will see where the keyboard is connected to the main board. To disconnect the canvas, you need to disconnect the wire leading to it (the type of fastening will depend on the manufacturer).
Afterwards, thoroughly clean the contacts and firmly insert the wire until it clicks. If the integrity of the keyboard or wire is damaged, you can replace it yourself.
Physical shutdown
A not entirely convenient, but still effective way to block the keyboard is to physically disable it. Typically used when the input device needs to be replaced or the keys need to be cleaned.
The keyboard is connected to the motherboard via a special cable. That's exactly what you need to get to. Therefore, we turn off the laptop, carefully trying not to damage anything, and open the case. We find the required cable and disconnect it.
However, if the laptop is under warranty, then using this method of blocking and disabling the keyboard is not recommended. The fact is that there is a high risk of damaging the seals, and then you can forget about free warranty service at the service center.
How to lock a laptop keyboard?
As noted above, laptops come in different models, and today you can buy a mobile computer to suit every taste. Each laptop may have its own advantages, but also comes with its own manual. For example, each model has a separate keyboard lock command.
Users also need to lock the laptop keyboard for various reasons: children click the keys, a computer game requires the use of only the numeric keypad, the keyboard is not fixed and needs to be disabled. Let's look at several options for locking the keyboard on a laptop:
- The first, easiest and fastest way is to use a key combination. You can enable the laptop keyboard lock, for example, by simultaneously
pressing
Win
and
L. You can lock the alphabetic panel using the Fn
and
NumLock
, as mentioned above.
Another key combination is Fn
and
F6
/
F11
, depending on the laptop model. In general, in this case, we can also advise you to study the instructions for your laptop so that you don’t have to do it at random.
The built-in keyboard on the laptop is locked and disabled, how to unlock it and turn it on
- The second way to guarantee a laptop keyboard lock is to simply physically disable it. This, of course, will be a little more complicated than in the first case, but anyone, even an inexperienced user, can cope here. The keyboard is connected to the laptop using a cable. To disconnect this cable from the motherboard, you need to carefully open the laptop case.
- The third way to lock (as well as unlock) a laptop keyboard is to use third-party programs. The method, of course, is less convenient than the first of those described above, but much simpler than the second. There can be many programs for locking a laptop keyboard, but we will recommend one like Toddler Keys
. You can download it from this link. Using the program is quite simple; instructions are given below.
The built-in keyboard on the laptop is locked and disabled, how to unlock it and turn it on
Download and install Toddler Keys
", like a regular program.
There is no need to perform additional actions; the program is designed to work with any version of Windows
, both on laptops and personal computers.
After installation, run it, you will see the program icon in the tray (right side of the taskbar). Right-click on this icon and then click on “ Lock Keyboard
” in the menu that opens. That's it - the laptop keyboard will be turned off.
The built-in keyboard on the laptop is locked and disabled, how to unlock it and turn it on
The keyboard is an integral part of the laptop as long as it functions without failure. As soon as problems arise with it, the user begins to worry about the question of how to disable the keyboard on a laptop. If there are software glitches with your input device, disabling it may be a temporary solution. If hardware defects appear on the laptop keyboard, it may need to be disabled permanently, for example, if it began to function incorrectly after water got in or it is missing a number of keys that cannot be replaced.