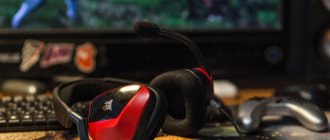
Most laptops already have a microphone. This is either a separate hardware device or a device built into the webcam. However, users often encounter situations where the system does not see the microphone due to its physical breakdown. In this case, you can use an external one. But they do this not only to fix hardware failures. Easily connect a wireless microphone to your laptop for karaoke. Or use a desktop model, which provides greater sensitivity and is conveniently located in front of the user. Connecting a microphone is done in different ways, depending on its model and the type of laptop port.
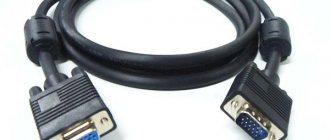
Interface 3.5 mm mini-jack
You can use a regular, wired microphone on a laptop only if there is a 3.5 minijack port. It's not difficult to find. Need to:
- inspect the ends of the laptop;
- find two port holes, indicated by green and red inserts;
- Make sure that the red port is intended specifically for a microphone by looking at the icon next to it.
On a note! This way you can connect a microphone to an Asus, Acer, HP laptop. These manufacturers install exactly a pair of 3.5 mm minijack ports on their devices for connecting speakers and a microphone.
Where to connect the microphone on the computer.
Modern computers and laptops are provided with microphone connectors in abundance.
They can be found on the system unit, keyboard, speakers, and nowhere else. It all depends on the imagination of the device designer. If you need high-quality sound, then you should not chase imaginary comfort, but connect the microphone directly to the sound card. This connector is located on the rear panel of the system unit. Move the system unit away, wipe the housing and all wires from dust. One of your sound card connectors is probably occupied by speakers. You need another socket. But first things first. There should be three holes. Pink (red), blue (blue) and green (salad). An icon with the purpose of a particular connector is usually stamped next to them. Sound card connectors on a computer. We are interested in the pink connector. There is a corresponding sign next to it. The connector rod should be inserted until it stops. Otherwise, the microphone will not be connected to the computer correctly and will not work.
Combo port
Some laptops use a combo port to connect headphones and receiving devices. It's easy to plug in a headset with one cable from the headphones to the voice recording point. However, if you take a regular dynamic microphone, you won’t be able to connect it directly to your laptop.
To use an external audio recording device, you will have to buy a branded one. It may be from the same brand as the laptop, or it may have compatibility information. However, such a device is quite expensive. It is much more attractive for the average user to buy an adapter.
This adapter looks very simple. At one end there is a plug for the hybrid port, at the other there are two taps, marked in green and red for clarity. It is the latter that allows you to connect an external microphone to your laptop.
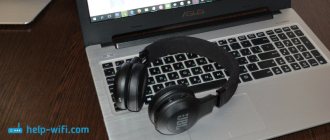
Built-in microphone
Of course, going on an impromptu stage holding a whole laptop in your hands is not a star thing. However, sometimes, when there is no time for visual effects, this helps. The main thing is that the built-in microphone works.
We wouldn't recommend recording full vocals or long podcasts directly into your laptop. But if you need to record a voice message in a messenger or a couple of words to insert into a video where the sound quality is not critical, the built-in one will be fine.
To avoid quality problems, we recommend cleaning the microphone hole before recording (it's usually located on the front of the case).
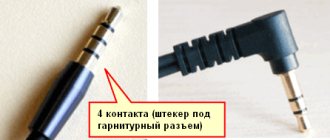
If your microphone uses a different type of plug
Today, connecting a microphone to a laptop can only be done using a 3.5 minijack interface. However, there are many models of audio recording devices on the market that may have a different plug. Meet:
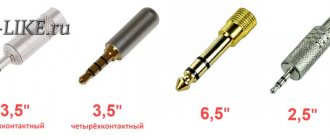
- TS, monophonic sound, 2.5 mm;
- TRS, monaural, 3.5 mm;
- TRS, stereo, 3.5 mm;
- stereo and mono, 1/4 inch.
To connect an external microphone, it is recommended not to experiment with disassembling its connector and resoldering the contacts, but to buy an adapter . It's inexpensive. The product can be extremely compact, in a rigid case. Or it can offer a flexible cable outlet to the connection port, which is convenient for some users.
Setting up and ways to connect an external microphone to a laptop
The remote speaker is connected via a headset or microphone connector directly or through an adapter and external sound adapter.
Use adapter
It will be required if the headset input on the computer does not match the dimensions of the plug: its diameter is 3.5 mm, and microphones can be equipped with various connectors: 2.5 mm, 3.5 mm and 6.35 mm (1/4”).
Via standard or headset jack
To connect a microphone with a 2.5 or 6.35 mm plug to the input (pink connector), appropriate adapters are used. They can be bought in a store that sells musical instruments, computer components, car audio, etc. or order via the Internet, including from China or Moscow. The price starts from 80-100 rubles.
To connect headphones and a microphone to the universal headset input (the only one on a laptop, indicated by a headphone icon), you will need an adapter (it differs from the headphone connector by an increased number of rings).
The adapter's output is connected to the headset jack, and headphones or speakers and a microphone are connected to the inputs. Then, in HD Manager, change the interface purpose to “Headset” so that Windows recognizes both the speaker and headphones. You can see more details in the video.
Remember: if the connector serves only as an output, connecting a microphone to it is useless. In such a situation, a speaker with a USB interface, an external sound card or a combined device will help.
Using a wireless microphone
If you don’t want to bother with adapters and wires, buy a wireless microphone that connects via Bluetooth.
- Charge the device or insert batteries.
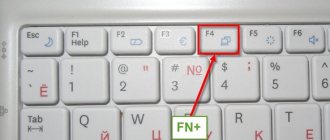
- Turn on the radio microphone and Bluetooth on your laptop. To do this, use the key combination Fn + F.
- Right-click to open the context menu of the Bluetooth icon in the tray (where the clock is) and select “Add device...”.
Windows 10 provides an alternative path: hold down Win + I, visit the “Devices” section and activate Bluetooth in the window.
- Click "Add Bluetooth or...".
- Specify the device type.
- After scanning and detecting the microphone, select it from the list.
If successful, a message will appear indicating that the wireless speaker is ready.
If Bluetooth does not turn on (the switch is not active) or the interface icon is missing in the tray, check whether the RF transceiver driver is installed and whether the module itself is activated on the laptop and microphone.
- Using the Win + I menu, open Device Manager.
- Expand the "Bluetooth" section to make sure the driver is there.
If there is no such item in the list or there is a yellow icon next to it, reinstall the Bluetooth software from the laptop installation disk or from the PC support site.
Suddenly, a gray arrow pointing down is drawn on the radio module icon, right-click on it and select “Enable device”.
The following steps will also help return the icon to the tray:
- Hold Win + R and run the command “ncpa.cpl”.
- Bring up the Bluetooth connection properties.
- In the second tab, click on the “Options...” link.
- Select the "Show Bluetooth icon in notification area" checkbox.
- Save the changes with the “OK” button.
The microphone will work.
Connection via external sound card
If the microphone connector is damaged or you need high quality recording, use an external sound card connected via USB. Windows will automatically detect the hardware and install the driver for it in a minute or two. Then plug the microphone jack into the corresponding socket. Ready.
An external audio card may also occupy an adjacent USB port; if you need it, use a USB splitter, but remember that the speaker may not work with a cheap hub.
To avoid conflicts, disable the built-in sound card in the laptop's BIOS/UEFI or at least in the Task Manager.
Features of connecting a lavalier microphone
A lavalier microphone is a tiny device that can be placed away from a laptop or digital camera thanks to a long wire, and attached to clothing. There are some peculiarities in the process of connecting the lavalier to the laptop due to the different pinout. They are soldered separately for pairing with a computer and a smartphone. PC models do not work fully on the phone and vice versa. Combined models with a matching device, compatible with all equipment, are widely used.
lapel microphone
Lavaliers mostly come with a 3.5 mm jack and connect to a laptop like a dynamic microphone.
To operate the professional model as a condenser speaker, you will need a TA-4 to XLR adapter.
How to connect a microphone via USB
To record vocals, musical instruments and voiceovers, buy microphones connected via USB. They are a combined device - microphone + built-in sound card.
Is the USB microphone suitable for all laptops?
You can connect any microphone to the USB interface, even a professional one equipped with an XLR connector, through the appropriate adapter. However, the power of the integrated audio card may not be enough to work with high-impedance devices (600 Ohms or more), based on user reviews on the forums. To operate, you will need a microphone amplifier or an external sound card.
Using an external sound card
What happens if the audio recording device has a weak output signal? In this case, if you connect a microphone to a laptop, the voice will be very quiet, and it may not be possible to amplify it using software. To solve this problem, you will need a connected multimedia device.
An external sound card is a very small device the size of a regular flash drive. At one end there is a USB interface, at the other there are 3.5 minijack outputs, red and blue, needed for connecting a microphone. You just need to plug the sound card into the laptop port.
Important! Simple device drivers will be installed automatically. For more complex ones, you will need to download them from the Internet. Responsible manufacturers offer a disk with a set of software required for its operation, complete with a sound card.
Possible failures and their elimination
Most problems can be fixed on your own at home.
Most often observed:
- No work after connection. In order for audio recording equipment to function correctly, drivers must be installed. If the computer is equipped with Windows 7, the system itself searches for the required programs on the Internet. Owners of other software will have to search and download it themselves. In most cases, you will have to go to the manufacturer’s official website.
- Third-party programs and applications may stop working after connecting the equipment. Reinstall the drivers. During the process of downloading the program, an error may have occurred due to which the gadget cannot function normally. If the procedure does not help, try connecting a different microphone or headset. It is also recommended to check the system for viruses and correct any detected errors.
- Sometimes equipment refuses to work due to mechanical breakdowns or manufacturing defects. To eliminate this possibility, test the device on another laptop.
Radio microphone
A radio microphone is an extremely popular device for karaoke. It consists of two functional modules. One of them, a decoder-transmitter, connects to a laptop. The second, the microphone itself, is equipped with a battery and a built-in transceiver module.
To connect a microphone to a laptop, you will need to follow the manufacturer's recommendations. Usually you need:
- connect the decoder-transmitter unit to the laptop using the USB port, 3.5 minijack, sometimes both at once;
- install microphone drivers;
- check the connection between the microphone and the data processing unit according to the manufacturer’s instructions;
- check the operation of the device.
Typically, a radio microphone has a fairly simple initialization technology. It is described in detail in its operating instructions.
How to configure the operating system.
After connecting the microphone to the computer, its system connection is carried out. In some cases, you should start with a reboot. Next, by clicking the “Start” button (lower left corner of the screen), select “Control Panel”. In this section we are interested in the “Sounds and Audio Devices” tab. A small clarification should be made here. Different operating systems have different folder names. But this does not change the meaning. Just be careful. By clicking on “Sounds and audio devices”, select the “Audio” section. In the middle part we will see an image of a microphone with the inscription “Volume”. The following window will appear with volume controls. O in the “Microphone” column and set the value to maximum. There should be a “Customize” button nearby. (If it is not there, then follow the next chain “Options” - “Advanced options” and it will appear). In the window that opens. https://www.youtube.com/watch?v=w54AhMcNluk Here, in fact, are all the system settings. Now you understand that connecting a microphone to a computer is absolutely not difficult. The main thing is not to get lost in open windows.
Bluetooth
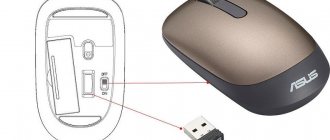
Bluetooth devices are gaining immense popularity among consumers. Although the communication range of such a wireless microphone is short, up to 10 meters without obstacles, it is enough for comfortable work with a laptop. To connect your device via Bluetooth, you will need to do the following.
- Connect the receiver to the laptop. This could be a very small whistle, or it could be a module powered by USB and transmitting an audio signal via a 3.5 mm minijack.
- Install drivers for the new device and software offered by the manufacturer.
- Turn on the microphone and make sure it connects to the receiver. Usually, a small light bulb is installed for this purpose, the nature of the glow indicates the state of the communication channel.
The manufacturer offers detailed connection instructions for each Bluetooth microphone.
Important! There are models without a receiver. In this case, to use them, the laptop must have its own Bluetooth module. If the model is old and does not offer such luxury, to connect a wireless microphone you just need to buy and install one of the universal receivers.
How to choose the right microphone
In this article, we will not talk about which company you should choose, or what price to focus on when choosing a microphone. We will only talk about how to choose a microphone suitable for your computer (laptop).
As mentioned earlier, not all modern laptops are equipped with all the connectors that a user may need. This happens because the laptop is more compact than the system unit, and therefore has much less space; its creators have to sacrifice something in order to fit an extra USB port or HDMI connector.
Not many people know, but modern microphones can be connected through three contact options:
- Audio jack 3.5 millimeters.
- Audio jack 6.3 mm.
- USB serial port (not to be confused with a regular one).
Before purchasing, you should look at what types of connectors are on the body of your laptop and, based on this, select the appropriate equipment. It is worth noting that most laptops are equipped with a USB serial port and a 3.5 mm audio jack.
But the 6.3 mm audio jack connector is very rare. Moreover, microphones with this connection have better sound quality than the first two options. If your laptop doesn’t have a suitable connector, don’t worry, you can easily find adapters that allow you to connect a 6.3 mm audio jack to a 3.5 mm jack.
How to start using an external device
The microphone on a laptop, even if it is faulty, may prevent it from working with a connected external device . It needs to be activated and set to be used on the system by default. This is done as follows.
- The speaker icon is located in the tray, next to the clock. If it is hidden, in Windows 10 and Windows 7 you just need to press Win+B.
- You must right-click on the icon.
- From the menu that appears, select Recording Devices.
After these steps, a window will open in which all sound recording sources identified by the system are listed. You need to select the recently connected one by its model name.
If the device name is grayed out, it needs to be enabled. To do this, right-click on the name or icon next to it and select Enable. It is easy to understand that the device is working by the indicator located to the right of the name. When you start talking or just tapping on the microphone, you can see how the output level is displayed.
Advice! In order for the system to automatically use an external audio recording source, it should be set as the main one. To do this, right-click on the model name and select Use default communication device. After this, when you connect a wired microphone, the operating system will immediately begin working with it.
It is more difficult to start using wireless Bluetooth devices. If the radio microphone only requires manipulations with the receiver or manufacturer’s software, then the model’s Bluetooth must be paired before any settings are made. To do this you will need:
- find the Bluetooth icon in the form of a blue logo next to the clock;
- right-click on it and select Search for devices from the drop-down menu;
- find the name of the wireless model in the list of found ones;
- double-click on the name with the left button or select and click the Pair button.
You may be required to enter an authorization code during pairing. The required combination of numbers is always in the device's operating instructions. Once pairing has been established, the wireless model will automatically connect to the system.
Standard connection
Hopefully you already have a microphone for vocals. Typically, relatively simple models are sold in specialized music stores and computer stores. Moreover: in computer systems it is easier to find a simple model, since professional musicians and presenters often need expensive specialized devices.
Often a microphone (or two) is included with a music center or DVD player. If you bought an advanced model, then you may not have to buy anything additional.
If you are buying a model specifically for home vocal parties, then pay attention to several factors:
- Microphone type. Between dynamic and condenser, you need dynamic: they are more affordable and do a better job in noise. Condensers are better suited for the studio.
- Directionality. Since you need to capture one person's vocals, it's best to go with a unidirectional model.
- Price. You shouldn’t overpay for professional models: regular karaoke options for 1000-1500 rubles are quite suitable. Although the expensive ones will deliver better voice quality, remember that you are limited by the capabilities of the sound card and speaker system.
Before connecting a karaoke microphone to your computer, look at the type of plug. Typically, there are three types of plug:
- 5 mm. It is the same as in the case of a telephone headset, but the wiring differs (three contacts instead of four). You can connect it directly to the input of your laptop.
- 3 mm. In appearance it differs from the first type only in size. You need to connect such a plug through a special adapter, which is usually included in the kit.
- The wide plug has a round shape with three pins inside. This is a professional standard, and it is unlikely that a household karaoke microphone will be equipped with a cable with such a plug. A suitable connector for it is only available on professional equipment (studio sound cards, mixing consoles, effects processors, etc.) But adapters can be found in music stores.
Don’t rush to part with such a cable if you get your hands on it: as a rule, cables with XLR plugs are of high quality. Among household devices, XLR can be found in the bases of wireless kits.
We're not covering USB microphones, as they tend to be more for recording while you're sitting in front of a mixer or computer.
To connect, you need to select the microphone input on board the laptop. Typically, if the input and output are separated, the output is green and the input pink. You need to insert a plug into the pink socket. If the connectors do not differ in color, then you need to navigate by the icons next to each of them. The combo connector simplifies the situation somewhat, but then you will have to output the sound externally in some other way (for example, through a USB sound card).
To adjust the microphone volume in Windows, you need to:
- Open inputs (right-click on the speaker icon in the system tray, select “Recording Devices”)
- Double-click on the microphone (usually it will be labeled Microphone (Input) and should be distinguished from the built-in microphone or USB camera)
- In the window that opens, select the “Levels” tab
- Adjust input and output levels using the Mic and Mic Gain faders. Experience shows that it is better to make the gain (lower control) constant at 10 dB, and it is better to adjust the volume using the upper control. However, if necessary, you can strengthen it even more.
Some sound card manufacturers (Creative, Asus) offer their own sound improvements. Through software from the manufacturer, you can add, for example, reverb, delay or other stage effects to the voice in real time.
Wireless microphone sets have gained popularity recently. At a modest price (from 4,000 rubles per pair plus a base), such devices allow you to sing a duet and lead celebrations together. As a rule, the base of such a kit contains a set of built-in effects, and the volume of each input is adjusted separately. It can be used to create truly impressive sound, and the absence of wires allows singers to move more freely. However, to connect the base you will still need a cable (as a rule, it is supplied in the kit), plus an additional socket.
What to do if the sound when recording or talking is very quiet
You can adjust the microphone sound volume using system tools in Windows 7, Windows 10. To do this, you need to go to the recording device settings window, as shown above. Here you just need to select the name of the model you are using with the left mouse button and click the Properties button. It is located in the lower right corner of the window.
In the device properties, sensitivity levels are adjusted on the tab of the same name. Having switched to it, you should use the slider to set the acceptable sound volume. To save the settings, just click OK and close the settings window.
Connecting a microphone to a laptop is sometimes very difficult. We are talking about old devices - their connector does not meet modern standards. Therefore, to use a very old microphone, you cannot do without qualified assistance. The device must be taken to a workshop or electronics specialist to re-solder the wires to a modern interface. Only after this can you connect the microphone to the laptop using one of the methods described above.